1
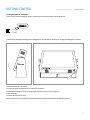
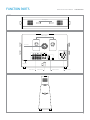
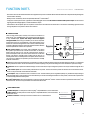
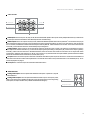
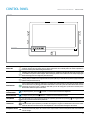
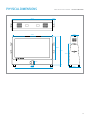
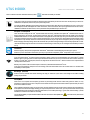
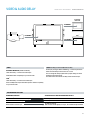
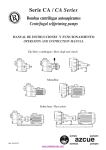
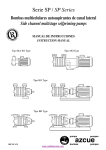
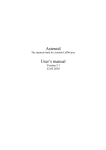
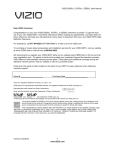
OVIDE SMART ASSIST HD2
USER’S MANUAL
USER’S MANUAL
Designed & manufactured in Barcelona by
INDEX
IMPORTANT INFORMATION
SMART ASSIST USER’S MANUAL
INDEX
3
Batteries and power supplies
Using the Smart Assist® safely
Notice
Trademarks
International Hardware Limited Warranty
Warranty Exclusions
Getting started
6
Installing the QTake HD® USB dongle
FUNCTION PARTS
7
CONTROL PANEL
10
PHYSICAL DIMENSIONS
11
Desktop folders
12
SETTINGS
13
Default password
Screen keyboard
Constant playout
Doubleclick speed (Accessibility)
3D genlock
UNDERSTANDING VIDEO & AUDIO DELAY
14
2
SMART ASSIST USER’S MANUAL
IMPORTANT INFORMATION
Please take all necessary precautions when using the Smart Assist®, and pay special attention to:
Batteries and power supplies
Please always use professional video batteries and avoid home-made ones. Professional video batteries are meant to give excellent performance,
and what is most important, to be safe. Always avoid to short-circuit the battery connections that can cause current to flow which can damage
the cells and even pose a fire hazard. For example, you should not carry batteries in a bag or pocket where they may contact other metal objects.
Batteries, power supply and cables must be kept away from water and moisture. Always unplug from mains socket when not in use.
Before cleaning the Smart Assist®, unplug any external power source and remove batteries from their socket.
Using the Smart Assist® safely
Smart Assist® is a heavy unit, and therefore special care has to be taken when moving it around.
Always try to move it around inside its transport case.
• Never block any of the ventilation holes. It may permanently damage the unit and void the warranty.
• Always make sure that the Smart Assist® is mounted securely and is unable to fall onto anyone nearby. This is especially important when
mounted on a C-Stand or Magliner® pin.
• Always ensure that cable runs to the Smart Assist® are clearly visible and do not present a trip hazard.
• Do not place on uneven or unstable surfaces.
• Do not touch the Smart Assist® screen with sharp, metallic or abrasive objects as you may damage the screen surface.
• Do not expose to strong electrical or magnetic fields.
• Do not expose to or use near liquids, rain or moisture.
• Do not dispose of the Smart Assist® or its batteries in waste and do not incinerate it, but follow local regulations for safe disposal.
• Do not use the stand by cover when the unit is on or hot.
• Make sure that right polarities and voltages are used.
Notice
Copyright© 2013 Ovide Maudet S.L.® (‘referred to as Ovide®’). All rights reserved. All information in this document is subject to change
without notice. No part of the document may be reproduced or transmitted in any form, or by any means, electronic or mechanical, including
photocopying or recording, without the express written permission of Ovide®. A reference to Ovide® includes its related entities, subsidiaries and
parent company.
Trademarks
Ovide®, Smart Assist® and Ovide Smart Assist® as we’ll as the Ovide® logo and the Smart Assis®t logo are registered trademarks of Ovide®. QTake
HD® is a registered trademark of IN2CORE SRO®. ARRI® is a registered trademark of Arnold & Richter Cine Technik GmbH & Co®. Apple®, the
Apple® logo, FireWire®, iPod®, iPod Touch®, iPad®, iPhone®, OSX®, iOS®, Mac® and Macintosh® are registered trademarks of Apple Inc®. Final Cut
Pro®, QuickTime® and the QuickTime® logo are trademarks of Apple Inc®. Adobe Premiere® is a registered trademark of Adobe Systems®. Philips®
is a registered trademark of Koninklijke Philips NV®. Avid® and DNxHD® are registered marks of Avid Technology Inc®. Lemo® is a registered
trademark of Lemo S.A®. Fischer® is a registered trademark of Fischer Connectors Inc®. AJA® and IOXT® are are registered trademarks of AJA Video
Inc®. TeamViewer® is a registered trademark of TeamViewer GmbH®. IDX® is a registered trademark of IDX Technology Europe Ltd®. Anton Bauer®
is a registered trademark of Anton/Bauer Inc®. All other trademarks are the property of their respective holders.
3
SMART ASSIST USER’S MANUAL
IMPORTANT INFORMATION
International Hardware Limited Warranty
Ovide® warrants that:
• The main product, not including any external accessories, will be free from defects in materials and workmanship for a period of 1 years
from the date of purchase, the user may upgrade to a total 2 year warranty at the time of purchase, with an extra cost.
This warranty is exclusively for the benefit of the original purchaser and is not assignable or transferable.
If during the warranty period the product is shown to be defective Ovide® may at its option:
A)Replace the goods or supply equivalent ones
B) Repair the goods
C) Pay the cost of replacing the goods or of acquiring equivalent ones
D)Paying the cost of having the goods repaired
The customer must notify Ovide® of any defect in the goods in writing prior to the expiry of the warranty periods set out above. The customer
will be solely responsible for returning the goods to Ovide®. Upon acceptance of a warranty claim by Ovide®, where Ovide® repairs or replaces the
goods, it will be responsible for reasonable shipping costs incurred in sending the goods to the customer. The customer is responsible of either
having an insurance or pay the couriers insurance.
Warranty Exclusions
This warranty applies only to defects in workmanship and does not cover defects caused by:
• Neglect
• Improper or negligent acts or omissions
• Unauthorised repairs or attempted repairs
• Tampering with or modification of the goods
• Connection to incompatible equipment or power sources
• Exposure to water or weather
• Exposure to magnetic fields or corrosive liquids or substances
• Physical damage
· Warranty will be automatically voided if any of the warranty seals are removed or have been tampered.
EXCEPT AS STATED IN THIS WARRANTY, OVIDE®, ITS VENDORS, AGENTS, RESELLERS AND DISTRIBUTORS DISCLAIM IN THEIR ENTIRETY ALL
OTHER WARRANTIES, EXPRESS OR IMPLIED, INCLUDING WITHOUT LIMITATION ALL WARRANTIES OF MERCHANTABILITY OR FITNESS FOR
A PARTICULAR PURPOSE. THE REMEDIES OUTLINED IN THIS WARRANTY ARE THE EXCLUSIVE REMEDY A CUSTOMER HAS ARISING FROM
DEFECTIVE GOODS WHICH ARE SUBJECT TO THE WARRANTY. OVIDE® DOES NOT WARRANT THAT THE GOODS WILL OPERATE IN A MANNER
WHICH IS ERROR FREE, OR UNINTERRUPTED. THE GOODS ARE NOT INTENDED TO BE THE PRIMARY OR ONLY DATA STORAGE DEVICE FOR
DATA – CUSTOMERS ARE SOLELY RESPONSIBLE FOR BACK UP AND PROTECTION OF DATA.
4
Thank you for choosing the Ovide Smart Assist®: your all-in-one hardware for video assist. It’s the most compact solution for QTake HD® video
assist available, with long battery life and a high-resolution screen.
A wide range power input (from 10 to 30vdc), four power inputs and hot swap capabilities, Smart Assist® is great for rapid on-site video assisting.
Boot time is only 25 seconds.
Your Smart Assist® comes pre-configured to run optimally QTake HD®. Both OSX® and the hardware have been optimized. Therefore we
recommend not changing any system settings or installing any OSX® updates unless Ovide® or In2core® tell you to do so.
Hard drives inside: System disk is only for apps and system. Data disk is only for video.
5
Getting started
SMART ASSIST USER’S MANUAL
GETTING STARTED
Installing the QTake HD® USB dongle
If you are using a permanent QTake HD® license, you will have your license protected by a USB dongle like this:
To avoid losing or damaging the dongle, there is a hidden USB 2.0 port beneath the unit where you can plug the USB dongle in a safe place.
01
02
1. Remove the QTake HD® metal label
2.To insert the dongle, tilt the Smart Assist® towards you (see figure 1)
3.Remove the two Philips PH® screws in the lower right corner and remove the cover (see figure 2)
4.Insert the dongle
5.Put back the cover and the screws
6.Restart Smart Assist®, now QTake HD® should detect the dongle, otherwise please read the troubleshooting section
6
FUNCTION PARTS
SMART ASSIST USER’S MANUAL
FUNCTION PARTS
Top view
WiFi antennas
Rear panel
Battery sockets
Fan intake
Lamp port
Video section
3
Audio section
4
2
Data connectors
1
Power section
Side view
7
FUNCTION PARTS
SMART ASSIST USER’S MANUAL
FUNCTION PARTS
·Fan intake: This is the fan intake that blows air straight into the processor and GPU. Never block this airflow as it will permanently damage the
unit and void its warranty.
·Battery sockets: two battery sockets are provided, either IDX® or Anton Bauer®.
· Lamp port: Use this port to insert a gooseneck LED reading light. Please note this is NOT a standard XLR4 power output. Do not connect
regular gooseneck halogen lights, as it will overload the output.
· Wifi antennas: the two plastic parts on top of the screen are the wifi antennas. Be careful not to cover them to avoid losing signal and avoid
having cell phones or any other tx devices close to them.
1
Power section
There are four power inputs, and only one of them is needed to run
Smart Assist®. Any available power source will be used, it will hotswap
to any available input. System will always choose the highest
voltage available, that’s why you should try to use 24V as the power
supply input and 14.4V Li-Iion batteries or 24V block batteries if you
want to run a UPS-like configuration. In this scenario, should the power
supply be unplugged or fail, the system will switch to batteries without
any interruption in the Smart Assist® operation.
power button: This button will inmediatelly shut down
the system if you switch it off, so make sure that OSX® is shut down
before using this switch. If you turn this switch off, there will be no
power consumption at all. If you turn it on, but do not turn on the front
button, unit will be in standby mode, in which only the fans run. In
standby mode there is minimal power consumption, but be careful as
you may run your battery out of power if you leave the unit in standby
mode for several hours.
D
Main power button
A
Main & Spare fuse
B
Fischer® Power input
XLR-4 Power input
C
24V Pin-1 +
24V Pin-2 -
12V Pin-1 12V Pin-4 +
Aux outputs
Pin-1 Pin-2 +
A Main
E
B Fuse: This is the fuse protecting the unit. If fuse blows out, make sure that the power supply is of the right voltage (10-30vdc), it is of the right
polarity and that the unit is not wet or humid. Once sure that everything is OK, proceed to change for a fuse stored in the spare fuse storage.
B Spare fuse: There is a spare fuse inside this storage. It is not used at all, it is only a storage for a spare fuse in case you need to change the unit’s
fuse.
C XLR-4 Power input:
XLR-4 is the industry standard for 12v dc power. Use this connector to power the Smart Assist® from external sources.
You can use any external DC source between 10 and 30v.
®
®
D Aux outputs: They use the same Lemo connectors as Arri cameras and they are 12v regulated (always 12v, provided the input voltage is
within accepted range). These outputs are current limited. If you connect something that draws too much power, it will shut the outputs down
to avoid shutting down the whole system.
Power input: This is the standard 24v connector used to dc power Arri® cameras. Use this connector to power the Smart Assist® from
external sources. You can use any external DC source between 10 and 30v.
E Fischer
2
®
Data connectors
A FireWire 800 port: use this port to connect any OSX
B USB 3.0 ports: use these ports to connect any OSX
-compatible device, such as hard drives.
-compatible devices, such as hard drives,
®
®
A
Firewire 800 port
B
USB 3.0 ports
keyboards or mouse.
C Ethernet connector: use this port to connect Smart Assist
®
to a wired network.
C
LAN connector
8
SMART ASSIST USER’S MANUAL
3
VIDEO section
A
HDSDI inputs
B
HDSDI outputs
B
TC input
D
TC output
E
FUNCTION PARTS
Analog outputs
A HDSDI inputs: These are inputs 1 &2, they are SDI, HDSDI and 3GHDSDI capable. These inputs are fully independent both in sync and format.
(e.g. one input can be 625/50i and the other 1080/30p and work simultaneously).
B HDSDI outputs: These
are outputs 1&2, they are SDI, HDSDI and 3GHDSDI capable. Please refer to QTake HD®’s user manual to setup if you
want to have these outputs processed or not and which exact format (primary/secondary) you wish to use. Video outputs: they are fed from
the AJA® boards, and therefore considered Constant Playout mode in QTake HD®. HDSDI connectors stick off a bit. This is done so that from the
screen side, you can tell what connectors are the HDSDI just by touching them
C Analog outputs: These connectors are the only layout exception. Connector on top is output 1 and connector on the bottom is output 2.
These outputs can either be luminance (Y) versions of the output (primary/secondary) or Composite (SD) versions of the outputs (primary/
secondary). Please take note that due to hardware limitations, there are formats that cannot be converted to SD as they’d need motion
compensation. Therefore, when working at 24, 30, 48 (I or P) and 60 (I or P), there will not be SD output available, just HD luminance. Available
formats for SD downconversion include 23.97, 25, 29.97, 59.94 (I or P).
D TC input: Use this connector to input LTC timecode. It feeds both video boards (view 1 &2) at the same time. It can also be used for Genlock of
both cards at the same time. Please refer to QTake HD®’s user manual to learn how to set up which timecode -LTC or embeeded (VITC)- to use.
See also 3D playback on page 12.
E TC output: This connector outputs LTC timecode of video board view 2.
4
AUDIO section
A Analog
audio inputs: These are professional balanced audio inputs. In QTake HD®, they will
be named ‘Built-in’
B Analog audio outputs: These are professional balanced audio outputs. All outputs (audio,
video, tc) are always active, regardless of the inputs used. This means that if you are using analog
audio inputs, all outputs will be active (ie HDSDI embedded and analogue).
A
Analog audio inputs
B
Analog audio outputs
9
CONTROL PANEL
SMART ASSIST USER’S MANUAL
CONTROL PANEL
Front panel
Control panel
Power LED
Will be still orange when back power button is on and there is at least one valid power input available. In this
situation, only the fans are running. The rest of the components are in standby state. This mode of operation is
useful to cool the system down during lunch breaks, etc.
Will blink green while unit is booting and performing self test. If light does not keep still after a few seconds, there
is a hardware issue, please contact support. When turning off, please wait for LED to become steady orange again
before removing power or turning back power button off.
Led will toggle orange/green if there is an internal power supply problem. If the unit still turns on, you can keep
working, but you should contact support ASAP for a quick repair as your internal backup power supply is doing the
job now and you have no backup.
Power button
Press to power on/off. Single press when unit is in standby (back power button on, front power lit orange) will turn
unit on. When unit is on, pressing power button will ask OSX® to turn the system off. Please follow OSX® onscreen
instructions to turn off. If OSX® is unable to shut down, you can do a long press (more than 3 seconds) of this
button which will force a system shut down.
Brightness &
increase button
To adjust brightness, press first
Contrast &
decrease button
To adjust contrast, press first
Lamp button
Use this button to turn on and choose color of the (optional) gooseneck lamp. Pressing
off/red (for dimmed environments)/white/off.
Lock button
Use to lock the touchscreen. All other functions such as external keyboard and mouse will still work. It will not
interfere normal system operation, just disables touch options. Long press is needed both to lock and to unlock.
Useful to clean the screen and not mess around QTake HD®. Also useful when moving the unit around.
Headphone volume
Underneath the monitor’s lower left corner, there is a headphone volume knob. Press it to let it stick out of the
chassis and comfortably adjust the volume. Push it to put it back to the recessed position and avoid accidental
volume changes.
and then +/- buttons to increase/decrease brightness.
and then +/- buttons to increase/decrease contrast.
will toggle between
10
Physical dimensions
561mm
SMART ASSIST USER’S MANUAL
Physical dimensions
25mm
101mm
540mm
326mm
415mm
312mm
50mm
15mm
30mm
475mm
25mm
150mm
11
Utils in Dock
There is a folder in the dock called utils with the symbol
SMART ASSIST USER’S MANUAL
Utils in Dock
and inside this folder you will find:
Touchscreen calibration
From time to time your touchscreen will not match the exact point where you touch on the screen. At this point, you need to recalibrate the touch panel, which is a very fast (10 second) process.
Just open the OPPD calibration app. A white screen with a crosshair in the upper left corner will appear, just press it. A new cross
hair will appear, and this will happen for a total of four times, one for each corner. Once you’ve pressed each of the four corners,
calibration is finished. For better results, use a stylus like the one provided with your Smart Assist®.
Setup AJA®’s control panel
There are certain settings of the AJA® capture boards that cannot be controlled from QTake HD®. Downconversion and TC/
Genlock selection is one of them. To setup down conversion, open AJA® control panel found in the utils folder of your desktop.
CHOOSE HOW TO DO IT. You must adjust each board* in the upper left corner of the app. Then go to the format tab, and change
secondary to whatever format you want to have in analog outputs. If you can’t find your desired downconverted format, please
remember that 24p and 60p cannot be converted to any SD format, so you may need to change the primary to 23.98 or 59.94
before changing secondary settings. Please do remember that you need to change analog out to secondary in QTake HD® as well.
*OSX will randomly assign an ID to each AJA® board on each booting, so make sure you are setting the actual board you wish to
set up.
Teamviewer®
With this app, any other person equipped with Teamviewer® will be able to remote diagnose and setup your system.
Whenever you are connected to the internet (you may use your 3G/4G smartphone), Ovide® can provide remote assistance.
Creating a wifi hotspot automatically
If you want Smart Assist® to create a hotspot everytime it boots so that you can automatically start using Copra4® or QTake
Monitor® apps on your iPad, there is a little script included that will do it for you. You just need to tell OSX® to start it everytime
it boots. Just open OSX® control panel, choose user, login items tab and click on the + button. Search for the script located at
/Desktop/Utils and choose it.
Reboot your system to make sure wifi hotspot is created. A symbol will be beside the OSX® clock.
If the script is launched on startup but it is not working, make sure that ‘Enable access for assistive devices’ is checked under
accessibility in control panel.
Blackmagic® speed test
Useful to test any external drive before recording. This way you will know if your drive is fast enough for the video recording
settings of your choice.
HiTempMode
Smart Assist is a computer and computers get hotter as processing needs increase. Under heavy processor loads, it is very
important to cool the processor. This is why the rear fan intake must be kept clear and with sufficient space around your Smart
Assist so that airflow is correct.
If the ambient temperature is high, your Smart Assist can have problems cooling. You will notice it with the CPU temp indicators
in the QTake status bar and messages alerting you of poor CPU performance. In this cases, you may want to lower the CPU speed
to relief the heat inside. You will loose some CPU performance, so less video processing (e. g. LUTs, DVE, h264 recording...) will be
available, but it will be much stabler for recording.
To enter HiTempMode, just open the Utils folder in the Dock and click the HiTempMode icon
until next reboot.
It will reduce CPU performance
12
Desktop folders
SMART ASSIST USER’S MANUAL
Desktop folders
In Smart Assist®’s desktop you will find three folders:
LUT: Copy here any LUTs you want to use in Smart Assist®. Remember to restart QTake HD® if you copy files to this folder while QTake HD® is
running, as otherwise they will not be detected.
CDL: Copy here any LUTs you want to use in Smart Assist®. Also, any CDL created in QTake HD® will appear in this folder. Remember to restart
QTake HD® if you copy files to this folder while QTake HD® is running, as otherwise they will not be detected.
13
SETTINGS
SMART ASSIST USER’S MANUAL
SETTINGS
Default password
Default password in SmartAssist® is Ovide®. You can change it if you wish. We didn’t left a blank password because some programs require a
password in the system account to work properly.
Remember that if you haven’t changed it, you can always use the password hint that will exactly tell you that the password is Ovide®.
Screen keyboard
We advise you to use a screen keyboard so that you can work without any keyboard at all, even when using bare OSX®. To show it just open
keyboard preferences, under OSX®’s system settings and choose ‘show keyboard’ If you want to fully support screen keyboard, you will need to
activate ‘sticky keys’ from accessibility under OSX®’s system settings. This way you can press several keys at a time (such as Cmd + W to close a
window). Please remember that sticky keys also affects USB keyboard, so don’t forget to disable it before using a USB keyboard.
Constant playout
Smart Assist® uses AJA®’s/QTake HD® constant playout mode. This means that the video outputs of Smart Assist® come from AJA® boards and
not from video card. This has advantages and disadvantages:
· There is a higher video delay in the outputs, but audio is compensated for this.
· Output can be any format(23.98, 24, 25, 29.97, 30...)
Doubleclick speed (Accessibility)
if your screen seems to doubleclick insten of single click or do long presses when you are just clicking, slow down the double click speed .
If you don’t feel comfortable with the double click speed of your touchscreen, you’ll need to slow it down (or speed it up) from OSX®. If there
is no USB mouse connected, the OSX® control panel will not show any mouse options. Therefore it is better to open the control panel, choose
accessibility, mouse and there adjust the double click speed.
3D genlock
Please remember to set your sync generator to the same system frequency as your QTake HD® settings. For 3D operation you must of course
have synced 3D inputs. For playback of course both outputs must be synced as well. As there are two totally independent boards for each input/
output channel, there is no way to have them synced if there is no genlocked 3D input. A workaround for this is to use a local Genlock device such
as AJA® GEN10® and connect it to the TC input, which is also used for genlock.
So, you need to go to AJA® control panel, and for each XTIO board, go to Input Select tab, nod set LTC/Ref to Reference.
Setting refresh rate
Your Smart Assist touchscreen can work in two refresh rates: 50Hz and 60Hz.
Setting your touchscreen refresh rate to 50Hz will improve your Smart Assist performance.
For shootings at 25P, 50i or 50P, setting your screen at 50Hz not only will improve performance, but will also show smother videos in your
touchscreen.
For shootings at 23.97, 59.94, etc, you can still work at 50Hz for the touchscreen with only very subtle smoothness loss, but with the benefit of
improved performance.
14
VIDEO & AUDIO DELAY
SMART ASSIST USER’S MANUAL
VIDEO & AUDIO DELAY
EXTERNAL
MONITOR
+2 FRAMES
iPAD®
+2 FRAMES
+1.5 FRAMES
camera
VIDEO
EXTERNAL MONITOR (HDSDI & ANALOG)
Total video delay: + 4 frames from video input
Embedded audio is completely in sync with its video
iPAD®
AUDIO / Analog out incl. headphones out delay
Audio input (analog or HDSDI embedded): + 2 frames by default to
match the video delay in the Smart Assist® screen.
You can change this delay in QTake HD®’s project settings to match
the delay in the video outputs.
You need to add 2 extra frames of delay to match video output.
Total video delay: + 3.5 frames from video input
iPad®’s headphones output and builtin speaker’s audio is completely
in sync with its video.
RECOMMENDED SETTINGS
Reference monitor
Analog output and/or headphone output
Smart Assist® built in monitor must be in sync
Set delay to 2 frames
External monitors must be in sync
Set delay to 4 frames
Both monitors must be in sync
Set delay to 3 frames.
Both monitors will be slightly out of sync, but it will be hardly noticeable
15