Transcript
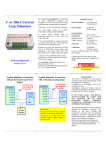
IP Explorer
Professional
1. Ethernet Connection
Standard (straight-through) or Crossover Ethernet
cables can be used for a direct connection to the
Target Device.
Ethernet connection supports 10/100 Mbps
Full/Half Duplex Auto-Negotiation with automatic
crossover detection.
Connection indicator shows
connection state and speed
information .
2. Batteries
The device uses two AA-size Ni-MH rechargeable
batteries. Alkaline batteries can be used with
reduced battery life.
Battery indicator provides
estimated remaining battery
capacity.
5. Assign Network Parameters
Mask and Gateway settings will be used for target
device as well.
Important: Mask and Gateway settings will be also
used for the target device.
6. Entering a target device IP address
7. Selecting Target device address from the
previously used list
8. Assign an IP address using BOOTP or DHCP
requests
3. Navigation keys
The universal set of keys
allows easy menu
navigation and address
change .
Quick Start Guide
Revision 2014-02
WWW.PLCTOOLS.COM
4. Turn Device On/Off
To turn device ON press Cancel key once
To turn Device OFF press and hold
Cancel key until shutdown message
shown, then release Cancel key.
Device will automatically turn power
OFF after 3 minutes of inactivity or if
batteries are low.
Important: Target Device IP, Own IP Address and
Gateway Address must be on the same subnet or
this feature will not be active. An error message
will be displayed if the addresses are not on the
same subnet.
Last used IP address will be offered as a template
for the new selection.
Important: Own IP Address, Gateway Address and
Target device IP addresses must be on the same
subnet for this device to function correctly. An
error message will be displayed if the addresses are
not on the same subnet.
13. Detecting an Unknown IP Address This device
will attempt to detect unknown IP address of your
target.
11. Setting to “Dynamic” (Enable BOOTP/DHCP)
This feature allows you to set target device to use
BOOTP/DHCP if device is currently set to Static.
Important:
It may take up to a few minutes to display the IP
address. Not every IP address can be detected.
10. Setting Target device to “Static” (Disable
BOOTP/DHCP)
After the IP address is assigned to the Target Device
using BOOTP/DHCP, it’s important to disable
BOOTP/DHCP or make the IP static. If this is not
done, the target device will not have an IP address
after its power is cycled.
15. Device information
12. Ping an IP Address
14. Reset IP Explorer to Factory Defaults
This will clear all Network Setting and saved IP
addresses from the device memory.
• Turn device power Off
• Press and hold OK key, then press
and release Cancel key.
• Hold OK during countdown,
• Release OK when prompted.
9. Replacing IP address for Target that already has
a Static IP address Assigned
The device will attempt to connect to the Target
Device using Ethernet/IP protocol by ODVA. Please
note that not all target devices support Ethernet/IP
protocol.
DISCLAIMER
This device is intended to provide general
assistance with Industrial Ethernet setup,
troubleshooting,
testing
and
application
development.
It should not be permanently used in live
production systems.
Accordingly, production system must be tested and
commissioned with real instruments to ensure safe
and reliable operation.
IN NO EVENT SHALL THE DEVICE MANUFACTURER
BE LIABLE FOR ANY DAMAGES OF ANY KIND
INCLUDING DIRECT, INDIRECT, INCIDENTAL,
CONSEQUENTIAL, LOSS OF PROFIT OR DAMAGE.
The examples and diagrams in this manual are
included for illustrative purposes only. Because of
the many variables and requirements associated
with any particular installation, the device
manufacturer cannot assume responsibility or
liability for actual use based on the examples and
diagrams.
Before making any decision or taking any action
that might affect your equipment, you should
consult a qualified professional advisor.
SIM-IPE
Product of USA