1
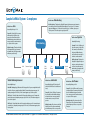
GotVMail Communications- User Manual
Table of Contents
Introduction & Basic Setup
Advanced Features
Welcome and Overview ............................................................ 2
Sample GotVMail Account ...................................................... 3
New Account Setup .................................................................. 4
Accessing Your GotVMail Account ............................................ 5
User Options ............................................................................ 5
Voicemails and Faxes ................................................................ 6
Manage Greetings .................................................................... 7
Dial-by-Name Directory ............................................................ 7
Live Call Forwarding ................................................................. 8
Fax-on-Demand ...................................................................... 12
After-Hours Schedule/Greetings .............................................. 13
Virtual Calling Card ................................................................. 14
Conference Calling .................................................................. 14
Message Forwarding ............................................................... 15
Virtual Hold Mailbox (ACD Queues) .......................................... 15
Distribution Lists .................................................................... 16
Question & Answer Mailbox ..................................................... 17
Virtual Marketing Extensions (VME’s) ........................................ 9
Music-on-Hold ........................................................................ 11
Call-Back Message Notification ................................................ 11
Email Delivery/Notification ...................................................... 11
Examples & Guides
Quick Access Card .................................................................... 18
Reference Guide ...................................................................... 19
Main Greeting Examples .......................................................... 20
Key:
Telephone Access
Online Access to
Welcome to the GotVMail Communications Virtual Phone System!
To Fully Understand Your GotVMail account, please read this page carefully.
Main Greeting/Auto Attendant - see pg. 19 for examples
Hello
Main Greeting
The main greeting is the first thing heard by callers when they call
your account number (e.g., “Thank you for calling ABC Company.
Dial 1 for sales, 2 for support…).
This is how you instruct callers to press an extension or dial 8
for the dial-by-name directory (optional on GotVMail Standard
Plans).
If you have VirtualFax enabled, callers can send a fax while listening to the main greeting.
The main greeting does NOT have a voicemail box. Callers must
dial an extension to access voicemail and leave a message.
Before recording your main greeting, make sure to understand
the flow the GotVMail system (see sample on next page).
701
702
VME1
703
VME2
704
VME3
705
706
707
6 Fax on Demand
708
709
0
8 Dial-By-Name
VME’s are optional
By default, the main greeting will repeat twice and disconnect
if no selection is made.
Mailboxes/Extensions
Each account has mailboxes/extensions under the main greeting.
You may assign these to employees and/or departments. The
GotVMail Standard Plan includes 5 mailboxes (0, 701-704), while
the Advanced and Premier plans have additional mailboxes.
Each mailbox has the ability to forward callers to up to 6 numbers
(home, office, cell phone, etc.). If a call is not answered when
dialing an extension or a caller dials a mailbox after-hours, they
will hear the mailbox greeting and can then leave a message.
While listening to a mailbox greeting, a caller may go to another
mailbox by dialing the corresponding 3 digit extension.
Mailboxes 701 through 705 can be also be accessed by pressing 1
through 5. Use this option if a mailbox is designated for a department (e.g. ,“Dial 1 for sales, 2 for customer support”). This option
does not work when VME extensions are activated.
Virtual Marketing Extensions (VME’s)
VME’s act as information-only extensions where callers can obtain additional information about your company, its products and services. By default, extension 1 forwards to 701, 2 forwards to 702, and 3 forwards to 703. The VME feature
allows you to have extensions 1, 2, and 3 off the main greeting be separate marketing extensions and, if activated, will
no longer forward to their 70# counterpart. For more information, please see page 10.
Passwords
Each extension can have its own individual password that can be given to extension owners (e.g., employees). The
Administrator Password is the same as the Main Menu Password.
To change an individual extension’s password, you must login as an administrator via myGotVMail.com and access that
extension's settings menu (see page 5).
GotVMail Communications Virtual Phone System User Manual v7.0. Copyright © 2007 GotVMail Communications, LLC. All rights reserved.
2
Sample GotVMail System - 2 employees
Mailbox Name: Main Greeting
Mailbox Greeting: “Thank you for calling ABC Company. If you know your party’s extension,
please dial it now or dial 8 for the Dial-by-Name directory. For sales, press 1. For customer
support and billing, press 2. For directions to our office, press 3. Otherwise, please press 0
for the operator. To hear these options again, please hold.”
Mailbox Name: Sales
Accessed By: Pressing 1 or 701
Forwards To: John’s Office. If no answer,
will forward to his Cell Phone. If no
answer, the caller will hear the Sales
Mailbox Greeting, and can either leave a
message, transfer to another extension,
or can press 0 for the operator.
Mailbox Name: Operator
Accessed By: Pressing 0
Main Greeting
Forwards To: Lisa's Cell Phone and
then, if no answer, to John’s Office.
If no answer, the caller will hear
the Operator Mailbox Greeting,
and can either leave a message or
transfer to another extension.
Mailbox Greeting: “Thank you for calling
ABC Company. Please leave your name
and number and a SALES representative
will return your call shortly.”
1
Sales
2
Customer Support
VME3
703
704
John
Smith
Lisa
Thomas
0
8 Dial-By-Name
Operator
Mailbox Greeting: “Thank you for
calling ABC Company. All representatives are assisting other customers. Please leave your name and
number and a representative will
return your call shortly.”
Virtual Marketing Extension 3
Mailbox Name: John Smith
Mailbox Name: Lisa Thomas
Accessed By: Pressing 3
Accessed By: Pressing 703 (Pressing 3 will
take callers to VME 3 since it is activated and
in use).
Accessed By: Pressing 4 or 704
Main VME 3 Greeting (Leg 0): “Directions to ABC Company. Press 1 if you are coming from Route 128
South. Press 2 if you are coming from Route 93 North. To return to the previous menu, press 9. At
anytime you may press 701 for Sales, 702 for Customer Support or press 0 for the operator.”
VME 3 Leg 01: “From 128 South, take exit 15A. To repeat these directions, press #. To return to the
previous menu, press 9. At anytime you may press press 701 for Sales, 702 for Customer Support or
press 0 for the operator."
Forwards To: John's Cell Phone. If no answer,
the caller will hear John's Mailbox Greeting,
and can either leave a message, transfer to
another extension, or can press 0 for the
operator.
VME 3 Leg 02: “From 93 North, take exit 8. To repeat these directions, press #. To return to the previous menu, press 9. At anytime you may press press 701 for sales, 702 for customer support or press 0
for the operator."
Mailbox Greeting: “Hi, you have reached John
Smith. Please leave your name and number
and I will return your call as soon as possible.
GotVMail Communications Virtual Phone System User Manual v7.0. Copyright © 2007 GotVMail Communications, LLC. All rights reserved.
Forwards To: Lisa's Cell Phone and, if no answer,
to her Home Phone. If no answer, the caller will
hear Lisa's Mailbox Greeting, and can either
leave a message, transfer to another extension,
or can press 0 for the operator.
Mailbox Greeting: “Hi, you have reached Lisa
Thomas. Please leave your name and number
and I will return your call as soon as possible.
Thank you.”
3
New Account Setup
New GotVMail accounts must have the Main Mailbox and at least one
extension setup to become active. We recommend that you review the
diagram on the previous page to determine how you want your GotVMail
system to work.
Sample Call Flow Process
Step 1 - Setup your Main Mailbox (Main Greeting)
1. Call your account number
2. Dial
• Setup After-Hours Schedule
3. Dial
6. To make changes to your Main Mailbox after the
Automated Setup, you can choose the following
options:
*
#
4. Dial your PIN
5. Dial # to enter Automated Setup.
You will be prompted to:
• Record Main Mailbox Name
1
(callers will not hear this)
[ # save, * re-record]
Caller dials your GotVMail number
and hears the Main Greeting.
• Record Main Mailbox Greeting
[
(Optional)
4 Record Main Mailbox Greeting or Name
7 Access Fax/ Messages
8 Manage User Options
0 Make an outbound call
(Virtual Calling Card required)
* save, 3 re-record]
2
Caller presses extension 3 or 703
and is taken to Mailbox 703.
Step 2 - Setup individual Extensions/Mailboxes
1. Call your account number
2. Dial
*
Options (Optional)
3. Dial your 3 digit extension
3
(70*) followed by #
Mailbox 703's Call Forwarding
options transfer the caller to
your Cell Phone, and if no answer
to your Home Phone.
5. Automated Setup prompts you to:
4. Dial your PIN
• Record Mailbox Name
(e.g., sales. Callers will hear this)
[ # save, * re-record]
• Setting a New PIN
4
[ # save,
If Call Forwarding is off, or you
don’t answer, the caller hears
703's Mailbox Greeting and is
placed into your voicemail.
• Setup Live Call Forwarding
6. To make changes to your extension after the
Automated Setup, you can choose the following
options:
4 Record Mailbox Greeting or Name
7 Listen to Voicemail and Fax Messages
8 Manage User Options
9 Setup Live Call Forwarding Options
0 Make an outbound call
(Virtual Calling Card)
* re-re-enter]
• Record Mailbox Greeting
(Your main greeting)
[ * save, 3 re-record]
GotVMail Communications Virtual Phone System User Manual v7.0. Copyright © 2007 GotVMail Communications, LLC. All rights reserved.
4
Accessing Your GotVMail Account
You can access your GotVMail account via phone or online. Access via myGotVMail.com is included with all
GotVMail plans and gives you access to System Settings, Call Logs, Support, and other Administrative features
online. It also gives you the ability to setup extensions, call forwarding numbers, and change notification options
online. Web and Email Delivery is an optional feature that gives you the ability to listen to messages on the Web
or by email via MP3/WAV attachments. This is GotVMail's most popular feature and is highly recommended.
GotVMail allows both an Administrative login as well as an individual employee login. Logging in as an
Administrator via myGotVMail.com gives you access to all mailboxes and extensions, as well as the main system
settings. Logging into a single extension gives you access to that particular extension’s settings and no other
administrative features (this gives individual employees access to their private extensions). By phone, the
administrator has access to the Administration Main Menu.
To Access Your Account Via Telephone
To access an Extension/ Mailbox
1. Call your account number
2. Dial *
3. Dial your 3 digit extension followed by #
4. Enter your PIN
5.You now have access to the Extension
Main Menu
To gain administrative access (Main Greeting)
1. Call your account number
2. Dial *
3. Dial # , (Do NOT dial an extension)
4. Enter your PIN
5. You now have Administrative access to the
Main Greeting
Changing Your PIN
To change your PIN
1. Press 1 from the User Options menu
2. Enter your new PIN and press
3. Press
To gain administrative access
1. Go to www.myGotVMail.com
2. Enter your account number
3. Leave the extension number field blank
4. Enter your Master PIN (Main Mailbox PIN)
5. Press Log In
* to accept or # to re-enter your PIN
Changing Your Time Zone
To change your time zone
1. Press 3 from the User Options menu
2. Select a time zone by pressing one of the following:
1 Eastern 2 Central 3 Mountain 4 Pacific
5 Alaska
6 Hawaii
Reviewing Usage Statistics
To hear your usage statistics for a particular mailbox
1. Press 2 from the User Options menu
2. Press: 1 to listen to Usage Statistics
2 to have Usage Statistics sent to a fax machine
To Access Your Account Online (http://myGotVMail.com)
To access an Extension/ Mailbox online
1. Go to www.myGotVMail.com
2. Enter your toll free number
3. Enter your 3 digit extension
4. Enter your PIN
5. Press Log In
# your new PIN will be read back to you
Caller ID Settings
To change your caller ID settings for a particular mailbox
1. Press 5 from the User Options menu
2. Press: 1 to have the number dialed display on the caller ID
2 to have the caller's number diaplay on the caller ID
Message Sorting
User Options
To change the order your messages are played for a particular mailbox
To Access Your User Options
1. Call your account number followed by
*
2. Enter your 3 digit extension followed by #
3. Enter your PIN
1. Press 6 from the User Options menu
2. Press: 1 to have the most recent message play first
4. Dial 8
GotVMail Communications Virtual Phone System User Manual v7.0. Copyright © 2007 GotVMail Communications, LLC. All rights reserved.
2 to have the oldest message play first
5
Voicemails and Faxes
Voicemail Management
After you have finished listening to a voicemail message, you have the following options:
To Access Voice and Fax Messages via Phone
1. Call your account number followed by
*
2. Enter your 3 digit extension followed by #
3. Enter your PIN
1
Listen to all saved messages
Review,
mark, and save messages that you have just deleted
2
NOTE: You only have one chance to re-listen to a deleted message and save it
3
Return to the main menu
4. Press 7
Voicemail Options
If you have messages, you will hear the number of new and old messages currently in
your box.
1. Press 7 to access your message box
2. Press 1 again to listen to current messages
NOTE: When you access your voice messages, playback will automatically begin if there
are any new messages in your mailbox.
Fax Message Options
If you have faxes in your mailbox, dial 2 to forward all of them to a fax machine.
Enter the fax number where you want your fax messages sent when prompted.
To Access Voice and Fax Messages Online
1. Go to www.myGotVMail.com
2. Enter your account number, extension
(leave blank for admin login), and password
Voicemail Navigation
3. Click + to expand mailbox,
then click on Inbox
4. Click on a voicemail message or fax
Moving Messages
Save
the current message
2
To move messages to another folder
3
Delete the current message
1. Click the checkbox next to the message
4
Reply to the sender or return call
2. Select a destination using the drop-down menu. You can create
5
Get CallerID information without date/time stamp
a new folder by right-clicking on an extension on the left navigation bar and choosing new folder.
6
Copy to another GotVMail subscriber
3. Click the Go button to automatically move message
7
Replay the message
8
Get CallerID information with date/time stamp
#
Skip and save as a new message
Naming Messages
To rename messages
1. Click the Edit icon next to the message and input a new message name
Voicemail Playback
During the playback of each message, you can:
4
Rewind message
6
Fast forward message
0
Pause/un-pause
Fax Message Options
From the Inbox, click on the name of the fax message you want to view. Click on the
link of the page number to open a new browser window displaying that page.
GotVMail Communications Virtual Phone System User Manual v7.0. Copyright © 2007 GotVMail Communications, LLC. All rights reserved.
6
Manage Greetings
After-Hours Greeting
This specialized greeting allows you to play a different greeting notifying callers that
they have called after normal business hours.
Mailbox Greeting
The Mailbox Greeting is played whenever someone accesses your voicemail to
leave you a message.
Record
After-Hours
Greeting
To record
your
After Hours
Greeting:
1. Dial 3
To Access the Greeting Menu
1. Call your account number followed by
2. Press 1 from the After-Hours Menu
*
3. At the tone, record your greeting
2. Enter your 3 digit extension followed by #
4. To accept the greeting and continue, press #
3. Enter your PIN
4. Press
5. To cancel and re-record, press
, then select one of the following 3 options:
*
Record Mailbox Greeting
Dial-by-Name Directory
1. Dial 1 from the Greetings Menu. You will be prompted to record your greeting
2. Once you have recorded your greeting, press # to accept (and return to the main menu)
or * to re-record your message
Setup Dial-by-Name
Directory
(Administrator
To record your
AfterOnline
Hours
Greeting:Only)
1. A Mailbox Name must be recorded prior to adding it to the Dial-by-Name directory. (see left)
Mailbox Name
2. Go to www.myGotVMail.com
The Mailbox Name is played whenever someone calls an extension.
3. Enter your account number and password and leave extension number
blank to login as an administrator
Record Mailbox Name
4. Click System on top navigation bar.
1. After selecting 2 from the Manage Greetings Menu, you will be prompted to record your name
5. Click Dial-by-Name
2. Once you have recorded your Name, press # to accept (and return to the main menu) or
* to re-record your Name.
6. Type a name into the text box next to an extension in the Dial-by-Name section,
you must enter a first and last name
7. Click the update button
GotVMail Communications Virtual Phone System User Manual v7.0. Copyright © 2007 GotVMail Communications, LLC. All rights reserved.
7
Live Call Forwarding
Phone Access - (for Online Access see pg. 9)
Priority Number Options
I. Select a phone number II. Select days of the week for the number to be active
Follow-Me Live Call Forwarding Options
III. Select times of the day for the number to be active
Your Follow-Me options determine how callers are transferred to you. You are provided with six
priority numbers (e.g., cell phone, home phone, etc.) for each mailbox. Each of these priority
numbers represents a telephone number and schedule of operation. This service can be turned
on or off.
I. Select a Phone Number - To setup the phone number for a specific priority, enter area code and phone
number. You will be read the number and provided with Answering a Live Call options.
Access Your Follow-Me Options
1. Call your account number followed by
* to enter the Subscriber mode.
2. Enter your 3 digit extension followed by #
3. Enter your PIN
1
Call Screening (Plays the caller's name before choosing to accept the call)
2
Direct Connect (Instant transfer without screening)
3
Announcement (Announces a caller is on hold and asks whether to accept the call)
For more information about what each type of in-bound call type does, see the following Call
Screening/Announce section. When you are finished entering the phone number and selecting the
Call Announce option, press
* to set additional features or # to return to the Follow-Me main
menu.
4. Press 9
II. Select Days of the Week
Basic Settings
To turn on the Follow-Me feature
1. Press 1 from the Follow-Me menu
Once the Follow-Me feature has been turned on, you can set the schedule and other options.
2. Press 2 from the Follow-Me menu to setup the Follow-Me features
3. Press 3 from the Follow-Me menu to change what callers hear when arriving at your mailbox
Press 1 to have callers hear your arrival message
Press 2 to have callers hear on-hold music instead of your arrival message
Press 3 to have callers hear ringing instead of on-hold music or your arrival message
Priority Number Settings
In order to set Follow-Me features, you must first select a priority number to setup. After
pressing 2 from the Follow-Me menu, you will be asked to enter a priority number.
Press 1 to 6 (with 1 being the first number that your mailbox will call when
attempting locate you for a live call) which will bring up the Priority Number Settings. If
no numbers are setup or callers are calling outside office hours, or you have the Follow-Me
feature turned off, then the caller will be transferred into voicemail.
1
Everyday.
Week
days only.
2
3
Individual Days
1 Sunday 2 Monday 3 Tuesday 4 Wednesday
5 Thursday 6 Friday 7 Saturday
NOTE: To set additional individual days, you must return to the previous menu
III. Select Times of the Day
• Enter a time for the After-Hours greeting to start; use two digits (e.g., enter 0230 for 2:30) for the
hours and minutes and then select a time of day
1 AM 2 PM
• For 24 hour operation you can press 0000
GotVMail Communications Virtual Phone System User Manual v7.0. Copyright © 2007 GotVMail Communications, LLC. All rights reserved.
8
Live Call Forwarding
Online Access - (for Phone Access see pg. 8)
Follow-Me Options
There are six numbers that you can set. These “priority” numbers determine the
order by which your mailbox will attempt to forward callers to you (with 1 being
the first number attempted and 6 being the last). If your mailbox cannot locate you
through these numbers, callers will be placed into voicemail.
To access Follow-me Options via the Web:
Call Screening/Announce Options
for Live Call Forwarding
While being forwarded, the caller is placed on hold, with music, while the system tries to
locate you utilizing your Follow-Me call forwarding options.
There are three types of incoming calls based upon your Follow-Me settings.
1. Call Screening & 2. Call Announcement
Call Screening asks the caller to record their name before placing them on hold and transferring the
call to you. Call Announcement does not ask the caller to record their name (recommended).
For every forwarded call, you have the following options:
1. Go to www.myGotVMail.com
1
Accept the call
2. Enter your account number, extension (leave blank for admin login), and password
2
Send the caller to voicemail
3. Click the + sign to expand your mailbox
3
Hear the caller’s phone number
4. Click Settings and then choose Call Destinations
3. Direct Connect
You can set the following options for each number:
• On - Check this box to enable this phone number
• Number - Enter the phone number with area code
• Call Screening - The caller is asked for his or her name
• Direct Connect - Callers are instantly transferred to you and are not sent back
into voicemail
• C all Announce - You are notified of a caller on hold and can choose
to accept the call
• D ays - Check the box for each day that you want calls forwarded to this number
• Start Time - Enter the start time for this number to be called
• End Time - Enter the end time for this number to be called
Click the Update Button when finished to save your changes.
NOTE: To turn off the follow-me feature for the entire day, set your open time to 1:00 am and close time to 1:01 am.
For 24/7 forwarding, set both open and close times to 12:00 am (The only time close time can be 12:00 am is if start
time is also 12:00 am, otherwise the maximum close time is 11:59 pm). NOTE: For International Call Forwarding, a
Credit Card Authorization form must be on file. You may download this form from http://support.gotvmail.com.
A Direct Connect call is automatically connected without any options.
You can speak to the caller as soon as you pick up your phone.
NOTE: Callers are not sent back into voicemail if you are not available with the Direct Connect feature.
Use this feature if you want a 2nd party voicemail system to answer (e.g., cell phone voicemail)
Placing a call back on hold or transferring to another mailbox
While on a live call, you can place the caller on hold, with music, by pressing # twice (##).
Options After Putting Caller Back On Hold
1
Return to the call
2
Transfer the call to another extension
3
End the call
There are two types of transfers that you can make
• Blind Transfer - The call is automatically transferred
• S upervised Transfer - You can speak to the party to which you are transferring the call prior to
completing the transfer
To complete a transfer, you must press # twice (##).
GotVMail Communications Virtual Phone System User Manual v7.0. Copyright © 2007 GotVMail Communications, LLC. All rights reserved.
9
Virtual Marketing Extensions (VME)
NOTE: You must activate VME Leg extensions online before being able to access or record a greeting.
Callers will also not be able to access a VME Leg that has not been activated online. (See instructions on pg. 10 for activating VME Leg
VME 1
Leg 0
What is VME?
The Virtual Marketing Extensions feature allows you to give callers up to date information
about your company, its products, and services via sub-menued extensions.
How VME Works
There are three main VME extensions that can be activated on your account. Each of these
three extensions has 5 sub-extensions, and each of those has 5 additional sub-extensions. By
default, pressing 1 from the Main Greeting takes the caller to to mailbox 701; 2 to mailbox
702; and 3 to mailbox 703. The VME feature allows you to have extensions 1, 2, and 3 off the
Main Greeting as separate marketing extensions and, if activated (see below), will no
longer take callers to their 70* mailbox counterpart. For example, if extension 1 is activated
as a VME and extensions 2 and 3 are not, then extension 1 will be a VME and extensions 2
and 3 will take callers to mailboxes 702 and 703, respectively.
Leg 01
LEG
011
LEG
012
LEG
013
Accessing VME Leg Extensions
For VME 1, Leg number:
For VME 2, Leg number:
0 is the main VME greeting
01 is extension 1 greeting
011 is extension 1 under extension 1
02 is extension 2 greeting 021 is extension 1 under extension 2 etc...
0 is the main VME greeting
01 is extension 1 greeting
011 is extension 1 under extension 1
02 is extension 2 greeting 021 is extension 1 under extension 2 etc...
For VME 3, Leg number:
0 is the main VME greeting
01 is extension 1 greeting
011 is extension 1 under extension 1
02 is extension 2 greeting 021 is extension 1 under extension 2 etc...
Leg 02
LEG
014
LEG
021
LEG
015
LEG
022
Leg 03
LEG
031
LEG
023
LEG
024
LEG
032
LEG
025
LEG
033
Leg 04
LEG
034
LEG
041
LEG
035
LEG
042
Leg 05
LEG
051
LEG
043
LEG
044
LEG
052
LEG
053
LEG
054
LEG
055
LEG
045
VME Leg Map
A Leg is a Virtual Marketing Extension (VME) number. Each VME Leg extension has a Main Greeting where callers
can listen to pre-recorded information. While listening to a VME recording, callers can dial another VME leg
extension (if activated), can dial 9 for the previous menu, or dial 0 for the operator. All Leg Extensions start with a
0 for administrative purposes. (For a sample VME extension, see pg. 3)
For example, to access VME 2 Leg # 022 (directions to the office from Route 95) a caller hears:
Main Menu: “...Dial 2 for Company Information...”
See diagram at right>>>
Uploading VME Greetings Online
1. Login to your account at www.myGotVMail.com as the administrator
2. Click on System
3. Click on VME
4. Upload greetings
Caller Dials 2 (VME 2 Leg # 0): “Dial 1 for store hours or dial 2 for directions to our office.”
Caller Dials 2 (Leg # 02): “Dial 1 for directions from Main Street or dial 2 for directions from Route 95.”
Caller Dials 2: (Leg #022) “Take Route 95 East to exit 14, bear left....”
C aller can now go to another mailbox by dialing the 3 digit number, dial 0 for the operator mailbox, or dial 9
to return to the previous VME Leg.
GotVMail Communications Virtual Phone System User Manual v7.0. Copyright © 2007 GotVMail Communications, LLC. All rights reserved.
10
Virtual Marketing Extensions (VME)
(continued)
Music-On-Hold
Accessing Music-On-Hold Selections Online (Administrator Only)
Activating VME Leg Extensions
1. Go to www.myGotVMail.com
2. Click on System
2. Enter your account number and password. Leave extension number
blank to login as an administrator
3. Click System
3. Click on VME
4. Click Music-on-Hold
4. Check all the extensions you want to activate, click Advanced to view more extensions.
4. Select the type of music you want callers to hear or upload a custom music file
1. Login to your account at www.myGotVMail.com as the administrator
Phone/Pager Message Notification
Accessing VME Leg Extensions
1. Call your account number and press the main VME extension that has been activated online and
that you want to access (1, 2, or 3)
2. Press
* to enter the Subscriber mode
1. Go to www.myGotVMail.com
2. Enter your account number, extension (leave blank for administrator login), and password
3. Enter your PIN #
4. Dial the Leg Number you want to access (0, 021...), followed by #
Call-Back Message Notification Options
(See Leg map on pg. 10)
3. Click Settings, choose Notifications
4. Check Phone/Pager Notification to activate
5. Enter your Call-Back number and click Update
Record a VME Leg Extension Greeting
You will be notified at this number when you have a new message
1. After you select a Leg number, you will be prompted to record your Leg greeting
2. After you have finished, press
* to accept or # to re-record.
Email Delivery/Notification
Email Delivery Options
To Change the PIN for VME Extensions
1. Go to www.myGotVMail.com
1. Press 1 from the main VME menu
2. Enter your account number, extension (leave blank for admin login), and password
2. You will be asked to enter your new PIN
3. Choose Click Settings
3. Enter your new PIN and press
#
4. Click Notification for the desired extension
4. Your password will be read back to you
4. Enter your Email Notification options
5. Press # to accept or
5. Click Update
* to cancel
Important: Some email programs will mark emails from GotVMail as spam. Make sure
to add emails from GotVMail to your allowed emails list.
GotVMail Communications Virtual Phone System User Manual v7.0. Copyright © 2007 GotVMail Communications, LLC. All rights reserved.
11
Fax-on-Demand
Record a Greeting for the Fax-on-Demand Mailbox
Fax-on-Demand Options
• A greeting that prompts the caller to enter their fax number
• A greeting that prompts the caller to enter the document ID
Fax-on-Demand allows callers to receive stored documents via fax with 24/7 access.
With this valuable feature, you can:
• Upload a document that your caller can have instantly faxed to them
• Record a greeting that provides a description of the document to be faxed
There are two types of greetings that you can record:
After selecting either greeting type, you will be prompted to record the greeting. Once you
have recorded your greeting, you may press any key to accept (and return to the main menu)
press to discard and re-record, or the key to return to the main menu. NOTE: If you do not
record a fax-on-demand greeting, the default greeting will be played.
To Access Fax-on-Demand
1. Call your account number and press * to enter Administrator mode
2. Press 6 # to access the Fax-On-Demand extension
3. Enter your PIN
Fax-on-Demand Options
1
Send a broadcast fax (This feature is not currently available)
2
Store or delete a document
3
Record greetings
8
User options
Other Fax-on-Demand Options
2
Change access code
3
Receive a report of faxes sent for the month
Store or Delete a Document
Storing a document is done through your fax machine. You will be asked if you are calling
from a fax machine. Press 1 to continue if you are calling from a fax machine. If you are
not, you will need to hang up and call back.
Each fax available to your customers or callers is provided through a three-digit number that
identifies the fax. When you have called from a fax machine and are ready to store your document, you will need to enter the three digit number and press # (You can use any 3 digit
number you want, and store up to 15 documents). Once you have accomplished that, you can
press the Start Button on your fax machine to store the document.
To delete a document, enter the document number you want to delete followed by # .
GotVMail Communications Virtual Phone System User Manual v7.0. Copyright © 2007 GotVMail Communications, LLC. All rights reserved.
12
After-Hours Schedule
Phone Access - (for Online Access see pg. 14)
After-Hours Schedule Options
B. Set After-Hours Schedule
1
Set weekend schedule
2
Set schedule for all weekdays
3
Set schedule for specific days
The After-Hours greeting is what callers will hear when calling your toll free or local GotVMail
number outside of your specified hours of operation. After callers hear this greeting, which
can include information such as office or store hours or after-hours contact information, they
can perform the same functions they could if calling during normal business hours.
C I. Weekend Schedule
1. Enter start and end times for your normal business hours greeting to be played
After-Hours Setup Menu
1. Call your Account Number and press
* to enter Subscriber mode
2. Press # to enter the Administrator mode
3. Enter your PIN
2. Once you have specified a specific hour and minute, you must select a time of day
1 AM 2 PM
3. You can press 0000 to schedule nighttime operation (Open 24 hours)
4. Press # to set other schedules
4. Press 4 to access the Manage Greetings Menu
5. Press 3 to setup After-Hours
C II. Weekdays Schedule
1. Enter start and end times for your normal “open” greeting to be played
Select an After-Hours Setup Option
2. Once you have specified a specific hour and minute, you must select a time of day
1
AM 2 PM
A. 1
Record a new after-hours greeting
B. 2
3. You can press 0000 to schedule nighttime operation (Open 24 hours)
Set After-Hours mode schedule
C. 3
4. Press # to set other schedules
Turn on After-Hours mode until specified day/time
C III. Specific Days Schedule
A. Record New After-Hours Greeting
1. Enter the number of days during which the After-Hours schedule will operate
1. At the tone, record your greeting
2. Press 0 to turn off the After-Hours schedule
2. To accept the greeting and continue, press #
3. Press # to accept or
* to re-enter the number of days
3. To cancel and re-record press 3
GotVMail Communications Virtual Phone System User Manual v7.0. Copyright © 2007 GotVMail Communications, LLC. All rights reserved.
13
After-Hours Schedule
Online Setup
After-Hours Schedule Options
Virtual Calling Card &
Conference Calling
To activate these features, visit http://support.gotvmail.com to download and complete the
Credit Card Authorization Form.
These office hours, based upon your time zone settings, determine when your After-Hours
greeting will be played instead of your standard greeting.
After-Hours Schedule
1. Go to www.myGotVMail.com
2. Enter your account number, extension (leave blank for administrator login), and password
3. Click Settings
4. Click General in an expanded mailbox to set After-Hours for a specific mailbox
To place a Virtual Calling Card Call or Conference Call
1. Call your account number followed by
2. Enter your extension followed by #
*
3. Enter your PIN
4. Press 0
5. Dial 2 for Calling Card call or Dial 3 for Conference Call
Virtual Calling Card
There are two types of After- Hours schedule settings that you can change:
Main Greeting After-Hours Schedule (Administrator)
Using the drop-down menus - 1. Select an Open Time for each day
You have the ability to make an outbound call from your GotVMail mailbox. To make an outbound call:
1. Enter the area code and phone number you want to call
2. To end the call or put the caller on hold, press # twice (##)
2. Select whether the Open Time is AM or PM
Conference Call Options
3. Select a Closing Time for each day
4. Select whether the Closing Time is AM or PM
5. Click the Update Button to save your changes
NOTE: The office hours you set here apply to all of the extensions unless individual extensions set their own office hours.
You can conference up to 9 people (10 including yourself) per call. To make a conference call:
1. Enter the area code and phone number you want to conference in
2. Dial # to add additional parties
3. Dial
Mailbox After-Hours Schedule (greeting played before voicemail)
Using the drop-down menus - 1. Select an Open Time for each day
* to start the conference
4. The parties will be called and notified of the conference. Your mailbox name will be played and the
parties can accept and enter the conference by pressing #
6. To end the call, press # twice (##)
2. Select whether the Open Time is AM or PM
3. Select a Closing Time for each day
To Activate Calling Card & International Dialing on Specific Mailboxes
4. Select whether the Closing Time is AM or PM
1. Login to www.myGotVMail.com as the administrator
5. Click the Update Button to save your changes
2. Click on System and select Mailbox Manager
3. Check the mailboxes you wish to activate virtual calling card and international dialing for
GotVMail Communications Virtual Phone System User Manual v7.0. Copyright © 2007 GotVMail Communications, LLC. All rights reserved.
14
Forwarding Messages to Other Extensions
Virtual Holding Mailbox
Automatic Call Distribution (ACD) Queues
To Copy (Forward) a Message to Another Extension
1. Call your account number followed by
2. Enter your extension followed by #
* to enter the Subscriber mode.
3. Enter your PIN
4. Dial 7 to access your messages
5. Listen to messages
To Copy (Forward) a voicemail message to another extension:
• Press 6 after listening to a message
• Enter an extension number followed by #
• Select how you want to copy the message.
1 With Comment
2 Without Comment
With Comment: When you copy a message with comment, you can record a greeting that will
preface your message. After you have recorded the greeting, you can press
3 To delete and re-record
7 To review the message
# To send the message now
GotVMail's Virtual Holding Mailbox (ACD Queues) allows callers to connect to the next
available agent. It is an upgraded version of a regular GotVMail mailbox. Rather than
transferring a caller into voicemail if the call is not answered via Live Call Forwarding,
the caller is kept on hold indefinitely until their call is answered.
You can have several employee phone numbers programmed into the Virtual Holding
Mailbox for Live Call Forwarding so that the next available representative can answer
the call (see Priority Numbers on page 8). Callers are transferred into voicemail only
when they are calling after-hours.
For example, a client might have a technical support Virtual Holding Mailbox (e.g.,
“dial 2 for technical support”). At any given time there might be 5 technical support
specialists assigned to answer calls to the technical support queue (5 numbers programmed for call forwarding). When there are more available agents than there are
callers, each caller is immediately routed to the next available agent. But, when the
call volume increases and there are more callers than there are available agents, the
callers are placed in a holding queue where they are serviced in FIFO (first-in-firstout) order. When an agent completes a call, the agent is marked as available, and the
next caller in the FIFO queue is routed to the agent.
Virtual Holding Mailboxes are separate mailboxes that can be added to your GotVMail
account. To setup Virtual Holding Mailboxes (ACD Queues), please contact GotVMail's
customer support at 1-800-820-8210.
Without Comment: Your message will by forwarded without any comments
To Copy/Move Messages Online
1. Login to your account www.myGotVMail.com
3. Click the Extension and Folder where the message is stored
4. Click the checkbox next to the message(s) you wish to copy/move
5a. To Copy, select "Copy Message" from the message functions drop-down box and follow the steps
5b. To Move, select the mailbox and folder from the message functions drop-down box and click Go
GotVMail Communications Virtual Phone System User Manual v7.0. Copyright © 2007 GotVMail Communications, LLC. All rights reserved.
15
2. Add Members to an Existing Distribution List
Distribution Lists
1. Enter a distribution list number from 1-20
Distribution List Options
2. Press # You will then be prompted to enter the mailbox # that you wish to add
Distribution lists are a very convenient and inexpensive way of communicating with many
employees at once. Setup a distribution list with the voicemail extensions of subscribers who
you wish to send messages to. Once this is accomplished you can send messages with one
phone call. Each GotVMail account can have up to 20 distribution lists.
3. When you have finished entering the mailbox #, press #
4. Repeat until you are finished entering extensions
5. When you are done, press
*
NOTE: Distribution list 21 is all mailboxes
Access Distribution Lists
1. Call your account number and press
3. Delete Members from an Existing Distribution List
*
2. Press # to enter the Administrative mode
3. Enter your PIN
4. Press 8 to access the User Options Menu
5. Press 4 to access the More Options
1. Enter a distribution list number from 1-20
2. Press # You will then be prompted to enter the mailbox # that you wish to remove
3. When you have finished entering the mailbox extension, press #
4. Repeat until you are finished removing extensions
5. When you are done, press
Setup Distribution Lists
1. Press 1 from the More Options Menu. You will be provided the following
Distribution List options
*
4. Hear All Members in a Distribution List
Create a new distribution list
1. Enter a distribution list number from 1-20
2
Add members to a current list
2. Playback will announce extensions currently attached to that distribution list
3
Delete members from a list
3. If the extension owner has recorded a name, the name will be read
4
Hear all members in a list
4. If the extension owner has not recorded a name, the extension number will be read
5
Delete your mailbox from another’s distribution list
1
6
Send a voicemail message to a distribution list
1. Create a New Distribution List
5. Delete Your Mailbox from a Distribution List
1. Enter the mailbox number for which you would like to stop receiving distribution messages from
1. Enter a distribution list number from 1-20
2. Press # you will then be prompted to enter a mailbox # that you wish to add
3. When you have finished entering the mailbox extension, press #
4. Repeat until you are finished entering extensions
5. When you have completed the list, press
6. Sending a Voicemail Message to a Distribution List
1. Enter the distribution number or mailbox number followed by #
*
GotVMail Communications Virtual Phone System User Manual v7.0. Copyright © 2007 GotVMail Communications, LLC. All rights reserved.
16
Question & Answer Mailbox (Q&A)
What is Q&A?
Mailboxes with Q&A activated will prompt callers to answer a series of questions and the system will compile the
answers into one voicemail file. This feature is typically used for lead generation and order taking. The system will
record the callers answers as they speak them.
Activating Q&A on a Mailbox
To activate Q&A on any mailbox, please contact GotVMail Customer Support at
1-800-820-8210. You can record questions once Q&A has been activated.
How to Record Questions
1. Call your account number
2. Press
* to enter subscriber mode
3. Enter your 3 digit mailbox number followed by #
(NOTE: This mailbox must have Q&A activated)
4. Dial 4 to access greetings
5. Dial the 3 digit question number (000, 001, etc) you would like to record or re-record. Question #000 is the main
greeting before questions are asked. Use this recording as an introduction.
Q&A Question Tree Sample
Question #000: “Thank you for your interest in ACME Mortgage. To have a representative contact you, please
answer the following 4 questions. Press # after each question to proceed.”
Question #001: “What is your first and last name?”
Question #002: “What is your current mortgage rate?”
Question #003: “How much money do you owe on your home?”
Question #004: “What is your annual income?”
Question #005: “Finally, please say your telephone number after the tone, followed by #. Thank you for calling
ACME Mortgage Services.”
GotVMail Communications Virtual Phone System User Manual v7.0. Copyright © 2007 GotVMail Communications, LLC. All rights reserved.
17
GotVMail Quick Access Card
This Quick Access Card (below) is designed to be printed, cut-out, and stored in your wallet, briefcase, or organizer. It provides the key strokes for basic
GotVMail phone functionality such as how to log into your mailbox, what you can do while listening to a message, and how to handle incoming calls.
GotVMail Quick Access Card
How to Log Into Your Mailbox
Step 1: Call your account number, and press
*
Step 2: Enter your extension# followed by #
Step 3: Enter your PIN and dial 4
Message Functions
2
Save the message
3
Delete current message
4
Reply to sender or return call
6 Copy to another GotVMail Subscriber
7 Replay the message
9 Get Caller ID with time stamp
5
Get Caller ID without time stamp
# Skip and save as new
Before You Answer an Incoming Call
1
Accept the Call
2
Send the caller to voicemail
3
Hear the caller’s phone number
During an In-Bound Call
#
1
#
Place the caller on hold
2
Transfer the call
Return to the call
9
1
2
Blind transfer
Supervised transfer
End the call
GotVMail Communications Virtual Phone System User Manual v7.0. Copyright © 2007 GotVMail Communications, LLC. All rights reserved.
18
GotVMail Reference Guide
Fax-On-Demand (admin): Press 6 from the Main Menu
The following is a list of all the menus and sub-menus for the
GotVMail phone system
1
Send a broadcast fax (function not currently available)
2
Store or delete a document
To access the mailbox menu, call your account number, dial * , enter the mailbox
number followed by # (or press # without a mailbox number to access the Main Menu),
and enter your password.
1
Greetings: Press 4 from the mailbox menu
1
Record greeting
2
Record name
3
Setup After-Hours greetings and schedules
1
Record new After-Hours greeting
2
Set After-Hours schedule
1
Set weekend schedule
2
Set schedule for all weekdays
3
Set schedule for specific days
3
Turn on After-Hours mode until specified day/time
Managing your messages
2
Save the current message 3
Delete the current message
4
Reply to sender
6 Copy to another GotVMail subscriber
7 Replay the message
9 Caller ID with time stamp
5
Caller ID without time stamp
# Skip and save as new
During the message
Rewind message 6 Fast forward message If calling from a fax machine
Record greetings
1
Main greeting for users to enter their fax number
2
Greeting for users to enter a document ID
8
User options
2
Change access code
3
Receive a report of faxes sent for the month
User Options (ext. owner): Press 8 from the mailbox menu
Messages: Press 7 from the mailbox menu
4
3
0 Pause/un-pause
After all messages have been played
1
Change PIN
2
Usage statistics
1
Listen to monthly usage statistics
2
Have detailed usage report sent to a fax machine
3
Change time zone
1 Eastern 2 Central 3 Mountain 4 Pacific 5 Alaska 6 Hawaii
5
Change caller ID settings
1
Have the number dialed display
2
Have the caller's number display
6 Change the order in which your messages are played
1 Have the most recent message play first 2 Have the oldest message play first
User Options (admin): Press 8 from Main Menu
1
Change access code
2
Usage statistics
1
Listen to monthly usage statistics
2
Have a detailed usage report sent to a fax machine
3
More Options
1
Listen to all saved messages
2
1
Review, mark, and save messages that you have just deleted
NOTE: You only have one chance to re-listen to a deleted message and save it
1
Create a new distribution list
3
Return to the main menu
2
Add members to a current list
3
Delete members from a list
Set up a Distribution List
GotVMail Communications Virtual Phone System User Manual v7.0. Copyright © 2007 GotVMail Communications, LLC. All rights reserved.
4
5
Hear all members in a list
Delete your mailbox from a list
19
GotVMail Reference Guide
Main Greeting Examples
(continued)
Virtual Calling Card & Conference Calls: Press 0 from mailbox menu
1
Travel to another mailbox
2
Make an outbound calling card call
3
Initiate a conference call with two or more additional parties
Live Call Forwarding: Press 9 from mailbox menu
1
Turn the service On or Off
2
Setup the Follow-Me sequence
1
Call screening
2
Direct Connect (without screening)
3
Call Announce
Everyday
2
Weekdays only
3
Individual Days
1
Sun 5
Thu 3
AM 2
“Thank you for calling ABC Company. If you know your party’s extension you may dial it at any
time or dial 8 for the Dial-by-Name Directory. For information about our company, press 1;
for sales, press 2; for support, press 3; for billing, press 4; or, for the operator, press 0.”
Mon Fri
3
7
Tues 4
Wed
Sat
PM
Change what callers hear when arriving at your mailbox
1
2
3
Have callers hear your arrival message
Have callers hear on-hold music instead of your arrival message
Have callers hear ringing instead of on-hold music or your arrival message
Live Call Options While on a Phone Call
# #
Place caller on hold
1
Return to the call
2
Transfer the call to another extension
1
Blind transfer
2
Supervised transfer
“Thank you for calling ABC Company. If you know your party’s extension you may dial it at any
time or dial 8 for the Dial-by-Name Directory. For sales, press 1; for support, press 2; for billing, press 3; or, for the operator, press 0.”
Main Greeting with VME
Select times of the day
1
3
2
6
Main Greeting with Dial-by-Name Directory
“Thank you for calling ABC Company. Your call is important to us. Please leave your name
and number and a representative will call you back shortly.”
Select days of the week
1
“Thank you for calling ABC Company. If you know your party’s extension you may dial it at any
time. For sales, press 1; for support, press 2; for billing, press 3; or, for the operator, press 0.”
Mailbox Greeting
Select a phone number
1
2
Main Greeting
Caller dials 1 - “For information about our services, press 1; for directions to our
office, press 2; for hours of operation, press 3. To repeat this menu, press #; to go
back to the previous menu, press 9. To talk to an operator, press 0 at any time”
Caller dials 1 - “Our company offers services A, B and C. To repeat this menu, press
#; to go back to the previous menu, press 9. To talk to a an operator, press 0 at any
time.”
Caller dials 2 - “From the south take Rt. 22 to Maple Street and make a left on Apple
Road. To repeat this menu, press #; to go back to the previous menu, press 9. To
talk to an operator, press 0 at any time.”
Caller dials 3 - “We are open from 9 to 5 Monday through Friday. To repeat this menu,
press #; to go back to the previous menu, press 9. To talk to an operator, press 0 at
any time.
GotVMail Communications Virtual Phone System User Manual v7.0. Copyright © 2007 GotVMail Communications, LLC. All rights reserved.
20


![Fio 2.0 UM ECU [ENG]](http://vs1.manualzilla.com/store/data/005638068_1-6dee15c8bb797972f1fa6aeeeee54189-150x150.png)