1
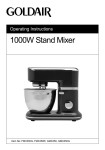
Operating Your Stand Mixer
General Operations
1.
Place the stand mixer on suitable work surface. The surface should be sturdy,
flat, smooth and clean; make sure that there is no flour or oil on the surface and
away from faucets, sinks and heat sources. A clean smooth surface will provide
the best footing and will limit slipping and/or “walking”. The mixer is also
designed with suctions cups on the base for extra hold on the work surface to
prevent slippage and provide added security.
2. Make sure the “Rotary Speed Control”(2) is set to “O” and unplugged from
electrical outlet.
3. Press the “Mixer Head Release Button”(1) and lift “Mixer Head”(5) up by hand
until it locks into place.
4. Select attachment you wish to use and attach to the Attachment Post. (see
Assembling Your Mixer, section: To attach the dough hook, wire whisk or flat
beater)
5. Lock “Bowl”(3) onto the bowl locking plate. (see Assembling Your Mixer, section:
To attach the bowl)
6. Lower the “Mixer Head” by pressing the “Mixer Head Release Button” and
guiding the “Mixer Head” down carefully with your hands. If the “Mixer Head” fails
to lock into place, check the “Bowl” to make sure that it is properly in place.
7. Place the “Splashguard Cover” on the “Bowl”. (see Assembling Your Mixer,
section: To fit and use your anti-splash cover) The cover has an integral feeding
funnel. The cover may be removed to add ingredients, but the cover should be in
place whenever the mixer is in operation. It is highly recommended to add
ingredients through the funnel. The “Splashguard Cover” serves to prevent the
escape of flour dust at the beginning of the stirring and kneading process, and
also serves to prevent accidental contact with the moving “Dough Hook”.
8. Plug the mixer into an electrical outlet nearby.
9. Turn the “Rotary Speed Control” to desired speed setting. The mixer will start
gradually, to avoid spattering, and build up to the selected speed.
10. To change the speed during operation, simply turn the “Speed Control” to the
desired setting.
11. To turn mixer off, turn the “Rotary Speed Control” to “O”. The unit will keep
turning for approximate 3 cycles to its park position before the mixer head
completely stops. This is the normal operation and allows you to slowly lift the
beater from the mixer. This special operational design provides for a smooth
stop to the rotary action and extends the life of the appliance. Unplug the
appliance from the electrical outlet.
12. To remove attachment (Dough Hook, Wire Whip or Flat Paddle), press them up
as far as possible, then turn clockwise to release. Pull from the attachment post.
Warning:
To avoid risk of injury, be sure to switch off the stand mixer before scraping the sides
of the Bowl. The Bowl is designed to mix effectively and require minimal scraping.
Never attempt to scrape the sides of the Bowl while the mixer is operating.
Use Dough Hook
The dough hook is used for mixing bread dough of all kinds. The design of the hook is
excellent for pulling sticky dough away from the side of the mixing bowl, and the cap
on the hook prevents the dough from crawling up the hook and keeps it in the right
mixing position. The dough hook and mixing bowl are intended to be used to knead
yeast doughs and to mix heavy cookie and pastry doughs, and also when adding nuts,
chocolate chips, dried fruit, hard butter or shortening, hardened brown sugar, etc. to
batters.
Use Wire Whisk
The whisk incorporates air into liquid mixtures. The beating whisk is intended to be
used for very light substances, such as cream, egg whites, sauces, batters and light
pastry doughs that are thin enough to pour. As the whisk rotates faster the mixture
becomes thicker and creamier. Meringues, frostings, and thick sauces are all made
using this attachment.
Use Flat Paddle
The paddle is used for mixing thicker and heavier cookie and cake batters where the
incorporation of air is not critical to the recipe. The flat paddle is also intended to be
used for stirring items at low speed, such as cake mixes and light cookie doughs.
Always be sure to use the dough hook for heavy cookie doughs.
Removing Contents
1.
2.
3.
Before beginning to remove the contents from the “Bowl”(3), make sure that the
”Rotary Speed Control“(2) is set to “O” and the power cord is unplugged.
Remove the “Splashguard Cover”. Press the “Mixer Head Release Button”(1)
and lift the “Mixer Head”(5) upward until it locks into place. Remove the
attachment from the attachment post.
The Bowl can be removed from the main unit by twist counter-clockwise.
The contents may now be used as desired.
Speed Control
Operate Unit with Rotary Speed Control
The speed of its moving components can be controlled through the use of the “Rotary
speed Control”(2) at the front of the ergonomic stand. The “Rotary speed Control” has
six positions:
Ɣ “Pulse”: turbo speed and only use for “Flat Paddle” attachment
Ɣ “O”: the off position
Ɣ 4 speeds labeled - “1”, “2”, “3” and “4”: (Speed 1 is the lowest speed. The speed
increases with each succeeding step up to the highest speed, speed 4.)
Speed Control Guide
The following speed control guide provides suggested settings for your mixer. If in
doubt, always start on a lower setting and work your way up.
NOTE: When working with ingredients that spatter easily, start on a lower speed and
then proceed to the recommended setting.
ATTACHMENT FUNCTION
Dough Hook
Flat Paddle
Wire Whisk
SETTING GUIDE
Folding
1
Yeast Dough (bread dough, pizza dough)
1~2
Heavy Pastry Dough
1~2
Heavy Mixes
1~2
Mix
2~4
Cookie Dough
2~4
Blend
1~3
Combine
1~3
Cream
1~3
Meatloaf
1~3
Stir
1~3
Mash potato
1~3
Whip Cream
1~4
Egg Whites
1~4
Desserts
1~4
Frosting
1~4
Useful Tips
ì
ì
ì
ì
ì
Before adding ingredients to the “Bowl” during operation, turn the “Rotary Speed
Control” to a lower speed. Always add the ingredients through the “Flour Feeder”.
When adding flour to recipes, mix at a low speed until incorporated.
Mixtures with large quantities of liquid should be mixed at lower speeds to avoid
splattering.
Be sure to watch liquids closely while whipping, since the powerful 450-watt
motor beats quickly.
When using the mixing bowl to knead or mix a recipe designed to be prepared by
hand, you will find that with the Westinghouse stand mixer you can usually place
all the ingredients in the mixing bowl at once. When doing this, always place the
liquids in first. This will assure more thorough mixing.
Special Note
When your work with the attachment is completed, turn the “Rotary Speed Control” (3)
to off position “O”. The mixer will keep turning for approximate 3 cycles to its park
position before the mixer head completely stop. This is the normal operation and
allows you to slowly lift the beater from the mixer. This special operational design
provides for a smooth stop to the rotary action and extends the life of the appliance.
Then unplug the unit from an electrical outlet.
Care and Cleaning
Always unplug the appliance after each use and before attempting to clean. Failure to
do so can result in broken bones , cuts or electrical shock.
1.
2.
3.
4.
5.
6.
7.
8.
Make sure the “Rotary Speed Control” is set to ‘O’ and the appliance is
unplugged before cleaning.
Wait until the motor head has come to a complete stop; when switched off, the
motor head will continue to turn for a brief period.
Please do not place hands into mixing bowl until the appliance comes to a
complete stop in order to prevent possible injury.
Press the “Mixer Head Release Button”(1) and lift the “Mixer Head”(5) up.
Remove attachments by pressing them up as far as possible, then turn
counterclockwise to release. Pull from the attachment post.
The “Bowl” and attachments can be washed in warm, soapy water or in a
dishwasher. Attachments are top rack dishwasher safe.
Wipe down the “Mixer Head” and main unit with a damp cloth. DO NOT immerse
the unit, power cord and plug in water or liquid. Do not use an abrasive or
cleaning pad on the mixer base.
DO NOT use household cleaners that contain bleach or pine cleaners. Do not
use any type of solvent-based cleaner or metal polish on the mixer base. Do not
spray cleaners directly on the mixer. Cleaners should be applied to a clean cloth
before using on the mixer. If these cleaning products DO come in contact with the
mixer, immediately clean with a water-dampened cloth and wipe dry.
!
"
#
!
$
%
&
!
'
(
)*
+
',-./
0
$
- & # -
. 0 0 # 0 0$
0%
1
&
$
+
- 2$ !
0
-
17
3
$
-
3 $
$'
4
$
-+
0
0
- &
!"'
-
+
#
-
0
# ** 0
- 5 # #
# +
#"6
-
4 - + # # 0 - 7 1
88
.&( 9# 0 ** -
18
!
#
-
'
-
!
-
::0
5 1
&
2$ !;
8
#0 -
$
0 '
-
0
!
-
-
+
$
!
-
+
.-
1
#
#/
# + # # /
<<
#-
8
0
<#-
+!,
#
-71
8
.&(
#-
19
-
1
0
-0 -
20