1
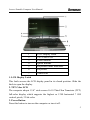
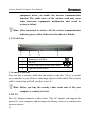
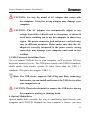
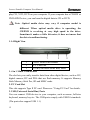
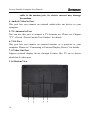
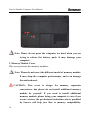
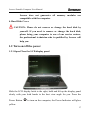
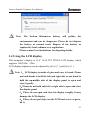
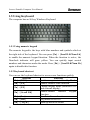
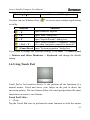
Lenovo Portable Computer User Manual Preface This manual is only used to describe the guide for using the requirements for conditions of use and environment about the Lenovo notebook computer it is attached to. Lenovo does not guarantee that this manual can be used for Lenovo notebook computers of other models or products from other vendors. The correctness of the materials in this manual has been reviewed carefully, but Lenovo will not guarantee the rightness of its content. © Copyright Lenovo 2006. All rights Reserved. This manual is only to guide you to use the Lenovo notebook computers. Without explicit written approval from Lenovo, it is prohibited for anybody, with any objective, and in any form or measure to use, replicate or spread any part of this manual. Trademarks, logos and icons used in this manual belong to Lenovo or its authorized parts and are under the protection of the People’s Republic of China’s laws and international treaties. Pentium, Dothan, Centrino and Celeron are registered trademarks of Intel Corporation. MS-DOS, Windows, Windows XP and Windows 2000 are registered trademarks of Microsoft Corporation. 1 Lenovo Portable Computer User Manual Read First Welcome to use Lenovo PCs Windows XP Operating System If the preinstalled operating system on your computer is Windows XP, when you start it up for the first time, the system will perform the tasks of user information collection and final configuration. You need to read the following carefully in order to ensure you operation can go on smoothly. When the system is booted, read the words on the screen carefully. To use Windows XP, you must get licensed at first. You should read End User License Agreement carefully, only after you have accepted this agreement, the installation will continue. The system will ask you to set up the name and description of this notebook computer, set up the Internet access, register your computer to Microsoft (You can decide to register or not by yourself) and set up the usernames for the computer. When you type in all the necessary user information, the system will complete the final configuration. By simply following the instructions, you can easily complete the entire setup process step by step and the notebook computer will be ready for use. NOTE: On the basis of the operating system authorization contract with Microsoft, the preinstalled Microsoft operating systems on this computer have been authorized by the copyright owner. 2 Lenovo Portable Computer User Manual Safety Warnings Care during Use: Do not place the computer in an overheated environment, to prevent the computer from being damaged by heat. Do not place any objects on the computer. Do not impact or let the computer fall, to prevent the computer being damaged. Care for AC Adapter: Do not disassemble it. Do not use it outdoors to prevent it from being heated, burned or getting electric shock. Do not touch it with wet hands or immerge it into water. Do not use this adapter with any other computers, in order to avoid electric shock, burning and component damages. In China, please use the AC power cord in the box; in other countries, please use power cords in compliance with local requirements. Care for Battery Pack: Do not make the battery short circuit Do not place the battery in an environment above 60℃ Do not place the battery in fire Do not fall or vibrate the battery Do not wipe the metal component on the battery with a wet cloth. Do not touch the battery with a wet hand or immerge it into water. Do not disassemble the battery. When you use the computer under sunshine or near high temperature object or fire, do not use the battery as the power supply. 3 Lenovo Portable Computer User Manual Chapter 1 Welcome This user manual provides the hardware and software information of the LENOVO® Portable Computer which you will use. The computer is complicated equipment, please read over the whole manual before your first use. Especially if you are a new user of computers or you’re new to portable computing. Please do not worry if you are still confused about some part of the manual, keep this manual as a reference when you are using your computer or call our agent for help. Please pay your attention to the caution and safety messages in this manual and the safety messages in the preface. Note: 1、Plug-in and/or remove any computer component is strictly forbidden during the computer is using (except the USB, PCMCIA and/or CD-ROM devices which support PnP-Plug and play Technology). 2、As many new hardware are adopted in this computer, user must install the drivers by following the manual’s instruction to get the best computer performance. 1.1 Quick Tour for your portable computer Congratulations on your purchase of the Lenovo 3000 Y100 series portable computer. This powerful, lightweight portable computer is designed to provide years of reliable, high-performance computing. Lenovo 3000 Y100 series Model contains Intel® 915GM Express Chipset and integrated graphics card. 1.1.1 Front view with the display open 4 Lenovo Portable Computer User Manual 1 2 3 4 5 6 7 LCD Display Latch TFT Color LCD Power Button Quick Buttons Keyboard Status Indicators Keyboard Touch Pad 1. LCD Display Latch This latch secures the LCD display panel in its closed position. Slide the latch to open the display. 2. TFT Color LCD The computer adopts 15.4" wide screen 16:10 Thin-Film Transistor (TFT) full-color display which supports the highest as 1280 horizontal * 800 vertical pixels, 32-bit color. 3. Power Button Press this button to turn on the computer or turn it off. 5 Lenovo Portable Computer User Manual Hint: If the system cannot shut down normally, press the power button for 4~5 seconds to shut it down manually. 4. Quick Buttons 1. Novo Key 2. Mute Key Onekey Recovery Turn on/off mute function The Novo Key is the Onekey Recovery key by default setting and used to activate the “Onekey Recovery” application. When the computer is powered off, press the Novo Key to enter into the system recovery application. You can recover, backup or uninstall the system through the application. Please see <Onekey Recovery User Manual> for details. CAUTION: Make sure you have already backup the data in the hard drive. The system recovery will reformat the hard drive and restore it to the factory setting. 5. Keyboard Status Indicators 1. CapsLock Indicator 2. NumLock Indicator 3. ScrLock Indicator 6 The Indicator glows when CapsLock is active. The Indicator glows when NumLock is active The Indicator glows when ScrLock is active Lenovo Portable Computer User Manual 6. Keyboard Standard 86-key keyboard (Embedded numeric keypad and function keys. They can combine with [Fn] key to achieve some shortcut functional applications). Please see “Using Keyboard” for details. 7. Touch Pad Moves the pointer and selects or activates items on the screen. There are two buttons perform as mouse buttons. After install the driver, touch pad can be set to perform other mouse functions. Please see “Using Touch Pad” for details. 1.1.2 Front view with display closed 1 2 3 4 5 Build-in Stereo Speakers Audio Jack Software AudioDJ System Status Indicators Wireless Communication Switch 1. Build-in Stereo Speakers The stereo speakers can output clear stereo sound. 2. Audio Jack Enables connection of a headphone or external speaker for audio output. When you connect the headphone or 1. Headphone Jack other device, internal speakers are automatically disabled. 7 Lenovo Portable Computer User Manual 2. Microphone Jack Enables connection of a microphone for audio input. 3. Software AudioDJ Play Audio-CD without turn on Windows and direct link Windows application to play mp3 and DVD. - CD mode will be turned on. Press MODE button over 3 seconds, CD mode LED Insert Audio-CD, then press PLAY/PAUSE, Next/Previous Chapter, STOP, Audio Volume Up/Down button to enjoy audio-CD playing. Insert DVD, then press PLAY button to direct into Windows to play. You can press PLAY/PAUSE, Next/Previous Chapter, STOP, Audio Volume Up/Down button to enjoy DVD playing. - MP3 mode Press MODE button over 3 seconds, CD mode LED will be turned on. Press MODE button less than 1 second, MP3 mode LED will be turn on. Press PLAY button, system will link to Windows Application to play MP3 files. Press PLAY/PAUSE, Next/Previous Chapter, STOP, Audio Volume Up/Down button to enjoy MP3 playing. 4. System Status Indicators 1. Power Indicator 8 The indicator glows yellow when the computer is on; The indicator fades in/out when the computer is in STR (Suspend To Ram) status; The indicator is off when the computer is Lenovo Portable Computer User Manual powered off or in STD (Suspend To Disk) status. 2. Hard Disk/CD-ROM The indicator flashes yellow when the computer is accessing a disk drive. Indicator When you use battery: The indicator is off means the battery is in normal use; The indicator flashes amber means the battery is low power. 3. Battery Indicator When you use external power source: The indicator glows amber means the battery is being charged; The indicator glows yellow means the battery is fully charged. 5. Wireless Communication Switch Use the switch to enable and disable the wireless communication function. It will extend the operating time of battery if the wireless function is disabled. CAUTION: Do not use the wireless communication function in the hospital or nearby any electronic medical equipment! The radio waves of the wireless card may cause the electronic medical equipments malfunction and result in serious accident. CAUTION: Do not use the wireless communication function on the plane! The radio waves of the wireless card may cause the electronic equipments of the plane malfunction and result in serious accident. CAUTION: Please avoid interfering with other electronic 9 Lenovo Portable Computer User Manual equipment when you enable the wireless communication function! The radio waves of the wireless card may cause other electronic equipments malfunction and result in serious accident. Hint: After connected to wireless AP, the wireless communication indicator glows yellow. Otherwise the indicator blinks. 1.1.3 Left View 1 2 3 4 Security Lock Slot DC IN USB (Universal Serial Bus) Ports Optical Media Drive 1. Security Lock Slot You can buy a security cable that can attach to the slot. Use it to anchor you computer to your desk or other large object to defer theft. The security cable’s instruction will tell you how to use it. Hint: Before you buy the security cable, make sure it fits your computer’s security lock slot. 2. DC IN The AC adaptor connects to this socket. The AC adaptor can support the power for your computer and/or charge the battery when it is connected to a power source. 10 Lenovo Portable Computer User Manual CAUTION: Use only the model of AC adaptor that comes with the computer. Using the wrong adaptor may damage your computer. CAUTION: The AC adaptor can automatically adjust to any voltage from 100 to 240volts and to a frequency of either 50 or 60 hertz, enabling you to use the computer in almost any region. The power connector jack and power cord jack may vary in different countries. Please make sure that the AC adaptor is correctly connected to the power source, wrong connection may damage your computer and result in fire accident. 3. USB (Universal Serial Bus) Ports You can connect USB devices to your computer, such as mouse, full-size keyboard, memory key etc. The USB ports comply with USB2.0 standards, which enable data transfer speeds 40 times faster than the USB 1.1 standards. (The ports also support USB 1.1.) Hint: The USB device supports PnP (Plug and Play) technology that means you can install and remove the USB device when your computer is on. CAUTION: Please do not install or remove the USB device during the compter is starting or shutting down. 4. Optical Media Drive Optical media drive provides the way to transferring data between your computer and CD/DVD. Depends on your computer’s feature, you may 11 Lenovo Portable Computer User Manual play CD, VCD, DVD on your computer. If your computer has a CD-RW or DVD±RW Device, you can burn the digital data to CD or DVD. Note: Optical media drive may vary if computer model is different. When optical media drive is operating, the CD/DVD is revolving at very high speed in the drive. Sometime it makes a little bit noise; it does not mean that the drive is malfunctioning. 1.1.4 Right View 1 2 3 4-in-1 Multi Card Reader PC Card Slot USB (Universal Serial Bus) Ports 1. 4 in 1 Multi Card Reader The slot lets you easily transfer data from other digital device, such as DV, digital camera; DV and PDA that use flash memory. It supports Memory Stick/Memory Stick Pro, SD and MMC cards. 2. PC Card Slot This slot supports Type II PC card. Please see “Using PC Card” for details. 3. USB (Universal Serial Bus) Ports You can connect USB devices to your computer, such as mouse, full-size keyboard, memory key etc. The USB ports comply with USB2.0 standards. (The ports also support USB 1.1.) 12 Lenovo Portable Computer User Manual 1.1.5 Back View 1 2 3 IEEE 1394 Port LAN Jack Modem Jack 4 Audio/S-Video In Port 5 TV-Antenna In Port VGA Port S-Video Out Port 6 7 1. IEEE 1394 Port You can connect an external device that supports IEEE 1394 to this port for high-speed data transfer. Most digital cameras support this technology. 2. LAN Jack The RJ-45 LAN jack allows you to connect your computer to a LAN (Local Area Network). CAUTION: Be careful not to put the telephone line into the LAN jack. The telephone line uses higher voltage than the LAN cable; it may damage your computer. 3. Modem Jack In areas where an internal modem is installed as standard device, there is a modem jack that lets you use a modular cable to connect your notebook to a telephone line with a standard RJ-11 connector. CAUTION: Please be careful not to connect the digital circuitry 13 Lenovo Portable Computer User Manual cable to the modem jack, its electric current may damage the modem. 4. Audio/S-Video In Port This port lets you connect an external audio/video out device to your computer. 5. TV-Antenna In Port You can use this port to connect a TV-Antenna set. Please see Chapter “TV” of book <PowerCinema User Guider> for details. 6. VGA Port This port lets you connect an external monitor or a projector to your computer. Please see “Connecting to External Display Device” for details. 7. S-Video Out Port Support external display device through S-video, like TV set or device which has S-video port. 1.1.6 Bottom View 14 Lenovo Portable Computer User Manual 1 2 3 4 Battery Pack Latch Battery Pack Memory Module Cover Hard Disk Cover 1. Battery Release/Lock Latch The Battery Pack latch secures the battery pack. To release, simply slide the latch across. The battery pack will pop up. 2. Battery Pack With a charged battery pack installed, you can use your notebook without connecting it to an electrical outlet. For more details, please see”Using Battery”. ¾ To install the Battery Pack To install the Battery Pack just presses it into the computer gently until you hear the little “Ka-Pa” sound. ¾ 1. 2. To remove the Battery Pack: Slide the Battery Pack Latch to the left. Gently take out the Battery Pack from the computer chassis. 15 Lenovo Portable Computer User Manual Note: Please do not press the computer too hard when you are trying to release the battery pack. It may damage your computer. 3. Memory Module Cover This cover protects the memory modules. Note: Please do not insert the different model of memory module. It may drop the computer performance, and even damage the motherboard. CAUTION: This cover is design for memory expansion convenience, but please do not install additional memory module by yourself. If you need to install additional memory module, please bring your computer to one of our service centres, the professional technician who is qualified by Lenovo will help you. Due to memory compatibility, 16 Lenovo Portable Computer User Manual Lenovo does not guarantee all memory modules are compatible with the computer. 4. Hard Disk Cover CAUTION: Please do not remove or change the hard disk by yourself. If you need to remove or change the hard disk, please bring your computer to one of our service centres, the professional technician who is qualified by Lenovo will help you. 1.2 Turn on/off the power 1.2.1 Open/Close the LCD display panel Slide the LCD display latch to the right, hold and lift up the display panel slowly with your both hands to the best view angle for you. Press the Power Button to turn on the computer, the Power Indicator will glow yellow. 17 Lenovo Portable Computer User Manual When you are closing the display panel, hold the middle-top side and lay down the panel slowly with your both hand until the LCD display panel is close with the main frame and the display latch is restored again. 1.2.2 Starting up for the first time Since the battery is uncharged, when you first time turn on the computer, you have to connect the AC adaptor to your computer. Note: If there’s no external power source connected and the computer uses battery only, it is possible you cannot power on the system because of its low battery, and then you need to plug an AC adapter for power supply. Note: Please use the power cord and AC adaptor which come with the computer. If one of them is damaged, do not use them and contact our service centre for help. CAUTION: Use the wrong AC adaptor may damage your computer. Instruction of connecting the AC adaptor and turning on the computer: 1. Place the computer on a flat and clean surface; 2. Connect the power cord to the computer; 3. Connect the AC adaptor’s DC output plug to the computer’s DC IN socket; 4. Plug the power cord into a live power source which supports the voltage from 100 to 240volts and the frequency of either 50 or 60 hertz. 5. Open the display panel to the right angle and press the power button to turn on the computer. 18 Lenovo Portable Computer User Manual 1.2.3 Turn off the computer Save and close all the open files and exit all the running applications. Click Start -> Turn Off Computer-> Turn Off. Computer will complete the turning off process and shut down the power. Hint: If there is an error happen during the turning off process, System cannot shut down automatically, you can press the power button “ manually. ” for 4~5 seconds to turn off the computer Note: If you are using the Windows operating system, it is advisable to use the operating system to turn off the computer in order to avoid losing data. 1.3 Using Battery Pack 1.3.1 Activate the Battery The battery which comes with the computer is a lithium-ion battery. The battery may contain a little power when you first use. Please operate the computer on the battery power until the battery is fully discharged, then follow the steps below to activate the battery. 1. Uninterruptedly charge the battery for a long time. Hint: Charge more than 6 hours when the computer is off; charge more than 8 hours when the computer is on. Note: 1、Please do not unplug the power connection during the charging. 19 Lenovo Portable Computer User Manual 2、Please only use and charge the battery that comes with the computer. 2. Operate the computer on the battery power until the battery is fully discharged. 3. Do the step 1 and 2 for another two times. The charging time must be longer in the second and third time to ensure the battery reaches the maximum capacity. After the above steps, you can use the battery normally. 1.3.2 Using Battery When your computer does not connect to an external power source, the battery will automatically supply the power for your computer. The fully charged battery’s operating time is about 3~4 hours. (It is based on the maximum of the Battery Mark test result.) The actual operating time varies that based on different factors, such as LCD brightness, system power management property, application, computer peripheral usage, battery accumulative using time, etc. You can plug the adaptor into DC IN Jack to charge the battery. The state of battery charging will display through the battery indicator at front of the computer. Hint: Whether the battery is installed in the computer or not, it always self-discharges. (About 1% a day) If the battery has not been used for a long time, it may have no power due to self-discharge; it is the inherent feature of lithium-ion battery. You should use the external power source or recharge the battery. If you still cannot turn on the computer (the battery indicator also no flash), it means the battery is in self-protection state. Charge the battery for 2~4 hours to activate the battery. Turn on the computer again when the battery 20 Lenovo Portable Computer User Manual indicator flashes. Hint: If you do not use the computer for a long time, please remove the battery pack and store it separately. Note: Charge and discharge the battery at lease once a month to avoid the battery malfunction due to over-discharge. 1.3.3 Battery Initialization After a long time using, the battery’s operating time is much shorter than the first use. The reason is the lithium-ion battery memory effect. You can do the battery initialization to erase part of the memory effect. The battery initialization is the process of fully-charging the battery, fully-discharging and fully-charging it again. Please follow the steps below to perform the battery initialization: ¾ Make sure the computer is turned off,connect the computer to an external power source to charge the battery. ¾ Turn on the computer when the battery is fully-charged. Press [F2] to enter the BIOS setup programme. ¾ Unplug the AC adaptor; let the computer operate on the battery power until it automatically turns off due to end of battery power. ¾ Plug the AC adaptor to fully charge the battery. ¾ Repeat the above steps for 2 or 3 times, you can erase part of the battery memory effect to extend the battery life. Hint:Because the lithium-ion battery has certain operating life, please use the external power source as possible as you can to decrease the using times of battery pack and extend the battery operating life. 21 Lenovo Portable Computer User Manual 1.3.4 Checking the battery status When you are using the battery power, you can get the battery status and the remaining power of the battery through the following ways: 1. Double-click the battery icon at the right-bottom of Windows taskbar (The battery icon only shows when the computer is using battery power by the default setting. The battery status window will pop-up, it shows the battery status and battery remaining power. 2. Hold the mouse on the battery icon at the right-bottom of Windows taskbar (The battery icon only shows when the computer is using battery power by the default setting.), the Windows will display the remaining battery power automatically. ; When the battery power is low,the system will notify the user by sound (BIOS and system should be made related setting), a red “×” mark will appear on the battery icon at the right-bottom of Windows taskbar and a notice window will pop-up to suggest you to connect to a power source in order to avoid losing data. Hint: If the battery icon does not appear at the right-bottom of Windows taskbar, you can adjust the Windows setting to display it. Follow the steps below: Click Start -> Control Panel -> Performance and Maintenance -> Power Option -> Advanced,select “Always show icon on the taskbar”. Click “OK”. 22 Lenovo Portable Computer User Manual Note: The broken lithium-ion battery will pollute the environment and can be dangerous. Please do not dispose the battery as normal trash. Dispose of the battery as required by local ordinances or regulations. Please contact local institutions for disposing details. 1.4 Using the LCD display This computer’s display is 15.4” 16:10 TFT WXGA LCD display, which supports 1280*800,32bit. LCD display brightness can be adjusted by [Fn]+[↑] and [Fn]+[↓]. Note: 1、LCD display is made of glass and easy to break. Please use both hands to hold the left and right side or one hand to hold the up-middle side of the display panel to open and close it gently. 2、Please do not hold only left or right side to open and close the display panel. 3、Please do not open and close the display roughly, it may damage the LCD display. 4、Please do not put object on the LCD back cover or press, hit it. 23 Lenovo Portable Computer User Manual 1.5 Using Keyboard The computer has an 86-key Windows Keyboard. 1.5.1 Using numeric keypad The numeric keypad is the keys with blue numbers and symbols which at the right side of the keyboard. You can press [Fn] + [Scroll LK/Num Lk] to enable the numeric keypad function. When the function is active, the NumLock indicator will grow yellow. You can quickly input serried numbers and characters under the mode. Press [Fn] + [Scroll LK/Num Lk] again to disable this function. 1.5.2 Keyboard shortcut You can use the keyboard shortcut to access some functions quickly: Shortcut Function [Fn] + [ESC] Let the computer into Standby Mode. [Fn] + [F4] Enable/Disable Mute function Change display mode (between LCD [Fn] + [F5] and external display) Enable/Disable numeric keypad [Fn] + [Scroll LK] function [Fn] + [Ins] Use Print Screen function [Fn] + [Del] IRQ under DOS/OS2 Turn up/down the sound [Fn] + [→][←] 24 Lenovo Portable Computer User Manual Increase/Decrease LCD brightness [Fn] + [↑][↓] You also can use Windows Key “ ” to access some window applications or utility: Shortcut Function +E Open Windows Explore +R Open “Run” dialog box Open “Search Results” dialog box Open “Search Results - Computers” dialog + Ctrl + F box (when computer connects to network) +Pause/Break Open “System properties” dialog box If you want to change the keyboard setting, Click Start -> Control Panel -> Printers and Other Hardware -> Keyboard, and change the default setting. +F 1.6 Using Touch Pad Touch Pad is feel sensitive device. It can perform all the functions of a normal mouse. Touch and move your finger on the pad to direct the on-screen pointer. The two buttons below the touch pad performs the same functions as a mouse’s two buttons. Touch Pad Utility: 1. Click: Tap the Touch Pad once to perform the same function as click the mouse 25 Lenovo Portable Computer User Manual left button. Tap twice as double click the left button. 2. Drag and Drop: Move the on-screen pointer on material that you want to move, tap the Touch Pad twice but leave your finger on the pad after the second tap, now you are in Drag and Drop mode (as press and hold the mouse left button). Move your finger away from the Touch pad to stop drag and drop. 3. Scroll Button: It helps you to view the websites and documents more convenient. You can change the Touch Pad setting through Start -> Control Panel -> Printers and Other Hardware -> Mouse, and get more help and examples. Note: Please always keep the Touch Pad and your fingers dry and avoid spilling any liquid on the Touch Pad. Do not expose the Touch Pad under magnetic and radiant environment for a long time. 1.7 Using Optical Media Drive To Load the disc into optical media drive, follow the steps below: 1. Press the drive eject button on the drive door, wait a while, the drawer will come out. Pull out it gently until it is fully opened. 2. Lay the CD/DVD into the drawer, label side up. 3. Press at the center of CD/DVD gently, aim at the optical drive center, until you feel it click into place and CD/DVD can rotate well. 4. Push the drawer and close it gently. Note: When you open or close the optical drive, please do not press the drive drawer. Please close the optical drive when 26 Lenovo Portable Computer User Manual you do not use it. Note: Please do not move the computer when the optical drive is working. The optical drive indicator that is beside the drive eject button will show the optical drive working status. 27 Lenovo Portable Computer User Manual Chapter 2 More understanding After you are familiar with the basic hardware and software operation, the content below will let you get more understanding about your portable computer. 2.1 Set up and maintain the computer 2.1.1 Power management The portable computer has a series of automatic adjustable power-saving facility called power management. Power management will try to change some system components from high power consumption to lower level and ensure the computer execute at higher performance and lower power consumption. This computer has build-in power management. It can force the computer into standby, hibernation mode under pre-defined conditions. Using the power management properly can extend the battery operating time. This computer supports ACPI (Advanced Configuration and Power Interface) power management standard. ACPI also needs the Operating System which supports ACPI (such as: Microsoft Windows Me,Microsoft Windows 2000,Microsoft Windows XP) to take effect. In Microsoft Windows XP and Microsoft Windows 2000, ACPI will write over the BIOS power management setting and take over the computer power management. Please refer to the Microsoft Windows manual for the details or use online support. Under pure DOS system, the BIOS will directly control the power management. 28 Lenovo Portable Computer User Manual 2.1.2 The power management under Windows XP ACPI mode Under the ACPI mode of the Microsoft Windows XP operating system, the system power management will be controlled by the operating system, so all the power management settings can be modified through Control Panel -> Performance and Maintenance -> Power Options. 2.1.3 Turn off the monitor or hard disk You can modify the power schemes to turn off the monitor or hard disk while the system is idle after a certain time, through Control Panel -> Performance and Maintenance -> Power Options. 2.1.4 Standby Mode Standby mode is suspending the system to RAM (STR). Under this mode, the computer will turn off the monitor and hard disk to reduce the power consumption while it is idle more than a certain time. Press the power button will restore the previous work environment. Note: If the AC adaptor and battery pack are both unplugged from the computer while it is in standby mode, all the data that is not saving to the hard disk will lose. In Windows XP, you can enter standby mode by following one of the two ways below: 1. Click Start -> Turn Off Computer -> Stand By. 2. Click Start -> Control Panel -> Performance and Maintenance -> Power Options -> Advanced, then set up how you want the computer to enter the standby mode, “close the lid of portable computer”, “press the power button”, or “press the computer sleep button”. 2.1.5 Hibernation mode 29 Lenovo Portable Computer User Manual Hibernation mode is suspending the system hard disk (STD). It is a very useful facility. It saves all the data of memory and video memory to the hard disk. The next time to turn on the computer, the pervious state will restore. If you are using Microsoft Windows XP or Windows 2000 operating system, you only need to enable this facility through Start -> Control Panel -> Performance and Maintenance -> Power Options -> Hibernate. Under hibernation mode, the system data will save to hard disk and shut down the computer to save the power consumption. After the computer enter hibernation mode, you can press the power button to wake up the computer and restore the previous state. If you enable hibernation facility, when the computer battery is extremely low, the computer will enter the hibernation mode automatically by default setting. You can set up the way of entering hibernation mode for your computer: “close the lid of portable computer”, “press the power button”, or “press the computer sleep button”. To enable hibernation facility, Click Start -> Control Panel -> Performance and Maintenance -> Power Options -> Hibernation, choose “Enable Hibernation”, click “Apply”. Hint: If the PC card does not work properly after the system restore from hibernation mode, please remove and re-install the card and restart the computer. To quit the hibernation mode, please press the power button. Press the keyboard key and touch pad can not quit the hibernation mode. 2.1.6 Set up low power protection: Note: If you do not save your data in time before the battery 30 Lenovo Portable Computer User Manual runs out, and you do not have some related protection setting for this issue, your data will be lost. So we suggest you to read the instructions given below about setting up low power protection. When the battery power is very low, the computer will notice you by sound. You should save all the data to the hard disk immediately and connect the AC adaptor to the computer. If you can not connect the adaptor to the computer, please turn off the computer or let the computer enter hibernation mode. Hint: We strongly suggest you to complete the setting below: ¾ ¾ ¾ Click Start -> Control Panel -> Performance and Maintenance -> Power Options -> Hibernation, choose “Enable Hibernation”, and click “Apply” to enable hibernation facility. Click Start -> Control Panel -> Performance and Maintenance -> Power Options -> Alarms, choose “Activate low battery alarm when power level reaches -- 10%”. Click Start -> Control Panel -> Performance and Maintenance -> Power Options -> Alarms, Click “Alarm Action” in “Critical battery alarm”, in the pop-up window, choose “when the alarm goes off, the computer will Hibernate”, click “OK” in the pop-up window, click “Apply” in the Power Options Properties window. 2.2 Using Multimedia Audio System The computer is equipped with a multimedia audio system including built-in stereo speakers. Audio output jacks and external microphone jacks are at the left side of the computer. You can adjust the main volume with software. You can adjust the speaker 31 Lenovo Portable Computer User Manual volume as desired while you are listening to music or watching movies. Click Start -> All Programs -> Accessories -> Entertainment -> Volume Control. In the Volume Control window, click and drag the bar in the Volume Control column, and slide it up or down to increase or decrease the volume. Note: Since there are several sound sources, such as the fan, hard disk and speakers in the computer, the speakers will scream when the volume is too high. This is caused by the internal speakers’ positive feedbacks and it can be eliminated by decreasing the volume. When you are performing voice recognition tasks, we recommend you to use external microphone, because the inner sound of the computer has certain effect to the internal microphones. 2.3 Setting Display Resolution To view a program at a specific resolution, both the video controller and display must support the program, and the necessary video drivers must be installed. Before you change any of the original display settings, please record the original settings for future reference. Click Start -> Control Panel -> Appearance and Themes -> Change the screen resolution. Use the slider to choose different settings for Color quality and Screen resolution. If you choose a resolution or color palette that is higher than what the display supports, the resolution will automatically adjust to the closest possible setting. 2.4 Connecting IEEE1394 Device 32 Lenovo Portable Computer User Manual IEEE 1394 is a new data transmission standard supported by Windows systems. It can transmit data and digital videos stably and rapidly. Through the IEEE 1394 port, the computer can connect external hard disks, digital cameras and video cameras. 2.5 Connecting to External Display Device Plug the power cord of the display to an AC outlet, connect the display cable to VGA port at the back of the computer and turn on the display. The computer will begin to search for the external display and display the current screen. You can switch the display mode between LCD and external display by pressing Fn + F5. There are three display modes: LCD only, external display only, LCD and external display simultaneously. 2.6 Using PC Card PC card can enhance the computer’s performance without any cost of mobility. The mostly used PC cards include memory cards, Modem, hard disks and LAN cards. PCMCIA defines the industry standard for PC cards. This computer provides a PCMCIA slot for Type II PC cards at its right side. When you need to remove the PC cards, press the eject button besides the slot and pull the PC cards out. Your computer can recognize most popular PC Cards and automatically load the appropriate device driver. If the configuration program tells you to 33 Lenovo Portable Computer User Manual load the manufacturer's drivers, use the floppy disk or CD that came with the PC Card. Removing PC card: Follow the procedures below to remove the PC card: 1. Press the release latch to let it protrude out. 2. Press the latch again to eject the card. 3. Remove the card. CAUTION: Before removing a PC Card, stop it from running from the configuration utility on the taskbar. Failure to do so could result in data loss. Never try to remove a PC Card by pulling on its cable, if one is attached. Note: Some PC cards do not support PnP (Plug and Play) facility; please refer to the user manual before using them. 2.7 Using Card Reader This computer has a 4 in 1 Memory Card Reader. It can read and write the popular Memory Stick/Memory Stick Pro, Secure Digital (SD) and MMC card. So you can easily transfer the data between your computer and digital camera, PDA and MP3 player. 34 Lenovo Portable Computer User Manual Chapter 3 System Configure 3.1 Install Drivers We provide a driver CD with all drivers that you need in the box. You can install drivers from the CD. Please follow the following steps to install drivers on your computer. We assume that the CD-ROM is “E:” Disk. Note: Please adhere to the sequence below, otherwise may compromise the system’s stability and audio or video effect, even cause you to reinstall the operating system. 3.1.1 Install Chipset Driver z Insert the driver CD. z Open “E:\WinXP\Chipset\Setup.exe”. In the appeared installation screen, follow the instruction to start the files copy process. z At the end of installing, restart the computer to complete the installation. 3.1.2 Install Graphic Card Driver z Insert the driver CD. z Open “E:\ WinXP\VGA\Setup.exe”. In the appeared installation screen, follow the instruction to start files copy process. z At the end of installing, restart the computer to complete the installation. 3.1.3 Install Sound Card Driver z Insert the driver CD. z Open “E: \WinXP\Audio\Setup.exe”. In the appeared installation screen, follow the instruction to start files copy process. At the end of installing, 35 Lenovo Portable Computer User Manual select “Yes, I want to restart my computer now” and click “Finish” to restart your computer. z The system will restart to complete the installation. 3.1.4 Install Modem Driver z Insert the driver CD. z Open “E:\WinXP\Modem\Setup.exe”. In the appeared installation screen, follow the instruction to start files copy process and complete the installation. z Please manually restart the system after the installation. 3.1.5 Install LAN Card Driver z Insert the driver CD. z Open “E:\WinXP\LAN\Setup.exe”. In the appeared installation screen, follow the instruction to start files copy process and complete the installation. z Please manually restart the system after the installation. 3.1.6 Install Wireless LAN Card Driver (Optional) Intel B+G Wireless LAN Card Driver z Insert the driver CD. z Open “E:\WinXP\WirelessBG\SetupWLD.exe”. In the appeared installation screen, follow the instruction to start files copy process and complete the installation. z Please manually restart the system after the installation. 3.1.7 Install Touchpad Driver z Insert the driver CD. z Open “E:\WinXP\Touchpad\Setup.exe”. In the appeared installation screen, follow the instruction to start files copy process. At the end of 36 Lenovo Portable Computer User Manual installing, select “Yes, I want to restart my computer now” and click “Finish” to restart your computer. z The system will restart to complete the installation. 3.1.8 Install Card Reader Driver z Insert the driver CD. z Open “E:\WinXP\Reader\Setup.exe”. In the appeared installation screen, follow the instruction to start files copy process. At the end of installing, select “Restart windows now” and click “Finish” to restart your computer. z The system will restart to complete the installation. 3.1.9 Install Easy Button Driver z Insert the driver CD. z Open “E:\WinXP\EasyButton\Setup.exe”. In the appeared installation screen, follow the instruction to start files copy process. z At the end of installing, restart the computer to complete the installation. 3.2.0 Install TV Card Driver z Insert the driver CD. z Open “E:\WinXP\TV Tuner\Setup.exe”. When appeared “Install FlyTV Platinum35 mini2 Drivers”, click “Next”. At the end of installing, click “Finish” to complete the installation. z Please manually restart the system after the installation. 3.2.1 Install E-Manual z Insert the driver CD. z Open “E:\Y100Manual\Setup.exe”. In the appeared installation screen, follow the instruction to start files copy process and complete the 37 Lenovo Portable Computer User Manual installation. z Please manually restart the system after the installation. 3.2 BIOS Setting The BIOS (Basic Input and Output System) Setup program is a menu driven utility that enables you to make changes to the system configuration and tailor the operation of your Notebook to your individual work needs. To enter the BIOS setup utility, please press F2 before the operating system is booted. BIOS Setup Utility is a menu-driven application in English. It is used to change the system configuration based on user’s need. Note: BIOS has a decisive effect on the system’s stability, reliability and security. Please do no change any BIOS setting until you get a comprehensive knowledge about BIOS. Hint: The BIOS setting figures in this book just for examples, the actual settings may be different. 3.2.1 Accessing the BIOS Setup program To access the BIOS Setup program, press the F2 key as soon as the computer starts up and you see the information “Press <F2> to enter SETUP, Press <F10> to enter Boot Menu”. 38 Lenovo Portable Computer User Manual The Menu Bar The top of the Setup screen has a menu bar with the following selections: Use this menu to make changes to the basic system Main configuration Use this menu to enable and make changes to the Advanced advanced features available on your system. Security Use this menu to set User and Supervisor passwords. Use this menu to specify the order in which the Boot Notebook is to check for a device to boot the system. Exit Use this menu to specify how to exit the Setup program. To move between menu bar items, use the [←] and [→] arrow keys until the desired item is highlighted. To call up a submenu, simply move the highlight to the desired field and press the [Enter] key or [↓] arrow key. The submenu opens. To leave submenu and back to menu bar, press [ESC] key. Hint: At the bottom of the Setup screen, you will notice an item specific help bar. For each item that you select on the menu, the bar informs of its specific function as well as the hot keys related specifically to that item and/or submenu. If you accidentally make unwanted changes to the current configuration, 39 Lenovo Portable Computer User Manual go to the Exit menu and select Discard Changes. 3.2.2 The Main Menu When the Setup program is accessed, the Information screen appears. It displays the following pieces of information regarding your current system: BIOS Version Reports the current version of the BIOS. Displays the model name of the hard disk of the Hard Disk default boot drive. DVD/CD-ROM Displays the model name of the default optical Device disc drive. System Lists the processor model name and CPU speed. Memory Lists the Base and Extended memory sizes. Use the down key to select the Main Menu. 3.2.2.1 Date and Time Set your system to the time that you specify (usually the current time). The format is hour, minute, and second, using the 24-hour clock. Insert the appropriate information. 40 Lenovo Portable Computer User Manual 3.2.2.2 Enable/Disable Quiet Boot This option allows you to display a screen logo immediately upon boot up while the system checks itself. This appears before the actual operating system is loaded. Press the [Enter] bar to select enable/disable quiet boot. When the facility is on, a checkmark √ appears next to the item. You can enable quiet boot to display a screen logo. 3.2.3 The Advanced Menu Selecting Advanced on the menu bar displays the Advanced Menu. This menu allows you to configure the Notebook's ports options. 3.2.3.1 USB Supports by BIOS Enables or disables legacy USB device support. Use the [Enter] bar to select the USB Supports by BIOS option or not. 41 Lenovo Portable Computer User Manual 3.2.4 The Security Menu The Notebook's advanced security system allows you to set a password to prevent unauthorized access to system resources, data, and the BIOS Setup program. Selecting Security from the menu bar displays the Security menu. The BIOS Setup program allows you to specify passwords in the Security menu. The passwords control access to the BIOS and certain Security menu options during system startup. When you choose your password, it should be composed of characters A-Z, 0-9 and ten characters in length. Note: The administrator password must be set before the user 42 Lenovo Portable Computer User Manual password can be set. 3.2.4.1 Set User Password… / Set Admin Password… These fields allow you to set the System Password. The System Password allows full access to the BIOS Setup menus. To set the Admin password, highlight this field and press [Enter]. Type the password and press the [Enter] key. To confirm the password, type the password again and press the [Enter] key. The administrator or user password is now set, and now you can choose when to verify the password – either when you the boot the system, or when a person enters Setup. 3.2.4.2 Password on Boot This allows you to specify whether a password is required upon booting the machine, or not. Press [Space] key to select Enabled to require a password, and Disabled when you don’t require one. Hint: To change or clear a password, enter the submenu again. You will need to enter the administrator password, after which you can create a new one or set the password verification options. 3.2.5 The Boot Menu The Boot Menu allows you to specify the order in which the Notebook checks for a device to boot the system. Bootable devices include: floppy 43 Lenovo Portable Computer User Manual disk drives, hard disk drives, Network Boot, and optical disc drives. To make changes, select Boot from the menu bar. Boot Sequence The Boot Sequence option allows you to alter the priority the system uses to search for the boot device on system power up according to numerical order. Press the [←], [→], [↑] and [↓] arrow keys to select first, second, or third boot device. Use keyboard “Page Up” & “Page Down” to select the First, Second, and Third boot devices. 3.2.6 The Exit Menu Once you have made all of your selections from the various menus in the Setup program, you should save your changes and exit Setup. 44 Lenovo Portable Computer User Manual Hint: Pressing the [Esc] closes an open menu or submenu. Pressing it again saves the current parameters and reboots the computer. 3.2.6.1 Save and Exit Once you have finished making your selections, choose this option from the Exit Menu to ensure the values you selected are saved to Non-Volatile RAM. Once your selections have been saved, the Setup program asks you to confirm your choice, and then reboot the computer. System will reboot if OK is selected and will stay in Setup if Cancel is selected. Hint: If you attempt to exit the Setup program without saving your changes, the program will prompt you with a message asking if you want to save your changes before exiting. 3.2.6.2 Exit (No Save) This option can be used if you do not want to save the changes you have made to the Setup program. The default is set to No. If you have made changes to the fields other than system date, system time and password, the system will ask for confirmation when choosing Exit (No Save). 45 Lenovo Portable Computer User Manual The system reboots using the original Setup values. 3.2.6.3 Default Settings This option allows you to load the default values for each of the parameters on the Setup Menus. When this option is selected, a confirmation message appears. The system will remain in Setup after either selection. 3.2.6.4 Restore Settings Restores the Setup program’s values to the ones it had when you entered the program during the boot sequence. 46 Lenovo Portable Computer User Manual 3.3 Hardware Specifications and Component Standard Note: The configuration is subject to prior sale, below only for your reference. CPU z Intel Pentium-M Dothan/Celeron CPU z µFCPGA encapsulation Chipset z North Bridge: Intel 915GM z South Bridge: Intel ICH6-M System RAM z Support DDRII RAM z Upgradeable to 2GB Memory by two sets of 1GB SODIMM Hard Disk Drive (HDD) z 2.5 inch (9.5 mm) hard disk for portable computer use. Optical Disk Drive (ODD) z 12.7mm DVD-Combo (DVD/CDRW) z 12.7mm DVD-ROM Audio 47 Lenovo Portable Computer User Manual z AC'97 CODEC z Build-in 2 speaker Display z Color 15.4” 16:10 WXGA TFT-LCD, 1280*800 z Intel 915GM model with integrated video card Keyboard z 86-Key Windows Keyboard Expansion z One DC IN Jack z One Headphone Jack z One Microphone-in Jack z One VGA Port z One Modem Jack (RJ-11) z One LAN Jack (RJ-45) z One TV-Antenna Port z One Audio/S-Video In Port z One S-Video Out Port z Three USB (2.0) Ports z One IEEE 1394 (4pin) Port z One TypeII PCMCIA Slot z One 4 in 1 Card Reader (Memory Stick/Memory Stick Pro, MultiMedia Card, Secure Digital) Communication Device z Build-in 10M/100M Ethernet Card z Build-in 56Kbps Modem Weight and Size z Weight (not including battery pack): 2.55 Kg (Weight may vary with different configurations.) 48 Lenovo Portable Computer User Manual z Size: 360 x 265 x 32.2 ~35 mm Power z Battery (Li-ion 4300mAh 8cell) z Adapter (Input: 100~240V, 50~60Hz; Output: 19V, 3.42A) 49 Lenovo Portable Computer User Manual Chapter 4 Technical Support and Customer Service 4.1 Kindly Remember Note: Please use your Lenovo portable computer in compliance with the instructions in this manual, for example, conditions and environment requirements. If you violate any requirement in any purpose, in this situation, Lenovo will not guarantee the computer’s performance, stability, reliability and security and you have to carry all the related risks alone. Please regularly backup you critical data which is in the portable computer to ensure the data safety and security. 4.1.1 Take care of using the computer z Do not disassemble the computer. Please contact your supplier immediately when you encounter a problem. z Do not place any heavy objects on the LCD cover. z The LCD is easy to make scratch. Do not wipe the LCD with paper or touch it with fingers or pens. z We strongly recommend you to select Turn Off the Display Automatically in Power Management to extend the LCD’s life. z Please cover the external ports with the attached cover when you do not use them to avoid dust and static electricity. z Please regularly backup you data to avoid data loss. 4.1.2 Environmental Requirements z Please keep the temperature around the computer in the range of 10-35 50 Lenovo Portable Computer User Manual z z z z z ℃ while you are using the computer. Do not use the computer in a humid, extremely hot or cold, vibrating, under direct sunshine or dusty environment. The slots and opening on the shell of the computer are used for ventilation. Please do not jam or cover these slots and openings to prevent the computer from being over heated. Please do not place the computer on bed, sofa or other similar places; otherwise these ventilation slots may be jammed. Please keep the computer at least 13cm away from electric appliances which have strong magnetic radiations such as TV set, refrigerator, motor or large speakers. Please do not move the computer from a cold environment to a warm place suddenly. When the temperature difference is over 10 ℃ , condensation phenomenon will happens inside the computer and damage storage media. Do not place the computer on an unbalanced surface. 4.1.3 Cleaning Your Computer z Do not clean your computer when it is on. z Please wipe the shell of the computer with a soft cloth. z Please use a soft cloth that does not leave any crumbs to clean the LCD. Do not use soap or detergent. z Dusts or stain will compromise the touchpad’s sensitivity. Please eliminate them with viscid tape. 4.1.4 About the Battery z Please recharge the battery only after the power has run out and fully recharge it in one time. Do not stop recharging or start discharging when the battery is still under recharging. This helps keep your battery 51 Lenovo Portable Computer User Manual in an optimized status. z If you will leave your computer unused for a long time (over 2 weeks), please plug out the battery. z Please place the battery in a place far away from conductive objects (e.g. water or metal) to prevent the battery from being short circuit. z Do not place the battery separately from the computer and without recharging for over 6 months. 4.1.5 For Outdoor Using z z z z z z z z z Please backup you critical data before you take you computer outdoors. Ensure that the battery is full. Be sure to turn off the power and close the LCD well. Do not leave anything between closed LCD and keyboard. When you leave the computer in your car, please place it on the back seat to avoid being insolated. Carry the AC adapter and power cord with the computer. Do not place the computer in the trunk and consign it by rail, but carry it yourself. For airport safety check, we recommend you to choose the X-ray machine (the machine to check your personal luggage) to check your computer and disks and avoid magnetic detectors (including the arch-like machine and handheld detectors in the hands of safety investigators). When going abroad, please know the power cord standard in the target country before you go. 4.1.6 Do not Change the Factory Hardware Specification Without Authority z Please do not change the computer’s factory hardware specification, 52 Lenovo Portable Computer User Manual including removing original hardware or adding new hardware, without authority from Lenovo licensed agencies. z Lenovo has no warranty on the usability or reliability of any devices or software that are not provided by Lenovo or its affiliates. 4.2 Troubleshooting 4.2.1 The computer does nothing when you turn it on. Please do as follows: z See if the AC adapter and its power cord are well connected to the computer and power outlet. z Check the battery’s power status (some battery has a power self-checking button). See if the battery interface is defiled or if the power cord plug is defiled. z Use the battery and AC power to power the computer respectively. Turn the computer on to see is the power indicator is on. z If you the methods above do not work, please contact Lenovo licensed service agencies. 4.2.2 You can turn on the computer but can not start the system. z If you hear a series of beeps, it means that there are system errors. Please contact Lenovo licensed service agencies. z If the computer shows the screen of logo, but cannot boot the operating system or reports errors when the system is booted, please see if there is a floppy disk in the floppy drive. z If the computer shows the screen of logo, but cannot boot the operating system or reports errors when the system is booted, please restore the operating system. z Enter the BIOS Setup Utility, restore it settings to default configuration 53 Lenovo Portable Computer User Manual and save it. Restart the computer. 4.2.3 The computer halts or reports error when you install software or applications from CD or other storage media. z Check the surfaces of the CD or other storage media. Try the CD or other storage media in other portable computers. z Read the user manual of the software you want to install, and see whether it is compatible with the operating system on you computer. z See if your computers hardware can meet the hardware requirements of the software. z See if you have shut down other running applications, such as anti-virus software, real-time network monitoring applications, when you are installing the software. z See if your computer in connected to Internet. z See if the software you are installing is licensed and qualified one. 4.2.4 The printer can not be installed and print. z See if the cable between the printer and computer is connected well. z See if the printer’s power is turned on and if the printer is in a normal working status. z Read the user manual of the printer and configure the printer and computer in compliance with the requirements in the manual. z See if the computer port connected with the printer is disabled in BIOS. z See if the computer’s port configuration meets the requirements of the printer. You can check this in BIOS and in the operating system. For example, some Ir-port printer’s transmission speed is different with the computer’s Ir transmission speed. z See if your printer can print normally when it is connected with other portable computers. 54 Lenovo Portable Computer User Manual z See if a printer of other model can print normally when it is connected with you portable computer. If the methods above do not work, please contact Lenovo licensed service agencies. 4.2.5 A peripheral device or an electronic device can not work when it is connected to the computer. z See if the cable between the device and the computer is well connected. z See if the device is turned on and in a normal working status. z Read the user manual of the device and configure it and your computer in compliance with the requirements in the manual. z See if the computer port connected with the electronic device is disabled in BIOS. z See if the port configuration and electric standard meets the requirements of the device or be compatible with it. z See if device can work normally when it is connected with other portable computers. z See if a device of other model can work normally when it is connected with you portable computer. If the methods above do not work, please contact Lenovo licensed service agencies. 4.2.6 You can not dial-up with the computer. z See if the telephone line is well connected to the Modem port on the computer. z See if you have hung up your telephone and extensions. z If you are using ISDN, see if the ISDN devices are working well. z See if your telephone line is working well and can dial an outside number. z If you are using an extension line in a hotel or other places, see if the they support dial-up Internet access service. 55 Lenovo Portable Computer User Manual Note: Some telephone line devices may use different standards from normal lines. It may cause compatibility problem when you want to access the internet by dial-up. If your computer can dial-up with normal telephone, it would mean that the computer works well. 4.2.7 The computer reports error or halt when running some programs. z See if these programs are normally installed and some files in these programs are not deleted by accident. z See if the hardware configuration of the computer meets the lowest operating requirement of these programs. z Please read the user manual of the software and make sure the software environment for these programs’ operation. z Please read the user manual of the software and make sure other peripheral devices called during the operation of these programs can operate normally. z Shut down other operating software so as to remove conflicts among software. z If the software can’t operate normally, uninstall it. Restart the computer and install it once more. 4.2.8 Battery service time is too short z See if it’s charged fully. z See if the battery hasn’t been used for a long time since it’s fully charged. Please recharge it and try again. z See if the battery interface is defiled. z Please protect the battery according to chapters before. 56 Lenovo Portable Computer User Manual z It’s the chemical feature of battery that its service time will shorted after charge and discharge time after time. It’s a normal phenomenon. z If there are still problems, please contact Lenovo licensed service agencies. 4.2.9 LCD is black z See if your computer is in Hibernate mode. z See if you have made the following configuration for Power Management: shut down LCD screen after some time. z See if your computer has connected to any external display device and you have switched to it. 4.3 Service Support System Except the maintenance and troubleshooting actions we recommend, we strongly recommend: Do not disassemble your computer; do not maintain, repair or restructure the computer by yourself or by agencies that are not licensed by Lenovo. Please contact Lenovo licensed service agencies for maintenance and repair services. You can get free or charging services on the basis of Lenovo’s service policies. You also can contact the following service support systems of Lenovo to get more service information. Telephone number: 1800 425 3324. Note: The above contact information is subject to change. If there is any change, we’ll not give any notification additionally. Please conform to the latest telephone numbers, web site address or addresses released by Lenovo Group. Please keep the manual well for future usage! 57