1
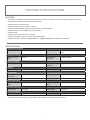
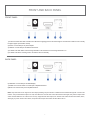
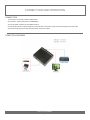
ANI-5.1CH
HDMI 2CH/5.1CH Audio Extractor
INSTRUCTION MANUAL
Frisco, Texas 75034
(317) 456-2461
TABLE OF CONTENTS
CONTENTS
Introduction and Contents ...................................................1
Features and Specifications .................................................2
Front and Back Panels ............................................................3
Connection and Operation ....................................................4
DISCLAIMERS
The information in this manual has been carefully checked and
is believed to be accurate. We assume no responsibility for any
infringements of patents or other rights of third parties which may
result from its use.
We assume no responsibility for any inaccuracies that may be
contained in this document. We make no commitment to update
or to keep current the information contained in this document.
We reserve the right to make improvements to this document
and/or product at any time and without notice.
COPYRIGHT NOTICE
No part of this document may be reproduced, transmitted,
transcribed, stored in a retrieval system, or any of its part
translated into any language or computer file, in any form or by
any means—electronic, mechanical, magnetic, optical, chemical,
manual, or otherwise—without express written permission and
consent
© Copyright 2011. All Rights Reserved.
Version 1.1 September 2012
TRADEMARK ACKNOWLEDGMENTS
All products or service names mentioned in this document may
be trademarks of the companies with which they are associated.
SAFETY PRECAUTIONS
Please read all instructions before attempting to unpack, install or operate this equipment and before connecting the power supply. Please
keep the following in mind as you unpack and install this equipment:
• Always follow basic safety precautions to reduce the risk of fire, electrical shock and injury to persons.
• To prevent fire or shock hazard, do not expose the unit to rain, moisture or install this product near water.
• Never spill liquid of any kind on or into this product.
• Never push an object of any kind into this product through any openings or empty slots in the unit, as you may damage parts inside
the unit.
• Do not attach the power supply cabling to building surfaces.
• Use only the supplied power supply unit (PSU). Do not use the PSU if it is damaged.
• Do not allow anything to rest on the power cabling or allow any weight to be placed upon it or any person walk on it.
• To protect the unit from overheating, do not block any vents or openings in the unit housing that provide ventilation and allow for
sufficient space for air to circulate around the unit.
INTRODUCTION & CONTENTS
INTRODUCTION
It is known that the most benefit of the HDMI is to integrate the audio and video signals together. This integration makes all of us enjoy the
high quality of the audio and video effect. Awfully the bad effect of the HDTV audio deprives the basic right of the enthusiasts. Fortunately,
we develop this new product eventually, not only to meet the ideal image of the HDTV but also to meet the need of the enthusiasts’
requirement for audio. Because it can extract the audio signal from the HDMI interface, then transmit audio to the Amplifier Receiver by
SPDIF or Stereo.
PACKAGE CONTENTS
ANI-5.1CH
Audio De-Embedder
Mounting Brackets
Users Guide
AC/DC Adapter: 110VAC North American plug ; 5VDC, 2000mA
1
FEATURES & SPECIFICATIONS
FEATURES
• This HDMI Audio Splitter has many features that enable it to perform in a superior manner. Among those features you will find:
• Supports audio output simultaneously: SPDIF and Stereo.
• Supports 2.0CH/5.1CH audio switch.
• Supports the highest video resolution to 1080p.
• Supports 225MHz/2.25Gbps per channel (6.75Gbps all channel) bandwidth.
• Supports 12bit per channel (36bit all channel) deep color.
• Supports HDCP
• Supports uncompressed audio such as LPCM.
• Supports compressed audio such as DTS Digital, Dolby Digital.
• Support 3D all format, including [email protected]/24Hz, [email protected]/60Hz/50Hz, bandwidth up to 225MHz
SPECIFICATIONS
Inputs/Output Connector
Input Connector
HDMI Female
Output Connector
HDMI Female, Toslink, Coaxial, 3.5mm
Stereo
50/60Hz
Video Amplifier
Bandwidth
2.25Gbps/225MHz
480i, 576i,1080i
Progressive
(50&60Hz)
480p, 576p, 720p,1080p
Operating Frequency
Vertical Frequency
Range
Resolutions (HDTV)
Interlaced (50&60Hz)
Warranty
Limited Warranty
1 Year Parts and Labor
Environmental
Operating
Temperature
0 °C to +70 °C / 32°F to +158°F
Storage Temperature
-10 °C to +80 °C/ 14°F to +176°F
Operating Humidity
10% to 80 % RH (no condensation)
Storage Humidity
5% to 90 % RH (no condensation)
5V DC @2A
Power Consumption
(max)
2.5W
FCC,CE,UL
Power Supply
UL,CE,FCC
US standard, UK standard and so on
User Manual
1 x English
Power Requirement
External Power
Supply
Regulatory Approvals
Converter Unit
Accessories Adapter
AC Power Adapter
Note: Specifications are subject to change without notice. Weight and dimensions are approximate.
2
FRONT AND BACK PANEL
FRONT PANEL
1) Power and Active LED: With a double color LED when supplying power to this unit the light is red and when it starts to work normally
the light is purple (red and blue mixed).
2) DC/5V: Connect this port to power adapter.
3) HDMI In: Connect this port to HDMI source device.
4) 2.0CH/5.1CH LED: When 2.0CH is being selected it is off and when 5.1CH is being selected it is on.
5) 2.0CH/5.1CH button: Pressing “button” to switch 2.0/5.1CH manually.
BACK PANEL
6) HDMI Out: Connect this port to HDMI Display.
7) SPDIF Out: Connect Toslink or Coaxial port to Amplifier Receiver.
8)Stereo Out: Connect this port to Amplifier Receiver.
Note: Only when the source supports 5.1CH output (including CD), this function is effective and it realizes through the 2.1CH/5.1CH
buttons. The product default output is 5.1CH, and LED turns on at the time. Press the button a time again, the product outputs 2CH
audio and the LED turns off. If the source can only supports 2CH audio output, the “2CH/5.1CH” button will become invalid, that is,
although you press “2CH/5.1CH” button, the product still outputs 2CH audio and the LED is still on.
3
CONNECTION AND OPERATION
CONNECTION
1) Connect the input of this product to HDMI Source.
2) Connect the output of this product to HDMI Display.
3) Connect SPDIF or Stereo port to Amplifier Receiver.
4) Insert the DC side of 5V power supply into the unit and then connect the AC side of the power supply into the wall outlet.
5) Select the Audio output you want through pressing “2CH/5.1CH” button.
CONECTION DIAGRAM
END OF DOCUMENT
4