1
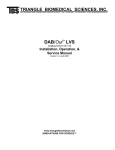
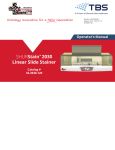
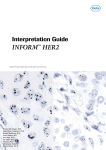
TRIANGLE BIOMEDICAL SCIENCES, INC. 3014 CROASDAILE DRIVE • DURHAM, NORTH CAROLINA 27705-2507 • USA • 919.384.9393 • FAX 919.384.9595 • E-MAIL: [email protected] HistoPro 3030 H & E Stainer Operator’s Manual v1.0 www.trianglebiomedical.com INNOVATIONS FOR SCIENCE™ TABLE OF CONTENTS Chapter 1 Introduction .................................................................................................................................. 4 Warranty Information ................................................................................................................. 4 Definition of Various Symbols ................................................................................................... 5 Product Description .................................................................................................................... 6 Functional Description of Parts .................................................................................................. 7 Chapter 2 Specifications ............................................................................................................................. 11 Electrical Characteristics .......................................................................................................... 11 Physical Characteristics ............................................................................................................ 11 Environmental Conditions ........................................................................................................ 12 Installation Category ................................................................................................................. 12 Pollution Degree ....................................................................................................................... 12 Chapter 3 Installation Instructions .............................................................................................................. 13 Safeguards ................................................................................................................................. 13 Inspection .................................................................................................................................. 14 Components Checklist .............................................................................................................. 14 Installation Procedures .............................................................................................................. 14 Chapter 4 Operating Instructions ................................................................................................................ 15 Operating the HistoPro 3030 Stainer ........................................................................................ 15 Set-Up Procedure .................................................................................................................. 15 Operating Procedure ............................................................................................................. 15 Shutdown Procedure ............................................................................................................. 15 Welcome Screen ....................................................................................................................... 16 Changing Default Settings ........................................................................................................ 18 Time Settings ........................................................................................................................ 18 Agitation Setup ..................................................................................................................... 19 Temperature and Flow Adjustments ..................................................................................... 20 Security and Passwords......................................................................................................... 20 Chapter 5 Programming .............................................................................................................................. 23 Creating Programs .................................................................................................................... 23 Editing Programs ...................................................................................................................... 30 Deleting Programs .................................................................................................................... 32 Copying Programs .................................................................................................................... 32 Importing and Exporting Programs .......................................................................................... 32 Chapter 6 Running Programs ...................................................................................................................... 34 Loading Racks .......................................................................................................................... 34 Run Time Status Display ......................................................................................................... 36 Unloading Racks ....................................................................................................................... 37 Cancelling Racks ...................................................................................................................... 38 Running Multiple Racks ........................................................................................................... 40 Chapter 7 Maintenance ............................................................................................................................... 41 Routine Maintenance ................................................................................................................ 41 Cleaning Procedures ................................................................................................................. 41 Charcoal Filter Replacement..................................................................................................... 41 Service Mode ............................................................................................................................ 43 Chapter 8 Spare Parts and Accessories ....................................................................................................... 44 www.trianglebiomedical.com INNOVATIONS FOR SCIENCE™ Page 2 www.trianglebiomedical.com INNOVATIONS FOR SCIENCE™ Page 3 CHAPTER 2 INTRODUCTION Warranty Information Triangle Biomedical Sciences, Inc. (TBS) HistoPro 3030 products are warranted against defects in materials and workmanship, under their prescribed use and operating conditions, for a period of twelve months from the date of shipment. TBS will repair or replace products that prove to be defective within the warranty period without charge when shipped prepaid to the TBS office. If the product is not registered by filling out and sending the warranty card to Triangle Biomedical Sciences, Inc., it will be warranted for a period of twelve months from its manufacturing date. Warranty Exceptions Consumables – bulbs, fuses, and other items of an expendable nature are not covered under this agreement. User’s failure to provide ample electrical power at constant voltage, consistent with the specifications of the product. Scratches, dents, and similar surface finish damage during normal use of the system are not covered under this agreement. Misuse and unauthorized repairs or alterations are not covered under this agreement. Acts of nature such as lightning strikes and floods are not covered and should be covered under owner’s separate insurance policy. All TBS products are sold on the condition that they be used and disposed of only within the scope of currently recognized, critical standards related to human health and the physical environment. EXCEPT FOR THE WARRANTY ABOVE, TBS MAKES NO OTHER WARRANTY OF ANY KIND WITH REGARD TO ITS PRODUCTS WHETHER EXPRESS, ARISING BY OPERATION OF LAW, OR IMPLIED BY COURSE OF DEALING, USAGE OF TRADE, OR OTHERWISE, INCLUDING WITHOUT LIMITATION THE IMPLIED WARRANTIES OF MERCHANTABILITY AND FITNESS FOR A PARTICULAR PURPOSE. TBS SHALL NOT IN ANY CIRCUMSTANCE BE LIABLE FOR ANY SPECIAL, INDIRECT, INCIDENTAL, OR CONSEQUENTIAL DAMAGES. Contact our Product Service Department for more information regarding your warranty. Product Service Department Triangle Biomedical Sciences, Inc., LLC. 3014 Croasdaile Drive Durham, NC 27705 Phone: (919) 384-9393 www.trianglebiomedical.com INNOVATIONS FOR SCIENCE™ Page 4 Definition of Various Symbols ! Attention, Consult accompanying documents. This symbol is used to direct the user to refer to the documents for additional information regarding the system use or description. Caution: Electric Shock Hazard. Disconnect Line Cord before Servicing. Refer Servicing to Qualified Service Personnel. Hot Surface. Surfaces may be very hot to the touch. www.trianglebiomedical.com INNOVATIONS FOR SCIENCE™ Page 5 Product Description The HistoPro 3030 continuous load slide stainer offers flexibility and programmability for routine and special stains of samples mounted on glass slides. This bench top unit contains 30 stations. Specific functions of some of these stations are as follows. Station Number How Many 30 1 21, 22 2 5, 6, 7, 8 4 9 1 10, 20 2 Function* Load Station Unload Stations Rinse Stations, Manual Flow Control with a common inlet Rinse Station, Manual Flow Control with an independent inlet Heating Stations * It should be noted that all the heating stations and rinse stations can be configured as reagent stations. The stations are numbered from left to right and from the back row to the front row. Stations 110 are located in the back row, stations 11-20 are in the middle row and 21-30 are located in the front row. This manual covers information about initial set up, programming test protocols, and slide staining processing operations only. The details of the functions to be performed by the qualified service technicians are provided in the Service Manual (Part # A12536). The operator interface is quite intuitive; however several sample tasks are described to minimize the learning curve. Due to the continuous improvement of the product software, it is possible that some of the newer product features are not described in this version of the manual or they may operate differently. If you have any questions or comments about the information provided in this manual, please contact our Product Service Department at 919-384-9393 or send an email to [email protected]. www.trianglebiomedical.com INNOVATIONS FOR SCIENCE™ Page 6 Functional Description of Parts (Refer to Figure 2-1: HistoPro 3030 Front View, Figure 2-2: HistoPro 3030 Functional Areas and Figure 2-3: HistoPro 3030 Rear View) The HistoPro 3030 H & E Slide Stainer has the following functional areas. Reagent Stations: Rinse Stations: Stations 1-4, 11-19, 23-29 Stations 5-8 with a common water inlet and station 9 with a separate water inlet. Load Stations: Station 30 Unload Stations: Stations 21 and 22 Flow Control Valves: Flow Control Valves can control the flow rate of the rinse water. Each rinse station has its own dedicated valve. The water flow can be completely shut off to any station if you desire to use it as a regular reagent station. Heating Stations: Stations 10 and 20 are used for heating the slides. The heater at the heating station will not turn ON if you select ambient temperature for a given program step in the heating station. This will allow you to use the heating station as a regular reagent station. Up/Down Mechanism: The slide rack mounts on the bracket mounted on this mechanism. At times, this mechanism is referred to as Z-axis mechanism also. In / Out Mechanism: The up/down mechanism mounts on this mechanism. At times, this mechanism is referred to as Y-axis mechanism also. Charcoal Filter: The charcoal filter is located behind the top left bezel. To access the filter pull the bezel straight out in the front. Computer /Display: The Active Matrix Display provides the information about the status of the system. With the touchpad on the display, you can program, run and maintain the unit with ease. Rinse Water Inlets: There are two water inlets in the rear of the unit. Looking from the back of the unit, the inlet located to the extreme right feeds water to stations 5, 6 7 and 8 simultaneously. When a slide rack is programmed to be in any of these stations, the water will flow through all the stations. The second inlet to the left of this common inlet feeds only to station 9. This allows you to use DI water, distilled water or any other specialized buffer to be fed in only one station while using tap water for all other rinses. Drain Connection: You can use standard 1-1/4” drain pipe from your local hardware store to provide proper drainage of the rinse water and any spills. Please do ensure that the drain water flows freely to the sink and the drain plumbing is free of kinks and is always at a level below the stainer bottom. www.trianglebiomedical.com INNOVATIONS FOR SCIENCE™ Page 7 Bezel Door for Charcoal Filter Unload Drawer 1 Station 21 Computer and Display Unload Drawer 2 Station 22 Load Drawer Station 30 Figure 2-1: HistoPro 3030 Front View www.trianglebiomedical.com INNOVATIONS FOR SCIENCE™ Page 8 Rinse Station with an Independent Water Inlet Heating Station 1 Heating Station 2 4 Rinse Stations With Manual Flow Control Up / Down Mechanism Flow Control Valves In / Out Mechanism Pick Up Arm Figure 2-2: HistoPro 3030 Functional Areas www.trianglebiomedical.com INNOVATIONS FOR SCIENCE™ Page 9 Rinse Water Inlet, Feeds Stations 5-8 Drain Connection, Accepts 1-1/4” PVC Drain Pipe Rinse Water inlet, Feeds Station 9 only. Figure 2-3: HistoPro 3030 Rear View www.trianglebiomedical.com INNOVATIONS FOR SCIENCE™ Page 10 CHAPTER 3 SPECIFICATIONS Electrical Characteristics Power Input Voltage: Current: Power: AC, 100-115 volts or 230 volts (Factory set for either 100-115 volts or 230 volts operation, not user changeable), 50 or 60 Hz 10 Amps max for 120 volts input, 8 Amps max (RMS) for 230 volts input 1200 watts max Fuse Rating 10 Amp x 250 volts Time Delay (Slo-Blo) fuse for 115 volts units 8 Amp x 250 volts Time Delay (Slo-Blo) fuse for 230 volts units Display/Programmability Display: Screen: Number of programs: Number of steps/program: Active matrix TFT 6.5” display Resistive touch pad 50 50 Physical Characteristics Dimensions Width: 34" (85 cm) Depth: 25" (63 cm) Height: 18" (48 cm) Weight Actual Weight: 65 lbs (30 kg) Capacity Number of Stations: Number of Rinse Stations: Rinse Water Flow Control: Number of Rinse Water Inlets: Number of Load Station: Number of Unload Stations: Reagent Container Volume: Slide Carrier Capacity: Drying Station Temp. Range: 30 5 (user selectable) Separate manual control for each Rinse Station 2 (one inlet feeds four stations, the second inlet feeds one station) 1 2 350 ml 30 slides 40o C – 70o C www.trianglebiomedical.com INNOVATIONS FOR SCIENCE™ Page 11 Environmental Conditions All HistoPro 3030 products are laboratory instruments and should be used in Medical/HistoPathology laboratory environments with the following conditions. Ambient Temperature: Relative Humidity: Ambient Pressure: 62 o F to 90 o F (17 o C to 32o C). 20-85% non-condensing. 29”-31” (74-79 mm) of Hg Installation Category In reference to Installation category as defined in UL 61010-1 standard, HistoPro 3030 products are categorized as Category II systems. Pollution Degree In reference to Pollution Degree as defined in UL 61010-1 standard, HistoPro 3030 products are categorized as Pollution Degree 2 systems. www.trianglebiomedical.com INNOVATIONS FOR SCIENCE™ Page 12 CHAPTER 4 INSTALLATION INSTRUCTIONS Safeguards Before doing anything, read this ! Please read all the instructions and retain for future reference. Follow all warnings and instructions marked on the stainer. 1. Read Instructions All the safety and operating instructions should be read before the stainer is operated. 2. Retain Instructions The safety and operating instructions should be retained for future reference. 3. Read Warnings All warnings on the stainer and in the operating manual should be followed. 4. Follow Instructions All operating and use instructions should be followed. 5. Attachments Do not use any attachments not recommended by the product manufacturer as they may cause hazards, damage the stainer, and void the warranty. 6. Accessories Do not use any accessories not recommended by the product manufacturer as they may damage the stainer and void the warranty. 7. Power Sources This product should be operated from the type of power source indicated on the marking label and in the instructions. 8. Grounding This product is equipped with a grounded three-wire plug. 9. Power-Cord Protection Power-supply cords should be routed so that they are not likely to be walked on or pinched by items placed upon or against them. Pay particular attention to cords at plugs, receptacles, and the point where they exit the stainer. 10. Overloading Do not overload wall outlets and extension cords as this can result in a risk of fire or electric shock. 11. Servicing Do not attempt to service this stainer yourself as opening or removing covers may expose you to dangerous voltage or to other hazards. Refer all servicing needs to qualified service personnel. 12. Replacement Parts When replacement parts are required, be sure the service technician uses replacement parts specified by the manufacturer. Unauthorized substitutions may result in fire, electric shock or other hazards. www.trianglebiomedical.com INNOVATIONS FOR SCIENCE™ Page 13 Inspection The HistoPro 3030 is carefully quality controlled prior to shipping. The highest quality packaging materials have been used to ensure that the equipment is well protected during shipping. Please follow these inspection instructions carefully. Carefully inspect the outer carton for any visible damage. If any damage is noticed, contact the shipping carrier and file a damage report before unpacking the stainer. Failure to report visible damage may forfeit any claims for internal damages. Inspect the system for any visible damage. If any shipping damage is visible, retain all packing material intact with the stainer and file a claim with the final carrier. Discarding any packaging materials prior to the carrier’s inspection may void any shipper liability. Components Checklist Each HistoPro 3030 stainer comes with the following components. If an item is missing, please contact Triangle Biomedical Sciences, Inc. Customer Service immediately at (919) 384-9393. Item HistoPro 3030 Stainer Power cord Operator’s Manual with Warranty Registration Card Reagent Containers Reagent Container Lids Drying vessels (for heater station) Slide Rack Computer (to be installed to the Stainer by the user) Charcoal Filter (Pre-installed) Quantity 1 1 1 23 23 2 2 1 1 Installation Procedures 1. 2. 3. 4. 5. 6. 7. 8. 9. Follow the instructions provided as “SAFEGUARDS” and “INSPECTION” procedures. Remove the HistoPro 3030 stainer from the wooden crate and place on the countertop. Remove all packaging materials. Ensure that all the tie wraps have been removed and the mechanism is free to move. Install the Computer. Connect the power cord to the stainer and plug the power cord into an electrical outlet. The software necessary to run the HistoPro 3030 stainer comes pre-installed. Turn the power switch in the back of the unit. Now the Stainer can be turned on by operating the switch located in the front on the lower right hand side. www.trianglebiomedical.com INNOVATIONS FOR SCIENCE™ Page 14 CHAPTER 5 OPERATING INSTRUCTIONS Operating the HistoPro 3030 Stainer Set-Up Procedure 1. 2. 3. 4. 5. 6. 7. 8. Load appropriate reagents in the reagent vessels at stations 1-5, 11-19 and 23-29. Load Xylene, Xylene substitute or water, as appropriate, at unload stations 21 and 22. Make an appropriate drain connection from the drain fitting in the rear of the unit to a sink. Make sure you follow your local regulations for draining the various chemicals. Ensure that the drain line is not kinked and is at a level below the drain fitting from the system. Pour about 2 liters of water in one of the rinse stations and ensure that the water drains from the unit without any restrictions. Connect water supply in the rear of the unit for rinse stations. Turn on the water supply. You are ready to use the Stainer. Operating Procedure 1. 2. 3. 4. 5. 6. 7. 8. 9. Turn ON the Stainer by operating the power switch located in the front on the lower right hand side. Once the Stainer initializes the Mechanisms, follow the procedures described in the later sections of this manual to set up various Staining Protocols. Remove all the lids from the reagent vessels. Remove all slide racks (if any are present) from the Stainer. Do not forget to check the Unload Drawers. Ensure that proper reagents are loaded in the Stainer at proper locations for the protocols that you will be running. Now you can load the slides in a Slide Rack, open the Load Drawer, install the rack in the drawer and close the drawer. The program Selection Screen will automatically appear on the Display. Select the desired program and press RUN. Once the rack has been picked up from the Load Drawer, you can add another rack for processing. When the staining is completed, the Stainer will put the processed rack in the selected Unload Drawer. Open the Unload Drawer with the rack, remove the rack and close the drawer. Failure to remove the processed rack in a timely manner may delay the processing of the other racks. Shutdown Procedure 1. 2. 3. Once all racks are processed for the day, remove them all from the Unload Drawers. Shut off the water supply. You can remove the reagent vessels and store them in a refrigerator, or you can leave them in the Stainer. You can place the lids over the reagent vessels to minimize the evaporation or you can leave the vessels uncovered. As you prefer. Make sure that you www.trianglebiomedical.com INNOVATIONS FOR SCIENCE™ Page 15 4. load the refreshed reagents next time you use the stainer and remove all the lids before starting the next processing run. You can leave the Stainer ON overnight or you can choose to power it down. Welcome Screen After powering up the HistoPro 3030, the following screens are displayed in order. Please wait until all the initialization steps have been completed before attempting to use the stainer. Figure 5-1: Startup and Stainer Initialization Manually inspect the stainer to ensure that all stations are free from slide carriers, then select OK to continue as shown in Figure 5-2. www.trianglebiomedical.com INNOVATIONS FOR SCIENCE™ Page 16 Figure 5-2: Welcome Confirmation Screen The following Main Menu screen will be displayed (Figure 5-3). Proper operation of the system can by achieved by making selections from this and the software screens that follow. To make a selection, gently press upon the desired button with a stylus. Figure 5-3: Stainer Software Main Menu www.trianglebiomedical.com INNOVATIONS FOR SCIENCE™ Page 17 Changing Default Settings The HistoPro 3030 software offers a user-friendly Operator Interface to set-up and run the stainer. To select different functions, locate the necessary button on the LCD screen. To make a selection, gently press upon the button with your finger or a touch-screen stylus (stylus not provided). The display prompts the user about what options are available and how to select one of those options at all times. Please refer to the section of documentation for each feature for more information on the user interface screens and options offered to the end user. Figure 5-4: Utility Main Menu Screen Time Settings To change the current date and time for stainer display and logging purposes, edit the time and date fields as shown in Figure 5-5. The plus and minus sign buttons that appear above and below the hours, minutes, month, day, and year fields allow you to modify the values. Please be aware that the time value is displayed in 24 hour format. Select the Accept button to save the settings or Cancel to ignore the changes. www.trianglebiomedical.com INNOVATIONS FOR SCIENCE™ Page 18 Figure 5-5: Time Settings Screen Agitation Setup To change the number of dips performed during agitation operations, edit the number as shown in Figure 5-6. The plus and minus buttons that appear above and below the dips per station number can be selected to modify the desired value. Select the Accept button to save the setting or Cancel to ignore the changes. Figure 5-6: Agitation Setup Screen www.trianglebiomedical.com INNOVATIONS FOR SCIENCE™ Page 19 Temperature and Flow Adjustments To change the temperature and flow control adjustment settings, edit the values as shown in Figure 5-7. The temperature adjustment controls appear at the top, with a separate setting for each temperature station (Station 10 and Station 20). The value can be set in the range from negative to positive five using the plus and minus buttons. The "-Test-" area for each temperature station can be used to turn on and off the heater for each station and physically test the stainer for accuracy. The adjustment value is added to the temperature requested by each program that utilizes station 10 or 20 during processing. The default value for each adjustment setting is zero. The flow control adjustment works in a similar way except it accepts a positive or negative percent value from -10 to +10. The setting applies only to the variable flow control station which is Station 9. The test controls can be used to turn on and off the flow valve at a standard value and physically test the stainer for accuracy. The adjustment value is used during rack processing to add or subtract a percentage of the program specified flow control for Station 9. Figure 5-7: Temperature and Flow Adjustment Screen Security and Passwords Operation of the stainer can be limited by implementing a password security scheme. With the password featured turned on, a valid password will be required to access the following screens from the Main Menu: Edit Utility Service By default, the password is set to "0000" which turns off the password entry screen. While viewing the Utility menu screen, the "Change Password" button can be selected to modify the www.trianglebiomedical.com INNOVATIONS FOR SCIENCE™ Page 20 current password. The password can be set to a maximum of 25 characters and is not case sensitive. Once the password is set, the password entry screen as shown in Figure 5-8 appears to allow password entry. The "Edit Password Text" button can be selected to view the onscreen keyboard for character entry. Figure 5-8: Enter Password Screen Accept After selecting the button, the password entered will be validated and access to the requested screen will be allowed or denied as appropriate. The change password screen is shown in Figure 5-9 and requires that you enter the current password to change the password to a new value. www.trianglebiomedical.com INNOVATIONS FOR SCIENCE™ Page 21 Figure 5-9: Change Password Screen www.trianglebiomedical.com INNOVATIONS FOR SCIENCE™ Page 22 CHAPTER 6 PROGRAMMING The HistoPro 3030 slide stainer offers flexibility and programmability for routine and special stains. The system can store up to 50 programs numbered 1-50. Note: Programs 41-50 are reserved for servicing purposes. These programs may not be edited by unauthorized personnel. Please refer to the operators manual for the HistoProgramEditor software utility for more information on this feature. Creating Programs 1. Select EDIT to display the following program listing screen. Up Arrow Down Arrow Figure 6-1: Select Program Screen 2. New programs are created by editing blank programs. Blank programs are typically labeled with hyphens as shown in Figure 6-1. Use the up and down arrow keys to navigate through the list of existing programs numbered 1-40. 3. Highlight the desired empty program slot and select Edit Program www.trianglebiomedical.com INNOVATIONS FOR SCIENCE™ Page 23 to create a new program. Edit Program Name 4. To name the program, select as shown in Figure 6-7: Program Steps Summary Screen. An onscreen keypad as shown in Figure 6-2 will appear. Figure 6-2: Onscreen Keypad CAPS ON CAPS OFF 5. Enter the name of the program. Use the and buttons to switch between the uppercase keypad and the lowercase keypad while entering the desired program name. Accept 6. When the desired program name has been entered, select Add New Step to save. 7. To add the first step of the program, select . The following screen will appear with the step number clearly labeled in the heading as shown in Figure 6-3. www.trianglebiomedical.com INNOVATIONS FOR SCIENCE™ Page 24 Current Step Number Show Next Step Show Previous Step Figure 6-3: Editing Program Steps Screen 8. The station at which the process is performed can be programmed under “Station #.” The programmed station number can be incremented or decremented by pressing the + and - buttons until the desired station number is displayed. Stations are numbered in the following way: Note: The following station numbers apply when the operator is facing the front of machine. Figure 6-4: Station Numbering Station Features: Samples are loaded at Load Station 30 and can be unloaded at Unload Stations 21 or Unload Station 22. The station number, time at station, agitation, criticality of a process can be programmed for all programmable stations (Stations 1-20, 23-29). The rinse stations are located at Stations 5-9. Station 9 has a separate water feed inlet and Stations 5-8 are fed from one common inlet. The www.trianglebiomedical.com INNOVATIONS FOR SCIENCE™ Page 25 temperature can be controlled for processes that occur at Heat Stations 10 and 20. Carrier pick up speed can be programmed for processes that occur at Stations 1-9, 1119, and 23-30. 9. The duration for which the process is performed can be programmed under “Time at Station (m:s).” Duration time refers to the time for which the sample is completely submerged in the station vessel. The programmed time can be incremented or decremented by pressing the + - and buttons until the desired time number is displayed. The duration time is displayed as “minutes:seconds.” Note: Actual duration time may exceed programmed duration time when multiple programs are run simultaneously. See Running Multiple Racks for more information. Note: The time can be incremented or decremented more quickly by selecting and holding the stylus on the plus or minus button, and released when the desired value is reached. 10. Carrier Pickup Speed refers to the speed at which the carrier is removed from the reagent containing station vessel. Desired carrier pick up speed settings may be programmed by appropriately selecting the “Normal” or “Fast” radio button that appears under the corresponding headings. 11. Agitation is a feature that relies on the carrier to move the slide rack in an up and down motion to ensure even stain distribution based on the agitation setting. Agitation can be turned on or off for a station by selected the "Yes" or "No" radio button. 12. Criticality is a feature that ensures a rack is not left submerged in a station for longer than the specified duration time. If the step is flagged as critical by selecting the "Yes" radio button, the duration will not be extended to accommodate multiple rack processing. 13. The temperature can be programmed under “Temperature (deg C)” for processes that take place at Heating Stations 10 and 20 (See Figure 6-5). Temperature refers to the temperature of air located in the station vessel. The programmed temperature can be incremented or + - decremented by pressing the and buttons until the desired temperature is displayed. The temperature is programmed as degrees Celsius and ranges from 40 to 70. www.trianglebiomedical.com INNOVATIONS FOR SCIENCE™ Page 26 Figure 6-5: Heating Station Step Setting 14. The flow rate can be programmed under “Flow Rate (mL/min)” for processes that take place at Rinse Station 9. Flow rate refers to the rate of water flow at the variable flow control station. The programmed flow rate can be incremented or decremented by pressing the + - and buttons until the desired flow rate is displayed. The flow rate is programmed as milliliters per minute and can be set from 0 to 2000 in 500 mL/min increments. It should be noted that the software controlled Flow Rate Adjustment for Station 9 is an optional feature and may not be present in all models. Note: The flow rate can be manually adjusted for processes that take place at Stations 5-8 with a screwdriver. (Screwdriver not provided.) www.trianglebiomedical.com INNOVATIONS FOR SCIENCE™ Page 27 Figure 6-6: Flow Control Station Step Setting Add Next Step 15. To add another step, select . A new Editing Program Steps Screen will appear with an incremented Step Number and default settings. Follow Steps 8-13 to program newly added steps. 16. To browse through and edit each of the defined program steps, use the buttons to display the previous and next step where applicable. < and > arrow Save and Exit 17. Once all desired steps have been programmed, select similar to the screen shown in Figure 6-7 will be displayed. www.trianglebiomedical.com INNOVATIONS FOR SCIENCE™ Page 28 . A summary screen Figure 6-7: Program Steps Summary Screen 18. Racks may be unloaded at Station 21 and 22. To program the station at which racks are Unload Station unloaded, select from the Program Steps Summary Screen. The following screen shown in Figure 6-8 will be displayed. NOTE: Racks are by default unloaded at Station 21 unless otherwise specified. www.trianglebiomedical.com INNOVATIONS FOR SCIENCE™ Page 29 Figure 6-8: Unload Station Selection Screen 19. To program Station 21 as the unloading station, select Station 21 . Station 22 To program Station 22 as the unloading station, select . The system automatically returns to the previous screen after a selection has been made. 20. After reviewing the program summary, select Main Menu or Exit Without Saving Save and Exit to save changes and return to to cancel and lose all changes. Editing Programs EDIT 1. To edit a program, select from the Main Menu. 2. Use the up and down arrow keys (Figure 6-1) to navigate through the list of existing programs. Highlight the program to be edited. 3. When the desired program is highlighted, select Edit Program Edit Program Name . 4. To rename the program, select from the Program Steps Summary Screen. A keypad as shown in Figure 6-2 will appear onscreen. Delete the current name of the www.trianglebiomedical.com INNOVATIONS FOR SCIENCE™ Page 30 program by selecting Clear All . Type in the desired name of the program and select Accept to save. Edit Step 5. To edit a process, highlight the desired step number and select . The “Editing Program Steps Screen” as shown in Figure 6-3 will be displayed. Change the appropriate settings by following Steps 8-13 of the Creating Programs section. Once all Finish desired steps have been edited, select to return to the previous screen. 6. To insert a process prior to an existing step, navigate through the list of programmed steps using the up and down arrow keys. Highlight the step that occurs after the one to be added and select Insert New Step to add and edit the new step. Once all desired settings Finish have been programmed, select to return to the previous screen. 7. To add a process after a programmed step, navigate through the list of programmed steps using the up and down arrow keys. Highlight the step that occurs before the one to be added and select Add New Step to add and edit the new step. Once all the desired Finish settings have been programmed, select to return to previous screen. 8. To delete a process, navigate through the list of programmed steps using the up and down Delete Step arrow keys. Highlight the step to be deleted and select to be asked to confirm the permanent step removal. 9. After making all the necessary changes, review the Program Steps Summary Screen to ensure the entire program definition is correct. 10. Select Save and Exit to save changes and return to Main Menu. Exit Without Saving 11. Select to discard changes and return to Main Menu. You will receive a discard changes confirmation message to verify the request to exit without saving. Note: Programs numbered 41-50 cannot be edited using the HistoPro 3030 stainer software. They can only be viewed in the editor and not modified. These programs are created and edited by using the HistoProgramEditor Windows application software. See the section on Importing and Exporting Programs for additional information. www.trianglebiomedical.com INNOVATIONS FOR SCIENCE™ Page 31 Deleting Programs 1. To delete a program, select EDIT from the Main Menu. 2. Navigate through the list of programs using the up the program to be deleted is highlighted. /\ and down \/ arrow keys until Delete Program 3. Select 4. Select and confirm the operation by selecting “Yes” when prompted. Exit to return to Main Menu. Copying Programs EDIT 1. To copy a program, select from the Main Menu. 2. Navigate through the list of programs using the up and down arrow keys until the program to be copied is highlighted. 3. Select Copy Program . /\ 4. Navigate through the list of programs using the up and down the desired blank slot to copy the program to is highlighted. \/ arrow keys until Accept Location 5. Select to perform the copy operation. 6. A keypad as shown in Figure 6-2 will automatically be displayed. Delete the name of the original program by selecting Clear All and name the duplicated program using the Accept onscreen keypad. After entering the desired name, select to save. 7. A summary of the copied program with its newly programmed name will be displayed. 8. Select Save and Exit to save changes and return to Main Menu. Importing and Exporting Programs The Utilities menu contains two buttons that allow the import and export of programs to and from the stainer (see Figure 5-4). Please note the import and export operations are advanced features and are recommended only for the person who is the HistoPro 3030 administrator. www.trianglebiomedical.com INNOVATIONS FOR SCIENCE™ Page 32 Export Programs Select to output the current set of programs from the stainer to an attached USB key. An error message will appear if a valid USB Key is not plugged into the stainer. The purpose of exporting programs from the HistoPro 3030 is to edit them on a Windows PC computer and share programs with multiple units. Please refer to the instructions for the HistoProgramEditor external program for details on how to edit programs on a PC and transfer those programs from a computer to one or more HistoPro 3030 stainers. After editing the programs on a PC using the HistoProgramEditor, attach the USB Key to the Import Programs stainer and select . The program definition files will automatically be imported to the HistoPro 3030 and will replace your current set of programs. *Please be cautious when importing programs since any changes to the current set of stainer programs since the last export will be lost upon import. www.trianglebiomedical.com INNOVATIONS FOR SCIENCE™ Page 33 CHAPTER 7 RUNNING PROGRAMS The primary purpose of the HistoPro 3030 stainer is to process slide racks using a pre-defined program. Each program follows a series of steps to move racks from station to station according to schedule and station processing parameters. Loading Racks 1. The first step in running a program is to insert a rack of slides to be processed into the Load Station (Station 30) as shown in Figure 7-1. 2. Make sure to open the drawer fully, properly insert the rack, and fully close the drawer. 3. The Program Selection Screen appears with the list of the most recently run programs as shown in Figure 7-2. VIEW OTHER SELECTIONS 4. If you wish to select a program which is not listed, select to view the next group of defined programs. You may need to select this button multiple times to cycle through all the program names. + - 5. You can also use the plus and minus buttons to select the first step number to process if you do not want to start at the first step of the program. 6. When you have located the program to run and have selected it, the program name will appear at the top of the screen. RUN THIS PROGRAM 7. Select program definition. to start the processing of the new rack using the selected EXIT 8. If you change your mind, select the button to return to the Main Menu. Figure 7-1: Loading a new Rack for Processing in the Load Drawer www.trianglebiomedical.com INNOVATIONS FOR SCIENCE™ Page 34 Figure 7-2: Program Selection Screen www.trianglebiomedical.com INNOVATIONS FOR SCIENCE™ Page 35 Run Time Status Display While programs are running, the screen in Figure 7-3 appears to show the status of each HistoPro 3030 station while displaying monitoring information and providing a stop button. The top of the display shows a line by line log of the actions taken by the stainer to process racks in each station in real time. This information can be used to monitor the previous steps taken for a rack that is processing and shows rack movement, heating station temperature, and rinse station flow rate. In addition, the log lists when a scheduled rack will begin processing along with any notification or error conditions that occur during stainer operation. HistoPro 3030 Log Di l Station 1 is Occupied Figure 7-3: Stainer Running Screen The stations numbered 1 to 30 appear as they do in the physical stainer with the addition of color coding to indicate the state and purpose of each station. Stations 5 to 9 are highlighted in light blue to indicate the are the rinse stations with Station 9 offering variable flow control. Stations 10 and 20 are highlighted in orange to signify they are the heating stations. In addition, the current temperature in degrees Celsius is listed for each of these stations. Stations 30, 21, and 22 are green in color and represent the one load station and two unload stations. Finally, each station that is occupied by a rack is filled with a color that is unique to each rack in progress. www.trianglebiomedical.com INNOVATIONS FOR SCIENCE™ Page 36 This can help to visualize which stations are occupied and follow each rack as they move from station to station according to the program. To view detailed information on a rack of slides currently being processed, hold your stylus on the icon of the station in question for a couple of seconds. If that station is currently holds a rack of slides, a popup window will momentarily appear at the top of the screen. This “Rack Status Popup Display”, shown in Figure 7-4 displays five items of information. The STAION NUMBER appears at the left of this window, while the PROGRAM NUMBER and the STEP NUMBER appear at the right, and the RACK NUMBER and the TIME REMAINING in this step appear in he center. Figure 7-4: Rack Status Popup Display Unloading Racks When a rack has completed processing as determined by the steps in the selected program, it will be dropped off in the designated unload station (Station 21 or Station 22). The stainer will beep once and the LED on the front of the unload drawer will begin flashing. In addition, the Stainer Running Screen will show the unload station icon as flashing. This is the indication to remove the rack from the stainer as soon as possible. It is necessary to remove a rack from each unload station quickly in order to allow subsequent racks to be processed successfully. If an unload station is occupied when a rack is scheduled to be sent to that station, the stainer will start beeping and pause all operations until there is user intervention. Once the drawer is cleared of the rack and the unload drawer is closed, the beeping and flashing will stop and processing will automatically continue. www.trianglebiomedical.com INNOVATIONS FOR SCIENCE™ Page 37 Cancelling Racks While the stainer is processing a rack, there are situations when a rack must be cancelled. In addition, sometimes the operator needs to temporarily stop the stainer to evaluate the state of the running racks and determine if any racks need to be cancelled and removed. To cancel one or more racks from processing, the following steps must be followed. STOP 1. Select from the Stainer Running Screen to pause the HistoPro 3030. 2. The stainer will continue its current motion if necessary before going into a paused state. Figure 7-5: Cancel Rack Option Screen RESUME 3. If you change your mind, select to return to the previous screen and continue processing racks. 4. When there is more than one rack currently being processed by the stainer, the Cancel All Racks button will appear in addition to the Cancel One Rack button. Cancel All Racks 5. Select to immediately cancel all processing racks and re-initialize the stainer to the startup state. Cancel One Rack 6. Select Figure 7-6. to view the Cancel Rack Selection Screen as shown in + - 7. If applicable, use the plus and minus buttons to cycle through each currently running rack so that the desired rack number is displayed. The program number and station number for each rack appears in order for you to verify your selection. www.trianglebiomedical.com INNOVATIONS FOR SCIENCE™ Page 38 8. Based on which unload stations are not occupied, select whether to move the cancelled Unload 21 Unload 22 rack to unload station or to manually remove the rack from the stainer. Proceed None , or select Cancel 9. Select the button to complete the cancellation or the button to return to the previous screen. 10. If you chose to manually remove the rack, you must open the stainer and remove the cancelled rack from its station when prompted and before resuming processing. Figure 7-6: Cancel Rack Selection Screen www.trianglebiomedical.com INNOVATIONS FOR SCIENCE™ Page 39 Running Multiple Racks The HistoPro 3030 stainer is designed to run multiple slide racks at the same time and optimizes a schedule to process all running racks as quickly as possible. The following guidelines apply when running multiple racks in the stainer simultaneously. You must wait until a rack is picked up from the Load Station and dropped off in the station designated by the first step of the selected program before inserting a new rack into the Load Station. The Load Station indicator light on the front of the stainer will stop flashing green when it is ready to accept a new rack. When a rack is already running and a new slide rack is inserted into the Load Station, the software must determine the optimal schedule to run all racks simultaneously. This processing may take several seconds so a "Please Wait…" message will appear on the screen. Please note that the stainer will finish any current motions before the scheduling calculation begins. When a new slide rack is inserted and the stainer is in the middle of processing an existing rack in a station marked as critical (Step Criticality=Yes), the scheduling of the new rack will be delayed. Once the existing rack has exited the critical station the new rack will be scheduled as usual. Running multiple racks at the same time is more efficient than waiting until each rack is completed before starting the next one. However there are situations when there is insufficient time to process additional racks and not adversely affect the racks already in progress. In those situations the new rack may not start processing immediately or it may cause the existing set of racks to take longer to complete each of their programs. It is recommended that each user analyze the set of programs that will be run and the desired throughput to determine the maximize number of racks to run at one time. www.trianglebiomedical.com INNOVATIONS FOR SCIENCE™ Page 40 CHAPTER 8 MAINTENANCE Routine Maintenance DO NOT use excessive amounts of solvent for cleaning! DO NOT use the stainer for purposes other than its designed function! DO practice good housekeeping and maintain the stainer in a clean condition! DO switch off the stainer before removing plug! DO ensure that replacement fuses are of the correct specification! Cleaning Procedures HistoPro 3030 system is designed to properly function under recommended settings. Please use the following instructions and cleaning procedures carefully. Disconnect line cord from stainer when cleaning. The stainer should always be disconnected from the mains power supply when cleaning, particularly if flammable solvents are used. Use only minimal quantities of solvent on an absorbent cloth. We recommend using a xylene substitute for cleaning the stainer. Charcoal Filter Replacement We recommend that you replace the charcoal filter every three months or at more appropriate interval based on your usage of the system. The charcoal filter is located behind the top left bezel. Pull the bezel straight out in front and you will be able to access the charcoal filter as shown Figure 8-1. www.trianglebiomedical.com INNOVATIONS FOR SCIENCE™ Page 41 Charcoal Filter behind top left bezel Figure 8-1: Charcoal Filter behind top left bezel www.trianglebiomedical.com INNOVATIONS FOR SCIENCE™ Page 42 Service Mode The HistoPro 3030 stainer has a Service Menu as pictured in Figure 8-2 to allow trained support technicians to perform maintenance in the field. Improper use of commands and the functionality available through this mode can damage the Stainer and void the warranty. DO NOT USE SERVICE MODE if you do not have proper training to operate various commands available to exercise various functions. Please contact your support technician if you are experiencing software or instrument problems with the HistoPro 3030. The following screen is available to test and service the stainer and can only be accessed from the Main Menu after entering the correct password. Figure 8-2: Service Menu Screen www.trianglebiomedical.com INNOVATIONS FOR SCIENCE™ Page 43 CHAPTER 9 SPARE PARTS AND ACCESSORIES Item Description Reagent Vessels and Lids (8 each per Pack) Slide Rack (1 per Pack) Operator Manual Service Manual Water Inlet Hose with In-Line Filter Heater Station Vessel Rinse Station vessel without Charcoal Filter 3-Position Vessel Carrier 4-Position Vessel Carrier www.trianglebiomedical.com INNOVATIONS FOR SCIENCE™ Page 44 Part No. A12540 A12541 A12537 A12636 A12542 A12543 A12544 A12637 A12545 A12547