1
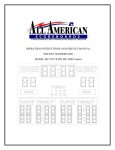
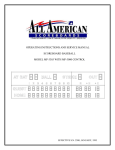
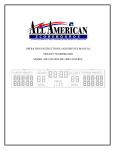
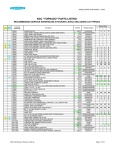
Operating Instructions &
Service Manual
Racetrack Scoreboard
Model MP-3820
EFFECTIVE S.N. XXXX, April 1, 1995
TABLE OF CONTENTS
PAGE
1.
GENERAL INFORMATION
1.1
1.2
1.3
1.4
2.
3.
8
INTRODUCTION
TEST EQUIPMENT
TROUBLESHOOTING
TROUBLESHOOTING GUIDE
10
SCOREBOARD DISPLAY PARTS
SCOREBOARD CONTROLLER ASSEMBLY PARTS
DIAGRAMS
6.1
6.2
6.3
6.4
6.5
6.6
6.7
6.8
6.9
6.10
5
CONSOLE DISPLAY
CONSOLE POWER
TIME TRIALS
RACE MODE
DIMMER
REPLACEMENT PARTS LIST
5.1
5.2
6.
GENERAL INFORMATION
INSPECTION
INSTALLATION
ELECTRICAL CONNECTIONS
MAINTENANCE AND TROUBLESHOOTING
4.1
4.2
4.3
4.4
5.
4
CONTROL CONSOLE OPERATION
3.1
3.2
3.3
3.4
3.5
4.
DESCRIPTION
IDENTIFICATION
DAMAGE
DAMAGE CLAIM PROCEDURE
INSTALLATION
2.1
2.2
2.3
2.4
3
13
CONTROL CONSOLE KEYBOARD AND SLIPSHEET LAYOUT
SCOREBOARD SYSTEM LAYOUT
SINGLE JUNCTION BOX WIRING
POWER WIRING (D-7828)
CONTROLLER ASSEMBLY WIRING (D-7829)
MICROPROCESSOR 4X 7 LAMP PATTERN (8 BIT)
FIGUREGRAM WIRING DIAGRAM (C-150429)
JUMPER LOCATION ON 3 POSITION SYSTEM
TRIAC PLACEMENT DIAGRAM
INSTALLATION DRAWINGS (C-7816)
s:\shared\stacey\scoreboard manuals\incomplete manuals\mp-3820.indd
401 South Main Street • Pardeeville, WI 53954 • 800-356-8146
08/05/02
2
1.
GENERAL INFORMATION
1.1 Description
Your All American Scoreboard has been carefully inspected and tested before leaving the factory. It is
possible, however, that components may be loosened or forced out of adjustment in transit. If this occurs,
follow the troubleshooting guide (section 4). If equipment then fails to operate, contact immediately:
ALL AMERICAN Service Department
EVERBRITE Corporation
P.O. Box 100
Pardeeville, WI 53954
Telephone: (608) 429-2121
Toll Free: 800-356-8146
Parts being returned for repair are to be sent to:
ALL AMERICAN Service Department
EVERBRITE Corporation
401 S. Main Street
Pardeeville, WI 53954
E-mail [email protected]
NOTE
If you need to send parts in for repair, please call the ALL AMERICAN
service department for a returned goods authorization (RGA) number.
1.2 Identification
All American uses a 4 digit serial number for scoreboard identification. The serial number tags are
located on the back of the control console and the lower right-hand corner on the face of the scoreboard
display. When contacting the factory for assistance it is important that the model number and serial
number are known.
1.3 Damage
Upon receipt, check for visible damage. If this occurs, or if damage is found after shipment has been
accepted, follow the damage claim procedure.
1.4 Damage Claim Procedure
An instruction sheet is enclosed advising the consignee in case of damage in transit. If damage is noted at
the time of delivery, consignee must obtain an ‘Inspection of Bad Order’ from the delivering carrier. In
order to process your claim, this must be properly filled out with a complete statement of all damage
and it must be signed by the carrier.
s:\shared\stacey\scoreboard manuals\incomplete manuals\mp-3820.indd
401 South Main Street • Pardeeville, WI 53954 • 800-356-8146
08/05/02
3
If damage is discovered after delivery, you should call the delivery company. Have them make out a
Concealed Damage Report. Fifteen days after delivery are allowed, so this should be done PROMPTLY
or it is impossible to process this claim.
Advise EVERBRITE corporation of necessary replacement parts or repairs.
Consignee will be invoiced and then should file a claim with the carrier to recover charges. TO FILE
YOUR CLAIM FOLLOW THIS PROCEDURE:
(A)
(B)
Cost of replacement parts or repair charges are invoiced to the carrier by the consignee.
The following documents, properly filled out, plus invoice are forwarded to the trucking
company in support of your claim:
(a) Original bill of lading
(b) Original paid freight bill
(c) Certified copy of original invoice
(d) Standard form for presentation of loss and damage claim properly filled out.
2.
INSTALLATION
2.1 General Information
Shipping papers accompany each scoreboard. Check carefully to see that you receive the following:
1 ea RACETRACK Display (4 SECTIONS)
1 ea Control Console
1 ea Service Manual
1 ea Mounting Hardware Package
1 ea Press Box Junction Box
1 set Electric Eyes (if ordered)
? ft Control Cable (if ordered)
IMPORTANT!
The MP-40 cable supplied by ALL AMERICAN SCOREBOARDS for use on the Microprocessor
based scoreboards is specifically designed for this system. Use of a substitute cable may void the
warranty on the scoreboard!
NOTE
A small length of rubber hose may be used as a lamp extractor. Simply taper the inside of the hose
with a sharp knife to fit the lamp.
s:\shared\stacey\scoreboard manuals\incomplete manuals\mp-3820.indd
401 South Main Street • Pardeeville, WI 53954 • 800-356-8146
08/05/02
4
2.2 Inspection
Tighten all screws, lamps, and fittings that may have loosened in shipment.
2.3 Installation
Select the location best suited for visibility by the majority of spectators. Preferred position is facing east
or north to avoid direct sunlight on the face of the scoreboard, if day games are played. For Permanent
mounting to uprights, see the enclosed installation drawing in section 6. The MP-41 data cable carries
only low voltage signals and therefore can be installed with or without conduit. Consult Section 6 for
junction box and scoreboard wiring.
2.4 Electrical connections
This scoreboard requires two 120 V. 40 AMP AC circuits for the exclusive use of the scoreboard.
IMPORTANT!!!
To protect the control from damage, it is advisable that you disconnect the control and store in a dry
secure area when not in use.
NOTE
This equipment is ETL (Electronics Testing Laboratories) CSA and NRTL approved and
complies with the requirements in part 15 of the FCC rules for a class A computing device.
Operation of this equipment in a residential area may cause unacceptable interference to radio and
television reception, requiring the operator to take whatever steps are necessary to correct the
interference.
3.
CONTROL CONSOLE OPERATION
3.1 Console Display
The 2 line by 20 character Liquid Crystal Display module displays the scoreboard information entered
from the keyboard.
3.2 Console Power
Plug the control console cable into the junction box connector marked “DATA”.
Plug the electric eye cable into the junction box connector marked “EE”.
Push ON/OFF
once to turn the console on.
Push ON/OFF a second time to shut the console off.
When first turned on; the LCD should show as follows:
s:\shared\stacey\scoreboard manuals\incomplete manuals\mp-3820.indd
401 South Main Street • Pardeeville, WI 53954 • 800-356-8146
08/05/02
5
RACETRACK
1992 VERSION 2.1
Enter the code (88) as follows: Push
CODE
8
8
ENTER .
When the proper code has been entered, the scoreboard will be in the race mode and the LCD will
show as follows:
TOP 5
LAP 0
3.3 Time Trials
Push TIME/RACE
to enter the time trial mode. The scoreboard time will show .00
and the LCD display will show
.000 --.--- --.--1 LAP TRIAL
.
Select the laps to be time trialed by pushing 1 LAP , 2 LAP , or 3 LAP .
The LCD display will reflect your selection. Push EE ENABLE
to enable the electric eye.
When the EE is enabled the LCD display will show EE in the lower left corner.
If, for example, car number 55 is going to time trial; Push POS 1 , and the car number 5
, and then ENTER .
5
Car number 55 would appear on the scoreboard in position 1, and you would be ready for time trials.
When the EE beam is broken the time will start. The 1/100th digit is blanked while the timer is running.
Push EE ENABLE
at any time to disable the electric eye.
When the EE beam is broken a second time, the time will stop and the hundredths digit will display
on the scoreboard and LCD display. If you are timing 2 or 3 laps at a time, when the car breaks the EE
beam the second time, the time displayed on the scoreboard will stop for two seconds and then resume
timing the second lap. The LCD on the control console will show the time for the first lap in position
1 and the elapsed time for the second lap in position 2. After the time trial you may post the lap times
as follows:
Push TIME RESET to reset the times to zero. The scoreboard will now read .00 , and the times
on the LCD display will all revert to zeroes.
Now push 1
8
4
3
, then ENTER
and the time 18.43 will post on the scoreboard.
If a car starts to time trial but doesn’t finish the lap, you may record the times for any completed laps,
then push TIME RESET to reset the scoreboard and LCD displays.
s:\shared\stacey\scoreboard manuals\incomplete manuals\mp-3820.indd
401 South Main Street • Pardeeville, WI 53954 • 800-356-8146
08/05/02
6
You may now post the lap time of the completed lap and you are now ready for the next car to time trial.
3.4 Race Mode
The LCD shows the car positions for five (5) cars and the Lap number at all times.
Push LAP +1
to increment the lap counter. Push LAP -1
to decrement the lap counter.
Push LAP followed by the desired number(s), then ENTER to correct the Lap counter.
Push POS 1
followed by the Car #, then ENTER
to load the 1st Place Car #.
Repeat the procedure for POS 2 through POS 10 .
Push LAP or POS 1 through POS 10 then CLEAR
to clear the respective locations.
If a car drops out during the race, you may push POS 1 through POS 10 for the position that car
was running in, then SHIFT , to clear that car number and shift all following positions up.
3.5 Dimmer
Push DIM to dim the lamps during night use.
s:\shared\stacey\scoreboard manuals\incomplete manuals\mp-3820.indd
401 South Main Street • Pardeeville, WI 53954 • 800-356-8146
08/05/02
7
4.
MAINTENANCE AND TROUBLESHOOTING
4.1 Introduction
This section gives maintenance and troubleshooting information. Included are troubleshooting guides for
typical scoreboard malfunctions. If the cause of a problem cannot be determined, please contact the
Customer Service Department.
WARNING!!
110 VAC wires are exposed whenever the cover over the controller assembly is
removed from the scoreboard. Use extreme caution during troubleshooting or repair.
To avoid possible damage to equipment or personal injury, always turn off the main
power before removing the cover or replacing assemblies, or replacing lamps.
4.2 Test Equipment
A simple analog or digital voltmeter will be sufficient for all user repairable problems. Printed circuit
boards requiring troubleshooting should be returned to the factory.
4.3 Troubleshooting
Whenever possible, follow the troubleshooting guides prior to contacting the customer service
department. If a problem not described in the guides exists, contact the customer service
department immediately. Refer to the diagrams provided for assistance in troubleshooting scoreboard
malfunctions.
4.4 Troubleshooting Guides
(A)
Scoreboard doesn’t light and console doesn’t work:
(a)
(b)
(c)
(d)
(B)
Check that the main power switch is turned on.
Replace any defective or blown fuses.
Check the power connections and voltages at the scoreboard.
Contact the Customer Service Department.
Scoreboard digits don’t light but the console works:
(a)
(b)
(c)
(d)
With the main power switch “OFF”; remove the cover over the controller assembly.
Check all connections.
Turn the main power “ON”.
If the scoreboard still doesn’t light, check the transformer voltage going to the
receiver PCB (printed circuit board) assembly (blue wires) using a voltmeter set
on the 12 VAC or higher scale.
If the voltage is less than 8 VAC contact the Customer Service Department.
s:\shared\stacey\scoreboard manuals\incomplete manuals\mp-3820.indd
401 South Main Street • Pardeeville, WI 53954 • 800-356-8146
08/05/02
8
If the voltage is between 8-12 VAC see the replacement parts list for a receiver PCB
assembly, and contact the Customer Service Department.
(C)
The scoreboard digits light but the console doesn’t work:
(a)
(b)
(c)
Check for continuity between the scoreboard and the junction box.
If an open circuit is found, the problem is either the cable or a cable connection.
If the continuity test checks good, check the voltage between the green wire and the white
wire in the junction box, using a voltmeter set on the 12 VAC or higher scale.
If the voltage is 0 VAC see the controller parts list for a transformer assembly.
If the voltage is less than 8 VAC consult the controller wiring diagram for instructions
on long cable compensation.
If the voltage is between 8 VAC and 12 VAC contact the Customer Service Department.
(D)
The scoreboard digits light, the console works but there is no control of the scoreboard:
(a)
(b)
(c)
(d)
(E)
The scoreboard works, but some lights stay on all the time:
(a)
(b)
(F)
Check the voltage between the black and red wires in the junction box with a
voltmeter set on the 3 VDC or higher scale. The voltage should read somewhere
between 2-3 VDC when the console is working properly.
If the voltage is 0 VDC contact the Customer Service Department for assistance.
If the voltage is correct, (2-3 VDC) check that this reading also appears at the scoreboard.
If the correct voltage also appears at the scoreboard, see the replacement parts list for
a receiver PCB assembly.
With the main power “OFF”, switch the plug from the bad digit with the plug for a
known good digit. EXAMPLE: Plug “C” into “D” and “D” into “C” locations.
Turn the power back on. If the same lamps remain lit all the time, the problem is a
shorted lamp socket. If the lamps on a different digit now stay lit all the time, the problem
is on the driver PCB assembly. See the replacement parts list for the proper
replacement part.
The scoreboard works but some lights do not come on:
(a)
(b)
(c)
Check for burned out lamps.
Check for a broken wire or bad connection on the 12 pin connector.
See the replacement parts list for the proper replacement driver board.
IMPORTANT !!!
In this scoreboard the 120 volt line is on the lamp socket all the time, and the
common is switched to turn the lamps on and off. For this reason, to avoid damage
to the equipment or personal injury, it is important to turn the main power off when
changing the lamps.
s:\shared\stacey\scoreboard manuals\incomplete manuals\mp-3820.indd
401 South Main Street • Pardeeville, WI 53954 • 800-356-8146
08/05/02
9
5.
REPLACEMENT PARTS
5.1 Scoreboard Display Parts
8
1
7
2
3
6
5
figure 1
DISPLAY ASSEMBLY
s:\shared\stacey\scoreboard manuals\incomplete manuals\mp-3820.indd
401 South Main Street • Pardeeville, WI 53954 • 800-356-8146
08/05/02
10
REPLACEMENT PARTS LIST (MP-3820 Racetrack)
fig.&
PART
fig.& MFGMFG
PART
index
index NUMBER
NUMBER DESCRIPTION
DESCRIPTION
REF VENDOR
REF
DES
PART
#
DES
VENDOR
PART #
11-1
150221
850030
Display Assembly
Lamp, 25W/125V Clear
150221
25A19 GR CL
1-2
150249
Controller Assembly
*****SEE FIGURE 2*****
150249
1-3
1-4
1-5
1-6
1-7
1-8
1-9
121880
EL044100
EL00083
000000
117456
150232
117457
Fuse, 15A 250V
Resistor, 2 OHM 30 WATT
Rainshield
Access Panel
Screen, Car Number
Screen, 24 X 48 13/16
Screen, Position
SU4450
HB005500
HB002300
702785
702786
EL053000
HB002400
WH009100
122763
Control Console
Slipsheet Pair
Transmitter Board
**Program SPSCSL.V00**
Connector, 5 Pin Male Cable
Connector, 5 Pin Female
LCD Display, 2 Line 20 Character
Keyboard Assembly,
Ribbon Cable Assembly, 14C 8”
Enclosure,
151204
702786
150500
000000
Junction Box, Single
Connector, 5 Pin Female
Cable, MP-41 Control
Terminal Strip, 7C
121814
20’ Cable Assy W/2 male 5c con.
121814
150257
Optional Electric Eyes
150257
s:\shared\stacey\scoreboard manuals\incomplete manuals\mp-3820.indd
F1-F7
ABC-15 (3AG)
HL-24-09Z
EL00083
000000
117456
150232
117457
SU4450
HB005500
A1
P1
J1/J4
HB002300
RM12BPG5P
RM12BRD5S
HB002400
WH009100
J1/J4
401 South Main Street • Pardeeville, WI 53954 • 800-356-8146
151204
RM12BRD5S
8723
670-7
08/05/02
11
5.2 Scoreboard Controller Assembly Parts
figure 2
CONTROLLER ASSEMBLY
REPLACEMENT PARTS LIST (MP-3820) Controller Assembly
fig.&
PART
fig.& MFGMFG
PART
index
NUMBER
index
NUMBER DESCRIPTION
DESCRIPTION
REF VENDOR
REF
DES
PART
#
DES
VENDOR
PART #
2-
150249
Controller Assembly
A2
150249
2-1
119323
Receiver PCB Assembly
*** PROGRAM SPSWY.CNT ***
A3
119323
2-2
2-3
2-4
2-5
2-6
118922
118522
701137
703719
705723
Driver PCB Assembly, 3 Position
Transient Suppressor PCB Assembly
Terminal Block, 7C
Transformer, 8V/18V
Spacer, P.C.Board
s:\shared\stacey\scoreboard manuals\incomplete manuals\mp-3820.indd
A4-A10
A16
TB1&2
T1/T2
401 South Main Street • Pardeeville, WI 53954 • 800-356-8146
118922
118522
670-7
CS-697
LCBS-6-01
08/05/02
12
6.
DIAGRAMS
6.1 Control Console Keyboard and Slipsheet Layout
CONSOLE KEYBOARD
s:\shared\stacey\scoreboard manuals\incomplete manuals\mp-3820.indd
401 South Main Street • Pardeeville, WI 53954 • 800-356-8146
08/05/02
13
6.2 Scoreboard System Layout
SYSTEM LAYOUT
s:\shared\stacey\scoreboard manuals\incomplete manuals\mp-3820.indd
401 South Main Street • Pardeeville, WI 53954 • 800-356-8146
08/05/02
14
6.3 Junction Box Wiring
SINGLE JUNCTION BOX WIRING
s:\shared\stacey\scoreboard manuals\incomplete manuals\mp-3820.indd
401 South Main Street • Pardeeville, WI 53954 • 800-356-8146
08/05/02
15
6.4 Power Wiring
POWER WIRING
s:\shared\stacey\scoreboard manuals\incomplete manuals\mp-3820.indd
401 South Main Street • Pardeeville, WI 53954 • 800-356-8146
08/05/02
16
6.5 Controller Assembly Wiring
CONTROLLER ASSEMBLY
s:\shared\stacey\scoreboard manuals\incomplete manuals\mp-3820.indd
401 South Main Street • Pardeeville, WI 53954 • 800-356-8146
08/05/02
17
6.6 Microprocesor 4 X 7 Lamp Pattern (8 Bit)
MICROPROCESSOR 4 X 7 (8 BIT) LAMP PATTERN
s:\shared\stacey\scoreboard manuals\incomplete manuals\mp-3820.indd
401 South Main Street • Pardeeville, WI 53954 • 800-356-8146
08/05/02
18
6.7 Figuregram Wiring
8 BIT FIGUREGRAM WIRING
s:\shared\stacey\scoreboard manuals\incomplete manuals\mp-3820.indd
401 South Main Street • Pardeeville, WI 53954 • 800-356-8146
08/05/02
19
6.8 Jumper Location on 3 Position System
All of the 3 position drivers and receivers are identical except for the jumper on each board.
Make sure the jumpers are set for the model of scoreboard you are installing them into.
(A)
On the receiver board (refer to figure 11); Jumper pins 2 & 3 for models MP-3385, MP-3312,
MP-3529, and MP-3549. Jumper pins 1 & 2 for all other models.
(B)
On the driver board (refer to figure 10); Jumper pins 1 & 2 for use of a horn. Jumper pins 2 &
3 for all others.
23
1
5
8
4
7
JUMPERS
9
1
12 11 10
6
2
23
1
P.N. 704150
ASSY 119323
8031
MICRO P
3
ASSY 118922
P.N. 704148
2732
EPROM
JUMPER LOCATION
s:\shared\stacey\scoreboard manuals\incomplete manuals\mp-3820.indd
401 South Main Street • Pardeeville, WI 53954 • 800-356-8146
08/05/02
20
6.9 Triac Placement
The triac is the switch that controls the figuregram lamps. The triacs for any given figuregram are
adjacent to the twelve pin connector on the driver board that controls that figuregram. Shown below is the
triac placement and bit designation relative to the figuregram bit pattern.
PN. 704148
12 11 10
ASSY. 118922
12 11 10
12 11 10
9
8
7
9
8
7
9
8
7
6
5
4
6
5
4
6
5
4
3
2
1
3
2
1
3
2
1
1118
3 1
6
2
6
2
6 7 7 8
8 5
5
3
5
3
6 4
4 4 4 8
FACE VIEW
2 7
DRIVER BOARD
No.
1
MP TRIAC PLACEMENT
s:\shared\stacey\scoreboard manuals\incomplete manuals\mp-3820.indd
401 South Main Street • Pardeeville, WI 53954 • 800-356-8146
08/05/02
21
6.10 Installation Drawing
9'
8'
2'
OPTIONAL
AD.PANEL
SCOREBOARD
FACE
STEEL
I BEAMS
5'
17'
REMOTE
DISCONNECT
SWITCH
GROUND ROD
4' MIN
CONCRETE
FOOTERS
INSTALLATION DRAWING
s:\shared\stacey\scoreboard manuals\incomplete manuals\mp-3820.indd
401 South Main Street • Pardeeville, WI 53954 • 800-356-8146
08/05/02
22