1
PAGE 2
TECH SHEET - DO NOT DISCARD
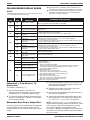
FAILURE/ERROR DISPLAY CODES
■ Upon replacement, immediately return old electronic oven
NOTES:
■ For combo ovens, the failure code is displayed on the side of
■ Always unplug microwave oven or disconnect power before
touching internal parts of the oven!
FAULT
CODE
ERROR
CODE
F0
E0
F1
F2
the display that corresponds to the oven with faulty part
(upper oven = left side of display).
RECOMMENDED REPAIR PROCEDURE
Default F code – no failure
Will only be displayed if user presses and holds the UPPER OFF key for 5 seconds and
there is no pre-existing fault. Press CANCEL to clear display.
E0, E1, &
E2
Electronic control malfunction
Check oven door switch. If OK replace control.
E3, E4, &
E5
Electronic control malfunction
Replace control.
E0 or E1
E0
Keypad keytail not connected
Key held down too long, or key
is shorted
Temperature sensor opened
(lower cavity)
E1
Temperature sensor shorted
(lower cavity)
E2
Temperature sensor opened
(microwave)
E3
Temperature sensor shorted
(microwave)
E3
F3
F5
MEANING OF
FAILURE CODE
control using the mailing label supplied with each new control.
E0
E0
F6
E1
E0
Lower cavity over temperature
while cleaning
Lower cavity over temperature
during cooking
Microwave cavity over
temperature during cooking
Self-clean latch will not lock
E3
Self-clean latch will not unlock
Oven over temperature while
door open and latch lock
Oven over temperature while
door open and latch unlock
E4
Oven over temperature while
door close and latch unlock
E1
E2
F8
1. Check keypad connector for firm connection.
2. Press CANCEL. If error code returns after 60 sec., replace keypad.
1.
2.
3.
4.
1.
2.
3.
4.
Check lower cavity sensor connection.
Measure sensor resistance (1080Ω at 70° F [21° C]. Add 2Ω per degree F).
If resistance is not valid replace sensor.
If sensor resistance and connections are good, then check for welded-closed relays on the
control. If relay is shorted, replace control.
Check microwave sensor connection.
Measure sensor resistance (280kΩ at 70° F [21° C]; 1kΩ at 392° F [200° C]).
If resistance is not valid replace sensor.
If sensor resistance and connections are good, then check for welded-closed relays on the
control. If relay is shorted, replace control.
See F3, Error Code E0, above.
See F3, Error Code E0, above.
See F3, Error Code E2, above.
1. Check the latch assembly: Check latch arm pivot joint, arm/motor connection, plunger
and hook springs.
2. Check the Latch Motor:
- Check for firm electrical connections.
- Disconnect the two wires from the motor and measure the resistance of the motor.
The resistance should be approximately 2450Ω. If the motor is open (∞Ω) or
shorted (0Ω), it should be replaced.
3. Check the Latch Switch:
Disconnect it and use a continuity tester:
- Door latched = switch closed, continuity should read 0Ω.
- Door unlatched = switch open, continuity should read ∞Ω.
4. Check Door Open/Closed Switch:
Disconnect it and use a continuity tester:
- Door closed = switch closed, continuity should read 0Ω.
- Door open = switch open, continuity should read ∞Ω.
5. Check power and element connections.
Fahrenheit (° F) to Celsius (° C)
Conversion
1. Fill a glass measuring cup with 16 oz. (453cc) of tap
water. Stir the thermometer through the water until
the temperature stabilizes.
The default is Fahrenheit (° F).
2. Place the cup of water in the center of the oven.
Operate on HIGH for 60 seconds.
1. Press the BROIL pad for 5 seconds. The
temperature will be displayed in degrees Celsius
indicated by the “C” in the temperature display.
3. Stir the thermometer through the water and record
the maximum temperature.
2. To return the display to degrees Fahrenheit press
the BROIL pad again for 5 seconds. “F” will show in
the temperature display.
4. Subtract the cold water temperature from the hot
water temperature. The normal result should be a
20 - 38° F (11.1 - 21.1° C) rise in temperature.
Microwave Oven Power Output Test
NOTE: Less than a 20° F (11.1° C) temperature rise
may indicate an operating voltage of less than 110 volts
or a low power output from the magnetron. Cooking
time can be adjusted to compensate for either
circumstance. Replace the magnetron only if the water
temperature rise indicates a power output well beyond
the normal result.
The power output of the magnetron can be measured
by the following test: (for accurate results, the line
voltage must be 120 VAC and the oven cavity must be
clean).
PART NO. 8302004
FOR SERVICE TECHNICIAN'S USE ONLY