1
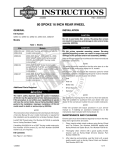
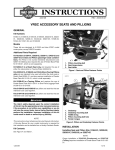
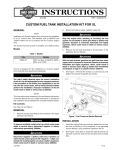
-J04979
REV. 2015-06-16
REAR AGITATOR WHEELS
Recommended Additional Parts
GENERAL
The following Harley-Davidson Genuine Motor Accessories
are recommended for proper maintenance and cleaning:
Install only wheels and installation kits approved for your
model motorcycle. Contact a Harley-Davidson dealer to
verify fitment. Mismatching wheels and installation kits or
installing wheels not approved for your model can cause
loss of control, which could result in death or serious
injury. (00610c)
•
Harley® Bright™ Chrome Cleaner (94683-99) (Not for use
on kit 40900112)
•
Harley® Glaze™ Polish and Sealant (99701-84)
•
Harley® Wheel and Spoke Brush (43078-99)
•
Harley-Davidson® Wheel and Tire Cleaner (94658-98)
Kit Numbers
•
Harley® Preserve Bare Aluminum Protectant (99845-07)
40225-10, 47951-10, 40900112, 40900459
Table 1. Rear Disc and Sprocket Hardware Fitment
Models
For model fitment information, see the P&A Retail Catalog or
the Parts and Accessories section of www.harley-davidson.com
(English only).
Kit Contents
Hardware
Fitment
Rear Disc Screws (select stock or chrome hardware)
5 Stock disc screws (43567-92) All models
See Figure 1 and the Service Parts Tables.
Chrome screw kit (46647-05)
includes 5 screws
Additional Parts Required
Rear Sprocket Screws (select stock or chrome hardware)
Separate purchase of tire (44006-09) is required for proper
installation of this kit.
5 Sprocket screw, stock (3109) 2007 and later Dyna and
Softail, 2007 Touring
This kit includes custom wheel only.
Chrome screw kit (94773-07)
2007 and later Dyna and
includes 5 screws and washers Softail
Proper installation of this kit requires the separate purchase
of the following parts which are available at a Harley-Davidson
dealer:
•
Wheel Installation Kit (See Table 3 and Table 4 to
determine required installation kit.)
•
Brake Disc Screws (See Table 1 to determine proper
hardware.)
•
Rear Sprocket Screws (See Table 1 to determine proper
hardware.) See the P&A Retail Catalog for chrome
sprocket hardware.
•
Wheel Bearing Remover and Installer (94134-09)
The rider's safety depends upon the correct installation
of this kit. Use the appropriate service manual procedures.
If the procedure is not within your capabilities or you do
not have the correct tools, have a Harley-Davidson dealer
perform the installation. Improper installation of this kit
could result in death or serious injury. (00333a)
NOTE
All models
5 Sprocket screw, stock (3737A) 2000-2005 Dyna, 20002006 Softail, 2004-2006
Touring
Chrome screw kit (94773-00A) 2000-2005 Dyna, 2000includes 5 screws and washers 2006 Softail
5 Sprocket screw, stock (3814) 2008 Touring
5 Sprocket screw, stock (3873) 2006 Dyna
5 Sprocket screw, stock (3899) 2000-2003 Touring, 2001
and later Sportster (except
Japanese models)
5 Sprocket screw, stock (40439- 2002-2006 VRSC and 2007
01)
VRSCR models
5 Sprocket screw, stock (4552) 2007 and later VRSC
models (except VRSCR and
VRSCSE models)
Rear Sprocket Washers
5 Sprocket washer, stock
(6516HW)
2006 and earlier Dyna, Softail and Touring and 2000
and later Sportster models
(except Japanese models)
5 Sprocket washer, stock (7039) 2002 and later VRSC
This instruction sheet references service manual information.
A service manual for your model motorcycle is required for this
installation and is available from a Harley-Davidson dealer.
-J04979
1 of 4
Many Harley-Davidson® Parts & Accessories are made of plastics and metals which can be recycled.
Please dispose of materials responsibly.
INSTALLATION
3.
Assemble wheel installation kit components, stock brake
disc and sprocket to wheel, using the appropriate service
parts table. See the service manual.
4.
Install primary bearing with a Wheel Bearing Remover and
Installer. See the service manual. The machined groove(s)
indicates the primary bearing side.
NOTES
Use plastic protectors on tire mounting tools and rim clamps
when mounting a tire to a painted wheel.
When mounting tires, liberally use tire lube on the wheel and
tire.
For tire removal, use plastic inserts between the rim and tire
after breaking the bead to create a large enough gap for the
rim clamps to get into.
Before removing or installing the wheel, the rear brake caliper
must be removed. The cotter pin or spring clip for the axle nut
must be replaced. They are available for separate purchase
from a Harley-Davidson dealer. See dealer for the correct part
number.
1.
Remove existing rear wheel assembly. Save axle, axle
nut, brake disc and wheel spacers for kit installation. See
the service manual.
NOTE
Install short valve stem (43157-83A) included in the installation
kit. Discard all other valve stems.
2.
See Figure 1. Install valve stem assembly (H) on wheel.
See the service manual.
Do not re-use brake disc/rotor screws. Re-using these
screws can result in torque loss and damage to brake
components. (00319c)
NOTES
Install the required (separately purchased) tire.
If the wheel has a yellow dot sticker on the rim, orient the tire
so the white dot is opposite of the sticker. If the wheel has a
green dot sticker on the rim, orient the tire so the white dot is
aligned with the sticker. If no rim dot sticker is present, see the
service manual.
5.
Mount new tire (purchased separately) to the wheel. See
the service manual.
6.
Install rear wheel (1), stock axle, sprocket and stock
spacers to motorcycle. See the service manual.
MAINTENANCE AND CLEANING
Chrome parts must be maintained regularly so they keep their
original shine and luster.
1.
Clean heavily-soiled wheel surfaces using Harley-Davidson
Wheel and Tire Cleaner, applied with Harley Wheel and
Spoke Brush.
2.
Thoroughly clean chrome with a good quality chrome
cleaner, such as Harley Bright Chrome Cleaner.
3.
After cleaning and polishing, seal the finish with a good
quality sealer, such as Harley Glaze Polish and Sealant.
Do not re-use sprocket mounting screws. Re-using
sprocket mounting screws can result in torque loss and
damage to the sprocket and/or belt assembly. (00480b)
-J04979
2 of 4
SERVICE PARTS
1
is06213a
4
C
A
A
B
H
Figure 1. Service Parts: Rear Agitator Wheel (18-inch shown)
Table 2. Service Parts and Wheel Kit Contents
Kit
Item
Description (Quantity)
40225-10, 47951-10,
40900112, 40900459
1
Wheel
4
Machined groove (all wheels)
Part Number
Not Sold Separately
Visual indicator mentioned in text:
Table 3. REAR 25mm Bearing Wheel Installation Kit (41456-08C)
REAR 25 MM Bearing Wheel Installation Kit (41456-08C)
Fitment
Wheel Size
Item (Quantity Used and Description)
A
C
D
E
F
H
I
J
2009 and later FLT without ABS
16 x 5.0 in
2
1
0
0
0
*
*
*
2009 and later FLT without ABS
18 x 5.0 in
2
1
0
0
0
*
*
0
2008 VRSCD without ABS
18 x 5.5 in
2
0
0
1
**
*
*
0
2013 and later FXSB, 2008 and later FXCW/C without ABS
18 x 8.0 in
2
0
1
0
0
*
*
0
2008 and later VRSCAW, VRSCDX and VRSCF without ABS
18 x 8.0 in
2
0
0
1
**
*
*
0
Installation kits are designed to work with many different wheel styles and fitments.
Contact a Harley-Davidson dealer to verify that the wheel and installation kits are
both designed and approved for the motorcycle they are being installed on.
NOTES:
* See NOTE above valve installation step in INSTALLATION to determine which
valve stem to use for your particular kit. Discard other valve stem(s).
** See INSTALLATION to determine if shim is required.
*** Bearing shim installed under primary bearing.
-J04979
A Bearing, regular (2)
9276A
C Axle sleeve
41349-07
D Axle sleeve
41358-08
E Axle sleeve
43704-08
F Bearing shim***
41447-08
H Valve stem, short
43157-83A
I
Valve stem, long
43206-01
J Valve stem, pull thru
40999-87
3 of 4
Table 4. REAR 25 MM Bearing ABS Wheel Installation Kit (41453-08C)
REAR 25 MM Bearing ABS Wheel Installation Kit (41453-08C)
Fitment
A
B
C
D
E
F
G
H
I
J
16 x 3.0 in
1
1
0
1
0
0
1
*
*
0
2014 and later XL with ABS (except 2014 and later 883L) 16 x 3.0 in
1
1
0
1
0
0
1
*
*
0
2009 and later FLT with ABS
16 x 5.0 in
1
1
1
0
0
0
0
*
*
*
2009 and later FLT with ABS
18 x 5.0 in
1
1
1
0
0
0
0
*
*
0
2008 VRSCDa with ABS
18 x 5.5 in
1
1
0
0
1
**
0
*
*
0
2008 and later VRSCAWa, VRSCDXa, VRSCXa and
VRSCFa with ABS
18 x 8.0 in
1
1
0
0
1
**
0
*
*
0
2008 FLT with ABS
Wheel Size
Item (Quantity Used and Description)
Installation kits are designed to work with many different wheel styles and fitments. Contact a Harley-Davidson dealer to verify that the wheel and installation kits are both designed and approved for the motorcycle they are being
installed on.
NOTES:
* See NOTE above valve installation step in INSTALLATION to determine
which valve stem to use for your particular kit. Discard other valve stem(s).
** Primary bearing. Bearing must be installed with red side facing the wheel.
*** Bearing shim installed under primary bearing.
-J04979
A Bearing, regular
9276A
B Bearing, ABS**
9252
C Axle sleeve
41349-07
D Axle sleeve
41900-08
E Axle sleeve
43704-08
F Bearing shim***
41447-08
G Bearing shim***
43904-08
H Valve stem, short
43157-83A
I
Valve stem, long
43206-01
J Valve stem, pull thru
40999-87
4 of 4