1
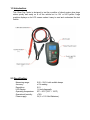
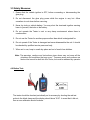
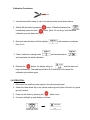
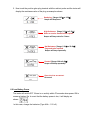
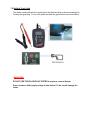
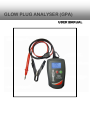
MULTI-VOLTAGE
GLOW PLUG ANALYSER (GPA)
USER MANUAL
1.0 Introduction:
This Glow Plug Tester is designed to test the condition of diesel engine glow plugs
status quickly and easily on or off the vehicle be it a 12V or 24V system. Large
graphics displays on its LCD screen makes it easy to read and understand the test
results.
2.0 Specification:
Measuring range:
Accuracy:
Resolution:
LED Display:
Operating temperature:
Operational humidity:
Power supply:
0.00 ~ 25.0 Ω with audible beeps.
± 2% reading
0.01
1.8 inch diagonally
0ºC ~ 50ºC (32ºF ~ 122ºF)
<70%.
3V (2 x 1.5V AAA Batteries).
3.0 Safety Measures:
1. Ensure that the vehicle ignition is OFF, before connecting or disconnecting the
glow plug.
2. Do not disconnect the glow plug power while the engine is very hot. Allow
sometime to cool down before removing.
3. Never lay tools on vehicle battery. You may short the terminals together causing
harm to yourself, the tools or the battery.
4. Do not operate the Tester in wet or very damp environment where there is
condensation.
5. Do not use the Tester for another purpose other than which is designated for.
6. Do not operate if the Tester is damaged and never disassemble the unit. It should
be checked by qualified service personnel only.
7. When not in use, keep in a safe dry place and out of reach from children.
Note: The warnings, cautions and instructions given above may not cover all the
situations and conditions that may occur. Common sense and cautions are
factors that cannot be built into this Tester, but must be adhered by operator.
4.0 Before Test:
The tester should be checked periodically on its accuracy by shorting the red test
probe to the black clamp and the display should show “0.00”. In event that it did not,
then a zero calibration should be done.
Calibration Procedures:
1. Use the tester black clamp to clip to its red test probe tip as shown above.
2. Switch ON the tester by pressing
immediately press and hold
button. When the display show
button. [Note: Do not let go until the whole
calibration process has completed.]
2. Moments later the tester will then display
with numbers countdown
from 5 to 0.
3. Then it switches to saving mode
and seconds later to
and completes the whole calibration.
4. Release the
button, the display will go to
and the alarm will
beep continuously. The reading should be 0.00 as shown if not repeat the
calibration procedures again.
5.0 OPERATION:
1. Disconnect the positive power supply to the glow plug terminal.
2. Attach the tester black clip to the vehicle chassis ground (Note: Ensure it is a good
ground contact).
3. Power up the tester by pressing the
button once.
4. Its screen will light up and display as follows:
5. Now touch the positive glow plug terminal with the red test probe and the tester will
display the resistance value of the plug as examples shown:
Good plug. [Range: 0.07Ω to 2.50Ω]
Beeper will beep once.
High Resistance. [Range 2.51Ω to 5.50Ω]
Refer car service manual before replace.
Beeper will beep twice for 5 times.
Bad Resistance. [Range: 5.51Ω to 25.00Ω]
Plug need to be replaced.
Beeper will beep repeatedly.
Shorted. [Range 0.00 to 0.06Ω]
Beeper will beep repeatedly.
Open circuit or no contact.
No sound
6.0 Low Battery Power
The tester will switch OFF if there is no activity within 70 seconds when power ON to
conserve battery life. In event that the battery power is low, it will display as
shown
.
In this case, change the batteries (Type AAA - 1.5V x2).
7.0 Build-in Torch Light
The tester comes with a built-in torch light to facilitate working in dim surroundings for
locating the glow plug. To turn ON, press and hold the green button as shown below:
WARNINGS!
DO NOT USE THIS GLOW PLUG TESTER to measure current (Amps).
Never (measure Volts) apply voltage to this device! To do so will damage the
tester.