1
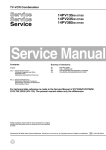
SERVICE MANUAL
MK14 Deck Mechanism Section
Deck Mechanism Part No.:
N25E1FL
TABLE OF CONTENTS
Standard Maintenance . . . . . . . . . . . . . . . . . . . . . . . . . . . . . . . . . . . . . . . . . . . . . . . . . . . . . . . 2-1-1
Service Fixture and Tools . . . . . . . . . . . . . . . . . . . . . . . . . . . . . . . . . . . . . . . . . . . . . . . . . . . . . 2-2-1
Mechanical Alignment Procedures . . . . . . . . . . . . . . . . . . . . . . . . . . . . . . . . . . . . . . . . . . . . . . 2-3-1
Disassembly / Assembly Procedures of Deck Mechanism . . . . . . . . . . . . . . . . . . . . . . . . . . . . 2-4-1
Alignment Procedures of Mechanism . . . . . . . . . . . . . . . . . . . . . . . . . . . . . . . . . . . . . . . . . . . . 2-5-1
Deck Exploded Views . . . . . . . . . . . . . . . . . . . . . . . . . . . . . . . . . . . . . . . . . . . . . . . . . . . . . . . . 2-6-1
Deck Parts List . . . . . . . . . . . . . . . . . . . . . . . . . . . . . . . . . . . . . . . . . . . . . . . . . . . . . . . . . . . . . 2-7-1
PAL
IMPORTANT SAFETY NOTICE
Proper service and repair is important to the safe, reliable operation of all
Funai Equipment. The service procedures recommended by Funai and
described in this service manual are effective methods of performing
service operations. Some of these service special tools should be used
when and as recommended.
It is important to note that this service manual contains various CAUTIONS
and NOTICES which should be carefully read in order to minimize the risk of
personal injury to service personnel. The possibility exists that improper
service methods may damage the equipment. It also is important to
understand that these CAUTIONS and NOTICES ARE NOT EXHAUSTIVE.
Funai could not possibly know, evaluate and advice the service trade of all
conceivable ways in which service might be done or of the possible
hazardous consequences of each way. Consequently, Funai has not
undertaken any such broad evaluation. Accordingly, a servicer who uses a
service procedure or tool which is not recommended by Funai must first use
all precautions thoroughly so that neither his safety nor the safe operation
of the equipment will be jeopardized by the service method selected.
STANDARD MAINTENANCE
Service Schedule of Components
This maintenance chart shows you the standard of replacement and cleaning time for each part.
Because those may replace depending on environment and purpose for use, use the chart for reference.
h: Hours
Deck
Ref.No.
Part Name
: Cleaning
I: Replace
Periodic Service Schedule
1,000 h
2,000 h
3,000 h
4,000 h
B2
Cylinder Assembly
B3
Loading Motor Assembly
B8
Pulley Assembly
I
I
B587
Tension Lever Assembly
I
I
B31
ACE Head Assembly
I
B573, B574
Reel S, Reel T
I
B37
Capstan Motor
I
I
B52
Cap Belt
I
I
*B73
FE Head
*B86
F Brake Assembly (HI)
I
I
B133
Idler Assembly (HI)
I
I
B410
Pinch Arm Assembly
I
I
B414
M Brake (SP) Assembly (HI)
I
I
B416
M Brake (TU) Assembly (HI)
I
I
B525
LDG Belt
I
I
I
I
I
I
Notes:
1.Clean all parts for the tape transport (Upper Drum with Video Head / Pinch Roller / ACE Head / FE Head)
using 90% ethyl alcohol.
2.After cleaning the parts, do all DECK ADJUSTMENTS.
3.For the reference numbers listed above, refer to Deck Exploded Views.
* B73 ------ Recording model only
* B86 ------ Not used in 2 head model.
2-1-1
U29PHSMEN
Cleaning
Cleaning of ACE Head
Cleaning of Video Head
Clean the head with a cotton swab.
Clean the head with a head cleaning stick or chamois
cloth.
Procedure
1.Remove the top cabinet.
2.Put on a glove (thin type) to avoid touching the
upper and lower drum with your bare hand.
3.Put a few drops of 90% ethyl alcohol on the head
cleaning stick or on the chamois cloth and, by
slightly pressing it against the head tip, turn the
upper drum to the right and to the left.
Procedure
1.Remove the top cabinet.
2.Dip the cotton swab in 90% ethyl alcohol and clean
the ACE Head. Be careful not to damage the
upper drum and other tape running parts.
Notes:
1.Avoid cleaning the ACE Head vertically.
2.Wait for the cleaned part to dry thoroughly before
operating the unit or damage may occur.
Notes:
1.The video head surface is made of very hard
material, but since it is very thin, avoid cleaning it
vertically.
2.Wait for the cleaned part to dry thoroughly before
operating the unit.
3.Do not reuse a stained head cleaning stick or a
stained chamois cloth.
ACE Head
Do Not touch
with your bare
hand!
Upper
Cylinder
Do Not !
Video Head
Cleaning Stick
2-1-2
U29PHSMEN
SERVICE FIXTURE AND TOOLS
J-1-1, J-1-2
J-2
J-3
J-4
J-5
Ref. No. Name
Part No.
Adjustment
J-1-1
Alignment Tape
FL6A
Head Adjustment of ACE Head
J-1-2
Alignment Tape
FL6N8
(2 Head model)
FL6NS8
(4 Head model)
Azimuth and X Value Adjustment of ACE Head /
Adjustment of Envelope Waveform
J-2
Guide Roller Adj. Screwdriver Available
Locally
Guide Roller
J-3
Mirror
Available
Locally
Tape Transportation Check
J-4
Azimuth Adj. Screwdriver +
Available
Locally
ACE Head Height
J-5
Flat Screwdriver -
Available
Locally
X Value
2-2-1
U29PFIX
MECHANICAL ALIGNMENT PROCEDURES
Explanation of alignment for the tape to correctly run
starts on the next page. Refer to the information below
on this page if a tape gets stuck, for example, in the
mechanism due to some electrical trouble of the unit.
Service Information
B. Method to place the Cassette Holder in the tapeloaded position without a cassette tape
1. Disconnect the AC Plug.
2. Remove the Top Case and Front Assembly.
3. Turn the LDG Belt in the appropriate direction
shown in Fig. M1. Release the locking tabs shown
in Fig. M1 and continue turning the LDG Belt until
the Cassette Holder comes to the tape-loaded
position. Allow a minute or two to complete this
task.
A. Method for Manual Tape Loading/Unloading
To load a cassette tape manually:
1. Disconnect the AC plug.
2. Remove the Top Case and Front Assembly.
3. Insert a cassette tape. Though the tape will not be
automatically loaded, make sure that the cassette
tape is all the way in at the inlet of the Cassette
Holder. To confirm this, lightly push the cassette
tape further in and see if the tape comes back out,
by a spring motion, just as much as you have
pushed in.
Top View
Moving guide T preparation
(Eject Position)
Moving guide S preparation
(Eject Position)
LOAD
UNLOAD
/EJECT
Side View
4. Turn the LDG Belt in the appropriate direction
shown in Fig. M1 for a minute or two to complete
this task.
To unload a cassette tape manually:
1. Disconnect the AC plug.
LDG Belt
2. Remove the Top Case and Front Assembly.
3. Make sure that the Moving guide preparations are
in the Eject Position.
4. Turn the LDG Belt in the appropriate direction
shown in Fig. M1 until the Moving guide preparations come to the Eject Position. Stop turning when
the preparations begin clicking or can not be
moved further. However, the tape will be left wound
around the cylinder.
Push the tape
to load it.
Push the locking tab gently to unlock
when loading without a cassette.
5. Turn the LDG Belt in the appropriate direction continuously, and the cassette tape will be ejected.
Allow a minute or two to complete this task.
Fig. M1
Bottom View
LDG Belt (B)
UNLOAD
/EJECT
Cam Gear
Fig. M2
2-3-1
D5P4HSMA
1. Tape Interchangeability Alignment
Note:
To do these alignment procedures, make sure that the
Tracking Control Circuit is set to the preset position
every time a tape is loaded or unloaded. (Refer to
page 2-3-4, procedure 1-C, step 2.)
Equipment required:
Dual Trace Oscilloscope
VHS Alignment Tape (FL6NS8)
Guide Roller Adj. Screwdriver
Flat Screwdriver (Purchase Locally)
Note: Before starting this Mechanical Alignment, do all
Electrical Adjustment procedures.
Flowchart of Alignment for tape traveling
Loading (Use a blank tape.)
No good
Adjust the height of the Guide Rollers
(Supply side and take-up side).
(Use a blank tape.) (Page 2-3-3)
1-A
Check to see that the tape is not creasing
and that there is no slack on the supply
and take-up side Guide Rollers.
(Use a blank tape.)
1-A
Adjust the X Value for maximum envelope.
(Page 2-3-3) (Use Alignment Tape.) 1-B
Adjust the envelope. (Page 2-3-4)
Check the envelope.
Do the final tape-traveling test to see that
the tape runs normally in play mode without creasing or slacking.
1-A
OK
1-C
No good
1-C
OK
Adjust the Audio Section.
(Azimuth Alignment) (Page 2-3-5)
1-D
Check the audio output.
1-D
Check to see that the tape is not creasing
and that there is no slack on the REV Post.
(Use a blank tape.)
1-E
Completion
No good
OK
Check the following:
1. X Value (Page 2-3-3)
2. Envelope (Page 2-3-4)
No good
Adjust the X value and envelope. 1-B, 1-C
1-B, 1-C
OK
2-3-2
D5P4HSMA
1-A. Preliminary/Final Checking and
Alignment of Tape Path
4. If creasing or snaking is apparent, adjust the Tilt
Adj. Screw of the ACE Head. (Fig. M6)
Purpose:
To make sure that the tape path is well stabilized.
Azimuth Adj. Screw
Symptom of Misalignment:
If the tape path is unstable, the tape will be damaged.
ACE Head
Note: Do not use an Alignment Tape for this procedure. If the unit is not correctly aligned, the tape may
be damaged.
Flat
Screwdriver
1. Playback a blank cassette tape and check to see
that the tape runs without creasing at Guide Rollers
[2] and [3], and at points A and B on the lead surface. (Refer to Fig. M3 and M4.)
2. If creasing is apparent, align the height of the guide
rollers by turning the top of Guide Rollers [2] and
[3] with a Guide Roller Adj. Screwdriver. (Refer to
Fig. M3 and M5.)
Guide Roller [2]
Guide Roller [3]
1-B. X Value Alignment
Purpose:
To obtain maximum PB FM envelope signal at the preset position of the Tracking Control Circuit, align the
Horizontal Position of the ACE Head.
1. Connect the oscilloscope to TP301 (C-PB) and
TP503 (CTL) on the Main CBA. Use TP504 (RFSW) as a trigger.
B
Take-up Guide Post [4]
Fig. M6
Symptom of Misalignment:
If the Horizontal Position of the ACE Head is not properly aligned, maximum PB FM envelope cannot be
obtained at the preset position of the Tracking Control
Circuit.
ACE Head
A
Tilt Adj. Screw
Fig. M3
2. Playback the Gray Scale of the Alignment Tape
(FL6NS8) and confirm that the PB FM signal is
present.
3. Set the Tracking Control Circuit to the preset position by pressing CH UP button and then “PLAY”
button on the unit. (Refer to note on bottom of page
2-3-4.)
4. Use the Flat Screwdriver so that the PB FM signal
at TP301 (C-PB) is maximum. (Fig. M6)
Lead Surface of Cylinder
Correct
Guide Roller
Tape
Fig. M4
Incorrect
Tape
Tape
Take-up Guide
Post [4]
Fig. M5
3. Check to see that the tape runs without creasing at
Take-up Guide Post [4] or without snaking between
Guide Roller [3] and ACE Head. (Fig. M3 and M5)
2-3-3
D5P4HSMA
either at the beginning or end of track as shown in
Fig. M9.
5. To shift the CTL waveform, press CH UP or CH
DOWN button on the remote control unit. Then
make sure that the maximum output position of PB
FM envelope signal becomes within ±2ms from
preset position.
Dropping envelope level at the beginning of track.
Good
FM envelope signal
2ms
Center Position
Fig. M8
Dropping envelope level at the end of track.
FM envelope output signal
is adjusted at maximum.
CTL signal
No Good
FM envelope output signal is low.
Fig. M9
Fig. M7
6. Set the Tracking Control Circuit to the preset position by pressing CH UP button and then “PLAY”
button on the unit.
Envelope is adjusted properly. (No envelope drop)
1-C. Checking/Adjustment of Envelope
Waveform
Purpose:
To achieve a satisfactory picture, adjust the Guide
Rollers so that the PB FM envelope becomes as flat
as possible.
Symptom of Misalignment:
If the envelope output is poor, noise will appear in the
picture. The tracking will then lose precision and the
playback picture will be distorted by any slight variation of the Tracking Control Circuit.
1. Connect the oscilloscope to TP301 (C-PB) on the
Main CBA. Use TP504 (RF-SW) as a trigger.
2. Playback the Gray Scale on the Alignment Tape
(FL6NS8). Set the Tracking Control Circuit to the
preset position by pressing CH UP button and then
“PLAY” button on the unit. Adjust the height of
Guide Rollers [2] and [3] (Fig. M3, Page 2-3-3)
watching the oscilloscope display so that the envelope becomes as flat as possible. To do this adjustment, turn the top of the Guide Roller with the
Guide Roller Adj. Screwdriver.
Fig. M10
Note: Upon completion of the adjustment of Guide
Rollers [2] and [3] (Refer to Fig. M3), check the X
Value by pushing the CH UP or DOWN buttons on the
unit alternately, to check the symmetry of the envelope. Check the number of pushes to ensure preset
position. The number of pushes of the CH UP button
on the unit to achieve 1/2 level of envelope should
match the number of pushes of the CH DOWN button
on the unit from center. If required, redo the “X Value
Alignment.”
3. If the envelope is as shown in Fig. M7, adjust the
height of Guide Roller [2] (Refer to Fig. M3) so that
the waveform looks like the one shown in Fig. M9.
4. If the envelope is as shown in Fig. M8, adjust the
height of Guide Roller [3] (Refer to Fig. M3) so that
the waveform looks like the one shown in Fig. M9.
5. When Guide Rollers [2] and [3] (Refer to Fig. M3)
are aligned properly, there is no envelope drop
2-3-4
D5P4HSMA
1-D. Azimuth Alignment of Audio/Control/ Erase Head
Purpose:
To correct the Azimuth alignment so that the Audio/
Control/Erase Head meets tape tracks properly.
2. When the tape has been curled up or bent, turn the
alignment screw to adjust the height of REV Post.
(Refer to Fig. M11 and M13.)
Symptom of Misalignment:
If the position of the Audio/Control/Erase Head is not
properly aligned, the Audio S/N Ratio or Frequency
Response will be poor.
REV Post [5]
1. Connect the oscilloscope to the audio output jack
on the rear side of the deck.
2. Playback the alignment tape (FL6NS8) and confirm
that the audio signal output level is 8kHz.
3. Adjust Azimuth Adj. Screw so that the output level
on the AC Voltmeter or the waveform on the oscilloscope is at maximum. (Fig. M6)
Note: Upon completion of the adjustment of Azimuth
Adj. Screw, check the X Value by pushing the CH UP
or DOWN buttons on the unit alternately, to check the
symmetry of the envelope. Check the number of
pushes to ensure preset position. The number of
pushes of the CH UP button on the unit to achieve 1/2
level of envelope should match the number of pushes
of the CH DOWN button on the unit from center. If
required, redo the “X Value Alignment.”
1-E. Checking and Alignment of Tape
Path during reversing
Take-up Guide Post [4]
Fig. M11
Correct
REV Post
Incorrect
Tape
Tape
Take-up Guide
Post
Fig. M12
Purpose:
To make sure that the tape path is well stabilized during reversing.
Symptom of Misalignment:
If the tape path is unstable during reversing, the tape
will be damaged.
Note: Do not use an Alignment Tape for this procedure. If the unit is not correctly aligned, the tape may
be damaged.
1. Insert a blank cassette tape into the tray and set
the unit to REV. Then confirm if the tape has been
curled up or bent at the Take-up Guide Post[4] or
REV Post[5]. (Refer to Fig. M11 and M12.)
2-3-5
Alignment
Screw
Tape Guide
Assembly
Fig. M13
D5P4HSMA
DISASSEMBLY/ASSEMBLY PROCEDURES
OF DECK MECHANISM
Before following the procedures described below, be sure to remove the deck assembly from the cabinet. (Refer
to CABINET DISASSEMBLY INSTRUCTIONS.)
All the following procedures, including those for adjustment and replacement of parts, should be done in Eject
mode; see the positions of [44] and [45] in Fig. DM1H on page 2-4-3. When reassembling, follow the steps in
reverse order.
STEP START/LOC.
ING
No.
No.
PART
Fig. No.
REMOVAL
REMOVE/*UNHOOK/
UNLOCK/RELEASE/
UNPLUG/DESOLDER
[1]
[1]
Guide Holder A
T
DM3H
[2]
[1]
Cassette Holder
Assembly
T
DM4H
[3]
[2]
Slider (SP)
T
DM5H
(S-1A), *(L-1)
[4]
[2]
Slider (TU)
T
DM5H
*(L-2)
[5]
[4]
Lock Lever
T
DM5H
*(L-3), *(P-1)
[6]
[2]
Cassette Plate
T
DM5H
[7]
[7]
Cylinder Assembly
T
DM1H, DM6H
Desolder, 3(S-2)
[8]
[8]
Loading Motor
Assembly
T
DM1H, DM7H
Desolder, LDG Belt,
2(S-3)
[9]
[9]
ACE Head Assembly
T
DM1H, DM7H
(S-4)
[10]
[2]
Tape Guide Arm
Assembly
T
DM1H, DM8H-1
*(P-2)
[11]
[10]
C Door Opener
T
DM1H, DM8H-1
(S-4A), *(L-4)
[12]
[11]
Pinch Arm (B)
T
DM1H, DM8H-1,
DM8H-2
*(P-3)
[13]
[12]
Pinch Arm (A)
Assembly
T
DM1H, DM8H-1,
DM8H-2
[14]
[14]
FE Head
T
DM1H, DM9H
(S-5)
[15]
[15]
Prism
T
DM1H, DM9H
(S-6)
[16]
[2]
Slider Shaft
T
DM10H
*(L-5)
[17]
[16]
C Drive Lever (SP)
T
DM10H
[18]
[16]
C Drive Lever (TU)
T
DM10H
(S-7), *(P-4)
[19]
[20]
[21]
[19]
[20]
[20]
Capstan Motor
Clutch Assembly (HI)
Center Gear
B
B
B
DM2H, DM11H
DM2H, DM12H
DM12H
3(S-8), Cap Belt
(C-1)
*[22]
[22]
F Brake Assembly (HI) B
DM2H, DM12H
*(L-6)
[23]
[24]
Worm Holder
Pulley Assembly (HI)
Mode Gear (LM)
B
B
B
[26]
[20],[25]
Mode Lever (HI)
B
Cam Gear (A) (HI)
B
TR Gear C
TR Gear Spring
TR Gear A/B
FF Arm (HI)
Idler Assembly (HI)
BT Arm
B
B
B
B
B
B
DM2H, DM13H-1
DM2H, DM13H-1
DM2H, DM13H-1
DM2H, DM13H-1,
DM13H-2
DM2H, DM13H-1,
DM13H-2
DM2H, DM13H-1
DM13H-1
DM13H-1
DM1H, DM14H
DM1H, DM14H
DM2H, DM14H
(S-9), *(L-7), *(L-8)
[25]
[22]
[22]
[25]
[27]
[28]
[29]
[30]
[31]
[32]
[33]
[22],[23],
[26]
[26]
[28]
[29]
[31]
[26]
[26]
INSTALLATION
ADJUSTMENT
CONDITION
2(S-1)
2-4-1
(C-2)
(C-3)
(C-4)
(+)Refer to Alignment
Sec.Page 2-5-1
(C-5)
*(L-9)
*(P-5)
U29PHSDA
STEP START/LOC.
ING
No.
No.
PART
Loading Arm (SP)
Assembly
Loading Arm (TU)
Assembly
REMOVAL
REMOVE/*UNHOOK/
UNLOCK/RELEASE/
UNPLUG/DESOLDER
Fig. No.
B
DM2H, DM14H
B
DM2H, DM14H
M Brake (TU)
Assembly (HI)
T
DM1H, DM15H
[2],[26]
M Brake (SP)
Assembly (HI)
T
DM1H, DM15H
[37]
Tension Lever
Assembly
T
DM1H, DM15H
[34]
[26]
[35]
[34]
[36]
[16],[26]
[37]
[38]
[39]
[40]
[41]
[38]
T Lever Holder
M Gear (HI)
[40]
[15],[40] Sensor Gear (HI)
T
T
T
DM15H
DM1H, DM15H
DM1H, DM15H
[42]
[36],[40] Reel T
T
DM1H, DM15H
Reel S
T
DM1H, DM15H
[43]
[38]
[44]
[34],[38]
Moving Guide S
Preparation
T
DM1H, DM16H
[45]
[35]
Moving Guide T
Preparation
T
DM1H, DM16H
[46]
[19]
TG Post Assembly
T
DM1H, DM16H
[47]
[27]
Rack Assembly
R
DM17H
[48]
[47]
F Door Opener
R
DM17H
[49]
[49]
Cleaner Assembly
T
DM1H, DM6H
[50]
↓
(1)
[49]
↓
(2)
CL Post
T DM6H
↓
↓
(5)
(4)
↓
(3)
INSTALLATION
ADJUSTMENT
CONDITION
(+)Refer to Alignment
Sec.Page 2-5-1
(+)Refer to Alignment
Sec.Page 2-5-1
*(P-6)
*(L-10)
(C-6)
(C-7)
(S-11), Slide Plate
*(L-11)
(+)Refer to Alignment
Sec.Page 2-5-1
*(L-12)
↓
(6)
↓
(7)
(1): Follow steps in sequence. When reassembling, follow the steps in reverse order.
These numbers are also used as identification (location) No. of parts in the figures.
(2): Indicates the part to start disassembling with in order to disassemble the part in column (1).
(3): Name of the part
(4): Location of the part: T=Top B=Bottom R=Right L=Left
(5): Figure Number
(6): Identification of parts to be removed, unhooked, unlocked, released, unplugged, unclamped, or desoldered.
P=Spring, W=Washer, C=Cut Washer, S=Screw, *=Unhook, Unlock, Release, Unplug, or Desolder
e.g., 2(L-2) = two Locking Tabs (L-2).
(7): Adjustment Information for Installation
(+):Refer to Deck Exploded Views for lubrication.
.
* [ 22 ] F Brake Assembly (HI) is not used in 2 head model.
2-4-2
U29PHSDA
Top View
[44]
[7]
[45]
[9]
[49]
[46]
[8]
[14]
[13]
[11]
[15]
[38]
[10]
[12]
[37]
[36]
[43]
[32]
[41] [31] [40]
[42]
Fig. DM1H
Bottom View
[19]
[35]
[34]
[25]
[23]
[24]
[26]
[27]
[22]
[28]
[20]
[33]
Fig. DM2H
2-4-3
U29PHSDA
A
[3]
(S-1)
[4]
(S-1)
[1]
(L-1)
(L-3)
[5]
B
(L-2)
(S-1A)
[6]
(P-1)
Installation of [3] and [6]
First, insert [6] diagonally in [3] as shown below. Then,
install [6] in [3] while pushing (L-1) in a direction of
arrow. After installing [6] in [3], confirm that pin A of [3]
enters hole A of [6] properly.
Fig. DM3H
[3]
Pin D
Pin C
1
[2]
View for A
A
[6]
2
Hole A
Pin A
Installation of [4] and [6]
1 Slide
2 Pull up
Pin A
(L-1)
Install [6] in [4] while pulling (L-2) in a direction of
arrow. After installing [6] in [4], confirm that pin B of [4]
enters hole B of [6] properly.
[4]
Pin B
Slot A
View for B
Hole B
Pin B
[6]
(L-2)
Fig. DM5H
Slots B
Slot A
First, while pushing the locking tab as
shown in the right, slide and pull up the right
side on [2] to release Pin A and Pin B from
the slots A.
Then, remove Pin C and Pin D on [2] from
the slots B as shown.
Locking tab
View for A
Fig. DM4H
2-4-4
U29PHSDA
[11]
(L-4)
(S-4A)
[7]
[49]
(P-3)
[13]
[50]
Removal of [11]
1) Remove screw (S-4A).
2) Unhook spring (P-2).
3) Release (L-4) while
holding [12] with a
finger.
4) Loosen a finger
holding [12] and
remove [11].
(L-12)
[12]
[10]
(P-2)
A
(S-2)
Pin of [12]
A
Pin of [10]
Groove of [27]
When reassembling [10] and
[12], confirm that pin of [10]
and pin of [12] are in the
[27] groove of [27] as shown.
Lead with
Red Stripe
Desolder
from bottom
View for A
Fig. DM8H-1
Fig. DM6H
View for A
(S-4)
[9]
[8]
A
Desolder
[8]
from bottom
(S-3)
Lead with White Stripe
LDG
Belt
View for A
Fig. DM7H
2-4-5
U29PHSDA
Installation of [13] and [12]
[14]
(S-5)
(S-6)
[13]
Hook spring (P-3) up to [12]
and [13], then install them to
the specified position so that
[12] will be floated slightly
while holding [12] and [13].
(Refer to Fig. A.)
[15]
(P-3)
[12]
Fig. A
Pin of [12]
Install pin of [12] in groove of [27].
(Refer to Fig. B.)
[27]
Fig. DM9H
[17]
Groove of [27]
(L-5)
Fig. B (Top view)
Press both [12] and [13] till the
groove of chassis pin appears,
and adjust [13] to the notch of
chassis. Then turn [13] a little
in the direction of the arrow
while pressing [12].
(Refer to Fig. C.)
Notch of
chassis
[13]
[16]
[18]
turn
(P-4)
[12]
Groove of
pin of chassis
Fig. C
Install [11] and [10] while holding [12].
(Refer to Fig. DM8H-1.)
Fig. DM8H-2
(S-7)
Fig. DM10H
2-4-6
U29PHSDA
[22]
(S-8)
turn
(C-1)
[20]
(L-6)
[21]
A
[19]
Cap Belt
Pin on [22]
Installation position of Cap Belt
[20]
Cap Belt
[27]
Position of pin on [22]
Fig. DM12H
[19]
View for A
Fig. DM11H
2-4-7
U29PHSDA
[26]
Installation of [26]
(C-3)
Position of Mode Lever when installed
Pin of [33]
(S-9)
Pin of [37]
Pin of [36]
(L-8)
[23]
(L-7)
[24]
Bottom View
(C-5)
(C-4)
[28]
[29]
[26]
(C-2)
[27]
[25]
[30]
Align [26] and [27] as shown.
First groove on [27]
[27]
First tooth on [47]
[27]
When reassembling [27],
meet the first groove on
[27] to the first tooth on
[47] as shown.
Top View
[31]
Fig. DM13H-2
Fig. DM13H-1
(P-5)
[33]
Refer to the Alignment
Section, Page 2-5-1.
[35]
[32]
(L-9)
[34]
Fig. DM14H
2-4-8
U29PHSDA
[38]
[36]
[43]
(P-6)
turn
[39]
(L-10)
turn
turn
[42]
[48]
[47]
Slide
[37]
Fig. DM17H
(C-7)
[41]
(C-6)
[40]
Fig. DM15H
[44]
[45]
[46]
(L-11)
Slide Plate
(S-11)
Fig. DM16H
2-4-9
U29PHSDA
ALIGNMENT PROCEDURES OF MECHANISM
The following procedures describe how to align the
individual gears and levers that make up the tape
loading/unloading mechanism. Since information
about the state of the mechanism is provided to the
System Control Circuit only through the Mode Switch,
it is essential that the correct relationship between
individual gears and levers be maintained.
All alignments are to be performed with the mechanism in Eject mode, in the sequence given. Each
procedure assumes that all previous procedures have
been completed.
IMPORTANT:
If any one of these alignments is not performed properly, even if off by only one tooth, the unit will unload or
stop and it may result in damage to the mechanical or
electrical parts.
Alignment 1
Loading Arm (SP) and (TU) Assembly
Install Loading Arm (SP) and (TU) Assembly so that
their triangle marks point to each other as shown in
Fig. AL2.
Alignment 2
Mode Gear
Keeping the two triangles pointing at each other, install
the Loading Arm (SP) Assembly so that the last tooth
of the gear meets the most inside teeth of the Mode
Gear. See Fig. AL2.
Triangle Marks
Loading Arm
(SP) Assembly
Alignment points in Eject Position
Last Tooth
Top View
Alignment 2
Loading Arm
(TU) Assembly
Most inside teeth
of Mode Gear
Alignment 1
Alignment 3
Mode Gear
Fig. AL2
Alignment 3
Cam Gear (A) (HI), Rack Assembly
Bottom View
Install the Rack Assembly so that the first tooth on the
gear of the Rack Assembly meets the first groove on
the Cam Gear (A) (HI) as shown in Fig. AL3.
Alignment 1
Alignment 2
Top View
Cam Gear (A)(HI)
Alignment 3
First tooth
Fig. AL1
First groove
Gear on Rack Assembly
on the Cam Gear (A)(HI)
Fig. AL3
2-5-1
U29PHSAPM
DECK EXPLODED VIEWS
Deck Mechanism View 1
Mark
Description
Floil G-684G or Multemp MH-D (Blue grease)
SLIDUS OIL #150
B2
B35
L1467 B494
B553
L1191
B73
B9
B10
B411
B567
L1053
B410
B74
L1051
Chassis Assembly
Top View (Lubricating Point)
B5
L1322
B501
L1450
L1450
B12
B121
B126
B11
B571
L1466
B8
B492
B37
B86
Chassis Assembly
Bottom View (Lubricating Point)
Some Ref. Numbers are not in sequence.
2-6-1
U29P4HSDEX
Deck Mechanism View 2
Mark
B587
B487
B521
B591
B416
Description
Floil G-684G or Multemp MH-D
(Blue grease)
SLIDUS OIL #150
SANKOUL FG84M (Yellow grease)
B590
B508
B499
B522
B573
B574
B585
L1406
B148
B3
B592
B558
B518
B564
B557
B31
B414
B572
B565
L1151
B525
B417
B568
B578
B133
B579
B551
B582
B580
A
B491
B583
B579
B513
B488
B581
Bottom Side
(Grease point)
B559
View
for A
B507
B516
B52
Bottom Side (Grease point)
Some Ref. Numbers are not in sequence.
2-6-2
U29P4HSDEX
Deck Mechanism View 3
Mark
L1321
B347
Description
Floil G-684G or Multemp MH-D (Blue grease)
SLIDUS OIL #150
L1321
B355
B354
B483
L1341
B425
B482
B562
B300
B563
B313
B529
B360
B359
B361
B555
B303
Some Ref. Numbers are not in sequence.
B514
2-6-3
U29P4HSDEX
DECK PARTS LIST
Ref. No.
Ref. No.
Description
Part No.
B2
CYLINDER ASSEMBLY MK12.5 PAL 6HD or
N236CCYL
B3
B5
CYLINDER ASSEMBLY MK12.5 PAL 6HD(V)
LOADING MOTOR ASSEMBLY MK14
SLIDE PLATE MK12.5
N236DCYL
1VSA12912
0VM416429
B8
B9
B10
PULLEY ASSEMBLY(HI) MK12
MOVING GUIDE S P.P MK12.5
MOVING GUIDE T P.P MK12.5
0VSA13501
1VSA12887
1VSA12886
B11
B12
B31
LOADING ARM(TU) ASSEMBLY MK12
LOADING ARM(SP) ASSEMBLY MK12
AC HEAD ASSEMBLY MK12.5
1VSA12880
1VSA12879
1VSA12888
B35
B37
B52
TAPE GUIDE ARM ASSEMBLY MK12.5
CAPSTAN MOTOR HI 288/VCZC1301
CAP BELT MK10
1VSA12889
N9688CML
0VM411138
B73
FE HEAD(MK12) HVFHP0047A or
FE HEAD(MK12) VTR-1X2ERS11-155 or
HEAD FE VTR-1X2ERS11-167
DHVEC01AL007
DHVEC01TE005
DHVEC01TE006
B74
PRISM MK10
0VM202870
B86
B121
F BRAKE ASSEMBLY(HI) MK12
WORM MK12
0VSA13447
0VM414091
B126
PULLEY MK12
0VM414330B
B133
B148
IDLER ASSEMBLY(HI) MK12
TG CAP MK6
1VSA12903
0VM407664C
B300
B303
B313
B347
B354
B355
B359
B360
B361
B410
B411
B414
C DRIVE LEVER(TU) MK12
F DOOR OPENER MK12
C DRIVE SPRING MK12
GUIDE HOLDER A MK10
SLIDER(TU) MK12
SLIDER(SP) MK12
CLEANER LEVER MK10
CLEANER ROLLER MK9
CL POST MK10
PINCH ARM(A) ASSEMBLY(5) MK12
PINCH SPRING MK12
M BRAKE(SP) ASSEMBLY(HI) MK12 or
M BRAKE SP ASSEMBLY HI MK14
M BRAKE(TU) ASSEMBLY(HI) MK12
TENSION SPG(3002645) MK12.5
LOCK LEVER SPRING MK10
CASSETTE PLATE
LOCK LEVER MK12
BAND BRAKE(SP) MK12.5
MODE LEVER(HI) MK12.5
CAM GEAR(A)(HI) MK12
MODE GEAR(LM) MK12
C DOOR OPENER MK12
T LEVER HOLDER MK12
WORM HOLDER MK12
REEL WASHER MK9 5*2.1*0.5
S BRAKE SPRING(HI) MK12
P.S.W F 6*2.55*0.5
SCREW RACK MK14
REEL WASHER MK9 5*2.1*0.5
P.S.W CUT 1.6X4.0X0.5T
REV BRAKE SPG(HI) MK12
TG POST ASSEMBLY MK10
LDG BELT MK11
CLEANER ASSEMBLY MK10
FF ARM(HI) MK12
REV SPRING MK11
RACK ASSEMBLY MK14
MOTOR PULLEY U5
LOADING MOTOR RF-500TB-12560 or
LOADING MOTOR M31E-1 R-14 7441
CLUTCH ASSEMBLY(HI) MK12
C DRIVE LEVER(SP) MK12
SLIDER SHAFT MK12
M GEAR(HI) MK12
0VM203773
0VM203751C
0VM414145
0VM304920
0VM101172F
0VM101182K
0VM304413
0VM410032C
0VM411114
1VSA12881
0VM414644
0VSA13655
1VSA13333
0VSA13449
0VM414221G
0VM411110
1VM220271
0VM414095
1VM320582
0VM101352
0VM101176G
0VM204236
0VM305719
0VM305729C
0VM203767
0VM410058
0VM414899
0VM402629A
0VM411535B
0VM410058
0VM408485A
0VM414943
0VSA11012
0VM412804
0VSA11161
0VM306183
0VM412555
1VSA11842
0VM403205A
MMDZB12MF003
MMDZB12MM009
0VSA13450
0VM203772
0VM305762B
0VM305755
B416
B417
B425
B482
B483
B487
B488
B491
B492
B494
B499
B501
B507
B508
B513
B514
B516
B518
B521
B522
B525
B529
B551
B553
B555
B557
B558
B559
B562
B563
B564
20060412
Description
Part No.
B565
SENSOR GEAR(HI) MK12
0VM305756
B567
B568
PINCHI ARM(B) ASSEMBLY MK12.5
BT ARM MK12
1VSA12890
0VM305728
B571
B572
B573
B574
B578
B579
P.S.W CUT 1.6X4.0X0.5T
P.S.W CUT 1.6X4.0X0.5T
REEL S MK11
REEL T MK10
TR GEAR A MK10
TR GEAR B MK12
0VM408485A
0VM408485A
0VM203436
0VM202872C
0VM304440
0VM305900
B580
B581
B582
B583
B585
B587
B590
B591
B592
L1051
TR GEAR C MK12
CENTER GEAR MK11
TR GEAR SPRING MK10
CAM WASHER MK12
PSW(317505) MK11
TENSION LEVER ASSEMBLY MK12
BRAKE ARM(TU) MK12
BAND BRAKE(TU) MK12
TG POST MK10
SCREW B-TIGHT M2.6X6 PAN HEAD+
0VM305743A
0VM305081
0VM411187C
0VM414741
0VM413663
1VSA12878
0VM203752E
0VM305724C
0VM411108E
GPJB9060
L1053
L1151
L1191
SCREW S-TIGHT M2.6X8 WASHER HEAD+
SCREW SEMS M2.6X4 PAN HEAD+
SCREW S-TIGHT M2.6X8 WASHER HEAD+
GCJS9080
CPJ39040
GCJS9080
L1321
L1322
L1341
L1406
L1450
L1466
L1467
SCREW S-TIGHT M3X6 BIND HEAD+
SCREW B-TIGHT M2.3X4 BIND HEAD+
SCREW P-TIGHT M2X6 PAN HEAD+
AC HEAD SCREW MK14
SCREW SEMS M2.6X5 PAN HEAD+
SCREW S-TIGHT M2.6X6 BIND HEAD+
SCREW M2.6X5 WASHER HEAD+
GBJS3060
GBJBY040
GPJP2060
0VM410964A
CPJ39050
GBJS9060
SCJ39050
2-7-1
N25E1FLDPL
N25E1FL
2006-05-10