1
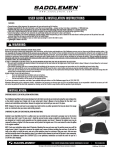
PERFORMANCE
ERFORMANCE
SEAT
EAT
KIT
IT
F EATURES
OF THE
S ADDLEMEN P ERFORMANCE S EAT K ITS :
• Second-to-none styling improves the appearance of your motorcycle and its function.
• Each kit has been developed to improve the motorcycle's saddle, most applications have several options to choose from
• Kits include specially shaped Saddlemen progressive density foam with a SaddleGel insert - this not only creates a plush seating
surface, but it provides additional support and vibration damping to maximize comfort regardless of the seat's thickness
• Expertly cut and sewn seat cover has integrated headliner foam layer to a smooth appearance and provides extra cushion
• Each cover is assembled using high quality, Marine-grade vinyl which is element resistant and holds up to extreme heat or cold
• Most kits are available with standard height foam with optional lower and/or higher profiles
• Other options include touring-type shapes and cover materials to enhance comfort during long period in the saddle
• Two-up, one-piece seats feature two GEL pads so the passenger comfort is improved
• Most Sportbike applications include a pillion cover so you can match the driver and passenger seats
• Some crossover applications have both sport and touring-oriented seat kit options
• Easy to install by your local dealer or yourself
• Includes easy-to-follow instructions that are chocked full of tips from Saddlemen's expert seat craftsmen
• Don't want to do it yourself? Each kit includes certificate for $20 cover installation at Saddlemen (return shipping additional)
• Each seat kit is designed and made in the USA.
READ THESE INSTRUCTIONS THOROUGHLY BEFORE INSTALLATION!
Because of the variety of motorcycle configurations, other accessories, and the features and intended use of this accessory seat foam and cover kit, there may be different
mounting options. You are responsible for the proper installation of this accessory on your motorcycle. Your attention to these installation instructions and recommendations
will permit safe and proper use of this accessory. You must mount this accessory properly and securely before riding your motorcycle. If you lack the ability to safely and
properly install this accessory, seek out a qualified motorcycle technician for assistance. During installation you should support the motorcycle with a suitable stand or lift
so it will not tip over and injure you, or damage the vehicle. Using or mounting this accessory improperly could result in a loss of control of the motorcycle which could result
in damage to your motorcycle or other personal property, the property of third parties, and/or personal injury to yourself or others, up to and including death.
BE SURE TO THOROUGHLY READ AND CLOSELY FOLLOW THE MOUNTING INSTRUCTIONS THAT ARE INCLUDED WITH THIS ACCESSORY:
• The seat must be reassembled and securely fastened to the motorcycle in the same fashion as the original seat(s). Refer to your vehicle’s Owner’s Manual or Service
Manual for seat removal and reinstallation instructions.
• If the vehicle’s passenger grab strap is removed during the installation of the accessory seat kit make sure it is reinstalled and secure before riding.
• If you do not understand the foam or cover installation instructions DO NOT mount the seat or cover. Remove any items you may have already installed on your motorcycle.
• If your seat is ever damaged, do not use it until it has been inspected by your local professional motorcycle dealer. Replace any seat immediately if it has damage that will
prevent it from being properly secured to your motorcycle.
DO NOT ATTEMPT TO USE THIS ACCESSORY IF:
• You do not understand these installation and use instructions,
• You do not understand any part of the accessory mounting system,
• You have any doubts as to the security of the mounting system.
If you have any concerns or questions, seek help at your qualified motorcycle dealer or call the Saddlemen support line at (310) 638-1222.
Remember: Motorcycling can be a dangerous activity. Installation of any accessory can increase your risk if it is not installed properly. You are responsible to install this
accessory so it will not contact any portion of the drive train, suspension or steering, and so that it will in no way interfere with the operation of your motorcycle.
SEAT KIT FOAM & COVER INSTALLATION:
Your new Performance Seat Kit has been engineered to fit on your motorcycle’s
original injected-plastic seat base. Depending upon the model and kit you selected,
you will have a foam and cover for each seat on your motorcycle. Be aware that
some kits have a cover only to replace the passenger seat cover, while select kits
only have foam and cover for the rider’s seat. Regardless of the kit’s configuration,
the foam and cover installation process is similar.
NOTE: Seat foam and cover installation takes about 30 minutes. If you lack the
tools or the ability to install the seat kit, contact the Saddlemen support line
(310-638-1222) as our seat artisans can install this cover for you for a $20.00
fee (plus shipping). See page five for more information.
Triumph Bonneville Thruxon
Seat Kit shown..
Continued on next page...
www.saddlemen.com
17801 SOUTH SUSANA ROAD, RANCHO DOMINGUEZ, CA 90221
The images in this instruction set may be different than your accessory or motorcycle.
(310) 638-1222 1 / 5
11-400296 v2 11-06-2013
STEP 2
INSTALLATION INSTRUCTIONS (continued):
Remove the seat from your motorcycle following the instructions listed it your vehicle’s
owner’s manual or the service manual.
STEP 1
CAUTION: Place the seat on a clean work surface free of debris or other objects that
could damage the seat or its cover.
STEP 1: Use an awl and a pliers to carefully pry up and remove the staples holding the
cover to the plastic seat base. Keep the removed staples away from the seat so you won’t
damage the cover. Once all the staples are removed, move to STEP 2.
TIP: Before touring the staples, take note of the staple spacing and location 1.
Maybe take a photograph so you can mimic the pattern when you staple the seat
kit’s cover in place.
1
STEP 2: Carefully peel the stock cover 2 back off the seat’s foam 3. In some cases the
cover may be glued or bonded to the foam, so the foam may lift off the pan without having
to separate the cover from the foam. If this is the case, move on to STEP 4. Other wise,
once the cover is removed from the foam, move to STEP 3.
NOTE: If you have difficulty separating the cover or foam that could be glued to the
seat pan, use some heat from a device such as a hair dryer. The heat will soften the
adhesive allowing the parts to separate. Use extreme care when using a higher capacity heat gun as it is possible to damage the vinyl, foam or the plastic pan of the
seat.
2
3
STEP 2
STEP 3: Carefully peel the foam 3 from the plastic pan 4. The cover may be glued to the
pan so use caution to not force it off so it will not tear. Once the foam is removed from the
pan, move to STEP 4.
3
4
STEP 3
STEP 4: With the original foam removed, clean any residual foam or glue from the seat pan.
Making sure the pan 4 is clean will aid in the seat kit installation, even if you elect to not
glue the new foam to the pan. Once the seat pan is clean, move on to STEP 5.
4
NOTE: To aid in seat kit installation, unpack the kit components early in the installation process. Take the cover, unfold it and place it in a warm environment - like in
sunlight - so the heat will allow the cover to become pliable and wrinkle free.
STEP 4
Continued on next page...
www.saddlemen.com
17801 SOUTH
OUTH SUSANA
USANA ROAD
OAD, RANCHO
ANCHO DOMINGUEZ
OMINGUEZ, CA 90221
The images in this instruction set may be different than your accessory or motorcycle.
(310) 638-1222 2 / 5
11-400296 v2 11-06-2013
INSTALLATION INSTRUCTIONS (continued):
STEP 5
NOTE: While it is not essential, gluing the foam from your new seat kit to the pan will
aid your during installation. Obtain a quality Upholstery Spray Glue Adhesive from a
auto or marine supply store.
STEP 5 (optional): Spray a light coat of upholstery adhesive on the bottom of the foam 5.
Do not spray the adhesive on the pan as over-spray will contaminate and appearance of
the seat pan. Move to STEP 6.
5
STEP 6: Install the foam onto your seat pan. Position the foam so it is straight on the pan.
If you used glue, make sure the foam is adhering to the plastic and manipulate it so the
edge of the foam is even with the edges of the seat pan. Move on to STEP 7.
CAUTION: Before installing the cover and any new staples, note the length of the
removed staple(s). Be sure you are using the same length staples as the one(s) you
have removed. This precaution will protect your new seat from potential damage
which could occur when using staples that are too long. The incorrect length staple
could cause damage to the seat by protruding through the seat base and piercing
the seat's foam.
STEP 6
STEP 7: Use a ruler, or preferably a flexible tape measure, to locate the center line of the
seat foam and the cover. Mark these center points 6 on the seat as these marks will help
you align the cover on the seat.
REMINDER: If the new cover is wrinkled, or you desire a very snug fit, warm the
cover in the sun or use a hand-held hair-dryer (do not use a heat gun as this can
damage the cover). This heat will slightly expand the cover so after it is secured to
the seat base and it cools, its surface will be taut and firm.
6
STEP 7
STEP 8: With the cover 7 still warm, slip it over the foam, using the marks you made on
the inside of the cover to center it on the seat base. Some covers will have outer bands
(like the illustration at right) while others will have open edges - this is normal. Regardless
of the cover ‘edging, align it so the cover pattern on the top of the seat is centered. Move on
to STEP 9.
7
STEP 8
Continued on next page...
www.saddlemen.com
17801 SOUTH SUSANA ROAD, RANCHO DOMINGUEZ, CA 90221
The images in this instruction set may be different than your accessory or motorcycle.
(310) 638-1222 3 / 5
11-400296 v2 11-06-2013
INSTALLATION INSTRUCTIONS (continued):
STEP 9: Pull gently on the sides of the cover and staple it into place at four initial points 8.
Move on to STEP 10.
CAUTION: Insert the staples at the same approximate locations as the original staples.
This precaution will protect your new seat cover from damage which could occur if the
staples are inserted too close to the seat’s edge where they could protrude through the
seat base and foam.
8
STEP 9
STEP 10: Verify that the cover is centered properly and evenly on the seat base, and that
its surface is taut and firm. You may then begin to insert other staples using your upholstery
stapler 9. Pull gently on the cover as you staple it in place so the surface of the cover will
be tight. Move on to STEP 11.
9
STEP 10
STEP 11: Space the staples approximately 1/2-inch apart around the perimeter of the seat
base AT. Alternate staple installation from side-to-side and top-to-bottom.
Move on to STEP 11.
CAUTION: Work with deliberate care to avoid damaging the cover. As you staple the
cover in place, frequently check its appearance on the top of the seat. Do not hesitate
to remove staples, adjust the seat cover location or tension, and reinstall the staples.
While you want the cover to be taut and firm after installation, take care to not apply
too much tension to the cover when you staple it in place.
AT
STEP 11
STEP 12: Make sure you do not cover bumpers or tabs with the cover. This could prevent
the seat from properly mounting to your motorcycle. Route the cover AK carefully around
these features on the seat.
Move on to STEP 13.
CAUTION: As noted above, work with deliberate care when stapling the cover into
place. Please remember that a tear or hole in the in the cover material from careless
installation is not a defect and is not covered by the Saddlemen Limited Warranty.
AK
STEP 12
Continued on next page...
www.saddlemen.com
17801 SOUTH
OUTH SUSANA
USANA ROAD
OAD, RANCHO
ANCHO DOMINGUEZ
OMINGUEZ, CA 90221
The images in this instruction set may be different than your accessory or motorcycle.
(310) 638-1222 4 / 5
11-400296 v2 11-06-2013
INSTALLATION INSTRUCTIONS (continued):
STEP 13: Use a hair dryer to warm the seat to smooth out wrinkles in the cover. Let the seat
cool before mounting it to your motorcycle or sitting on it.
Congratulations for completing your seat kit installation.
WARNING: Some kits include a longer passenger grab strap to use in place of the
original strap (because of the different shaped seat foam). If you removed a passenger
grab strap from the seat or got a new strap with the kit, you must reinstall it when
placing the seat on your motorcycle. With the kit installation complete, reinstall the
seat(s) per the instructions in your vehicle’s Owner’s Manual or Service Manual.
STEP 13
IMPORTANT:
Failure to install the accessory seat kit, or passenger grab straps properly may allow portions of the seat(s) or related materials to contact the
vehicle’s moving parts or exhaust system. It is vital that you verify that the seat(s) and any related parts will not touch, or interfere with other
components throughout the vehicle’s entire range of motion. After 50 miles (80 kilometers) of riding, verify that the seats’ mounting is still tight
and secure. It is your responsibility to make sure that any accessory installation does not create an unsafe or illegal situation.
CARE OF YOUR SADDLEMEN ACCESSORY SEAT KIT:
Your Saddlemen foam and seat cover kit requires almost no maintenance, other
than periodic cleaning. Use Saddlemen Seat & Saddlebag Ultra Wash (#3101) for
the best results while cleaning, or use mild soap and water.
INSTALLATION CERTIFICATE
Thank you for purchasing your Saddlemen Performance Seat Kit. You are eligible
for $20.00 kit installation if you elect to have Saddlemen install your seat kit on to
your motorcycle’s seat. You are responsible for shipping your seat to Saddlemen
plus the return shipping charges. To obtain the special installation pricing, call the
Saddlemen support line at (310) 638-1222. When you call in you will be provided
a authorization code that will need to be written on the box in which you will ship
your seat into Saddlemen. Your pre-authorization call will also let us prepare for
your seat’s arrival so the installation will be expedited and your seat will be back
on its way to you in just a day or two. You will also have the ability to select other
options related to your seat, as explained by the Saddlemen support staff.
You must call Saddlemen in advance of sending in your seat. Seats sent in without prior authorization may be returned without notice.
The installation special applies only to seats from models for which the Saddlemen seat kit was designed for. If your kit includes a front
and rear seat cover, both will be installed for the $20 charge. While the installation only requires a business day or two to complete,
please remember the shipping time required when you send your seat to Saddlemen. When you speak to the Saddlemen support staff
you can discuss return shipping time and costs so you can make the best choice for your situation. Thank you.
SADDLEMEN LIMITED ONE-YEAR WARRANTY
Saddlemen warrants its products for defects in materials, design or workmanship for a period of one year after retail purchase. Items that are
defective will be repaired or replaced by Saddlemen at its sole discretion. Damage caused by improper use or improper installation is not a
defect; therefore repair or replacement of a damaged accessory will not be covered under this warranty. This warranty contains other provisions and conditions, so please visit www.saddlemen.com for additional information. Thank you for purchasing your new Saddlemen accessory. You can count on Saddlemen's quality, innovation, service and style. We want you to be completely satisfied. If you have any comments,
or are not satisfied with the performance of your Saddlemen accessory, please contact the Saddlemen support line at (310) 638-1222.
www.saddlemen.com
17801 SOUTH SUSANA ROAD, RANCHO DOMINGUEZ, CA 90221
The images in this instruction set may be different than your accessory or motorcycle.
(310) 638-1222 5 / 5
11-400296 v2 11-06-2013