1
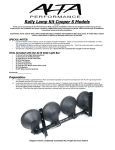
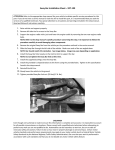
Version 2.0 19mm Rear Sway Bar Kit
07242008
Thank you for purchasing the ALTA MINI Performance rear sway bar kit. Installation should only be performed by persons experienced in the
proper operation of MINI suspensions systems. Please read through all the instructions before performing the installation.
SPECIAL NOTES:
•
•
•
Use of the factory service manual can be very helpful during the installation. These can be purchased at the dealership or online.
http://www.realoem.com has diagrams for the entire car, which can also be helpful.
It is critical that all bolts and nuts are tightened; improper tightening can cause serious injury or death.
Take extra precaution when driving car after sway bar is installed. The handling of your car will change dramatically!
Parts Included with your Sway bar
•
•
(1) 19mm Alta 3 setting rear sway bar.
(1) 19mm (9.5178) Bushing packet.
Checked By _______________
Removal of factory sway bar:
1.
2.
3.
4.
5.
6.
7.
Raise rear of vehicle onto jack stands or use commercial vehicle hoist.(NEVER WORK ON A VEHICLE SOLELY SUPPORTED BY A JACK!)
Remove both rear wheels.
Remove factory end links from both sides of vehicle. Endlink is indicated in left picture below.
Remove passenger side strut/spring assembly. (2) 13mm bolts and (1) 21mm bolt. Use care when disconnecting ABS and brake fluid lines
from clips on strut. Repeat strut removal on driver side. Left picture below shows strut.
Remove (4) 16mm bolts connecting rear sub frame to chassis. Right picture bellows indicates bolts to be removed. NOTE: Convertibles have
one extra bolt securing sub frame to chassis that needs to be removed. This is located in the center of the sub frame.
Remove sway bar bushing clamps from both sides of vehicle.(2) 13mm bolts each side. Left picture below indicates bushing clamps.
Remove sway bar through drivers’ side of car. Use caution not to snag wire harness. Note: Rear sub frame may need to be pulled down to
help facilitate ease of removal. Right picture below indicates, wire harness, and how far sub frame needs to be pulled down.
Installation of new bar:
1.
2.
3.
4.
5.
6.
7.
8.
9.
Route new bar through same area as stock bar was removed. Again, rear sub frame may need to be moved to help ease the installation, and
use care around factory wire loom. Install sway bar as shown in the picture below, with small flange on top.
Place new bar in the approximate final installed position.
Generously lube each bushing inside and out with supplied grease and place each over new sway bar. Note: Place each bushing in same
position as factory bushings removed prior!
Install new sway bar bushing clamps over new bushings using factory hardware removed prior. (2) 13mm bolts each side.
Re-install (4) 16mm bolts through sub frame and into uni-body. Tighten to factory specs prior to proceeding!
Re-install both strut/spring assemblies removed in step 4 above. Note connect both sides to the body (2) 13mm bolts each side before
connecting (1) 21mm bolt each side to sub frame. This will aid in installation and tightening of sub frame in step 6 below. Tighten all fasteners
to factory specs.
Connect factory end links to desired position on sway bar. There are 3 settings to the sway bar. The hole closest to rear of vehicle will result
in less oversteer, settings closer to the front of vehicle will result in more oversteer.
Re-install rear wheels and tighten lug bolts to factory specs.
Lower vehicle and test drive! If squeaks are present in the rear of vehicle after install, add additional lubrication to sway bar bushings.
NOTE: THE HANDLING OF YOUR VEHICLE WILL BE AFFECTED DRAMATICALLY WITH THE INSTALLATION OF THIS SWAY BAR AND THE
END LINK POSITION YOU CHOOSE. DRIVE VEHICLE CAUTIOUSLY UNTIL YOU BECOME FAMILIAR AND ACCUSTOMED TO THE NEW
HANDLING CHARACTERISTICS OF YOUR VEHICLE!
Percentage Increase in stiffness over OEM 17mm bar
ALTA 19mm
ALTA 22mm
Setting #3
178%
330%
Setting #2
141%
260%
Setting #1
115%
213%
PARTS TO GO WITH YOUR Mini Rear Swaybar:
•
•
•
ALTA Version 2.0 Endlinks
ALTA Version 2.0 Positive.Steering.Response.System.
ALTA Version 2.0 Supercharger Pulley
For questions & comments please contact
[email protected]
503-222-MINI
AIM contact ALTAPERRINSALES