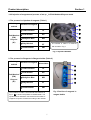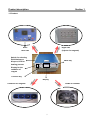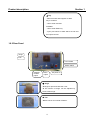
1
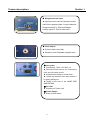
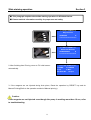
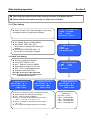
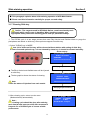
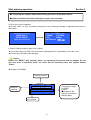
USER’S MANUAL
AFB Multi Stainer
AT-3001
■ User's manual (VER 2.1)
■ For safety and proper use of the product, please read this
operation manual carefully.
DAGATRONICS CORPORATION
117, TANJUNG-RO, ILSANSEO-GU, GOYANG-SI, GYEONGGI-DO, KOREA
TEL: 031-916-8005/ FAX: 031-916-8080 / URL: www.dagatron.com
Introduction
Thank you for purchasing Our AFB Multi Stainer. The AFB Multi stainer produced by us is high
technology product made under strict quality control. We guarantee their exceptional precision and
utmost reliability. For proper use of the product, please read this operation manual carefully and keep
this manual.
Note
1. To fully maintain the precision and reliability of the product use it in specified environment condition
(Temperature: 10°C~35°C, maximum relative humidity 80%)
2. This equipment should be used with a triple line power cord for safety.
4. For quality improvement the exterior design and specification of the product can be changed without
prior notice.
5. If you have further questions concerning use, please contact our service center or sales outlet.
Safety Summary
Please take a moment to read these operating instructions thoroughly and completely before operating
this equipment. Pay particular attention to WARNINGS used for conditions and actions that pose hazard
to the user and CAUTIONS used for conditions and actions that may damage the equipment.
Always to inspect the equipment and other accessories for any sign of damage or abnormality
before every use.
Never ground yourself and keep your body isolated from ground.
Never touch exposed wiring, connections or any live circuit conductors.
Do not install substitute parts or perform any unauthorized modification to the instrument.
Use caution when working above 60V DC or 30V AC rms. Such voltages pose a shock hazard.
Remember that line voltage is present on some power input circuit points such as on-off switches,
fuse, power transformers, etc., even when the equipment is turn off.
Also, remember that high voltage may appear at unexpected points in defective equipment.
2
Safety Symbols
1.
Protective earth (ground)
To identify any terminal which is intended for connection to
an external conductor for protection against electric shock
in case of a fault, or the terminal of a protective earth
(ground) electrode.
2.
Functional earth terminal on the rear panel.
3
"IN" position of a bi-stable push control
To associate the "IN" position of a bi-stable push control
with the corresponding function.
4.
"OUT" position of a bi-stable push control
To associate the "OUT" position of a bi-stable push control
with the corresponding function.
5.
Alternation current
To indicate on the rating plate that the equipment is
suitable for alternating current only to identify relevant
terminals.
6.
Caution, risk of danger
7.
Caution, risk of electric shock
3
Contents
Section
Page
■ Safety Summary ----------------------------------------------------------------------- 03
■ Section 1 Product description
1.1 Purpose of use ----------------------------------------------------------------------- 05
1.2 Usage ----------------------------------------------------------------------------------- 05
1.3 Features ------------------------------------------------------------------------------- 05
1.4 Injection of reagent and process of set up ------------------------------------ 06
1.5 Product --------------------------------------------------------------------------------- 08
1.6 Controls and connections --------------------------------------------------------- 09
■ Section 2 Installation and initial setup
2.1 Install Drain hose -------------------------------------------------------------------- 13
2.2 Connect AC Power ------------------------------------------------------------------ 14
2.3 Install reagent bottles --------------------------------------------------------------- 16
■ Section 3 Slide staining operation
3.1 Prime, T/S, Cleaning slide tray _ In F/L mode ------------------------------- 19
3.2 Prime, T/S, Cleaning slide tray _ In Z/N(Ki) mode -------------------------- 28
3.3 Cleaning inside Chamber --------------------------------------------------------- 37
3.4 Before use ---------------------------------------------------------------------------- 40
3.5 During use in F/L mode ----------------------------------------------------------- 42
3.6 During use in Z/N mode ------------------------------------------------------------ 48
3.7 After use ------------------------------------------------------------------------------- 54
■ Section 4 Preventive Maintenance
4.1 Routine and Preventive Maintenance (Daily/Weekly/Monthly) ----------- 56
4.2 Prevention of Contamination ----------------------------------------------------- 58
4.3 Remove broken Slide Glass ------------------------------------------------------ 59
■ Section 5 Solving problems --------------------------------------------------------- 60
■ Section 6 Technical Specification -------------------------------------------------- 63
■ Section 7 Warranty Conditions ----------------------------------------------------- 64
4
Product description
Section 1
1.1 Purpose of Use
■ AT-3001 AFB Multi Stainer
For diagnosing the acid fast bacilli, the fastest and economical best method is AFB smear inspection
through sputum. There are three ways (Ziehl-Neelsen, Kinyoun and Fluorescence staining) for Acid-fast
Staining method. This AFB Multi Stainer is automated AFB stainer for staining microscope slides
smeared with materials containing acid-fast micro organisms such as body fluids, culture materials, or
excudates for detecting AFB(TB). This Auto stainer is automated Ziehl-Neelsen staining with heating
system. It features safety, precise, convenience, save time comparing with manual staining.
1.2 Usage
After smearing and fixation of sputum on slide glass, set the slide glass on slide tray of this stainer and
select desired staining method(Ziehl-Neelsen, Kinyoun or Fluorescence) and just push "SATIN" key. The
stainer will stain automatically by programmed stain process. After staining, you just need to inspect the
slide glass by microscope and diagnose the status of acid fast bacilli by color and shape.
1.3 Features
This AFB Multi Stainer incorporates advanced features that make it ideal for routine clinical or industrial
applications, including ;
○ Available to stain for Ziehl-Neelsen, Kinyoun, Fluorescence (3 in one)
○ Minimize personal variation during AFB staining
○ Automation of staining
○ Minimal reagent usage.
○ Precise, microprocessor-controlled staining
○ Cleaning to purge nozzle and slide tray with alcohol and distilled water.
○ No cross-contamination in all process
○ Heating system to heat in carbol fuchsin staining(Ziehl-Neelsen only) automatically
○ Checking and Warning for lower level of reagent
○ Separate injection of reagents
5
Product description
Section 1
This paragraph explains about the name of reagents, Abbreviation, the process for setting of reagents.
1.4 Injection of reagent and process of set up
1.4.1 Injection of reagents and process of set up _ In Fluorescence
1. The process for injection of reagents (Table 1)
Staining
method
The name of reagents
Abbreviation
⑤
① Auramine-Rhodamine
AR
④
② Acid Alcohol
AA
③
②
PM
①
Fluorescence ③ Potassium
permanganate
(F/L)
④ Ethyl Alcohol
⑤ Distilled Water
The number in Table 1 is matched
ET
with number in Fig.1.
DW
Fig. 1 Injection Nozzles
2. The process for Reagents in Reagent holder (Table 2)
Staining
method
The name of reagents
Abbreviation
① Auramine-Rhodamine
AR
② Acid Alcohol
AA
Fluorescence ③ Potassium
(F/L)
permanganate
⑤
④
③
PM
②
④ Ethyl Alcohol
ET
①
⑤ Distilled Water
DW
Fig. 2 Position of reagents in
The numbers in Table 2 are matched with numbers in
Fig.2. ⑤ is shown the position of distilled water. The
injection tubes should be connected from the bottle of
reagents to injector of stainer according to the number.
6
reagent holder
Product description
Section 1
1.4.2 Injection of reagents and process of set up _ In Ziehl-Neelsen/Kinyoun mode
1. The process for injection of reagents (Table 1)
Staining
method
The name of reagents
Abbreviation
⑤
① Carbol Fuchsin
CF
Ziehl-Neelsen ② Acid Alcohol
(Z/N)
③ Methylene Blue
Kinyoun
(Ki)
④ Ethyl Alcohol
AA
⑤ Distilled Water
④
③
②
MB
①
The number in Table 1 is matched
ET
with number in Fig.1.
DW
Fig. 1 Injection Nozzles
2. The process for Reagents in Reagent holder (Table 2)
Staining
method
The name of reagents Abbreviation
⑤
① Carbol Fuchsin
CF
② Acid Alcohol
AA
③ Methylene Blue
MB
②
④ Ethyl Alcohol
ET
①
⑤ Distilled Water
DW
④
③
Ziehl-Neelsen
(Z/N)
Kinyoun
(Ki)
Fig. 2 Position of reagents in
The numbers in Table 2 are matched with numbers in
Fig.2. ⑤ is shown the position of distilled water. The
injection tubes should be connected from the bottle of
reagents to injector of stainer according to the number.
reagent holder
7
Product description
Section 1
1.5 Product
Drain
Right side
Rear side
(Injector for reagents)
Switch for selecting
Ziehl-Neelsen or
Kinyoun, LED for
heating process
Mode key
Display for the
condition of
reagent
Function key
Display
Inside of Chamber
Container for reagents
8
Product description
Section 1
1.6 Controls and display
1.6.1 Front panel
● Display
▲ Display selected Function and Mode.
Display the status of processing.
▲ Color : White letter on blue back ground
● Reagent Lack indicator
▲ Check the status(level) of reagents by sensor and
indicate for lacking of reagents by "RED" LED and
beep sound.
● Function key
▲ Select desired function number on Display. The
instrument is working according to selected function.
●
Increase slide quantities (Max.10)
; Max. 20 with additional tray in F/L stain.
●
Decrease Slide quantities (Min. 1)
● Mode Key
▲ Reset
- Initialize all of function.
- Use to stop the operation of Stainer.
9
Product description
Section 1
▲ Dry
- Remove water and reagents on slide
tray in chamber.
- Use to clean and test.
▲ Clean
- Use to clean Slide tray.
- Inject pure water to slides which are set and
then inject alcohol.
1.6.2 Rear Panel
Hinge
Fan
Fuse Holder
Power switch
Reagent
monitor
inputs
Drain
output
AC power In
● Hinge
▲ Hinge to open and close the cover.
▲ The tension of hinge can be adjusted by
Screw under hinge.
● Fan
▲ Blow out air from inside of Stainer.
10
Product description
Section 1
● Reagent monitor input
▲ Input terminal to connect Reagent monitor
cable from reagents holder. Connect between
Reagent holder(F/L, Z/N) and Reagent
monitor input(F/L, Z/N) of instrument.
● Drain output
▲ Connect drain hose(14Φ).
▲ Should be used "Standard supplied hose".
① Fuse holder
▲ Fuse Rating : T8AL / AC 250V x 2
▲ Disconnect and remove all connections
from any live power source.
▲ Unscrew fuse holder by screw driver.
▲ Locate the defective fuse and remove it
by gently pulling-out.
▲ Install a new fuse of the SAME SIZE
AND RATING.
② AC Inlet
▲ Connect AC Power cord.
③ Power Switch
▲ Power On/Off switch.
11
Product description
Section 1
1.6.3 Right Side
■ This paragraph explains about installation and initial set up for AFB Multi Stainer.
■ Please read this information and follows for proper use and safety.
① Label of reagents
▲ Label plates to show each name of reagents.
② Tubes including Connector
▲ Tubes for injecting reagents.
③ Holder(Container) for bottle of reagents
④ Sensor for sensing the level of reagents
⑤ 8P cable to transfer reagent level to Reagent lack
1.6.4 Inside of Chamber
① Slide Tray to set slide glass
② Micro switch to control cover on/off.
③ Nozzle for injecting reagents
④ Hole sensor to set initial position of slide(Number 1).
⑤ Drain hole to drain waste water
⑥ Horizontal gage
▲ Shown the status of horizontal balance.
※ Refer to "Injection of reagents and process of reagents" for the sequence of reagent injection.
12
Installation and initial setup
Section 2
■ This paragraph explains about installation and initial set up for AFB Multi Stainer.
■ Please read this information and follows for proper use and safety.
2.1 Install Drain hose
1. Place the instrument on a level counter surface
near a sink or drainageway.
Warning
If the drain hose is installed to drainageway
directly, "Waste water cleaning system" should
be set up.
2. Connect Drain hose to "Drain output" of
instrument. If there is no proper drain hose
(waste outlet way) within 1.5m, Use a waste container.
3. The waste container should be located under the
instrument for proper draining and the distance
Drain hose
should be connected as short as possible less
than 1.5 m.
Caution
The end of drain hose should not be touched
on bottom of waste water container.
If the drain hose is touched on the bottom of
container, it can be affect draining.
13
Waste
water
contai
Installation and initial setup
Section 2
■ This paragraph explains about installation and initial set up for AFB Multi Stainer.
■ Please read this information and follows for proper use and safety.
2.2
Connect AC Power
1. Check the Power switch is "Off" before
connecting AC Power into instrument.
2. Connect AC Power cord from AC Power
outlet to AC inlet of instrument.
14
Installation and initial setup
Section 2
■ This paragraph explains about installation and initial set up for AFB Multi Stainer.
■ Please read this information and follows for proper use and safety.
3. Turn the Power switch ON(I)..
The display window will show as follows;
▲ In case of zero position is not set,
====================
Find position
ZERO POSITION
SEARCHING
====================
■■■■■■■■■■■■■■■■■■■■
DAGATRONICS
Flickering company name
BIOMEDICAL
■■■■■■■■■■■■■■■■■■■■
===MULTI STAIN ===
F/L and Z/N(Ki)
1. Fluorescence
2. Ziehl-Neelsen
Main screen display
15
Installation and initial setup
Section 2
■ This paragraph explains about installation and initial set up for AFB Multi Stainer.
■ Please read this information and follows for proper use and safety.
▲ In case of zero position is set,
■■■■■■■■■■■■■■■■■■■■
DAGATRONICS
Flickering company
name two times
BIOMEDICAL
■■■■■■■■■■■■■■■■■■■■
===MULTI STAIN ===
F/L and Z/N(Ki)
1. Fluorescence
2. Ziehl-Neelsen
Main screen
display
2.3 Install reagent bottles
Caution :
The reagents used in AFB Multi Stainer contain moderately toxic chemicals which require care in
handling. When handling reagents, use appropriate safety measures including gloves and eye
protection always.
1. Prepare reagents.
■ Reagents for Fluorescence Stain
■ Reagents for Ziehl-Neelsen/Kinyoun Stain
① Auramine-Rhodamine
① Carbol Fuchsin
②Acid Alcohol
② Acid Alcohol
③Potassium permanganate
③ Methylene Blue
④Ethyl Alcohol(Joint use with Z/N)
④ Ethyl Alcohol(Joint use with F/L)
▲ Refer to "Injection of reagents and process of set up(1.4)".
16
Installation and initial setup
Section 2
■ This paragraph explains about installation and initial set up for AFB Multi Stainer.
■ Please read this information and follows for proper use and safety.
Warning message
2. Set Reagent holder.
▲ Monitoring and warning for the level of reagents
===================
1) During staining
!!!!WARNING!!!!
- Red LED is turning on in Reagent Lack.
SUPPLY A REAGENT
- Warning beep sound.
====================
- Display will be flickering.
2) After staining
- Warning message is shown in display
until supplying reagent.
3. Connect 8pin cable between Reagent holder(Z/N, F/L) and
Reagent monitor input(Z/N, F/L) of instrument.
Caution :
The power should be "OFF" before connecting cable.
4. Insert reagent bottles in Reagent holder. Be sure reagents are in the correct position.
Caution :
Refer to "Injection of reagents and process of
MB
DW
set up(1.4)".
ETPM
AA
CF
AA
AR
To avoid damage of instrument, suggest to use
reagents which supply from our company.
17
Installation and initial setup
Section 2
■ This paragraph explains about slide staining operation of AFB Multi Stainer.
■ Please read this information carefully for proper use and safety.
5. Connect the tube to the connector of instrument. Just push the tube according to outer of connector. .
Caution :
The reagents should be connected correctly to
match with the label. To avoid leakage of reagents,
connector should be held to tubes with close contact.
7. Check the position of reagent bottles and the status of connection again.
18
Slide staining operation
Section 3
■ This paragraph explains about slide staining operation of AFB Multi Stainer.
■ Please read this information carefully for proper use and safety.
3.1 Prime, T/S, Cleaning slide tray _ IN F/L MODE (Choosing NO.1)
3.1.1 Priming(First injection of reagents before staining)
To get peak staining performance, thoroughly purge and prime each reagent delivery line
using following instructions.
Caution :
The reagents used in AFB Multi stainer contain moderately toxic chemicals which require care in
handling. When handling reagents, use appropriate safety measures including gloves and eye
protection always.
◎ The priming can be done in two ways(Manual or Auto).
■ Process for Fluorescence Stain
▲ Manual Priming : Select and prime each
① Auramine-Rhodamine
reagents separately. The manual prime
②Acid Alcohol
is doing only during the Key S/W is pushed.
③Potassium permanganate
▲ Auto Priming : No need to select reagents.
④Ethyl Alcohol
Prime each reagent by following process
⑤Distilled Water
automatically.
3.1.2 Manual Priming
1. Select function No. 1.
===== F/L STAIN =====
1.PRIME
2.A-PRIME
3.T/S
4.Main
Set Slide No. <10>pcs
====== PRIME ======
1.END
2.AR
3.AA
4.PM
2. To avoid for injecting reagents on empty slide tray,
set the slide tray for the injector is located between
slide tray and slide tray.
19
5.ET
6.DW
Slide staining operation
Section 3
■ This paragraph explains about slide staining operation of AFB Multi Stainer.
■ Please read this information carefully for proper use and safety.
3. Select the function number of reagent which will be primed.
▲ Prime only during the Key S/W is
pushed and the process is shown in display.
▲ The reagent will be injected from
injection nozzle.
▲ To remove air in injection tube, repeat
====== PRIME ======
1.END
4.PM
2.AR
5.Et
3.AA
6.DW
to inject reagent 2 or 3 times for each
2 second.
====== PRIME ======
AR PRIME
1.END
4.PM
2.AR
5.ET
3.AA
6.DW
4. Select all of reagent number and prime as above(3).
Caution:
1. Do not operate if the reagents
and distilled water is empty.
2. Check the injection is doing
well at each injection nozzle.
When the prime is done properly,
a steady stream of reagent (no
sputtering or breaks) from each
nozzle receptacle as the corresponding
button is pressed.
※ If the reagents are not injected even though the pump is working more than 10 sec, refer to
troubleshooting.
20
Slide staining operation
Section 3
■ This paragraph explains about slide staining operation of AFB Multi Stainer.
■ Please read this information carefully for proper use and safety.
5. After injecting all of reagents, press Function No. 1(END) to return F/L initial menu screen.
====== PRIME ======
1.END
2.AR 3.AA
4.PM
5.ET
=====
F/L STAIN =====
1.PRIME
2.A-PRIME
3.T/S
4. Main
Set Slide No. <10> pcs
6.DW
21
Slide staining operation
Section 3
■ This paragraph explains about slide staining operation of AFB Multi Stainer.
■ Please read this information carefully for proper use and safety.
3.1.3 Auto Priming
1. Select Function No. 2(A-Prime).
Display
====AUTO PRIME ====
===== F/L STAIN =====
1.PRIME
2.A-PRIME
3.T/S
4. Main
Set Slide No. <10> pcs
S
E
=================
====AUTO PRIME====
AURAMINE-RHODAMINE
S■■■
E
====================
====AUTO PRIME====
ACID ALCOHOL
S■■■■
E
=====================
====AUTO PRIME====
Pot.Permanganate
S■■■■■
E
====================
Caution :
Check the injection is doing well at each injection nozzle. When the prime is done
properly, a steady stream of reagent (no sputtering or breaks) from each nozzle receptacle as the
corresponding button is pressed.
22
Slide staining operation
Section 3
■ This paragraph explains about slide staining operation of AFB Multi Stainer.
■ Please read this information carefully for proper use and safety.
====AUTO PRIME====
Ethyl Alcohol
S■■■■■■■
E
===================
====AUTO PRIME====
DISTILLED WATER
S■■■■■■■■■■
E
===================
2. After finishing Auto Priming, return to F/L initial screen
automatically.
===== F/L STAIN =====
1.PRIME
2.A-PRIME
3.T/S
4. Main
Set Slide No. <10>pcs
3. If the reagents are not injected during Auto prime, Reset the operation by "RESET" key and do
Manual Priming(Refer to the operation method of Manual priming.)
Caution:
If the reagents are not injected even though the pump is working more than 10 sec, refer
to troubleshooting.
23
Slide staining operation
Section 3
■ This paragraph explains about slide staining operation of AFB Multi Stainer.
■ Please read this information carefully for proper use and safety.
3.1.4 Time Setting
▲ Select Function No.3(Time Setting) in main menu
to change the time for injecting and waiting.
▲ No.1(END): Return to MAIN MENU.
▲ No.2(WAIT TIME, Abb.: W/T)
Set the time for waiting after injecting of
reagent.
▲ No.3(INJECTION TIME, Abb.: I/T)
Set the time for injecting of reagent.
===== F/L STAIN =====
1.PRIME 2.A-PRIME
3.T/S
4. Main
Set Slide No. <10>pcs
== TIME SELECTION ==
1. END
2. WAIT TIME
3. INJECTION TIME
3.1.5 Wait Time Setting
▲
▲
▲
▲
▲
▲
Screen for selecting reagents.
Use FUNCTION No.1 to 5.
No1. : Return to previous MENU.
Select desired reagent to set time.
No5. : Go to initial standard value.
Standard value(STD-PRO.)
== W/T SELECTION ==
1. END
2. AR
3. AA
4. PM
5. STD-PRO.
AR: 2 Min 30 sec, AA: 2 Min, PM: 1 Min
Note: It can be different according to the
characteristics of stainer.
== AR W/T SET UP ==
SET AR TIME: M S
1.END 2.MIN+ 3.MIN4.SEC+ 5.SEC-
== AA W/T SET UP ==
SET AA TIME: M S
1.END 2.MIN+ 3.MIN4.SEC+ 5.SEC-
▲
▲
▲
▲
Screen for "Wait Time setup" of selected reagent.
Adjust waiting time after injecting reagent.
No1. : Return to previous MENU.
No.2,3 : Increase or decrease minutes in step 1.
- AR: 0 ↔ 10 , AA: 0 ↔5 , PM: 0 ↔ 5
▲ No.4,5 : Increase or decrease Second in step 5.
- 00 ↔ 55
▲ The changed value will keep until next change.
24
== PM W/T SET UP ==
SET PM TIME: M S
1.END 2.MIN+ 3.MIN4.SEC+ 5.SEC-
□ Reference □
○ M : Min., S :Sec
○ Min+ : Increase Min.
○ Min- : Decrease Min.
○ Sec+ : Increase Sec.
○ Sec- : Decrease Sec.
Slide staining operation
Section 3
■ This paragraph explains about slide staining operation of AFB Multi Stainer.
■ Please read this information carefully for proper use and safety.
3.1.6 Injection Time Setting
▲ No.1(END): Return to MAIN MENU.
▲ No.2(WAIT TIME, Abb.: W/T)
Set the time for waiting after injecting of reagent.
▲ No.3(INJECTION TIME, Abb.: I/T)
Set the time for injecting of reagent.
▲ Screen for selecting reagents.
▲ Use FUNCTION No.1 to 5.
▲ No1. : Return to previous MENU.
▲ Select desired reagent to set time.
▲ No5. : Go to initial standard value.
▲ Standard value(STD-PRO.)
AR: 0.5 Sec, AA: 0.5 Sec, PM: 0.5 Sec
Note: It can be different according to the
characteristics of stainer.
== AR I/T SET UP ==
SET AR TIME:
S
1.END 2.SEC+ 3.SEC-
== TIME SELECTION ==
1. END
2. WAIT TIME
3. INJECT TIME
== I/T SELECTION ==
1. END
2. AR
3. AA
4. PM
5.STD-PRO.
== AA I/T SET UP ==
SET AA TIME:
S
1.END 2.SEC+ 3.SEC-
▲ Screen for "Injection Time setup" for selected reagent.
▲ Adjust injecting time of reagent.
▲ No1. : Return to previous MENU.
▲ No.2,3 : Increase or decrease second in step 0.1.
- AR:0.0↔5.0, AA:0.0↔5.0, PM:0.0↔5.0
▲ The changed value will keep until next change.
== PM I/T SET UP ==
SET PM TIME:
S
1.END 2.SEC+ 3.SEC-
□ Reference □
○ S : Sec
○ Sec+: Increase Sec.
○ Sec-: Decrease Sec.
◎ Use the STANDARD PROCEDURE(STD-PRO.) to return to initial standard value.
◎ The last condition is keeping until next change of value.
◎ Use this function to change time for proper staining during use in laboratory.
25
Slide staining operation
Section 3
■ This paragraph explains about slide staining operation of AFB Multi Stainer.
■ Please read this information carefully for proper use and safety.
3.1.7 Cleaning Slide tray
Caution : The reagents used in AFB Multi Stainer contain moderately toxic
chemicals which require care in handling. When handling reagents, use
appropriate safety measures including gloves and eye protection always.
◎ The CLEAN cycle is a two stage process that uses Ethyl Alcohol and Distilled Water to purge the
precipitates and debris on slide tray, then reprimes reagents into slide tray.
1. Select "CLEAN" key in MODE.
Note: All of slides on first tray will be cleaned without relation with setting of slide Q’ty.
In case of second optional tray, it is not cleaned by clean key. It should be cleaned manually.
Shown display
====== CLEAN =======
ETHYL ALCOHOL
S■■■■■■■
E
====================
DRY(High speed rotation)
▲ The Ethyl Alcohol and distilled water will be injected
on slide tray.
====== CLEAN ======
▲ The bar graph is shown the status of cleaning.
Distilled Water
S■■■■■■■■■■■■E
==================
Note:
Check the status of injection from each nozzle.
DRY(High speed rotation)
2. After cleaning cycle, return to main menu
(Mode selection) automatically.
Note :
This cleaning cycle should be done after staining
each time(at least once per shift). We recommend
frequent use of CLEAN cycle to ensure reliable
performance.
26
==== F/L STAIN ====
1.PRIME
2.A-PRIME
3.T/S
4. Main
Set Slide No. <10>pcs
Slide staining operation
Section 3
■ This paragraph explains about slide staining operation of AFB Multi Stainer.
■ Please read this information carefully for proper use and safety.
3. If the Ethyl Alcohol and distilled water are not injecting during cleaning Slide tray, press "RESET" key
in Mode and change to Manual prime and inject Ethyl Alcohol and distilled water.
▲ Refer to the process of Manual priming.
Note :
If Ethyl Alcohol and distilled water are not injected, refer to the troubleshooting.
4. After manual priming, start "Cleaning cycle" again.
27
Slide staining operation
Section 3
■ This paragraph explains about slide staining operation of AFB Multi Stainer.
■ Please read this information carefully for proper use and safety.
3.2 Prime, T/S, Cleaning slide tray In Z/N(Ki) mode (Choosing NO.2)
3.2.1 Priming(First injection of reagents before staining)
To get peak staining performance, thoroughly purge and prime each reagent delivery line using following
instructions.
Note : Kinyoun(Ki) staining method can be selected by selector switch(heating off)
before staining.
Caution :
The reagents used in AFB Multi stainer contain moderately toxic chemicals which require care in
handling. When handling reagents, use appropriate safety measures including gloves and eye
protection always.
◎ The priming can be done in two ways(Manual or Auto).
■ Process of Ziehl-Neelsen and
Kinyoun Stain
▲ Manual Priming : Select and prime each
①Carbol Fuchsin
reagents separately. The manual prime
is doing only during the Key S/W is pushed.
②Acid Alcohol
▲ Auto Priming : No need to select reagents.
③Methylene Blue
Prime each reagent by following process automatically.
④Ethyl Alcohol
⑤Distilled Water
3.2.2 Manual Priming
1. Select function No. 1.
====== Z/N STAIN ======
1.PRIME
2.A-PRIME
3.T/S
4.Main
Set Slide No. <10>pcs
===== PRIME =====
1.END 2.CF 3.AA
4.MB
5.ET
6.DW
2. To avoid for injecting reagents on empty slide tray,
set the slide tray for the injector is located between
slide tray and slide tray.
28
Slide staining operation
Section 3
■ This paragraph explains about slide staining operation of AFB Multi Stainer.
■ Please read this information carefully for proper use and safety.
3. Select the function number of reagent which will be primed.
▲ Prime only during the Key S/W is
pushed and the process is shown in display.
▲ The reagent will be injected from
injection nozzle.
===== PRIME =====
1.END 2.CF 3.AA
▲ To remove air in injection tube, repeat
to inject reagent 2 or 3 times for each
4.MB
5.ET
6.DW
2 second.
===== PRIME =====
CF Prime
1.END 2.CF 3.AA
4.MB
5.ET
6.DW
4. Select all of reagent number and prime as above(3).
Caution:
1. Do not operate if the reagents
and distilled water is empty.
2. Check the injection is doing
well at each injection nozzle.
When the prime is done properly,
a steady stream of reagent (no
sputtering or breaks) from each
nozzle receptacle as the corresponding
button is pressed.
※ If the reagents are not injected even though the pump is working more than 10 sec, refer to
troubleshooting.
29
Slide staining operation
Section 3
■ This paragraph explains about slide staining operation of AFB Multi Stainer.
■ Please read this information carefully for proper use and safety.
5. After injecting all of reagents, press Function No. 1(END) to return Z/N initial menu screen.
===== Z/N STAIN =====
1.PRIME
2.A-PRIME
3.T/S
4. Main
Set Slide No. <10>pcs
===== PRIME =====
1.END
4.MB
2.CF
5.ET
3.AA
6.DW
30
Slide staining operation
Section 3
■ This paragraph explains about slide staining operation of AFB Multi Stainer.
■ Please read this information carefully for proper use and safety.
3.2.3 Auto Priming
1. Select Function No. 2(A-Prime).
Display
====AUTO PRIME====
===== Z/N STAIN =====
1.PRIME
2.A-PRIME
3.T/S
4. Main
Set Slide No. <10> pcs
S
E
===================
====AUTO PRIME====
CARBOL FUCHSIN
S■■■
E
==================
====AUTO PRIME====
ACID ALCOHOL
S■■■■
E
====================
====AUTO PRIME====
METHYLENE BLUE
S■■■■■
E
===================
Caution :
Check the injection is doing well at each injection nozzle. When the prime is done
properly, a steady stream of reagent (no sputtering or breaks) from each nozzle receptacle as the
corresponding button is pressed.
31
Slide staining operation
Section 3
■ This paragraph explains about slide staining operation of AFB Multi Stainer.
■ Please read this information carefully for proper use and safety.
====AUTO PRIME====
ETHYL ALCOHOL
S■■■■■■■
E
===================
====AUTO PRIME====
DISTILLED WATER
S■■■■■■■■■■
E
===================
2. After finishing Auto Priming, return to initial screen
===== Z/N STAIN =====
1.PRIME
2.A-PRIME
3.T/S 4. Main
Set Slide No. <10>pcs
automatically.
3. If the reagents are not injected during Auto prime, Reset the operation by "RESET" key and do
Manual Priming(Refer to the operation method of Manual priming.)
Caution:
If the reagents are not injected even though the pump is working more than 10 sec, refer
to troubleshooting.
32
Slide staining operation
Section 3
■ This paragraph explains about slide staining operation of AFB Multi Stainer.
■ Please read this information carefully for proper use and safety.
3.2.4 Time Setting
▲ Select Function No.3(Time Setting) in main
menu to change the time for injecting and
waiting.
▲ No.1(END): Return to MAIN MENU.
▲ No.2(WAIT TIME, Abb.: W/T)
Set the time for waiting after injecting of
reagent.
▲ No.3(INJECTION TIME, Abb.: I/T)
Set the time for injecting of reagent.
===== Z/N STAIN =====
1.PRIME
2.A-PRIME
3.T/S
4. Main
Set Slide No. <10> pcs
== TIME SELECTION ==
1. END
2. WAIT TIME
3. INJECTION TIME
3.2.5 Wait Time Setting
▲ Screen for selecting reagents.
▲ Use FUNCTION No.1 to 5.
▲ No1. : Return to previous MENU.
▲ Select desired reagent to set time.
▲ No5. : Go to initial standard value.
▲ Standard value(STD-PRO.)
CF: 2 Min 30Sec, AA: 4 Min, MB: 1 Min
== W/T SELECTION ==
1. END
2. CF
3. AA
4. MB
5. STD-PRO.
Note: It can be different according to the
characteristics of stainer.
== CF W/T SET UP ==
SET CF TIME: M S
1.END 2.MIN+ 3.MIN4.SEC+ 5.SEC-
== AA W/T SET UP ==
SET AA TIME: M S
1.END 2.MIN+ 3.MIN4.SEC+ 5.SEC-
▲ Screen for "Wait Time setup" of selected reagent.
▲ Adjust waiting time after injecting reagent.
▲ No1. : Return to previous MENU.
▲ No.2,3 : Increase or decrease minutes in step 1.
- CF: 0 ↔ 10 , HA: 0 ↔ 5 , MB: 0 ↔ 5
▲ No.4,5 : Increase or decrease Second in step 5.
- 00 ↔ 55
▲ The changed value will keep until next change.
33
== MB W/T SET UP ==
SET MB TIME: M S
1.END 2.MIN+ 3.MIN4.SEC+ 5.SEC-
□ Reference □
○ M : Min., S :Sec
○ Min+ : Increase Min.
○ Min- : Decrease Min.
○ Sec+ : Increase Sec.
○ Sec- : Decrease Sec.
Slide staining operation
Section 3
■ This paragraph explains about slide staining operation of AFB Multi Stainer.
■ Please read this information carefully for proper use and safety.
3.2.6 Injection Time Setting
▲ No.1(END): Return to MAIN MENU.
▲ No.2(WAIT TIME, Abb.: W/T)
Set the time for waiting after injecting of reagent.
▲ No.3(INJECTION TIME, Abb.: I/T)
Set the time for injecting of reagent.
▲
▲
▲
▲
▲
▲
Screen for selecting reagents.
Use FUNCTION No.1 to 5.
No1. : Return to previous MENU.
Select desired reagent to set time.
No5. : Go to initial standard value.
Standard value(STD-PRO.)
CF: 0.5 Sec, AA: 0.5 Sec, MB: 0.5 Sec
Note: It can be different according to the
characteristics of stainer.
== CF I/T SET UP ==
SET CF TIME:
S
1.END 2.SEC+ 3.SEC-
== TIME SELECTION ==
1. END
2. WAIT TIME
3. INJECTION TIME
== I/T SELECTION ==
1. END
2. CF
3. AA
4. MB
5. STD-PRO.
== AA I/T SET UP ==
SET AA TIME:
S
1.END 2.SEC+ 3.SEC-
▲
▲
▲
▲
Screen for "Injection Time setup" for selected reagent.
Adjust injecting time of reagent.
No1. : Return to previous MENU.
No.2,3 : Increase or decrease second in step 0.1.
- CF:0.0 ↔ 5.0 , HA:0.0 ↔ 5.0 , MB:0.0 ↔ 5.0
▲ The changed value will keep until next change.
== MB I/T SET UP ==
SET MB TIME:
S
1.END 2.SEC+ 3.SEC-
□ Reference □
○ S : Sec
○ Sec+: Increase Sec.
○ Sec-: Decrease Sec.
◎ Use the STANDARD PROCEDURE(STD-PRO.) to return to initial standard value.
◎ The last condition is keeping until next change of value.
◎ Use this function to change time for proper staining during use in laboratory.
Note ;
In Kinyoun staining, the time setting value of each process can be different with Ziehl-Neelsen.
In this case, it should be adjusted for proper staining.
34
Slide staining operation
Section 3
■ This paragraph explains about slide staining operation of AFB Multi Stainer.
■ Please read this information carefully for proper use and safety.
3.2.7 Cleaning Slide tray
Caution : The reagents used in Auto Stainer contain moderately toxic
chemicals which require care in handling. When handling reagents, use
appropriate safety measures including gloves and eye protection always.
◎ The CLEAN cycle is two stage process that uses Ethyl Alcohol and Distilled Water to purge the
precipitates and debris on slide tray, then reprimes reagents into slide tray.
1. Select "CLEAN" key in MODE.
Note: All of slides will be cleaned without relation with setting of slide Q’ty.
Shown display
====== CLEAN =======
ETHYL ALCOHOL
S■■■■■■■
E
====================
DRY(High speed rotation)
▲ The ethyl Alcohol and Distilled Water will be
sprayed on slide tray.
====== CLEAN ======
▲ The bar graph is shown the status of cleaning.
Distilled Water
S■■■■■■■■■■■■E
Note:
Check the status of injection from each nozzle.
==================
DRY(High speed rotation)
2. After cleaning cycle, return to Z/N initial menu automatically.
Note :
This cleaning cycle should be done after staining
each time(at least once per shift). We recommend
frequent use of CLEAN cycle to ensure reliable
performance.
35
===== Z/N STAIN =====
1.PRIME
2.A-PRIME
3.T/S
4. Main
Set Slide No. <10> pcs
Slide staining operation
Section 3
■ This paragraph explains about slide staining operation of AFB Multi Stainer.
■ Please read this information carefully for proper use and safety.
3. If the Ethyl Alcohol and distilled water are not injecting during cleaning Slide tray, press "RESET" key
in Mode and change to Manual prime and inject Ethyl Alcohol and distilled water.
▲ Refer to the process of Manual priming.
Note :
If Ethyl Alcohol and distilled water are not injected, refer to the troubleshooting.
4. After manual priming, start "Cleaning cycle" again.
36
Slide staining operation
Section 3
■ This paragraph explains about slide staining operation of AFB Multi Stainer.
■ Please read this information carefully for proper use and safety.
3.3 Cleaning inside of Chamber
Note : If you change staining, You should wash
and clean the front of reagent nozzle and inside of tray for prevention of
crossing reagents.
Caution : The reagents used in Auto stainer contain moderately toxic
chemicals which require care in handling. When handling reagents, use
appropriate safety measures including gloves and eye protection always.
3.3.1 The AFB Multi Stainer requires cleaning to keep the instrument in top running condition. So
frequent cleanings are recommended ensure reliable performance.
3.3.2 The process of cleaning
▲ At the end of each staining, or if the instrument will be idle for more than 3 hours.
1. Prepare "Alcohol Sprayer", absorbent cotton, Clean paper towel
and pincette.
2. Use a alcohol sprayer to spray the front of nozzle,
inside of tray, bottom and wall of chamber.
37
Slide staining operation
Section 3
■ This paragraph explains about slide staining operation of AFB Multi Stainer.
■ Please read this information carefully for proper use and safety.
3. Cleaning as follows;
①
▲ Wipe off the bottom of slide tray with
absorbent cotton by using pincette.
▲ Be careful not to scratch on the surface
slide tray.
▲ Spraying alcohol during this cleaning.
②
Sprayer
▲ Wipe off the front of each nozzle with a
clean paper towel.
Clean
paper
towel
▲ Be careful not to cross contaminate the
nozzle face with the dirty portion of towel.
Use different towel for each nozzle.
Nozzle
▲ Spraying alcohol during this cleaning.
Nozzle after cleaning
38
Slide staining operation
Section 3
■ This paragraph explains about slide staining operation of AFB Multi Stainer.
■ Please read this information carefully for proper use and safety.
③
▲ Wipe off the bottom and wall of chamber
with absorbent cotton by using pincette.
▲ Be careful not to scratch on the surface
chamber.
▲ Spraying alcohol during this cleaning.
④
▲ Clean the injection tube of each
reagents.
▲ Dip the tube into beaker with distilled
water(500 cc) and cleaning inside of tube
by manual priming. <Repeat On(3sec),
Off(1sec) operation until remove the
remains of reagent>
▲ Clean all of reagent tube as above.
Note :
Use different beaker not to cross
contaminate the tube and fill distilled
water inside of tube before next
operation.
39
Slide staining operation
Section 3
■ This paragraph explains about slide staining operation of AFB Multi Stainer.
■ Please read this information carefully for proper use and safety.
3.4 Before Use
Caution : The reagents used in Auto stainer contain moderately toxic
chemicals which require care in handling. When handling reagents, use
appropriate safety measures including gloves and eye protection always.
1. Check reagents levels and expiration date. And fill it in
and replace required reagents.
▲ Fill the reagents into bottle through a funnel.
▲ Use different funnel for each reagents.
(To avoid cross contamination)
▲ If the reagents are not enough to stain,
the warning LED and sound will work.
2. Check the reagents are properly connected in correct injection input.
(Refer to "Installation".)
3. Check the connection of reagent monitoring cable.(Refer to "Installation".)
Reagent
Reagent Monitor In
40
Slide staining operation
Section 3
■ This paragraph explains about slide staining operation of AFB Multi Stainer.
■ Please read this information carefully for proper use and safety.
4. Check the status of Slide tray and inside of
chamber. If there are pieces of dirt, remove it
before using.
Note:
Specially, be careful not to be clogged Drain hole in
chamber. It makes big trouble for staining.
5. Check the drain hose is connected properly.
▲ Refer to "connection of drain hose" in Installation.
6. The AFB Multi Stainer should be placed with the space(more than 30cm) from the wall.
41
Slide staining operation
Section 3
■ This paragraph explains about slide staining operation of AFB Multi Stainer.
■ Please read this information carefully for proper use and safety.
3.5 During use in F/L mode
Note: If you change staining mode from Z/N to F/L, You should wash and clean the
the front of reagent nozzle and inside of tray for prevention of crossing reagents.
Caution : The reagents used in Auto stainer contain moderately toxic chemicals which
require care in handling. When handling reagents, use appropriate safety measures including
gloves and eye protection always.
1. Connect AC Power
===MULTI STAIN ===
F/L and Z/N(Ki)
1. Fluorescence
2. Ziehl-Neelsen
2. Select F/L stain mode in main menu.
▲ Select FUNCTION No.2 for F/L.
▲ In initial mode of Z/N(Ki), don’t need to “Power off”.
Just select FUNCTION No.4 to go main menu
and select FUNCTION No.2 for F/L.
===== F/L STAIN =====
1.PRIME
2.A-PRIME
3.T/S
4. Main
Set Slide No. <10> pcs
3. Push door lock and open the cover of chamber.
▲ The slide tray located in front of hole sensor will be Tray No. 1.
42
Slide staining operation
Section 3
■ This paragraph explains about slide staining operation of AFB Multi Stainer.
■ Please read this information carefully for proper use and safety.
4. Prime reagent
▲ Refer to Prime process.
5. Cleaning Slide tray.
▲ Refer to Clean cycle process.
6. Set the slide glass with smear from Slide tray No. 1 to clockwise.
Do not use lower quality of slide and
defective slide. It can be broken during staining.
Do not skip to set slide glass on slide tray.
It should be set from reference slide tray
▲ Set the Slide glass for Smeared surface to be upward.
7. Set the quantities of Slide glass (Set Slide No.)
▲ Set the quantities of slide (1 to 20) by using + , - key.
(The initial slide setting quantities are ‘10’. After staining, it is returned to 10 automatically.)
▲ When push +, - Key in one time, increase and decrease the number with step 1.
▲ If push +, - Key continuously, increase and decrease the number continuously with step 1
Initial screen
for F/L stain
==== F/L STAIN ====
1.PRIME
2.A-RIME
3.T/S
4.Main
Set Slide No. <10> pcs
The number will be
changed.
●
Increase Slide quantities up to 20.
●
Decrease Slide quantities from 20 to 1.
43
Slide staining operation
Section 3
■ This paragraph explains about slide staining operation of AFB Multi Stainer.
■ Please read this information carefully for proper use and safety.
8. Close the cover of chamber.
▲ If push "Stain" or "Dry" key before closing the cover, Warning message is appeared and return to
main menu.
==== F/L STAIN ====
1.PRIME
2.A-RIME
3.T/S
4.Main
Set Slide No. <10> pcs
===============
WARNING !!!
DOOR OPEN!!
===============
9. Start STAIN by pushing "Stain" key in Mode.
▲ At the same time of STAIN, The cover lock is working and it is not possible to open the cover.
▲ Fluorescence STAIN will be operated.
Caution :
Please use "RESET" Key carefully. Since, any operating and process will be stopped. Do not
open the cover in operation mode. The cover will not opened by door lock system without
"Reset"
▲ Display in STAINING
Staining method
Stage of
staining
===== F/L STAIN =====
AURAMINE-RHODAMINE
S■
E
Set Slide No. <10> pcs
Q'ty of slide
44
The status of stage
S :START
E :END
■:Display for the
status of proceeding
staining stage.
Slide staining operation
Section 3
■ This paragraph explains about slide staining operation of AFB Multi Stainer.
■ Please read this information carefully for proper use and safety.
▲ The process of STAINING
▲ Inject Auramine-Rhodamine
===== F/L STAIN =====
AURAMINE-RHODAMINE
S■
E
(reagent).
Set Slide No. <10>pcs
===== F/L STAIN =====
(AR) WASHING-1
S■■
E
Set Slide No.
<10>pcs
===== F/L STAIN =====
(AR) WASHING-2
S■■■
E
Set Slide No. <10>pcs
===== F/L STAIN =====
DECOLORIZING
S■■■■
E
▲ Injecting distilled water.
▲ Remove reagent and clean Slide
glass and Slide tray.
▲ Injecting distilled water.
▲ Remove reagent and clean Slide glass
and Slide tray.
▲ Decolorizing stage.
▲ Decolorize by using Acid Alcohol.
Set Slide No. <10>pcs
===== F/L STAIN =====
(AA) WASHING-1
S■■■■■
E
Set Slide No. <10>pcs
▲ Injecting distilled water.
▲ Remove reagent and clean Slide glass
and Slide tray.
===== F/L STAIN =====
(AA) WASHING-2
S■■■■■■■
E
Set Slide No. <10>pcs
▲ Injecting distilled water.
▲ Remove reagent and clean Slide
glass and Slide tray.
45
Slide staining operation
Section 3
■ This paragraph explains about slide staining operation of AFB Multi Stainer.
■ Please read this information carefully for proper use and safety.
===== F/L STAIN =====
POT. PERMANGANATE
S■■■■■■■■■
E
▲ Injecting Potassium permanganate
(reagent).
▲ Collate stain is doing.
Set Slide No. <10>pcs
===== F/L STAIN =====
(PM) WASHING-1
S■■■■■■■■■■■■
E
▲ Injecting distilled water.
▲ Remove reagent and clean Slide
glass and Slide tray.
Set Slide No. <10>pcs
===== F/L STAIN =====
(PM) WASHING-2
S■■■■■■■■■■■■
E
▲ Final stage for cleaning.
▲ Remove reagent and clean Slide glass
and Slide tray.
Set Slide No. <10>pcs
===== F/L STAIN =====
DRY
S■■■■■■■■■■■■■■■■■E
▲ The stage for drying.
▲ Dry the upside of slide by high speed
rotation.
Set Slide No. <10>pcs
===== F/L STAIN ======
END
S■■■■■■■■■■■■■■■■■E
Set Slide No. <10>pcs
▲ Finish "Staining"
▲ The cover lock will be released.
▲ The melody will announce finish of
staining.
===MULTI STAIN ===
▲ Return to Initial Main Menu
F/L and Z/N(Ki)
1. Fluorescence
(Mode selection).
2. Ziehl-Neelsen
46
Slide staining operation
Section 3
■ This paragraph explains about slide staining operation of AFB Multi Stainer.
■ Please read this information carefully for proper use and safety.
※ After injecting reagent, Washing and Slide Dry, drying process is working commonly.
===== F/L STAIN =====
DRY
S■■■■■■■■■■■■■■■■■E
▲Remove reagent and distilled water.
▲The display marking(■) is different in
each process.
▲High speed rotation.
Set Slide No. <10>pcs
▲"Dry" on display will flickering.
10. Open the cover and take out stained Slide glass.
Be careful not to drop the slide inside of
chamber.
▲ When you open the cover, don't close your face near
the cover due to bad smell of reagent.
▲ When you take out slide glass, be careful not to touch stained area on slide. Push inner side of
slide. It can be taken out easily.
11. Select "CLEAN" key in Mode for cleaning Slide tray.
▲ Refer to "Slide tray clean".
12. If you want to stain continuously, please read "Before use, During use".
Note :
Check the level of reagent not to shortage during staining. Please do not operate stainer
without reagents.
13. If you don't use stainer more than 3 hours, please do cleaning properly.
▲ Refer to "Cleaning inside of chamber".
Note: When the stainer is not used, close the cover and keep the
status of nozzles not to dry.
Note: The "RESET" Key should be used carefully. Since, any
operating and process will be stopped. After using "Reset" key, all of
setting value will set again for proper use.
47
Slide staining operation
Section 3
■ This paragraph explains about slide staining operation of Auto Stainer.
■ Please read this information carefully for proper use and safety.
3.6 During use in Z/N(K/N) mode
Note: If you change staining mode from F/L to Z/N, You should wash and clean the the
front of reagent nozzle and inside of tray for prevention of crossing reagents.
Caution : The reagents used in AFB Multi stainer contain moderately toxic chemicals which
require care in handling. When handling reagents, use appropriate safety measures including
gloves and eye protection always.
1. Connect AC Power
===MULTI STAIN ===
F/L and Z/N(Ki)
1. Fluorescence
2. Ziehl-Neelsen
2. Select Z/N(Ki) stain mode in main menu.
▲ Select FUNCTION No.1 for Z/N(Ki).
▲ In initial mode of F/L, don’t need to “Power off”.
Just select FUNCTION No.4 to go main menu
and select FUNCTION No.1 for Z/N(Ki).
===== Z/N STAIN =====
1.PRIME
2.A-PRIME
3.T/S
4. Main
Set Slide No. <10> pcs
▲ Change the switch for selecting Z/N or Ki staining.
Note:
In Kinyoun(Ki) staining, the heating function is off only.
The LCD display is shown “Z/N STAIN”. During heating
in Z/N mode, LED on left panel turns on,
3. Push door lock and open the cover of chamber.
▲ The slide tray located in front of hole sensor will be Tray No. 1.
48
Slide staining operation
Section 3
■ This paragraph explains about slide staining operation of AFB Multi Stainer.
■ Please read this information carefully for proper use and safety.
4. Prime reagent
▲ Refer to Prime process
5. Cleaning Slide tray.
▲ Refer to Clean cycle process
6. Set the slide glass with smear from Slide tray No. 1 to clockwise.
Do not use lower quality of slide and
defective slide. It can be broken during staining.
Do not skip to set slide glass on slide tray.
It should be set from reference slide tray
▲ Set the Slide glass for Smeared surface to be upward.
7. Set the quantities of Slide glass (Set Slide No.)
▲ Set the quantities of slide (1 to 10) by using + , - key.
(The initial slide setting quantities are ‘10’. After staining, it is returned to 10 automatically.)
▲ When push +, - Key in one time, increase and decrease the number with step 1.
▲ If push +, - Key continuously, increase and decrease the number continuously with step 1.
Initial screen
for Z/N stain
=== Z/N STAIN ===
1.PRIME
2.A-RIME
3.T/S
4.Main
Set Slide No. <10> pcs
The number will be
changed.
●
Increase Slide quantities up to 10.
●
Decrease Slide quantities from 10 to 1.
49
Slide staining operation
Section 3
■ This paragraph explains about slide staining operation of AFB Multi Stainer.
■ Please read this information carefully for proper use and safety.
8. Close the cover of chamber.
▲ If push "Stain" or "Dry" key before closing the cover, Warning message is appeared and return to
main menu.
=== Z/N STAIN ===
1.PRIME
2.A-RIME
3.T/S
4.Main
Set Slide No. <10> pcs
===============
WARNING !!!
DOOR OPEN!!
===============
9. Start STAIN by pushing "Stain" key in Mode.
▲ At the same time of STAIN, The cover lock is working and it is not possible to open the cover.
▲ Z/N STAIN will be operated.
※ During Z/N staining, the heating process will be done in Carbol Fuchsin.
Caution :
Please use "RESET" Key carefully. Since, any operating and process will be stopped. Do not
open the cover in operation mode. The cover will not opened by door lock system without
"Reset"
▲ Display in STAINING
Staining method
Stage of
staining
===== Z/N STAIN ======
CARBOL FUCHSIN
S■
E
Set Slide No. <10>pcs
Q'ty of slide
50
The status of stage
S :START
E :END
■:Display for the
status of proceeding
staining stage.
Slide staining operation
Section 3
■ This paragraph explains about slide staining operation of AFB Multi Stainer.
■ Please read this information carefully for proper use and safety.
▲ The process of STAINING
===== Z/N STAIN ======
CARBOL FUCHSIN
S■
E
▲ Inject Carbol Fuchsin(reagent).
▲ Heater is working.
Caution: High temperature in
Set Slide No. <10>pcs
===== Z/N STAIN ======
(CF) WASHING-1
S■■
E
Chamber.
▲ Injecting distilled water.
▲ Remove reagent and clean Slide
glass and Slide tray.
Set Slide No. <10>pcs
===== Z/N STAIN ======
(CF) WASHING-2
S■■■
E
▲ Injecting distilled water.
▲ Remove reagent and clean Slide
glass and Slide tray.
Set Slide No. <10>pcs
===== Z/N STAIN ======
(CF) WASHING-3
S■■■■
E
Set Slide No. <10>pcs
===== Z/N STAIN ======
DECOLORIZING
S■■■■■
E
▲ Injecting distilled water.
▲ Remove reagent and clean Slide
glass and Slide tray.
▲ Decolorizing stage.
▲ Decolorize by using Acid-Alcohol.
Set Slide No. <10>pcs
===== Z/N STAIN ======
(AA) WASHING-1
S■■■■■■■
E
Set Slide No. <10>pcs
▲ Injecting distilled water.
▲ Remove reagent and clean Slide
glass and Slide tray.
===== Z/N STAIN ======
(AA) WASHING-2
S■■■■■■■
E
▲ Injecting distilled water.
▲ Remove reagent and clean Slide
glass and Slide tray.
Set Slide No. <10>pcs
51
Slide staining operation
Section 3
■ This paragraph explains about slide staining operation of AFB Multi Stainer.
■ Please read this information carefully for proper use and safety.
===== Z/N STAIN ======
METHYLENE BLUE
S■■■■■■■■■
E
▲ Injecting Methylene Blue(reagent).
▲ Collate stain is doing.
Set Slide No. <10>pcs
===== Z/N STAIN ======
(MB) WASHING-1
S■■■■■■■■■■■■
E
Set Slide No. <10>pcs
▲ Injecting distilled water.
▲ Remove reagent and clean Slide
glass and Slide tray.
===== Z/N STAIN ======
WASHING-2
S■■■■■■■■■■■■■■
E
Set Slide No. <10>pcs
▲ Remove reagent and clean Slide
===== Z/N STAIN ======
DRY
S■■■■■■■■■■■■■■■■ E
Set Slide No. <10>pcs
▲ The stage for drying.
▲ Dry the upside of slide by high
speed rotation.
===== Z/N STAIN ======
END
S■■■■■■■■■■■■■■■■■E
Set Slide No. <10>pcs
▲ Finish "Staining"
▲ The cover lock will be released.
▲ The melody will announce finish of
staining.
▲ Final stage for cleaning.
glass and Slide tray.
===MULTI STAIN ===
F/L and Z/N(Ki)
1. Fluorescence
2. Ziehl-Neelsen
▲ Return to initial screen for Z/N
STAIN.
52
Slide staining operation
Section 3
■ This paragraph explains about slide staining operation of AFB Multi Stainer.
■ Please read this information carefully for proper use and safety.
※ After injecting reagent, Washing and Slide Dry, drying process is working commonly.
===== Z/N STAIN ======
DRY
S■■■■■■■■■■■■■■■■■E
▲Remove reagent and distilled water.
▲The display marking(■) is different in
each process.
▲High speed rotation.
Set Slide No. <10>pcs
▲"Dry" on display will flickering.
10. Open the cover and take out stained Slide glass.
Be careful not to drop the slide inside of
chamber.
▲ When you open the cover, don't close your face near
the cover due to bad smell of reagent.
▲ When you take out slide glass, be careful not to touch stained area on slide. Push inner side of
slide. It can be taken out easily.
11. Select "CLEAN" key in Mode for cleaning Slide tray.
▲ Refer to "Slide tray clean".
12. If you want to stain continuously, please read "Before use, During use".
Note :
Check the level of reagent not to shortage during staining. Please do not operate stainer
without reagents.
13. If you don't use stainer more than 3 hours, please do cleaning properly.
▲ Refer to "Cleaning inside of chamber".
Note: When the stainer is not used, close the cover and keep the
status of nozzles not to dry.
Note: The "RESET" Key should be used carefully. Since, any
operating and process will be stopped. After using "Reset" key,
all of setting value will set again for proper use.
53
Slide staining operation
Section 3
■ This paragraph explains about slide staining operation of AFB Multi Stainer.
■ Please read this information carefully for proper use and safety.
3.7 After use
Caution : The reagents used in AFB Multi stainer contain moderately toxic
chemicals which require care in handling. When handling reagents, use
appropriate safety measures including gloves and eye protection always.
1. Turn the power switch OFF.
2. Disconnect AC Power cord from consent.
3. If you don't use and store the stainer more than 2days, please do as follows;
1) Cleaning inside of Chamber according to Cleaning methods(Refer to cleaning inside of chamber).
2) Turn the power switch OFF.
3) Disconnect AC Power cord.
4) Take out Injection tube from instrument.
54
Slide staining operation
Section 3
■ This paragraph explains about slide staining operation of AFB Multi Stainer.
■ Please read this information carefully for proper use and safety.
5) Install a cap on the reagent bottle and set aside.
6) Disconnect the drain hose from the instrument and wipe off any remaining wastes inside of hose by
using distilled water and Alcohol. and keep.
7) Clean the outside of stainer and the table around stainer and keep the clean status.
▲ Please read "Installation" before using the stainer again.
55
Preventive Maintenance
Section 4
■ This paragraph explains about routine and preventive maintenance of AFB Multi
stainer. Please read this information carefully for proper use and safety.
Caution : The reagents used in AFB Multi stainer contain moderately toxic
chemicals which require care in handling. When you maintain this instrument,
use appropriate safety measures including gloves and eye protection always.
4.1 Routine and Preventive Maintenance
4.1.1 Daily
At the end of each staining or if the stainer will be idle for more than 3 hours;
○ Do the SLIDE TRAY CLEAN.
○ Do the CLEAN INSIDE OF CHAMBER.
○ Clean the outside of stainer and the table around stainer and keep the clean status.
○ Check the performance of injection nozzle by checking the status of injection.
2. Check the level of Reagent bottles and expiration date.
3. Check the status of drain in side of chamber.
4. Check the sensor of reagent bottle holder is working properly.
5. Check the status of waste container.
4.1.2 Weekly
1. Do the CLEAN INSIDE OF CHAMBER.
2. Disconnect the drain hose from the instrument and wipe off any remaining wastes inside of hose by
using distilled water and Alcohol. And check the status of draining.
3. Clean injection tube and filter with Alcohol and distilled water not to remain precipitates inside of tube
and filter.
4. Clean the outside of stainer and the table around stainer and keep the clean status.
Note: Do not use too much alcohol to clean outside of instrument for protecting electric
circuit inside of instrument.
56
Preventive Maintenance
Section 4
■ This paragraph explains about routine and preventive maintenance of AFB Multi
stainer. Please read this information carefully for proper use and safety.
Caution : The reagents used in AFB Multi stainer contain moderately toxic
chemicals which require care in handling. When you maintain this
instrument, use appropriate safety measures including gloves and eye
protection always.
4.1.3 Monthly
1. Disinfect reusable reagent bottles with 1% dilution of household bleach and. Rinse throughly with
distilled water.
2. Disassemble and clean all of nozzles and connector not to contaminate.
① Make 70% clean solution and inject to each nozzle by priming.
70% Clean solution : Ethyl Alcohol 70ml + Distilled Water 30ml
② Keep around 15 minutes for clean solution to stay in instrument.
③ Repeat ①,②.
④ Remove clean solution by injecting distilled water.
57
Preventive Maintenance
Section 4
■ This paragraph explains about routine and preventive maintenance of AFB Multi
stainer. Please read this information carefully for proper use and safety.
Caution : The reagents used in AFB Multi stainer contain moderately toxic
chemicals which require care in handling. When you maintain this instrument,
use appropriate safety measures including gloves and eye protection always.
4.2 Prevention of Contamination
▲ Under normal use this auto stainer poses very little risk of biological infection to workers. The stainer
is certainly an environmental surface which should be kept clean. The low level of disinfection is need
before and after using auto stainer.
▲ The biological contamination can be happen when specimens are sloughed off from the slide glass
during staining. These will be removed by the continual flow of reagents through injection of reagents.
Additionally, the staining process containing acid alcohol and phenol can be enough to remove the
possibility of contaminations. And also, heating process for fixation kills most of the organisms prior to
staining. This auto stainer has self-cleaning process in normal use with a low level infection risk, but can
not be considered risk-free.
▲ Under conditions you consider to be unusually hazardous, we recommend you the following
procedures ;
1. Move the stainer the place which is ventilate well.
2. Spray inside of cover, chamber, Slide tray and any suspected contaminated areas on instrument with
10% clean solution(or intermediate level detergent).
.
Do not spray fluids near opening in the stainer housing that will let fluid
into the instrument interior. This can cause severe damage.
Inside of cover
Inside of chamber
58
Slide
Preventive Maintenance
Section 4
■ This paragraph explains about routine and preventive maintenance of AFB Multi
stainer. Please read this information carefully for proper use and safety.
3. Repeat spraying every 2 minutes and staying 5 minutes.
▲ Be careful no to be dry.
4. Clean inside of chamber(Including nozzles and slide tray) by water.
5. Clean the outside of stainer and the table around stainer and keep the clean status.
Do not spray fluids near opening in the stainer housing that will let fluid
into the instrument interior. This can cause
Note : Above explanation is general decontaminating. If you return the
instrument to us for troubleshooting, please do general decontaminating
and send us for protecting peoples who carry this instrument.
4.3 Remove Broken Slide glass
Caution : If a slide breaks inside of chamber during a staining process, you must take
tringent precautions during clean up, especially if the instrument has been processing
dangerous pathogens. Always use protective gloves, safety glass and forceps when
handling broken glass from chamber.
1. Glass shards can be imbedded in the walls of chamber. These can cause serious cuts and pose a
danger of infection. Always remove these shards with a pincette before attempting to remove loose
glass.
2. Use a vacuum cleaner or adhesive tape to pick up loose glass inside of chamber.
59
Solving Problems
Section 5
In this section, provide suggestions to help you quick solution for routine problems that might be
encountered using the auto stainer. For more difficult problems may require detailed technical service,
institutions with qualified service personnel should obtain and refer to the service manual. Otherwise you
could contact your dealer for assistance.
Problem
Solution
1. There is no power to the stainer ▲ Make sure the electrical outlet is "live" and AC Power cord is
when the power switch is turned on. securely connected at both ends.
▲ Check the voltage selector that it matches with the voltage
from outlet.
▲ Check the fuses by disconnecting AC power cord, then
opening the fuse holder.
▲ Use same rated fuse for continued protection. If fuse failure
recurs, consult the service manual or contact your dealer for
assistance.
2.Strange information is shown on ▲ Press "RESET" key. If not solved, switch the power off and
display and/or erratic operation of wait 15 seconds, and then power on again.
stainer is happened.
▲ If possible , connect the stainer to a power circuit that is not
shared by other equipments.
3. A reagent line is not primed.
▲ Select manual prime while listening carefully for the sound of
pump operating. If cannot hear the pump, there maybe an
internal problem. Refer to service manual or contact your dealer
for assistance.
▲ If you can hear the pump, but you feel resistance while trying
to draw reagent into the pump and simultaneously pressing the
prime button, there maybe a problem with one of control valves.
Refer to service manual or contact your dealer for assistance.
4. The chamber fills with reagent ▲ A small puddle of stain around the drain opening at the rear of
after use(Not proper drain)
the chamber or a few drops of stain around the bottom of
chamber is not unusual and will not cause a problem.
▲ If the chamber is filling with a large quantity of stain, check the
external drain hose is properly connected to the drain output port
on the rear of stainer.
▲ The tubing must run continuously down toward lab drain or
waste container, with no loops, rises, or obstructions.
▲ Make sure the end of the hose is not submerged in liquid.
This can prevent proper drainage.
▲ If a waste container is used, make sure the container is
vented to allow air to be displaced by the spent stain.
▲ Check the drain hose for blockage or foreign material.
60
Solving Problems
Section 5
Problem
Solution
5.Shown warning message
"SUPPLY A REAGENT" and not
working.
▲ This is warning message for adding reagent.
▲ Check the level of each reagents and fill in for shortage of
reagent.
==================
!!!!WARNING!!!!
SUPPLY A REAGENT
====================
6."RESET" is not working.
▲ Switch the power off and wait 15 seconds, and then power on
again.
▲ If not working continuously, there maybe an internal problem.
Refer to service manual or contact your dealer for assistance.
7.Staining is not start when you
press "STAIN".
WARNING !!!
DOOR OPEN!!
▲ If the warning message is shown on display as above, verify
that the cover is closed perfectly.
▲ If the staining is not processed to next step, press "RESET"
key and check "Initial main menu" is shown on display. Or Switch
the power off and wait 10 seconds, and then power on again.
▲ And restart stain by pressing "STAIN" key.
▲ If sample problem is happened continuously, there maybe an
internal problem. Refer to service manual or contact your dealer
for assistance.
8. Staining reagents are leaking to ▲ Check all of external reagent lines for visible signs of cracks or
outside of instrument.
loose fittings.
▲ Make sure the drain output(inside of chamber) is not blocked
by any foreign materials.
▲ Make sure the drain tube is securely connected to the drain
output and the hose is not cracked or deformed.
▲ The reagent leaks may indicate an internal problem(tube
between the output of pump and nozzle). In this case, contact
your dealer for assistance
61
Solving Problems
Section 5
Problem
9. Abnormal staining
surface of all slides.
Solution
on
entire ▲ Check reagent level in bottles.
▲ Check that external reagent connection tubes are securely
fitted to each bottle.
▲ Verify that each reagent nozzle is primed by opening the cover
and process "Manual prime". The nozzle should immediately
inject a reagent. There should be no sputtering or hissing sounds,
which indicate the presence of air in the reagent lines.
▲ Watch the external reagent lines to see if there are any air
bubbles present. Air bubbles in any reagent line will be caused
poor staining.
▲ Check that the heating process is working properly in Carbol
Fuchin.
▲ If sample problem is happened continuously, there maybe an
internal problem. Refer to service manual or contact your dealer
for assistance.
10. The reagents are not injected ▲ Watch the external reagent lines to see if there are any air
properly.
bubbles present. Air bubbles in any reagent line will be caused
poor staining.
▲ Check the status of Reagent line tubes. If there are any
defects, change to new one.
▲ If same problem is happened continuously, there maybe an
internal problem. Refer to service manual or contact your dealer
for assistance.
62
Technical Specification
Section 6
1. Technical specification of AT-3001 AFB Multi Stainer
Staining method
Ziehl-Neelsen, Kinyoun, Fluorescence
Slide Carousel Capacity
1 to 10slides for Ziehl Neelsen(Kinyoun), 1 to 20 slides for Fluorescence
Carousel Rotation Speed
200RPM Approx.
Display
4 Line by 20 character alpha-numeric LCD dot-matrix
Key Button Controls
6 Mode Key(Stain, Prime, Clean, Dry, Reset, Up, Down), 6 Function selection
Used Reagent
Z/N(KI) :Carbol-Fuchsin , Acid Alcohol , Methylene Blue
F/L : Auramine-Rhodamine, Potassium permanganate, Acid Alcohol
Cleaning : Ethyl Alcohol, Washing: Distilled Water
10 slides in 15 minutes(Z/N, Kinyoun), 20 slides in 18 minutes(F/L)
1 Cycle Stain Time
* can be varid according to the status of staining.
480(W) x 445(D) x 265(H) mm, Approx. 20 kg
Dimensions & Weight
Clearance Height(Lid open) : Max. 565 mm (Open door)
Drain Connection
Nipple on rear Panel
Electrical Requirements
100-240 VAC @50 to 60 Hz , Fuse : T8AL / AC 250V x 2
Power Consumption : 800 W
Electrical Safety
Installation/Overvoltage Category : II, Pollution degree : 2
Environment condition
- Operation; Temp.: 10°C to +35°C (Accuracy Specified at 23°C ± 5 °C)
Humidity: up to 80% to 35°C without temperature extremes causing condensation
within the instrument.
- Storage; Temp.: -20°C to +70°C , Humidity: below 80% RH
※ The specifications and design can be changed for improvement without notice.
2. Used Reagent/Consumption per slide(Typical)
Staining method
Ziehl-Neelsen
Kinyoun
Reagent
Consumption
Staining method
Reagent
Consumption
Carbol Fuchsin
1.2ml~1.8ml
Fluorescence
Auramine-Rhodamine
1.2ml~1.8ml
Acid Alcohol
1.2ml~1.8ml
Acid Alcohol
1.2ml~1.8ml
Methylene Blue
1.2ml~1.8ml
Pot. permanganate
1.2ml~1.8ml
Distilled Water
7.0ml~9.0ml
Ethyl alcohol
1.2ml~1.8ml
Ethyl alcohol
1.2ml~1.8ml
Distilled Water
7.0ml~9.0ml
※ The consumption of reagents can be different according to the status of staining.
3. Supplied Accessories
Name
Q’ty
Name
Q’ty
Name
Q’ty
Spare Bottle (950ml)
8
Power cord
1
Quick installation guide
1
Spare Bottle (5L)
1
Drain hose
1
Spare fuse
2
Reagent bottle holder
2
Injection Tube
8
Reagent
1
Connector Cable of holder
2
User’s Manual
1
Carbon filter
5
Acryl Cover of Chamber
1
63
Warranty Conditions
Section 7
LIMITED WARRANTY
DAGATRONICS CORP. warrants the Instrument, disposables and replacement items, to the original
"Purchaser" for a period of one (1) year after date of receipt by the end user, against defects in material
and workmanship. DAGATRONICS CORP. agrees to correct either by repair or, at its election, by
replacement, any such defect found on examination to have occurred, under normal use and service,
during such one (1) year period provided DAGATRONICS CORP. is promptly notified in writing upon
discovery of such defect to the address of one of its workshops noted in the User's Guide.
Upon discovery of such defect, the instrument should be sent to a DAGATRONICS CORP. workshop
noted in this User's Guide, postage prepaid.
EXCLUSIONS
DAGATRONICS CORP. shall not be liable as to any defect arising from abuse of the Instrument, failure
to operate and maintain the Instrument in accordance with the User's Guide supplied with the Instrument,
repair, service, alteration or modification of the Instrument by any person other than the authorized
service personnel of DAGATRONICS CORP., modification, change or reuse of the disposables supplied
by DAGATRONICS CORP. for use in the Instruments, operation outside of the environmental
specifications for the product listed in the User's Guide or accidental damage to the Instrument.
NO OTHER WARRANTIES
The warranty set forth above is exclusive and no other warranty, whether written or oral, is expressed or
implied. DAGATRONICS CORP. and its suppliers specifically disclaim any implied warranties including
merchantability and fitness for a particular purpose.
NO LIABILITY FOR CONSEQUENTIAL DAMAGES
DAGATRONICS CORP. or its suppliers shall not be liable as to any damage whatsoever (including
without limitation, special, incidental, consequential, or indirect damages for personal injury, loss of
business profits, business interruption, loss of business information, or any other pecuniary loss) or
defect arising from abuse of the Instruments, failure to operate and maintain the Instruments in
accordance with the User's Guide, repair, service, alteration or modification of the Instruments by any
person other than authorized service personnel of DAGATRONICS CORP., or modification, change or
reuse of the disposables supplied by DAGATRONICS CORP. for use in the Instruments.
64
Warranty Conditions
Section 7
Important information
Purchaser shall indemnify DAGATRONICS CORP. and hold it harmless for all expenses, damages,
attorneys' fees, and costs resulting from claimed infringement from patents, trademarks or industrial
property rights arising out of compliance by DAGATRONICS CORP. with Purchaser's specifications,
designs or instructions.
All software, firmware, hardware and manuals relating to Instruments supplied to Purchaser by
DAGATRONICS CORP. shall be treated by Purchaser as confidential and proprietary and protected by
copyright, and shall not be disclosed to third parties. Purchaser shall not reproduce, copy or substantially
duplicate any parts of said materials without the written consent of DAGATRONICS CORP.. In the event
any Instrument is returned to DAGATRONICS CORP. for any reason, or transferred to a third party,
Purchaser shall return all of said materials including copies thereof to DAGATRONICS CORP..
Acceptance by DAGATRONICS CORP. of purchaser's order is expressly limited to and conditioned upon
purchaser's acceptance of, and assent to, these terms and conditions referred to herein. Any additional,
inconsistent or different terms and conditions contained in purchaser's purchase order or other
documents submitted by purchaser to DAGATRONICS CORP. at any time, are hereby expressly
rejected by DAGATRONICS CORP.. Purchaser acknowledges that, notwithstanding anything to the
contrary contained in its purchase order or other documents, receipt and acceptance by purchaser of the
Instrument shall constitute acceptance by purchaser of these terms and conditions.
This is marking shown on the product or its literature, indicates that it should not be
disposed with other household wastes at the end of its working life. To prevent
possible harm to the environment or human health from uncontrolled waste disposal,
please separate this from other types of wastes and recycle it responsibly to promote
the sustainable reuse of material resources. Household users should contact either
the retailer where they purchased this product, or their local government office, for
details of where and how they can take this item for environmentally safe recycling.
Business users should contact their supplier and check the terms and conditions of
the purchase contract.
65