1
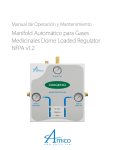
Operating & Maintenance Manual
Automatic Cryogenic Liquid Solenoid
Manifold NFPA v1.1
w w w . a m i c o . c o m
Contents
User Responsibility4
Introduction5
Features
Description of the Manifold8
Shipment Details
The Manifold Enclosure
Manifold Display Board
Economizer Circuit
Liquid Tanks
Gas Flow Through Manifold
Reserve (High Pressure) Bank
Description of Parts11
Main Line Source Valve
Solenoid Valve
Pressure Transducers
Check Valve
Line Regulator Ball Valve
Dual Line Regulator
Pressure Relief Valve
Front Panel Indicators
Power Supply
Control Board
Gas Service Identification
Header Bar Connections
Operating Alarm Systems
Parts Layout
Display Functions12
Installation13
Wall Mounting Instructions14 - 16
Tank Installation Instructions17
2
Amico Corporation
Contents
Testing for Leaks18
Initial Power-Up19 - 20
Line Regulator Pressure Adjustment21
Line Regulator Replacement21
Control Board Replacement22
Solenoid Replacement22
Tank Changing Procedures23
Ordering Information
24
Manifold Cabinet
Header-Bar Assembly
Control Cabinet Part List25
Appendix A Manifold Internal Layout26
Appendix B Piping Schematic Diagram27
Appendix C Electrical Wiring Diagram28
Appendix D Control Cabinet Wiring Diagram29
Appendix E Liquid Setup with Header Bars
30
Appendix F Liquid Manifold with High Pressure Reserve
31
www.amico.com
3
Microprocessor Digital Manifold
Microprocessor Digital Manifold
USER
RESPONSIBILITY
User Responsibility
USER
RESPONSIBILITY
The information contained in this Installation and Maintenance Manual, pertains only to the ALERT-2
The
information contained
in this
Installation
and Maintenance
Manual
pertains only
to the Amicowith
Automatic
Manifold.
microprocessor
based
digital
manifold.
This product
will perform
in conformity
the descriptions
Mproduct
i c r o pwill
r operform
c e s s oinr conformity
D i g i t a with
l Ma
n idescriptions
fold
This
the
contained
in
this
manual
when
assembled,
operated,
contained in this manual when assembled, operated, maintained and serviced in accordance with the
maintained
andinstructions
serviced
in accordance
the installation
instructions provided.
The
information
contained
in thiswith
Installation
and Maintenance
Manual, pertains only to the ALERT-2
installation
provided.
microprocessor based digital manifold. This product will perform in conformity with the descriptions
USER RESPONSIBILITY
The
manifold
must
be when
checked
periodically.
Parts maintained
that
areworn,
broken,
missing,
worn, distorted
or
The
manifold
MUST
bemanual
checked
periodically.
Parts that
are broken,
missing,
or contaminated
must
bethe
contained
in this
assembled,
operated,
anddistorted
serviced
in accordance
with
contaminated,
must
be
replaced
immediately.
Should
such
repair
or
replacement
become
necessary,
replaced
immediately.
Shouldprovided.
such repair or replacement become necessary, please contact Amico Corporation or
installation
instructions
please
contact Amico Corporation or their distributors.
their
distributors.
The manifold must be checked periodically. Parts that are broken, missing, worn, distorted or
Installing
CO2must
and be
N2O manifolds
outdoors.
Please
refer
toorNFPA
Code: become
5.1.3.3.1.8
Central
The
information
contained
in this or
Installation
and
Maintenance
Manual,
pertains
to the
ALERT-2
immediately.
Should
such
repair
replacement
necessary,
Allcontaminated,
Manifolds
should
not bereplaced
repaired
altered without
prior
written
approval
by Amicoonly
Corporation
or its
supply
systems
for
nitrous
oxide
and
carbon
dioxide
shall
be
prevented
from
reaching
microprocessor
based
digital
manifold.
This
product
will perform in conformity with the descriptions
please
contact
Corporation
or warranty
their
distributors.
distributors.
FailureAmico
to comply
will void
all
on the manifold.
temperatures
than
the assembled,
recommendations
the central
supply
system’s
manufacturer,
contained
in thislower
manual
when
operated,ofmaintained
and
serviced
in accordance
with the
Installing
CO2
and
N2O
manifolds
outdoors.
Please
refer
to
NFPA
Code:
5.1.3.3.1.8
Central
but shall never
be lower
than -7°C (20°F) or greater than 54°C (130°F).
installation
instructions
provided.
Statements
this manual
preceded
by the
words
WARNING,
CAUTION,
DANGER
NOTE
are of special
significance.
supply in
systems
for
nitrous
oxide
and
carbon
dioxide
shallandbe
prevented
from
reaching
All
Manifolds
should
not
be
repaired
or
altered
without
prior
written
approval
by
Amico
Please
read
these
sections
carefully.
The
manifold
must
be
checked
periodically.
Parts
that
are
broken,
missing,
worn,
distorted
or
temperatures lower than the recommendations of the central supply system’s manufacturer,
Corporation
or
it’s
distributors.
Failure
to
comply
will
void
all
warranty
on
the
manifold.
contaminated,
must
be replaced
immediately.
such
repair
or (130°F).
replacement become necessary,
but
shall never
be lower
than -7°C
(20°F) orShould
greater
than
54°C
please
contact
Amico
Corporation
or
their
distributors.
Statements
in this
manual
preceded
by the or
words
WARNING,
CAUTION,
DANGER
and NOTE
are of
All
Manifolds
should
not
be repaired
altered
without
prior written
approval
by Amico
special
significance.
Please
read
these
sections
carefully.
Installing CO2
N2O manifolds
outdoors.
Please
to warranty
NFPA Code:
5.1.3.3.1.8
Central
Corporation
or and
it’s distributors.
Failure
to comply
will refer
void all
on the
manifold.
supply systems for nitrous oxide and carbon dioxide shall be prevented from reaching
Statements in this manual preceded by the words WARNING, CAUTION, DANGER and NOTE are of
temperatures lower than the recommendations of the central supply system’s manufacturer,
special significance. Please read these sections carefully.
but shall never be lower than -7°C (20°F) or greater than 54°C (130°F).
All Manifolds should not be repaired or altered without prior written approval by Amico
Corporation or it’s
distributors.
Failure
to comply
willprevent
void allinjury.
warranty on the manifold.
WARNING:
denotes
steps
which can
Statements in this manual preceded by the words WARNING, CAUTION, DANGER and NOTE are of
special significance. Please read these sections carefully.
WARNING:
steps
which
injury.
WARNING:denotes
denotes
steps
whichcan
can prevent
prevent injury.
CAUTION: denotes steps which can prevent damage to equipment.
WARNING:
steps
preventdamage
injury. to equipment.
CAUTION: denotes
denotes
stepswhich
whichcan
can prevent
CAUTION: denotes steps which can prevent damage to equipment.
DANGER:
steps
which
preventelectrical
electrical
shock
to equipment
DANGER:denotes
denotes
steps
whichcan
can prevent
shock
to equipment
or to or to
prevent serious injury and/or death.
denotes
prevent
serious
injury
death.
CAUTION:
steps
which
canand/or
prevent
damage to equipment.
DANGER: denotes steps which can prevent electrical shock to equipment or to
prevent serious injury and/or death.
DANGER: denotes steps which can prevent electrical shock to equipment or to
prevent serious injury and/or death.
4
Amico Corporation
Page: 4
Introduction
The Amico Automatic Cryogenic Liquid Solenoid Manifold is designed to provide a reliable, uninterrupted supply of
gas to a hospital or other medical facility. The manifold accommodates multiple cryogenic containers divided into
two equal banks. One bank is designated as a “Primary” source of gas while the other bank stands in reserve as a
“Secondary” source.
A display of LED’s on the front of the manifold indicates the status of the gas supply. Each bank has a green (IN
USE), yellow (READY) and red (EMPTY) LED. When the primary bank of cylinders are depleted, the manifold will
automatically switch to the secondary bank of cylinders without interruption of gas flow to the facility. The red
LED will illuminate when a bank is depleted and two normally closed dry contacts for the reserve In-Use alarm
will open. One or both sets of contacts may be wired to an external alarm, remote buzzer and/or a building
management system.
When the empty Liquid tanks / Dewar’s are replaced with full ones, the manifold will need to be reset by pressing
the “PUSH TO RESET” button on the front of the cabinet. At this time the status is changed from EMPTY to READY
mode as indicated on the LED display that the bank is now the secondary bank.
Note: the “PUSH TO RESET” button should not be pressed until the empty Liquid tank / Dewar has been replaced
with a full one.
The power supply is connected to the top right hand corner of the manifold. Connections from the manifold to the
Amico master alarm must be made from terminals marked C/Signal to the appropriate terminals (Reserve In-Use) on
the master alarm or a remote buzzer.
The Manifold is designed in accordance with the National Fire Protection Association (NFPA 99)
FEATURES INCLUDE:
•
Input power to the manifold is 110-240 VAC, 50-60Hz
•
Incorporates six LED’s display - readable in poor lighting conditions
•
Dual line pressure regulators
•
•
3/4" Isolation valve for supply line
•
Manifold complies with NFPA 99
•
Economizer circuit
Wall mounting bracket attached to manifold for easy installation
www.amico.com
5
Description of the Manifold
SHIPMENT DETAILS
The Manifold system may be shipped in more than one carton, depending on the number of cylinder connections. The
main carton contains the following items:
•
•
•
•
Manifold control panel (with power supply assembly)
Wall mounting bracket (attached to manifold control panel)
3/4" (19.05mm) source shut-off valve
Installation, Operation and Service manual
Additional cartons may contain appropriate number of headers and cylinder pigtail assemblies. Cylinder inlets closest to
the manifold control panel are intended for cylinders placed directly beneath the manifold control panel. Pigtails for all
gases are 72" (1,828.8mm) flexible type. The manifold is designed to be mounted directly to a wall.
THE MANIFOLD ENCLOSURE
The manifold contains a switch mode power supply that can handle voltage from 110-240 VAC with a built-in fuse and
terminal block. The enclosure on this manifold is NEMA-1 (general purpose applications only). This cabinet must not be
mounted outdoors. For outdoor use, a NEMA- 4 enclosure is recommended.
The manifold also has a latched enclosure that is easy to remove. The pre-assembled circuit board is located on the
center of the enclosure with a hinged mounting bracket. This design will reduce installation time and eliminate the risk
of improper installation, since all the components of the manifold are connected and tested at the factory.
MANIFOLD DISPLAY BOARD
The LED’s on the front of the Manifold indicate the status of the gas supply. The primary bank will indicate (In-Use, with
the Green LED turned on) and the reserve / secondary indicating (Ready, with the Yellow LED turned on) or (Empty, Red
LED turned on) depending on the status of gas. When the primary bank of cylinders are depleted, the manifold will
automatically switch to the secondary bank of cylinders without interruption of gas flow to the facility. The Red LED
will illuminate when a bank is depleted and two normally closed dry contacts will open. One or both sets of contacts
may be wired to an external alarm, remote buzzer and/or a building management system.
When replacement cylinders are attached to the depleted bank and the reset button pressed, the red LED goes out and
the yellow LED illuminates indicating that the bank has been automatically designated as the secondary supply. No
other user interaction is required. Both sets of dry contacts close to cancel any external alarm conditions.
ECONOMIZER CIRCUIT
To prevent the loss of useful gas into the atmosphere, an economizer circuit is included to utilize the accumulated
excess pressure from the secondary supply bank. The economizer circuit re-routes the excess pressure into the line via
check valves inserted into the main inlet blocks, then passes through the 0.007" orifice which goes into the main center
section of the manifold.
6
Amico Corporation
Description of the Manifold
LIQUID TANKS
Liquid cylinders contain the product in a liquid state inside of the container. The liquid has to be converted to gas before
entering the manifold. This can be done by the container VIA the internal vaporizers, or in a high or low flow situation
with an external vaporizer. The contents of the liquid container can only be measured by weight. A gauge on the tank,
or simply rocking the tank to determine its weight. The contents of the tanks cannot be measured by the pressure
output. The gauges on the manifold for bank pressure do not indicate the amount of product inside the liquid tanks.
GAS FLOW THROUGH THE MANIFOLD
The liquid containers are divided into two banks. One bank will be the “In-Use” and the other bank will be “Ready” or
secondary bank. The bank In-Use can be either bank with the other bank as secondary, depending on the current status.
As the “In-Use” bank depletes (liquid is gone and pressure drops in that bank) the manifold will switch to the secondary
bank. Indicator LEDs will change to indicate the “In-Use” now as “Empty” and the “Ready” bank will become “In-Use”.
NOTE:
It is common for the pressure on the empty bank to increase and give the false indication that the tank is full. Always check
contents of tanks via weight and float gauge on the tank.
The “Empty” tank can then be replaced with a full one. The manifold will not reset until the “Empty” bank is replaced and the
“Push to Reset” button is pressed. At this time the status is changed from “Empty” to “Ready”. That bank is now the secondary
bank. The “Push to Test” reset should not be pressed until the empty tank has been replaced with a full one.
During normal operation this sequence of alternation will change, the “In-Use” and “Ready” banks from right hand to left
hand banks back and forth as tanks get depleted.
Depending on the amount of gas usage the pressure building valve on the tank “In-Use” may need to be left open. This
allows the tank to convert adequate liquid to gas for the higher flow needed. This will depend on the facility’s usage. This will
normally cause frosting on the outside of the container indicating the proper operation of the pressure builder. Occasional
venting of gas on the tank to relieve excessive pressure is normal and can be expected.
RESERVE (HIGH PRESSURE) BANK
The high pressure reserve bank is used to back up the liquid tanks. The reason is that sometimes the liquid tanks (both
banks) could run empty and the personnel using the system does not know how to determine the amount of liquid
content inside the tanks.
When the liquid tanks run empty, the pressure inside the manifold will drop (in the case of OXY, CO2 & N2O below 150
PSI and NIT below 275 PSI). At 80 PSI for OXY, CO2 & N2O and 180 PSI for NIT, the High Pressure Reserve manifold will
start to supply gas. An alarm from the Reserve In-Use pressure switch (set at 85 PSI for OXY, N2O & CO2 and 190 psi for
NIT) will be activated. The Reserve header has a reserve low pressure switch (to be set at 1100 PSI for OXY, NIT & AIR and
500 PSI for CO2 & N2O) that will ensure the Reserve Header has adequate volume to supply the facility until the liquid
tanks are replenished. The reserve high-pressure tank when full is usually around 2300 psi for OXY, NIT & AIR and 800
PSI for CO2 & N2O.
www.amico.com
7
Description of the Manifold
RESERVE (HIGH PRESSURE) BANK
NOTE:
Flow capacity depends on the amount of liquid containers and type of tanks/containers used. For Oxygen the average
flow per liquid tank/container is 350scfh. Flow capacity is increased with additional containers. For higher flow
requirements an external vaporizer (supplied by others) is necessary.
Description of Parts
MAIN LINE SOURCE VALVE
A 3/4" (19.05mm) isolation valve with a locking handle, supplied with the manifold
should be installed on top of the manifold connecting to the main supply line.
SOLENOID VALVE
The Solenoid valve is 12 VDC, normally open and is located between the Liquid tank/
Dewar and the Line regulator. The Solenoid is logically controlled by the micro display
board with the bank In-Use being normally opened and the reserve/secondary being
held normally closed.
PRESSURE TRANSDUCERS
The Pressure Transducer senses the bank pressure and transfers information to
the display board to indicate the In-Use, Reserve & Empty mode. There are two
transducers in the manifold cabinet, one for the left bank cylinder and one for the
right bank cylinder.
CHECK VALVE
A Check valve is provided upstream of each solenoid to prevent back flow while
servicing a bank.
8
Amico Corporation
Description of Parts
LINE REGULATOR BALL VALVE
Quarter-turn ball valves are provided upstream and downstream of each
line regulator. These valves allow for removal and servicing of one of the
line regulators while the other is in use. All four ball valves are normally in
the open position.
DUAL LINE REGULATOR
On every Amico Automatic Gas Manifold the line regulator is capable
of maintaining a constant dynamic delivery of pressure at the
maximum designed flow rate of the system. For Oxygen, Nitrous
Oxide and Carbon Dioxide service, the line regulators are factory preset
at 55psi and for Nitrogen at 170psi.
PRESSURE RELIEF VALVE
Pressure relief valves are installed downstream of all pressure regulators
and are set at no more than 50% above the setting of the pressure
regulator. Relief valves are capable of fully relieving the pressure at
the set point. All pressure relief valves in the manifold have piping
connections to allow for connection of a vent line to the outside of
the facility.
FRONT PANEL INDICATORS
Six front panel indicators monitor the status of the manifold.
www.amico.com
9
The information contained in this Installation and Maintenance Manual, pertains only to the ALERT-2
microprocessor based digital manifold. This product will perform in conformity with the descriptions
contained in this manual when assembled, operated, maintained and serviced in accordance with the
installation instructions provided.
Description of Parts
The manifold must be checked periodically. Parts that are broken, missing, worn, distorted or
contaminated, must be replaced immediately. Should such repair or replacement become necessary,
please contact Amico Corporation or their distributors.
POWER SUPPLY
Installing CO2 and N2O manifolds outdoors. Please refer to NFPA Code: 5.1.3.3.1.8 Central
supply systems for nitrous oxide and carbon dioxide shall be prevented from reaching
The
power supplylower
is 110 -than
240 VAC,
Hz. It is mounted on
temperatures
the50-60
recommendations
of the
thetop
central supply system’s manufacturer,
right
hand
side
of
the
manifold
and
has
a
1
amp
fuse.
but shall never be lower than -7°C (20°F) or greater than 54°C (130°F).
All Manifolds should not be repaired or altered without prior written approval by Amico
Corporation or it’s distributors. Failure to comply will void all warranty on the manifold.
Statements in this manual preceded by the words WARNING, CAUTION, DANGER and NOTE are of
special significance. Please read these sections carefully.
CONTROL BOARD
The Control Board is an electronic circuit board which controls the bank
WARNING:
denotes
can prevent injury.
switch-over. It monitors
the pressure with
the helpsteps
of the which
bank transducers
and controls the solenoid valve in order to initiate the bank switch or
changeover. The control board illuminates the appropriate front panel
LED indicators and also provides dry contacts for connections to a remote
buzzer or an external master alarm. Power to the control board is provided
by the external power supply.
CAUTION: denotes steps which can prevent damage to equipment.
DANGER:
Electricaldenotes
shock hazard.
Ensure
thatcan
the main
power
source is turned
the
DANGER:
steps
which
prevent
electrical
shockofftoduring
equipment
or to
connection
of
the
power
supply.
prevent serious injury and/or death.
GAS SERVICE IDENTIFICATION
Amico manifolds are clearly labeled for the intended gas use. The appropriate gas label is attached on the cabinet door.
There are two pipes extending from the top of the cabinet, one is for the main line pressure and the other is the vent for
the pressure relief valve, which is also labeled accordingly.
HEADER BAR CONNECTIONS
The
header bar should be attached to the inlet block on either side of the manifold. The inlet block is provided
P a gas-specific
ge: 4
with a sintered bronze filter and a “C” clip to secure it. The header bar should contain the proper gas connections and all
cylinder connections; as well the pigtail (hose) assemblies should comply with CGA standard B96, Compressed Gas
Cylinder Valve outlet and inlet connections.
10
Amico Corporation
Description of Parts
OPERATING ALARM SYSTEMS
The manifold control cabinet contains the required circuitry to send a dry contact signal to the alarm unit when
a bank is empty and change-over occurs. The normally closed internal circuitry is designed to alarm when there
is an open circuit. The depletion of a bank triggers a relay, which renders the alarm circuit open and initiates the
alarm signal.
PARTS LAYOUT
Provision for reserve
Supply
Line Relief Valve
Operating Relief Valve
Relief Valve Vent
Power Supply
Line Gauge
Alarm Connection
Ball Valve 4X
Bleed Valve 2X
Left Line Regulator
Right Line Regulator
Bank Transducer
Bank Transducer
Left Bank Gauge
Right Bank Gauge
Economizer Circuit
Solenoid
Solenoid
Check Valves
www.amico.com
11
Display Functions
1. Introduce power to the control cabinet
2. Follow Cylinder Changing Procedures on the side of the cabinet to ensure that all tanks and fittings are secure and
properly connected to the header bar.
3. Check the indicator LED for proper functioning.
4. Open the Liquid Tanks one side at a time and press the “Push to Reset” button between the LED displays. One Green
LED, on the side which had the tanks opened first should be lit for In Use and the other side should have a Yellow
LED lit for Ready.
5. Close the Liquid tank valves on the primary (In Use) bank and watch the indicator LED to ensure proper functioning.
The primary bank pressure should decrease, while the secondary and line pressures stay constant.
6. When the primary bank pressure falls to approximately 100psi for all gases except Nitrogen which is 200psi, the
bank switch-over occurs. The line pressure will remain constant with the LED illuminating, indicating the In Use and
Empty banks. After replacing the depleted gas cylinders, open the liquid tank valves on the depleted side and press
the “Push to Reset” button and the Empty bank should become Ready.
7. With the Manifold wired to the Amico Master Alarm, the change-over from primary to secondary bank will cause
an audible alarm. The appropriate indicator LED on the Master Alarm will illuminate. This can also be achieved by
usingthe switch-over test button located on the back of the control board.
The Amico Automatic Manifolds are designed in accordance with the current revision of NFPA 99.
There are two categories of the Amico Manifolds. Depending upon the delivery pressure, the following gas types
are available.
55psi Delivery Pressure
• Oxygen, Nitrous Oxide, Carbon Dioxide
170psi Delivery Pressure
• Nitrogen
NOTE:
In the event of a power fluctuation or failure, a switch over alarm will be activated on the master alarm panels.
• Both the solenoid valves will open and supply pressure until both the banks are depleted.
• The solenoid will not prevent the flow from being supplied no matter which side is In-Use and until the system is
completely out of gas.
12
Amico Corporation
Installation Precautions
Tampering with gas specific connections shall be prohibited. Do not alter, remove or modify gas specific connections.
Keep all manifold parts, tools and work surfaces free of oil, grease and dirt. These and other flammable materials may
ignite when exposed to high pressure oxygen or nitrous oxide.
•
Do not use chemicals, lubricants or sealants unless specified in these instructions
•
Before connecting the Liquid tank / Dewar to the manifold, ensure the tank valve is free of dirt and debris
•
After connecting the tank to manifold, open the tank valve S-L-O-W-L-Y to allow heat of compression to dissipate
•
Do not use flame or “sniff” tests for leaks
•
Do not apply heat to any part of the manifold system
•
Always ensure Liquid tanks / Dewar’s are secure and on level floor
•
Do not repeatedly bend, sharply bend, or twist pigtails as damage to tubing may occur
•
After the manifold wall bracket has been mounted, at least two people should lift and hang the manifold cabinet, one
should not do this alone
•
Do not put the manifold into operation until verified by a qualified person as per NFPA 99 or other local standards
www.amico.com
13
Wall Mounting Instructions
1.
2.
Remove manifold control panel from the shipping carton and ensure it is in upright position on the foam
packaging insert.
Using the back support bracket as a template, place on the flat wall, align top of the bracket with the level
horizontal line. The vertical center line of the bracket will be the vertical center line of the installed manifold. The
support bracket should be mounted 61-1/2" [1,562.1 mm] from the finished floor to the bottom hole on the
bracket as shown in Figure 1.
3.
Mark locations of mounting holes. Remove the bracket and drill mounting holes. Attach the bracket to the wall
with appropriate anchors (supplied by others). 3/8" [9.525 mm] diameter anchors are recommended.
Figure 1
Locate bracket per
horizontal line
Mark Location
of holes
61 1/2"
[1,562.1mm]
To Floor
14
Amico Corporation
Wall Mounting Instructions
4.
Hang the manifold control panel on the mounting bracket. The top two control panel mounting bolts will slide into slots of the bracket. The bottom of the manifold control panel should be angled away from the bracket until the top two bolts have been inserted as shown in Figure 2.
Figure 2
NOTE:
A bracket mounting height of 61-1/2" [1,562.1 mm] from the finished floor to the bottom hole on the support bracket
allows for adequate clearance beneath the manifold when utilizing standard “H” size or slightly taller cylinders.
www.amico.com
15
Wall Mounting Instructions
5.
The bottom of the control panel can then be positioned so that the holes at the bottom of the panel align
with the holes in the hanging bracket. Use 3/8" [9.525 mm] bolts to secure the cabinet to the bracket as shown in Figure 3.
Figure 3
Microprocessor Digital Manifold
USER RESPONSIBILITY
Microprocessor Digital Manifold
The information contained in this Installation and Maintenance Manual, pertains only to the ALERT-2
microprocessor based digital manifold. This product will perform in conformity with the descriptions
contained in this manual when assembled, operated, maintained and serviced in accordance with the
installation instructions provided.
USER RESPONSIBILITY
The manifold must be checked periodically. Parts that are broken, missing, worn, distorted or
contaminated, must be replaced immediately. Should such repair or replacement become necessary,
The
information
contained
in this Installation
and Maintenance Manual, pertains only to the ALERT-2
please
contact Amico
Corporation
or their distributors.
microprocessor based digital manifold. This product will perform in conformity with the descriptions
Installing inCO2
N2Owhen
manifolds
outdoors.
Please
refer toand
NFPA
Code:
5.1.3.3.1.8 with
Central
contained
this and
manual
assembled,
operated,
maintained
serviced
in accordance
the
supply systems
for provided.
nitrous oxide and carbon dioxide shall be prevented from reaching
installation
instructions
temperatures lower than the recommendations of the central supply system’s manufacturer,
The
manifold
must
be checked
periodically.
that
are54°C
broken,
missing, worn, distorted or
but shall
never
be lower
than -7°C
(20°F) or Parts
greater
than
(130°F).
contaminated, must be replaced immediately. Should such repair or replacement become necessary,
All Manifolds
should
not be repaired
or altered without prior written approval by Amico
please
contact Amico
Corporation
or their distributors.
Corporation or it’s distributors. Failure to comply will void all warranty on the manifold.
Installing CO2 and N2O manifolds outdoors. Please refer to NFPA Code: 5.1.3.3.1.8 Central
Statements
in this manual
preceded
by and
the words
WARNING,
DANGER and
NOTE
are of
supply
systems
for nitrous
oxide
carbon
dioxide CAUTION,
shall be prevented
from
reaching
special significance.
read
these sections carefully.
temperatures
lowerPlease
than the
recommendations
of the central supply system’s manufacturer,
but shall never be lower than -7°C (20°F) or greater than 54°C (130°F).
All Manifolds should not be repaired or altered without prior written approval by Amico
Corporation or it’s distributors. Failure to comply will void all warranty on the manifold.
Statements in this
manual Do
preceded
by the
words
WARNING,
CAUTION,
andfor
NOTE are of
WARNING:
not attempt
to lift
manifold
alone. Two
people areDANGER
recommended
WARNING:
denotes
steps
which
can
prevent
injury.
special significance.
Please
read
these
sections
carefully.
hanging the manifold onto wall mounting bracket
CAUTION:
Do not use
threadsteps
sealantwhich
on header
or pigtail
connections
WARNING:
denotes
canbar
prevent
injury.
CAUTION: denotes steps which can prevent damage to equipment.
16
Amico Corporation
All Manifolds should not be repaired or altered without prior written approval by Amico
Microprocessor Digital Manifold
Corporation
or it’s distributors. Failure to comply will void all warranty on the manifold.
Statements in this manual preceded by the words WARNING, CAUTION, DANGER and NOTE are of
special significance. Please read these sections carefully.
USER
RESPONSIBILITY
Tank
Installation
Instructions
The information contained in this Installation and Maintenance Manual, pertains only to the ALERT-2
microprocessor based
digital
manifold.
This product
will
performnecessary
in conformity
withinstallation.
the descriptions
CAUTION:
This
section contains
important
information
for proper
Read it
contained in this manual
when
assembled,
operated,
maintained
and
serviced
in
accordance
with the
WARNING:
denotes
steps
which
can
prevent
injury.
carefully before installing Header bars
installation instructions provided.
The manifold must be checked periodically. Parts that are broken, missing, worn, distorted or
must
be replaced immediately. Should such repair or replacement become necessary,
•contaminated,
Position the wall
brackets
please contact Amico Corporation or their distributors.
•Installing
Connect the
twoand
header
bar assemblies
to the
inlet blocks
on either
side of
cabinet
CO2
N2O
manifolds
outdoors.
Please
refer
tothe
NFPA
Code: 5.1.3.3.1.8 Central
supply systemsCAUTION:
for nitrousdenotes
oxide steps
and carbon
dioxide
be prevented
from reaching
which can
preventshall
damage
to equipment.
•temperatures
Secure the Header
bar assembly
tightening the union nuts
the inlet blocks
lower
than thebyrecommendations
of onto
the central
supply system’s manufacturer,
but shall never be lower than -7°C (20°F) or greater than 54°C (130°F).
•
Remove the plug and chain assembly on each of the outlet connections on the header bar
All Manifolds should not be repaired or altered without prior written approval by Amico
or it’s
distributors.
Failure to
comply
warranty
on the
•Corporation
Attach the pigtails
to the
header bar connections
while
ensuringwill
the void
check all
valves
are operating
in themanifold.
proper direction
Microprocessor Digital Manifold
Statements in this manual preceded by the words WARNING, CAUTION, DANGER and NOTE are of
DANGER:
denotes
which
can prevent electrical shock to equipment or to
special significance.
Please read
thesesteps
sections
carefully.
prevent serious injury and/or death.
USER RESPONSIBILITY
WARNING:
avoid
contamination
particles or other
potentially
hazardous
keep
The information contained
inTo
this
Installation
andwith
Maintenance
Manual,
pertains
only tomaterials,
the ALERT-2
WARNING:
denotes
steps
which
can
prevent
injury.
pigtails
in
plastic
wrapping
until
such
time
as
connection
to
gas
cylinder
is
planned
microprocessor based digital manifold. This product will perform in conformity with the descriptions
contained in this manual when assembled, operated, maintained and serviced in accordance with the
installation instructions provided.
The manifold must be checked periodically. Parts that are broken, missing, worn, distorted or
contaminated, must be replaced immediately. Should such repair or replacement become necessary,
please
contact
Corporation
their
In accordance
withAmico
NFPA 99,
the manifoldor
can
thendistributors.
be connected to it.
CAUTION:
denotes
steps
which
can prevent
damage
equipment.
Installing CO2 and N2O manifolds outdoors.
Please
refer to
NFPA to
Code:
5.1.3.3.1.8 Central
The
outlet systems
pipes leading
the Amico
control
cabinet
should
be connected
respective pipeline
system
supply
forfrom
nitrous
oxide
and
carbon
dioxide
shall to
betheir
prevented
from reaching
connections.
The
connection
to
the
relief
valves
should
be
made
with
a
union
(supplied
by
others)
to
facilitate
temperatures lower than the recommendations of the central supply system’s manufacturer,
P
a gshall
eif: required.
4never be lower than -7°C (20°F) or greater than 54°C (130°F).
change,
but
Allappropriate
Manifolds
should
not that
be isrepaired
written
by Amico
An
sealing
compound
suitable foror
thealtered
gas beingwithout
transmittedprior
shall be
used forapproval
threaded connections.
Corporation or it’s distributors. Failure to comply will void all warranty on the manifold.
DANGER: denotes steps which can prevent electrical shock to equipment or to
Statements in thisprevent
manualserious
preceded
by the
words
WARNING, CAUTION, DANGER and NOTE are of
injury
and/or
death.
special significance. Please read these sections carefully.
WARNING: If downstream joints near the cabinet outlet are to be silver brazed, special attention
must be given denotes
not to overheat
copper
since
this may alter the sealing compound
WARNING:
steps the
which
cantubing,
prevent
injury.
used in the threaded joints leading from the control cabinet
CAUTION: denotes steps which can prevent damage to equipment.
www.amico.com
17
Testing for Leaks
The following instructions apply for performing a leak test on the joints made during assembly and connection of
the Amico manifold.
The connections inside the Amico control cabinet have been inspected at the manufacturing plant and DO NOT
require leak testing. In order to determine whether any leaks exist between the tank and header bar sections or at
the pipeline connections, the systems must be pressurized using either oil-free dry air or oil-free dry nitrogen.
In the case of medical Oxygen, Nitrous Oxide, or Carbon Dioxide Amico manifolds, the actual service gases
ARE NOT suitable for leak testing due to their inherent dangerous properties. Leak testing must be performed
using either oil-free dry air or oil-free dry nitrogen.
•
Connect a Liquid tank of the manifold service gas to the header bars on each side of the manifold using the
proper tank connection hose assemblies (pigtails) supplied
•
Make sure all other outlets are capped with the plug and chain assemblies supplied
•
Make sure that the pressure inlet valves of each bank are fully OPEN
•
“S-L-O-W-L-Y” open the tank valves on each side of the cabinet, one side at a time, to pressurize the header bar and pipeline
•
All outlets from the pipeline, downstream of the manifold, should be closed and thus there should be no
flow from the manifold
•
Check for leaks at all tank extension joints and at the joints where the pipes are connected to the pipeline,
using a commercial leak detector which is compatible with oxygen
•
If any leaks are found the system must be depressurized by bleeding through a convenient pipeline outlet
and the faulty connections must be repaired
•
The Header bar connections may be tightened one more turn maintaining the horizontal location of the
tank adapters, or a further application of an oxygen service threaded sealant may be required
•
If the brazed pipeline connections leak they must be removed, cleaned and then re-brazed following the
proper technique. All repaired joints must be pressure tested as mentioned previously
18
Amico Corporation
Initial Power-Up
1.
Release the two latches on either side of the manifold control panel and remove the cover.
2.
Verify the following:
• Both master valves located on both header bars are open
• All four line regulator isolation valves are open (handles in horizontal position)
• Power supply has been connected
• Both Red “Empty” indicators on the front of the manifold are illuminated
• If connected to a master alarm panel, “Secondary Supply” alarm is activated
3.
Close 3/4" source shut-off valve.
4.
Slowly open one tank on the right side of the manifold and press the “Push to Reset” button between
the bank LED indicators.
5.
Verify the following:
• Right bank Red “Empty” LED goes out
• Right bank Green “In Use” LED illuminates
• Right bank cylinder contents gauge reads cylinder pressure
6.
Slowly open one tank on the left side of the manifold and press the “Push to reset” button between the bank indicators.
7.
Verify the following:
• Left bank Red “Empty” LED goes out
• Left bank Yellow “Ready” LED illuminates
• Left bank cylinder contents gauge reads cylinder pressure
• If connected to a master alarm panel, “secondary supply” alarm is not activated
8.
Close right bank cylinder. Slightly depress bleed valve located on the side of the regulator. Verify the following:
• Right bank cylinder contents gauge drops slowly
• As the right cylinder contents gauge is nearly depleted, the manifold changes over to the left bank
• After change-over, the right bank Green “In Use” LED goes out and the Red “Empty” LED illuminates
• After change-over, the left bank Yellow “Ready” LED goes out and the Green “In Use” LED illuminates
9.
Verify the “line pressure” gauge reading is acceptable.
10.
Slowly open one cylinder on the right side of the manifold and press the “Push to Reset” button.
www.amico.com
19
Initial Power-Up
11.
Verify the following:
• Right bank Red “Empty” LED goes out
• Right bank Yellow “Ready” LED illuminates
• Right bank tank contents gauge reads cylinder pressure
12.
Close left bank tank. Slightly press bleed valve located on the side of the line regulator. Verify the following:
• Left bank tank contents gauge drops slowly
• As left cylinder contents gauge is nearly depleted, the manifold changes over to the right bank
• After change-over, the left bank Green “In Use” LED goes out and Red “Empty” LED illuminates
• After change-over, the right bank Yellow “Ready” LED goes out and Green “In Use” LED illuminates
13.
Slowly open one cylinder on the left side of the manifold and press the “Push to Reset” button
14.
Verify the following:
• Left bank Red “Empty” LED goes out
• Left bank Yellow “Ready” LED illuminates
• Left bank cylinder contents gauge reads tank pressure
• If connected to a master alarm panel, “secondary supply” alarm is not activated
15.
Close left and right side cylinders.
16.
Record pressure readings of left and right bank tank contents gauges.
17.
Wait 15 minutes.
18.
Compare current readings of the left and right bank tank contents gauges to those recorded in step 16. If
there is a noticeable pressure change on either gauge, perform leak testing described in Testing For Leaks
(page 20).
19.
Reinstall manifold control panel cover.
20.
Slowly open all tanks on both banks of the manifold.
21.
Open 3/4" (19.05mm) source valve.
20
Amico Corporation
Line Regulator Pressure Adjustment
This procedure should be performed if the line regulator pressure is not within acceptable limits during performance
verification procedure or after installation of a new line regulator.
1. With both the banks supplying pressure, open ball valves on the inlet and outlet on only one side of the line regulator
to be adjusted.
2. Slightly press the bleed valve on the side of the regulator to create a small flow of gas though the manifold.
3. Using the handle on the bonnet of the regulator, turn to adjust the pressure to the specified setting, as mentioned on
the cabinet door by observing the line gauge.
4. Repeat (steps 1-3) to adjust the other line regulator.
5. After adjusting the pressure to the specified setting open all balls valves and ensure the supply line remains open.
Line Regulator Replacement
If necessary, the line regulator replacement can be performed while manifold is in service. However, this should only be
done by qualified technicians experienced in servicing medical equipment.
1. Close the two ball valves on inlet and outlet of line regulator to be replaced.
2. Loosen union nuts on two closed isolation valves.
3. Vent pressure from the bank, which was shut off in step 2, by pressing the bleed valve on side of the regulator.
4. Ensure the orientation of fittings (direction of gas flow) is the same on the replacement regulator. Install fittings on new
regulator.
5. Inspect O-ring removed from the ball valve union. If damaged, replace O-ring.
6. Verify the correct orientation of fittings on the regulator; some slight adjustment may be required to align with the
ball valves without causing stress to the fittings.
7. Hand-tighten the two ball valve union nuts and then with a wrench snug lightly to ensure the fittings are secure.
NOTE: do not over tighten unions, as it is an o-ring seal.
8. Open ball valves and set the line regulator’s output pressure as described in Line Regulator Pressure Adjustment procedure.
www.amico.com
21
Control Board Replacement
If necessary, the control board replacement can be performed while the manifold is in service. However, this should only
be done by qualified technicians experienced in servicing medical equipment.
1. Remove two top screws at the base of the display board bracket and tilt the display board assembly back.
2. Disconnect power supply.
3. Remove the screws located on the circuit board, which detaches it from the front plate. Note orientation of the old
circuit board and remove wiring one at a time and connect each wire to the appropriate terminal on the new board.
4. Install the circuit board and fasten the screws to secure it. Return bracket to its original position and then fasten the two
screws at the base.
5. Reconnect power supply to the manifold cabinet.
6. Check the correct operation of the circuit board by simulating a bank switch over a couple of times.
Solenoid Replacement
1. Ensure the Solenoid that needs to be replaced is not the side that is In-use.
2. Disconnect power supply if manifold is not in service.
3. Remove two top screws at the base of the display board bracket and tilt the display board assembly back and with
the help of a small flat screw driver, disconnect the solenoid wires labeled L for left and R for right to indicate the side
of the solenoid from the terminal block on the circuit board.
4. Remove the two union nuts on either side of the solenoid, one located at the inlet side and the other at the
output side of the solenoid.
5. Install the replacement solenoid and tightened the union nuts on either side to ensure the solenoid is secure.
6. Connect the solenoid wires to the appropriate terminal on the circuit board.
7. Return the circuit board bracket back to upright position and then fasten the two screws at the base.
8. Reconnect power supply to the manifold cabinet.
9. Check the correct operation of the solenoid by simulating a bank switch over a couple of times.
22
Amico Corporation
Tank
M i c r oChanging
p r o c e s s o r D Procedures
igital Manifold
USER RESPONSIBILITY
1. Keep the main bank valve open throughout these procedures.
2. Close tank valves on all empty tanks.
information
in this
Maintenance
3.The
Disconnect
hosecontained
/ pigtails from
tankInstallation
valve outletsand
using
an appropriateManual,
wrench. pertains only to the ALERT-2
microprocessor based digital manifold. This product will perform in conformity with the descriptions
in this caps
manual
assembled,
maintained
and serviced
in accordance with the
4.contained
Place protective
over when
the tank
valves of theoperated,
empty tanks
and move them
aside.
installation instructions provided.
5. Visually inspect the tank valves for dust, grease or oil.
The manifold must be checked periodically. Parts that are broken, missing, worn, distorted or
M i c r o p r o cmust
e s s be
o r replaced
D i g i t aimmediately.
l Manifold
contaminated,
Should such repair or replacement become necessary,
6. Using a clean (lint free) cloth, wipe each tank valve outlet clean. Do not use your fingers.
please contact Amico Corporation or their distributors.
CO2
N2Otomanifolds
outdoors.
NFPA
Code: 5.1.3.3.1.8
Central
7.Installing
Connect the
hoseand
/ pigtails
the tank valve
outlets andPlease
tighten refer
the nutto
with
an appropriate
wrench.
USER RESPONSIBILITY
supply systems for nitrous oxide and carbon dioxide shall be prevented from reaching
8.temperatures
Very S-L-O-W-L-Y
open than
the valve
the tank closest to theofcontrol
cabinet. supply
Watch thesystem’s
bank pressure
display on
lower
theon
recommendations
the central
manufacturer,
theshall
front of
the cabinet
to make
sure
the pressure
rises
slowly. than 54°C (130°F).
but
never
be lower
than
-7°C
(20°F) or
greater
The
information
contained
in
this
Installation
and
Maintenance
pertains
only to the
All Manifolds should not be repaired or altered without Manual,
prior written
approval
byALERT-2
Amico
microprocessor
based
digital manifold.
product
will void
perform
in conformity
withmanifold.
the descriptions
9.Corporation
S-L-O-W-L-Y open
thedistributors.
remaining
tankFailure
valves This
one
a time. will
or it’s
to at
comply
all warranty
on the
contained in this manual when assembled, operated, maintained and serviced in accordance with the
Statements
this manual
preceded by the words WARNING, CAUTION, DANGER and NOTE are of
installation in
instructions
provided.
special significance. Please read these sections carefully.
The manifold must be checked periodically. Parts that are broken, missing, worn, distorted or
contaminated, must be replaced immediately. Should such repair or replacement become necessary,
please contact Amico Corporation or their distributors.
Installing CO2 WARNING:
and N2OOxygen
manifolds
Please
to Spontaneous
NFPA Code:
5.1.3.3.1.8
Central
systemsoutdoors.
must be handled
with refer
CAUTION.
combustion
may occur
if oxygen
comes into
contact
withcarbon
grease or dioxide
oil. Ensure shall
that hands,
clothing
and tools
are
supply systems
for nitrous
oxide
and
be gloves,
prevented
from
reaching
WARNING:
denotes
steps
which
canthe
prevent
injury.
kept
clean
andthe
free
of oil and
grease.
Be careful
notcentral
to introduce
dust or
other contaminants
into
temperatures lower
than
recommendations
of
supply
system’s
manufacturer,
when
changing
tanks. Failure
to comply
with54°C
the procedure
but shall neverthe
besystem
lower
than
-7°C (20°F)
or greater
than
(130°F).may be hazardous
All Manifolds should not be repaired or altered without prior written approval by Amico
Corporation or it’s distributors. Failure to comply will void all warranty on the manifold.
Statements in this manual preceded by the words WARNING, CAUTION, DANGER and NOTE are of
special significance. Please read these sections carefully.
CAUTION: denotes steps which can prevent damage to equipment.
WARNING: Fire Hazard. DO NOT permit smoking, or any other source of ignition in area where
the manifold is located, or near the relief valve vent outlet. Be certain that all connections are free
which
can
prevent
injury. in air enriched with oxygen, or
of WARNING:
dirt, grease, anddenotes
oil. These steps
substances
burn
with
great intensity
nitrous
oxide anddenotes
some gassteps
mixtures
DANGER:
which can prevent electrical shock to equipment or to
prevent serious injury and/or death.
CAUTION: denotes steps which can prevent damage to equipment.
www.amico.com
23
Ordering Information
M3A-DS-LL-L-XXX
Manifold Cabinet:
A = Analog
DS = Dual Solenoid
The Letters “XXX”
Define the Gas:
LL = Liquid
The Letter “L” Defines
the Langauge:
U = English (NFPA)
S = Spanish (NFPA)
Header-Bar Assembly:
OXY = Oxygen
N2O = Nitrous Oxide
CO2 = Carbon Dioxide
NIT = Nitrogen
M2-HBLQ-XXL-XXX
Number of Cylinders:
(1*1 = 02)
(2*2 = 04)
LQ = Straight c/w Cryogenic Pigtails
24
Amico Corporation
Control Cabinet Parts List
DESCRIPTION
MODEL NUMBER
Pressure transducer for Oxy, N2O, CO2, & Nit
M2-X-MAN-07C
Line pressure regulator for Heavy Duty Manifolds
For NIT
M2-X-MAN-42E-L
M2-X-MAN-42E-R
M2-X-MAN-42E-LN
M2-X-MAN-42E-RN
Repair Kit - Line pressure regulator
M2-REG700-RK
Intermediate check valve for all gases
Operating pressure relief valve
Pipe away adaptor
Line Pressure relief valve for Nitrogen
Line pressure relief valve for Oxy, N2O, & CO2
Pigtail c/w Check valve – Cryogenic
M-X-MAN-33B
M-X-MAN-72W-500
M-X-PIPEAWAY-GNT
M-X-IN-72W-225
M-X-IN-72W-075
M-X-HB-CRYO-GAS
GAS= OXY, N2O, NIT & CO2
ALERT-2.1 LED circuit board
Manifold Power Supply Board
Solenoid Valve
Economizer check valve
M3-LED-DLCB
M2-X-POWER
M3-X-LIQ-SOLVLV
M2-X-MAN-31
www.amico.com
25
Appendix A
Manifold Internal Layout
26
Amico Corporation
Appendix B
Piping Schematic Diagram
PIPING SCHEMATIC DIAGRAM
DUAL LINE REGULATORS (NFPA)
TO
PIPELINE
DISTRIBUTION
SYSTEM
PROVISION
FOR
RESERVE
VENT TO
OUTSIDE
9
7
8
7
11
CONTROL CABINET
10
6
6
4
LEFT HAND BANK
CYLINDER PRESSURE
3
4
6
HP
LB
HP
RB
3
1
5
LEFT
BANK
5
RIGHT
BANK
2
RIGHT HAND BANK
CYLINDER PRESSURE
Item Description
Pig-Tail check valve
Cylinder valve
High pressure inlet valve
Pressure Transducer
Solenoid Valve
Check valve
Line pressure regulator
2 - Way valve
Line pressure relief valve
10 Operating pressure relief valve
11 Bleed Valve
1
2
3
4
5
6
7
8
9
www.amico.com
27
Appendix C
Electrical Wiring Diagram
Amico Medical Gas Alarm
Master Alarm
115 VAC
Supply
Voltage
Amico Gas
Manifold
Connect the NO loop to the
appropriate points.
110 / 240 VAC Wiring
50 / 60 Hz
C
NO
Current Draw: 1 Amp. Max.
External Power
Supply
28
Amico Corporation
Appendix D
Control Cabinet Wiring Diagram
www.amico.com
29
Appendix E
Liquid Setup with Header Bars
NOTE: A standard 450psi relief valve is
provided on the header.
Inch
[mm]
3/4" Isolation Valve
Provision for Reserve Manifold
Relief Valve Vent
Supply Line
Approx.
40 [1016]
9
[229]
Approx.
40 [1016]
OXYGEN
H.P. Vent (1/2" NPT)
19
[432]
Push
To
Start
17
[432]
Dependent upon type
of Liquid cylinder used.
Minimum tank pressure
must be at least 300 psi
for Liquid Nitrogen and
200 psi for all other gases.
Dependent upon type
of Liquid cylinder used.
60
[1524]
60
[1524]
Front View
30
Amico Corporation
Minimum tank pressure
must be at least 300 psi
for Liquid Nitrogen and
200 psi for all other gases.
Minimum tank pressure
must be at least 300 psi
for Liquid Nitrogen and
200 psi for all other gases.
Side View
Appendix F
Liquid Manifold with High Pressure Reserve
Set at 85psi Decreasing
3
110 psi NFPA Relief Valve
Piping Not Included
8
7
6
Set at 1100 psi Decreasing
5
Set Reg. to 80 - 85 psi
Supply Line
4
Provision for Reserve Manifold
Relief Valve Vent 1/2” (NPT)
Approx.
40 [1016]
1
OXYGEN
2
Push
To
Start
H.P. Vent
(1/2" NPT)
Approx.
40 [1016]
Top View
2
Dependent upon type
of Liquid cylinder used.
Minimum tank pressure
must be at least 300 psi
for Liquid Nitrogen and
200 psi for all other gases.
60
[1524]
60
[1524]
Minimum tank pressure
must be at least 300 psi
for Liquid Nitrogen and
200 psi for all other gases.
(1)
(2)
(3)
(4)
(5)
(6)
(7)
(8)
M3A-DS-LL-U-OXY
M2-HBLQ-02U-OXY
M-PRSW-GA-ORES
M-SIMP-U-08-OXY
M-PRSW-RES-OXY
M-X-MAN-72W-125
VV-CHK3-EXT (PIPE SIZE)
VV-ISO-G-(PIPE SIZE)
www.amico.com
31
www.amico.com
Amico Corporation | www.amico.com
85 Fulton Way, Richmond Hill
Ontario, L4B 2N4, Canada
Toll Free Tel: 1.877.462.6426
Toll Free Fax: 1.866.440.4986
Tel: 905.764.0800
Fax: 905.764.0862
Email: [email protected]
C
US LISTED C
APE-INSTAL-MAINT-SOL-LIQ-MANI 05.28.2015
US L