1
DARTMOOR BLADE / RUSH / SIMPLE
chainguide assembly manual
Required tools:
– 3mm, 4mm and 5mm Allen keys
To correctly assembly the chainguide, first you have to properly set the chain line.
Chainguide was designed to assist your drivetrain, but performance will be hindered
if for example, the bottom bracket is too long or too short, the crankset spindle is
bent, etc. All Dartmoor chainguides use the ISCG (International Standard Chain Guide
mount) bolt pattern. Depending on version it may be either the ISCG 03 (OLD) or ISCG
05. All the modern gravity aimed frames are fitted with one of this standard mounts.
In case your frame is not equipped with such a mount, each guide is designed to use
a flanged fixed cup type bottom bracket when using the supplied ISCG adapter plate.
All the chainguides are built of aluminum spider and plastic sliders and pulleys (the Simple
chainguide has only the pulley).
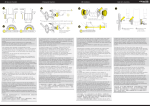
1. Remove both crank arms. Fit the chainguide assembly to the ISCG mounts
using one of the 3 M6 screws, and 4mm Allen key. Do not tighten the screws yet,
just make sure that there is a possibility of changing the angle of chainguide.
Photo 1
Blade / Rush chainguide mounted
properly
ISCG bolts
2. Re-install your crankarm / chainring assembly on to the bottom bracket spindle. In case
of Blade / Rush chainguide loosen the upper cage mounting bolts, using 4mm Allen key, to
allow the chainring to fit easily.
3. Fit the chain onto chainring. In case of Rush chainguide you have to open the upper
guide cage (photo 3). Use 3mm Allen key.
Photo 2
Simple chainguide
mounted properly
Photo 3
4. To make sure that your chainguide will work properly it is crucial to properly set its
angle. The ISCG mount allows for a lot of angle adjustment. In case of chainguides with
upper guide cage (Blade/Rush) the angle of the chainguide should be set so the hole in the
cage is parallel to the chain line (see photos 4, 5).
Photo 4
Blade
Photo 5
Rush
Simple chainguide can be set
differently,
depending
on
its
purpose. In case of two chainrings
in front it can be set precisely only
to reduce the possibility of chain
falling off the rockring (photo 6).
Photo 6
In case of singlespeed setting on the frame with vertical dropouts, the angle of chainguide
should be set to reduce chain slack to minimum (photo 7).
Photo 7
5. After setting the correct angle,
you can screw the chainguide to the
frame (photo 8).
Photo 8
6. After setting the aluminum spider of the chainguide, you have to screw the bolts of
the upper cage. Remember not to over-tighten those. Maximum torque is 6 Nm. Cage
should be as close to the chainring as possible, but preferably without chain contact. This
allows for friction free action.
7. Now the chainguide is mounted properly. Unfortunately there are different cranksets
and different bottom brackes so there can be a situation in which you will find the
chainguide to be not perfectly mounted. To find out if everything is ok, check the chainline
by looking at the chainguide upper cage (photo 9 and 10).
correct
chain line
Photo 9
Photo 10
8. In this case (photo 11) the chainring is too far from the frame, so to set the chainguide
properly you have to use provided spacers. The spacers should fit between the frame
ISCG mount and the chainguide itself (photo 12).
In this case (photo 13) the chainring is too close to the frame. The solution is adding extra
spacer on the right side of bottom bracket or changing the bottom bracket to a longer
one.
too much
space
too little
space
spacer
Photo 11
Photo 12
Photo 13