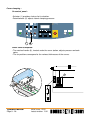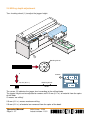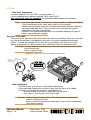
1
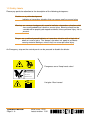
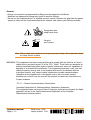
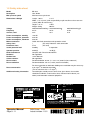
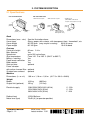
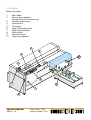
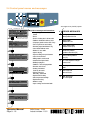
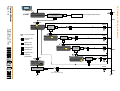
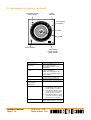
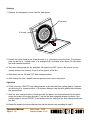
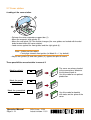
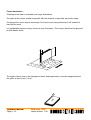
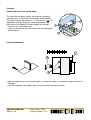
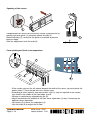
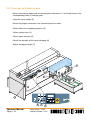
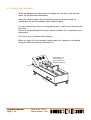
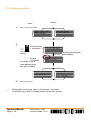
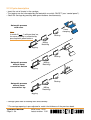
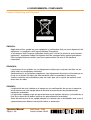
ROL G
CONT ERUN
URE GULI N
ERAT URRE LATIO URE
G
TEMP ERAT REGU ERAT E
URIN
TEMP COLL URST
GLUE TEMP
LEIM
RATU
EMPE
Y
GENC
EMER STOP TOP
T
E
NOTS
ARRE GENC P
D'UR DSTO
NOO
LIJMT
OPERATOR
MANUAL
Initial issue: 12/00
Latest revision : 08/06
9.133.459
Content of this documentation has a confidential nature and remains the
exclusive property of C.P. Bourg SA. It is only put at the user (including without
limitation: Renter or Purchaser or their employees) disposal within the
exclusive scope of using and servicing the product. Without C.P. Bourg SA
prior agreement in writing, disclosure to third party and/or reproductions as well
as changes are prohibited.
Operator Manual
Page 9 - 2
Initial issue: 12/00
Latest revision: 11/01
TABLE OF CONTENTS
1. Introduction . . . . . . . . . . . . . . . . . . . . . . . . . . . . . . . . . . . . . . . . . .5
1.1
1.2
1.3
1.4
1.5
Foreword . . . . . . . . . . . . . . . . . . . . . . . . . . . . . . . . . . . . . . . . . . . . . . . . .5
Safety information . . . . . . . . . . . . . . . . . . . . . . . . . . . . . . . . . . . . . . . . . .5
Safety labels . . . . . . . . . . . . . . . . . . . . . . . . . . . . . . . . . . . . . . . . . . . . . .6
Instructions for safe use . . . . . . . . . . . . . . . . . . . . . . . . . . . . . . . . . . . . . .9
Safety data sheet . . . . . . . . . . . . . . . . . . . . . . . . . . . . . . . . . . . . . . . . . .11
2. System description . . . . . . . . . . . . . . . . . . . . . . . . . . . . . . . . . . .12
2.1 Specifications . . . . . . . . . . . . . . . .
2.2 General . . . . . . . . . . . . . . . . . . . . .
2.3 Control Panel . . . . . . . . . . . . . . . .
2.4 Control panel menus and messages
2.5 Change of binding parameters . . . .
2.6 Instructions for timer use (optional) .
2.7 Cover station . . . . . . . . . . . . . . . . .
2.8 Milling depth adjustment . . . . . . . .
2.9 Glue . . . . . . . . . . . . . . . . . . . . . . .
2.10 To set up the Binder module . . . .
2.11 Output unit (optional) . . . . . . . . . .
2.12 Binding condition . . . . . . . . . . . . .
2.13 Cycle description . . . . . . . . . . . . .
3. Maintenance
.
.
.
.
.
.
.
.
.
.
.
.
.
.
.
.
.
.
.
.
.
.
.
.
.
.
.
.
.
.
.
.
.
.
.
.
.
.
.
.
.
.
.
.
.
.
.
.
.
.
.
.
.
.
.
.
.
.
.
.
.
.
.
.
.
.
.
.
.
.
.
.
.
.
.
.
.
.
.
.
.
.
.
.
.
.
.
.
.
.
.
.
.
.
.
.
.
.
.
.
.
.
.
.
.
.
.
.
.
.
.
.
.
.
.
.
.
.
.
.
.
.
.
.
.
.
.
.
.
.
.
.
.
.
.
.
.
.
.
.
.
.
.
.
.
.
.
.
.
.
.
.
.
.
.
.
.
.
.
.
.
.
.
.
.
.
.
.
.
.
.
.
.
.
.
.
.
.
.
.
.
.
.
.
.
.
.
.
.
.
.
.
.
.
.
.
.
.
.
.
.
.
.
.
.
.
.
.
.
.
.
.
.
.
.
.
.
.
.
.
.
.
.
.
.
.
.
.
.
.
.
.
.
.
.
.
.
.
.
.
.
.
.
.
.
.
.
.
.
.
.
.
.
.
.
.
.
.
.
.
.
.
.
.
.
.
.
.
.
.
.
.
.
.
.
.
.
.
.
.
.
.
.
.
.
.
.
.
.
.
.
.
.
.
.
.
.
.
.
.
.
.
.
.
.
.
.
.
.
.
.
.
.
.
.
.
.
.
.
.
.
.
.
.
.
.
.
.
.
.
.
.
.
.
.
.
.
.
.
.
.
.
.
.
.
.
.
.
.
.
.
.12
.13
.14
.15
.16
.18
.21
.27
.29
.31
.32
.33
.34
. . . . . . . . . . . . . . . . . . . . . . . . . . . . . . . . . . . . . . . .35
3.1 Preventive maintenance . . . . . . . . . . . . . . . . . . . . . . . . . . . . . . . . . . . .35
3.2 Paper dust bag replacement . . . . . . . . . . . . . . . . . . . . . . . . . . . . . . . . .36
4. Mechanical trouble shooting
. . . . . . . . . . . . . . . . . . . . . . . . . . .37
5. Some common glueing defects
. . . . . . . . . . . . . . . . . . . . . . . . .38
6. Environmental compliance . . . . . . . . . . . . . . . . . . . . . . . . . . . . .39
Product Recycling and Disposal
. . . . . . . . . . . . . . . . . . . . . . . . . . . . . . . . .39
7. Appendix . . . . . . . . . . . . . . . . . . . . . . . . . . . . . . . . . . . . . . . . . . .41
Operator Manual
Page 9 - 3
Initial issue: 12/00
Latest revision: 08/06
Cette page est intentionnellement vide.
This page is intentionally left blank.
Deze blad is opzettelijk in het wit gebleven.
Diese Seite wurde absichtlich leer gelassen.
Operator Manual
Page 9 - 4
Initial issue: 12/00
Latest revision: 11/01
1. INTRODUCTION
1.1 Foreword
Thank you for choosing a BOURG product.
The BOURG BINDER 3001 is a perfect binder destined for the off line production of bound
booklets.
This manual is a guide to operate the BOURG BINDER 3001.
Follow the instructions carefully and you should obtain years of excellent service from your
Finishing on Demand system.
If you have any difficulty using your equipment, please call us and ask for technical assistance
(phone numbers are listed on the last page). We will be delighted to help you.
1.2 Safety information
You are advised to read the "Instructions for a safe use" before you start to actually use the
device.
Technical safety information such as safety data sheet can also be found.
Where applicable, cautions and warnings are used to draw your attention to safety precautions
to be taken.
All information in this publication is based on the latest information available at the time of
approval for printing.
We reserve the right to revise this publication and to make changes in the content without
obligation to notify any person of such revisions or changes.
Operator Manual
Page 9 - 5
Initial issue: 12/00
Latest revision: 11/01
1.3 Safety labels
Please pay particular attention to the description of the following pictograms:
Caution: on a yellow background,
indicates a hazardous situation that can cause small or severe injury.
Warning: on a orange background is used to indicate a hazardous situation which
has some probability of death or severe injury. Warning should not be
considered for property damaged accidents unless personal injury risk is
present.
Danger: on a red background:indicates a hazardous situation with a high risk of
death or severe injury. The ‘danger’ sign does not apply to accidents
causing material damage, unless they can cause personal injury.
An Emergency stop on the control panel can be pressed to disable the binder.
Dangerous area. Keep hands clear !
WARNING
KEEP HANDS CLEAR
CAN CAUSE
SEVERE INJURY
Hot glue. Burn hazard
Operator Manual
Page 9 - 6
Initial issue: 12/00
Latest revision: 11/01
On the Top Cover
®
MODEL : BB3001
SER. N° :
3P+PE
60 Hz
208 / 220 / 230 / 240 V
20 A
LISTED
I.T.E.
E125337
3P+PE
50 Hz
220 / 230 / 240 V
20 A
3P+N+PE
50 Hz
380 / 400 / 415 V
20 A
geprüfte
Sicherheit
Refer to specifications
in Installation Manual.
GLUE TEMPERATURE CONTROL
c p bourg S.A.
LEIMTEMPERATURREGULIERUNG
MADE IN BELGIUM BY
.
.
B-1340 Ottignies - rue des Technologies, 22
Tel : +32 / 10 / 62 22 11 Fax : +32 / 10 / 61 36 38
REGULATION
TEMPERATURE
COLLE
9139560
LIJMTEMPERATUURSTURING
Inside the Binder
WARNING
KEEP HANDS CLEAR
CAN CAUSE
SEVERE INJURY
TAG
Factory wired for / Verdrahtet für
Cablé pour:
380 / 400 / 415 V
220 / 230 / 240 V
208 / 220 / 230 / 240 V
Υ
∆
∆
50 Hz
50 Hz
60 Hz
GB
To connect to different networks, rewiring
according to service manual is compulsary.
Caution: wiring errors can result in heavy
damage and void the guarantee.
D
Für Anschluss an andere Netzspannung,
Verdrahtung wie in Installationsanweisung
ändern.
Wichtig: Falscher Anschluss kann schwere
Schäden verursachen und die
Garantie ausschliessen.
F
Pour des réseaux différents, il y a lieu de
modifier le raccordement comme indiqué
dans le manuel d'installation.
Attention: un raccordement erroné peut
entraîner des dommages graves
que la garantie ne couvre pas
9.139.158
Operator Manual
Page 9 - 7
Initial issue: 12/00
Latest revision: 11/01
High leakage current
earth connection essential before
connecting supply
9.139.163
In the Power Rack
Courant de fuite élevé
Raccordement à la terre indispensable
avant le raccordement au réseau
Main Ground
Pictogram
E
P
L3
L2 1
L
N
Power supply
connection
On the back (inside)
GB
WARNING
S E E IN S T A L L A T IO N IN S T R U C T IO N S
B E F O R E C O N N E C T IN G T O T H E S U P P L Y
WHEN WIRING THE BINDER TO A
380v or 415v Y NETWORK ALL
OF THE 5 WIRES MUST BE
CONNECTED.
THE OMISSION OF THE NEUTRAL
WILL RESULT IN HEAVY DAMMAGE
AND BREACH OF WARANTY
(BEWARE OF EXTENSION CORDS)
Operator Manual
Page 9 - 8
Initial issue: 12/00
Latest revision: 11/01
D
WARNUNG
S IE H E IN S T A L L A T IO N S A N L E IT U N G
V O R A N S C H L U S S A N S S T R O M N E T Z
BEIM ANSCHLUSS DER MASCHINE ANS
380v oder 415v Y NETZ MÜSSEN
UNBEDINGT ALLE 5 ADERN
ANGESCHLOSSEN WERDEN.
WENN DIE NEUTRALE ADER NICHT
ANGESCHLOSSEN WIRD, ENTSTEHEN
"
SCHWERWIEGENDE SCHADEN
UND
"
DIE GARANTIE FALLT.
"
(ACHTUNG BEI VERLANGERUNGSSCHNUR)
F
ATTENTION
V O IR IN S T R U C T IO N S D E M O N T A G E
A V A N T R A C C O R D E M E N T A U R E S E A U
LORS DU RACCORDEMENT A UN
RESEAU 380v ou 415v Y LES 5
CONDUCTEURS DOIVENT ETRE
RACCORDES.
UN RACCORDEMENT ERRONE
ENTRAINERAIT DES DOMMAGES
IMPORTANTS QUE LA GARANTIE
NE COUVRE PAS.
(MEFIEZ- VOUS DES CORDONS PROLONGATEURS)
1.4 Instructions for safe use
Bourg products have been tested in accordance with the strictest international safety
standards. To help assure safety it is important that you observe the following rules:
Connection:
• Do not move the machine yourself, but contact our Customer Service.
• For equipment connected via a fixed connection to the network. The cable connection to the
interface box should be easily accessible.
• Do not place the machine in rooms which are too small and insufficiently ventilated.
See safety data sheet (in appendix) for information about space and ventilation
requirements.
Note : • If an other type of glue is used of the recommended one (National Coolbind
1300), please refer to the safety data sheet of the used glue.
• Vapours which may be formed at elevated temperature may be irritating to
eyes and respiratory tract. A local exhaust over glue tank and a good
ventilation of the room are required.
• Different fume regeneration/extraction are available following the type of
binder (see spare parts catalog).
Surroundings:
• Do not block the ventilation openings of the machine.
• Ensure that the machine is placed on a level, horizontal surface of sufficient strenght. See
machine specifications for information about the weight of the equipment.
Maintenance:
• Do not remove any screws from fixed panels.
• Do not carry out maintenance activities except for the parts and maintenance materials
mentioned in this manual.
• Do not place any liquids on the machine.
• To avoid the risk of introducing hazards, all modifications to Bourg equipment are
strictly reserved to properly qualified and trained service technicians.
Operator Manual
Page 9 - 9
Initial issue: 12/00
Latest revision: 08/06
General:
• Always use materials recommended by Bourg and developed for the Binder.
Materials not approved by Bourg may result in machine failures.
• Do not use the machine when it is emitting unusual sounds. Remove the plug from the power
socket or switch off the fixed connection to the network, and contact your Service provider.
Dangerous area
keep hands clear
Hot glue
burn hazard
Note: These safety alert symbols are for your personal safety. Never operate without
all safety covers in place.
WARNING: This equipment has been tested and found to comply with the limits for a Class A
digital device, pursuant to part 15 of the FCC* Rules. These limits are designed to
provide reasonable protection against harmful interference when the equipment is
operated in a commercial environment. This equipment generates, uses, and can
radiate frequency energy and, if not installed and used in accordance with the
instruction manual, may cause harmful interference to radio communications.
Operation of this equipment in a residential area is likely to cause harmful
interference in which case the user will be required to correct the interference at
his own expense.
*F.C.C. = Federal Communications Commission.
Canadian Department of Communications Compliance Statement:
This equipment does not exceed Class A limits per radio noise emissions for digital
apparatus set out in the Radio Interference Regulation of the Canadian
Departement Communications.
Operator Manual
Page 9 - 10
Initial issue: 12/00
Latest revision: 11/01
1.5 Safety data sheet
Model
Description
Max. process speed
Dimensions & Weight
Voltage
Frequency
Current, rated
Power consumption, stand by
Power consumption, operation
Power consumption, maximum
Mains connection
Safety class
Protection class
Sound pressure level
Operator position
Radio interference
Radiation
Radiant heat
Ozone emission
Room volume
Room ventilation
Dust concentration
Additionnal safety information
BB 3001
Glue binder
Maximum 500 cycles/hour
Lenght: 1,88 m
6.17 ft
Width: 1,16 m (3.8 ft) (with the possibility to split machine to have 695 mm
(2.28 ft) width for narrow way)
Height: 1,06 m
3.48 ft
Weight: 400kg
882 lbs
208V/220V/230V/240V/3 220V/230V/240V/3
380V/400V/415V/3 N
60 Hz
50 Hz
50 Hz
20 A
20 A
20 A
1500 W
3000 W
5500 W
Cable with fixed connection and separation switch
I
(IEC 536) Protective earth connection
IP 20
(IEC 529)
Standby
In operation
55 db(A)
76 db(A)
Complies with Directive 89/336/EEC
Not applicable
10224 Btu/hour
Not applicable
Recommendation: 95 m3 (7 x 4,5 x 3 m) 3336 ft3 (23x14.8x9.8 ft)
Recommendation: min. 47,5 m3/h (natural ventilation)
For heat evacuation at continuous binding extra ventilation may be necessary
0,04 mg/m3 at continous operation
(TLV for nuisance dust = 10 mg/m3)
To avoid higher sound pressure levels than given above, the machine
should be installed in a room with at least minimum room volume (see
above) and favourable acoustical properties.
3P+PE
50 Hz
220 / 230 / 240 V
20 A
3P+N+PE
50 Hz
380 / 400 / 415 V
20 A
®
MODEL : BB3001
SER. N° :
3P+PE
60 Hz
208 / 220 / 230 / 240 V
20 A
LISTED
I.T.E.
E125337
geprüfte
Sicherheit
Refer to specifications
in Installation Manual.
c p bourg S.A.
MADE IN BELGIUM BY
.
.
B-1340 Ottignies - rue des Technologies, 22
Tel : +32 / 10 / 62 22 11 Fax : +32 / 10 / 61 36 38
9139560
Operator Manual
Page 9 - 11
Initial issue: 12/00
Latest revision: 11/01
2. SYSTEM DESCRIPTION
2.1 Specifications
MAX. BOOK DIMENSIONS
MIN. BOOK DIMENSIONS
320mm
(12.6in.)
385mm
(15.2in.)
• With manual reception
• With automatic reception
• Padding mode
(without BBR - with manual
reception and only by the low exit)
100mm
(3.9in.)
140mm
(5.5in.)
90mm
(3.5in.)
100mm
(3.9in.)
Max.thickness
45mm
(1.8in.)
Book
Dimensions (max - min)
Cover types
Cover weight
Paper weight
Features
Cover pile height
Miss detector
Speed max.
Glue temperature
Milling + notching
Paper waste collection
Book counter
Start up timer
Fume extractor
with active charcoal filter
Outdoor fume exhaust
210mm
(8.3in.)
Min. thickness:
2 sheets (theorecal,
with very thin cover)
75mm
(2.95in.)
See the illustration above
Glossy paper, with cutouts, with transparent front, “kromekote”, etc.
80-250 gsm (may require creasing)
30-90 lb cover
60-160 gsm
15-40 lb bond
60 mm 2.4 in.
Yes
up to 500 cycles/hour.
From 140° C to 165° C (284°F to 392°F)
Yes
Yes
Yes
optional
optional
optional
Machine
Dimensions: (l x w x h)
1,88 m x 1,16 m x 1,06 m (6.17 ft x 3.8 ft x 3.48ft)
Weight
Binder
Output Unit (optional)
400 kg
55 kg
(882 lbs)
(121 lbs)
Electrical supply
208V/220V/230V/240V (60Hz)
220V/230V/240V (50Hz)
380V/400V/415V (50Hz)
Radiant heat
Noise level (Lpa)
10224 Btu/hour
76 dB (A) (at operator position)
Operator Manual
Page 9 - 12
Initial issue: 12/00
Latest revision: 11/01
∆ -20A
∆ -20A
Y -20A
2.2 General
Binder description
1.
2.
3.
4.
5.
6.
7.
8.
9.
10.
Main Switch
Start up timer (optional)
(to skip the 35 minutes warm up)
Handling loading area
Control panel
Thermostat
Depth milling adjustment
Depth milling indicator
Cover station
Glue tank access
Output unit (optional)
5
9
3
8
2
L
TRO NG
CON IERU
RE GUL
ATU
TION RE
PER ATURRE ULA ATU
REG PER LE TURING
E TEM PER
TEM COL URS
GLU TEM
ATU
LEIM
PER
TEM
LIJM
NCY
RGE P
P
EME STO STO
ET CE
NOT
ARR GEN
OP
D'UR DST
NOO
4
7
10
1
6
Operator Manual
Page 9 - 13
Initial issue: 12/00
Latest revision: 11/01
2.3 Control Panel
12
13
14
15
c.p. bourg
MENU
5
7
8
9
2
1
1
PROGR.
10
2
3
4
6
7
5
2.
3.
4.
5.
6.
7.
8.
9.
10.
11.
12.
13.
14.
15.
ENTER
6
4
3
1.
S.A.
N.V.
8
10
11
1
9
Closes the carriage and starts the Binding Process
(press the two start buttons simultaneously)
Adjusts the clamping duration
Adjusts the lateral clamping pressure
Adjusts the suction level
Allows you to select menus and perform operation from these menus
Toggles the blade rotation ON/OFF
Selects the programs*
Toggles the glue tank heating (the drum rotation starts when the glue is warm enough)
Confirms the selection
Stop all operations in an emergency
Opens the carriage
Toggles jogger ON/OFF
Carriage normal or large pre-opening
Fixed speed ON/OFF
Liquid Crystal Display for menus and messages
* With cover
or Without cover evacuation:top (for padding)
or Without cover evacuation:bottom (for padding)
Stop the drum rotation to select the program.
Confirm the choice by starting the drum rotation.
Note: In N
1 mode with pre-feed : yes. If the message “Cover sheet misfeed” is
displayed, it is not possible to change the program.
You have to press on the emergency button and then change the program.
Operator Manual
Page 9 - 14
Initial issue: 12/00
Latest revision: 11/01
2.4 Control panel menus and messages
c.p. bourg
MENU
5
S.A.
N.V.
ENTER
6
7
4
8
3
9
2
1
PROGR.
10
messages # on (earlier) eprom
At switch on:
.
NR . OF B I ND I NGS : X X X
N – > 1 L : X X X CORR : X
Display of the values
previously selected in
next two menu steps.
MENU
MOD E : N – > 1
PR E - F E E D :
BOOK S I Z E :
S I Z E COR RE C T I ON :
MENU
E X T RA CORREC T I ON
COV ER POS I T I ON
( mm ) :
OV ER L AP
XXX
MENU
GL UE F I LM
L ENGT H
± 7
±16
MENU
CHANGE TOT A L NUMBER
O F B I ND I NGS
N R . OF B I ND I NGS :
COUN T ER RE S E T
List of messages and instructions:
• Emergency pressed or hood not
closed
• Reset
• Drum is heating but is still too cold.
• Problem with book in delivery area
• Lift perpex guard remove cover if any
• Press key drum to start heating
• Remove paper from binder if any
• Cover feeder did not move
• Binder is in test mode
• Spine is drying
• Depress both green push buttons
• Cover sheet misfeed
• Milling motor is overheated
• Switch off and open hood
• Binding in progress
• Problems with carriage position
• Remove cover sheet
• Heating is disabled.
Push key to restore
• Delivery conveyer
Not ready / connected
• Replace MCU battery
• Glue temperature too high
• Replace dust bag
• Binder is ready
• Open carriage and remove book
MENU
L ANGU :
F ( GB ) D
NL I E P
MENU
Operator Manual
Page 9 - 15
Initial issue: 12/00
Latest revision: 11/01
#
ERROR MESSAGES
1
Carriage open/close
Motor problem M7 F35
2
Shutter motor
Problem M15 F5
4
Cover nipping motor
Problem - M14 (F12)
8
Suction bar problem
Up/down motor M13 (F4)
9
Clutch or brake problem
K12 (F2)
10
T21 Time out/process longer
than one min
17
Notching tools index
probl.
18
Error check S45
S49 and Tacho
19
Book too thick or
carr switch probl
ENTER
MENU
B I NDER READY
START
Mode and parameters
are correct
NR . OF B I ND I NGS : XX
N – > 1 W : X XX CORR : X XX
yes
Press on both green buttons
CYCLE RUN
no
MENU
MENU
+
MOD E : N – > 1
PRE - F E ED
BOOK S I Z E :
S I Z E CORRECT I ON
Mode is
correct
ENTER
no
:
Initial issue: 12/00
Latest revision: 11/01
yes
Press on button
MENU
MOD E : N – > 1
PR E - F E E D :
BOOK S I Z E :
S I Z E CORRECT I ON
Changes the
screen
+
Pre-feed
is correct
:
ENTER
no
yes
Selects the
desired line
+
MOD E : N – > 1
PR E - F E E D :
BOOK S I Z E :
S I Z E CORRECT I ON
Changes the
parameters
+
:
Book size
is correct
ENTER
no
MENU
yes
ENTER
Confirms the
selected
parameters
MOD E : N – > 1
PR E - F E E D :
BOOK S I Z E :
S I Z E CORRECT I ON
MENU
( mm ) :
:
XXX
+
Is cover leading edge
flush with book ?
yes
ENTER
no
yes
E X T RA CORREC T I ON
COV ER POS I T I ON
OV ER L A P
+
Book length
is correct
ENTER
no
Realign
(each push = 0.2 mm)
MENU
2.5 Change of binding parameters
Operator Manual
Page 9 - 16
MENU
Operator Manual
Page 9 - 17
MENU
MENU
+
GL UE F I LM L ENGT H .
± 7
±16
: X XX
The left end of
glue film is correct
ENTER
no
yes
MENU
+
GL UE F I LM L ENGT H .
± 7
The right end of
glue film is correct
±16
: XXX
ENTER
no
Initial issue: 12/00
Latest revision: 11/01
yes
+
GL UE F I LM L ENGT H
Inhibition cylinder
state is correct
±
INHIBITION CYL.1:
MENU
ENTER
no
MENU
yes
MENU
MENU
CHANGE TOT A L NUMBER
O F B I ND I NGS x x x
N R . OF B I ND I NGS : x x x
COUN T ER RE S E T
+
Number of bindings
is correct
ENTER
no
yes
MENU
CHANGE TOT A L NUMBER
O F B I ND I NGS x x x
N R . OF B I ND I NGS :
COUN T ER RE S E T
Reset of
the counter
ENTER
yes
no
MENU
MENU
ENTER
L ANGU :
F ( GB ) D
NL I E P
The language
is correct
yes
no
MENU
2.6 Instructions for timer use (optional)
Operation selector
with indicator
Power
indicator
POWER
ON
Time setting
brackets
OFF
2
1 24 23 2
2
3
21
40
30
4
8
7
6
10
19 18 17 16
60
5
20
50
Dial
20
9
15
14
Knob
13 12 11 10
ON
AUTO
OFF
Manual switch
Time setting
bracket storage
compartment
Name
Operation selector
with indicator
Time setting
brackets
Knob
Dial
Time setting
bracket storage
compartment
Operator Manual
Page 9 - 18
Function
Indicates the ON/OFF status of the
control output; rotating the
knob clockwise turns the control
ouput ON/OFF.
Two time setting brackets are provided:
ON time setting bracket
and OFF time setting bracket. They
turn the control output ON or OFF at
the specified time.
Manually rotates the dial and indicates
the present time in 1-minute units.
Holds time setting brackets and
indicates the time in every 15 minutes.
Stores the time setting bracket not in
use.
Manual switch
AUTO: Produces the control output as
specified by the time setting
bracket position on the dial.
ON: Normally turns ON the output
irrespective of the time setting
bracket position on the dial.
OFF: Normally turns OFF the output
irrespective of the time setting
bracket position on the dial.
Power indicator
Lights when power is applied and
indicates that the timer is in operation.
Initial issue: 12/00
Latest revision: 11/01
Settings
1. Remove the transparent cover from the front panel.
R
WE
PO
ON
24
2
60
13
30
4
7
20
14
6
5
10
40
3
50
18 17 16 15
3 o'clock
23 22 21
20
19
1
F
OF
50 minutes
12
11 10 9
8
ON
TO
AU F
OF
2. Rotate the center knob in the arrow direction (i.e., clockwise) to set the time. The present
time can be set in 1-minute units. For example 3:50 as shown in the figure. Do not rotate
the knob counterclockwise.
3. Two time setting brackets are provided: ON (gold) and OFF (silver). Be sure to use the
correct bracket and securely insert it in the groove of the dial.
4. Alternately set the ON and OFF time setting brackets.
5. After setting the time, reattach the transparent cover to the front panel.
Operation
6. Firmly insert the ON/OFF time setting bracket to the desired time setting groove. However,
do not insert it in a groove within ± 15 minutes distance from the dial groove that indicates
the present time.
7. After the time setting bracket is fixed and with the power and load connected to the timer,
rotate the knob in the arrow direction. Turn the dial one complete rotation to check if the
control output is turned ON/OFF in accordance wit the setting of the time setting bracket on
the dial.
8. Rotate the knob in the arrow direction and set the desired time according to step 2.
Operator Manual
Page 9 - 19
Initial issue: 12/00
Latest revision: 11/01
9. Now start the operation of the timer.
Example:
OFF
ON
OFF
22 21 20
2
4
40
3
11
5
20
30
10 9
6
16 15 14
17
13
50
10
OFF
19
60
1
23
18
24
ON
12
ON
8
7
ON
OFF
With the above setting the timing chart will be as follows:
24 1 2 3 4 5 6 7 8 9 10 11 12 13 14 15 16 17 18 19 20 21 22 23
Operator Manual
Page 9 - 20
Initial issue: 12/00
Latest revision: 11/01
2.7 Cover station
Loading of the cover station
4
1
3
2
• Release the cover separators support bar (1).
• Move the magnetic side guides (2).
• Move the rear guide (3) if the format changes (the rear guides are locked with knurled
knob located under the cover station).
• Load covers against the front guides and the right guide (4).
Note:- Visible part face down.
- Front page towards front guides (in Mode N➞ 1, by default).
• Adjust rear guides (3) and side guides (2), against the pile of covers.
Three possibilities are selectable in menu # 2
Mode by default:
N
1
ar
Re
1
N
Mode for special
applications:
1
The cover are always loaded
at the same place, whatever
the thickness book is.
Use this mode for an optimal
production.
N
nt
N
o
Fr
1
Mode for symmetrical
cover:
Operator Manual
Page 9 - 21
Sym.
Use this mode for booklet
with notes on the spine of the
cover.
Initial issue: 12/00
Latest revision: 11/01
Cover dimensions :
Trimming of the book is mandatory for larger dimensions.
The grain of the covers should be parallel with the arrow for sharp folds around the spine.
Creasing of the cover may be necessary if the covers are cross-grained or if stiff material is
used for the cover.
It is not possible to press heavy covers on very thin books. Thin covers should not be pressed
on thick books either.
e
l
m
h
L=l
+e+
h
m
+1
l+1
mm
The paper side of covers with transparent fronts and paper backs, must be wrapped around
the spine at least 4 mm (.16 in.).
Operator Manual
Page 9 - 22
Initial issue: 12/00
Latest revision: 11/01
Settings
Positioning the cover on the book:
The machine has been factory set to place a perfectly
squared cover, in line with the right edge of the booklet.
The guide angular adjustment is “0”. And its RH
LH
adjustment is made to get the cover aligned with the
right edge of the booklet. Do not change this except :
• if you use an unsquared cover.
• if you do not want to align the cover with the right edge
of the booklet.
1
2
3
Lateral adjustment:
1
2
3
• Adjust the position of the right side guide (1) using the knob (2) to correctly align the cover to
the book.
• Lock the magnetic side guides (3) on the left against the pile of covers.
Operator Manual
Page 9 - 23
Initial issue: 12/00
Latest revision: 11/01
Squaring of the covers:
1
2
Compensation for covers not cut exactly square is provided for by
moving right side guide (1) askew by means of knob (2).
Before adjusting (2), verify that the guide is unlocked to prevent
bows or warps.
After the adjustment, lock the knob (2).
2
0
Cover picking and front cover separators:
3
4
5
6
7
4
8
3
9
2
1
10
1
5
2
• If the suction cups on the left extend beyond the width of the cover, you must place the
plastic studs (1) from the tool kit in the suction cups.
• According to cover material, one more plastic stud (1) may be required in the suction
cup situed in the middle of the front edge as well.
• Vacuum is continuously adjustable by pot (5).
• Adjust the position and number of the front cover separators (4) only if necessary for
optimum cover separation.
• Use knobs (2) to move the separators (4).
• Use the knob (3) to adjust the air flow.
Operator Manual
Page 9 - 24
Initial issue: 12/00
Latest revision: 11/01
• In some case, the leading
edge (1) of the cover store
can be lifted by adjusting
knob (2).
• Make sure to adjust the
suction cup support bar
accordingly by loosening the
screw (3).
This keeps the cover parallel
with the tilted suction cups.
Operator Manual
Page 9 - 25
Initial issue: 12/00
Latest revision: 11/01
2
1
3
Cover clamping :
On control panel :
• Selector (1) provides choices for its duration.
• Potentiometer (2) adjusts lateral clamping pressure.
c.p. bourg
MENU
5
6
1
10
S.A.
N. V .
ENTER
7
4
8
3
9
2
1
PROGR.
2
Under cover stockplate:
• The notched handle (3), located under the cover station, adjusts pressure on book
spine.
• The six positions correspond to the various thicknesses of the covers.
3
3
Operator Manual
Page 9 - 26
Initial issue: 12/00
Latest revision: 11/01
2.8 Milling depth adjustment
Turn knurling wheel (1) to adjust the jogger height.
2
Y
ROL G
CONT ERUN
URE GULI N
ERAT URRE LATIO URE
G
TEMP ERAT REGU ERAT E
URIN
TEMP COLL URST
GLUE TEMP
LEIM
RATU
EMPE
LIJMT
GENC
EMER STOP TOP
T
E
NOTS
ARRE GENC P
D'UR DSTO
NOO
1
Notching knives
0
cursor
2
2,5 mm (0.1 in.)
2.5
2 1.5 1 0.5
0
Notching knives
Blade
Jogger
The cursor (2) indicates the jogger level according to the milling blade.
The jogger height can be adjusted to remove until 2.5 mm (0.1 in.) of material from the spine
of the book.
O means “no milling”.
2.5 mm (0.1 in.) means maximum milling
2.5 mm (0.1 in.) of material are removed from the spine of the book.
Operator Manual
Page 9 - 27
Initial issue: 12/00
Latest revision: 11/01
• Milling motor will automatically start if jogger is not in upper position. There is a time out on
the milling motor rotation.
• When jogger is in upper position, the operator will have to make a choice:
• If operator ask for the motor to run ( notching without milling) the motor will
immediately start and there will be no time out on the motor rotation ( unless the
operator ask for the motor to stop , activate the emergency knob or open any cover).
• If the operator ask to not use the motor, the machine will check if the paper path is
clear from scoring tools.
• If paper path is clear from tools, the UI will indicate “binder ready”.
• If the notching tools are in the paper path, the binder will ready after the
indexation tools (a few seconds).
Operator Manual
Page 9 - 28
Initial issue: 12/00
Latest revision: 11/01
2.9 Glue
Glue drum temperature:
To select between 140° and 165°C using the knob (1)
For the supplied glue (National coolbind 1300) select 140°C.
See safety data sheet (in appendix) for information about space and ventilation
requirements.
Note : • If an other type of glue is used of the recommended one (National Coolbind
1300), please refer to the safety data sheet of the used glue.
• Vapours which may be formed at elevated temperature may be irritating to
eyes and respiratory tract. A local exhaust over glue tank and a good
ventilation of the room are required.
• Different fume regeneration/extraction are available following the type of
binder (see spare parts catalog).
Glue level in the tank:
The check of the glue level takes place when the drums are rotating. When the level gets
low, the minimum mark in the bottom of the tank in the glue compartment becomes
visible.* To avoid an overflow, fill the tank with glue granules until they reach to the
bottom of the funnel (3). When melted, they should just cover the maximum mark.
CAUTION: The glue amount should never be over the maximum level either below
the minimum level.
Prefer a regular filling.
* Neglecting to refill in time may result in damage to the glue tank.
Glue T°
(black needle)
Minimum
T° for drum rotation
(green needle)
Working T°
(red needle)
2
150
10
0
50
200
25
0
3
1
Glue distribution :
• The film of glue on the drum is controlled automatically.
• A glue spreader removes the excess of glue from the spine of the book,
its height is adjustable by means of a thumbwheel (2):
• At zero, almost all the glue is removed from the spine.
• At 9, about 1 mm of glue is left on the spine.
Important: Never change the adjustment (2) by more than two graduations
without checking the result.
Never change the adjustment when glue is not at fusion temperature
(glue drums rotating)
Operator Manual
Page 9 - 29
Initial issue: 12/00
Latest revision: 08/06
Over temperature safety detection:
• To comply with international safety regulations, the glue tank and the drum are equipped
of temperature regulation circuitry. The system stops the machine if the glue
temperature exceeds 170°C either on one or on other sensors.
This system requires a working temperature below 165°C and a glue flash point higher
than 200°C.
• After the system activated, the machine shut down and the binder restart could only be
done by a technician.
Note : • Please refer to the safety data sheet (in appendix) for the National Coolbind
1300.
• If an other type of glue is used of the recommended one (National Coolbind
1300), please refer to the safety data sheet of the used glue.
• Vapours which may be formed at elevated temperature may be irritating to
eyes and respiratory tract. A local exhaust over glue tank and a good
ventilation of the room are required.
• Different fume regeneration/extraction are available following the type of
binder (see spare parts catalog).
Operator Manual
Page 9 - 30
Initial issue: 12/00
Latest revision: 08/06
2.10 To set up the Binder module
• Select and clip the proper pair of carriage jaws extensions (1) and install them in the
corresponding holes in carriage jaws.
• Load the cover station (2)
• Select the proper size book in the second step of the menu
• Select side cover clamping pressure (3).
• Select suction level (4)
• Select spine pressure (5)
• Select the duration of the cover clamping (6)
• Adjust the jogger height (7)
1
2
L
TRO NG
CON IERU
RE GUL
ATU
TION RE
PER ATURRE ULA ATU
REG PER LE TURING
E TEM PER
TEM COL URS
GLU TEM
ATU
LEIM
PER
TEM
LIJM
NCY
RGE P
P
EME STO STO
ET CE
NOT
ARR GEN
OP
D'UR DST
NOO
5
c.p. bourg
7
MENU
5
6
7
4
8
3
9
2
1
6
Operator Manual
Page 9 - 31
PROGR.
10
3
4
Initial issue: 12/00
Latest revision: 11/01
ENTER
S.A.
N.V.
2.11 Output unit (optional)
• When the booklets are delivered on the output unit, the glue is still soft and
warm. Do no take them immediately.
• Adjust the receiver spline with the thickness book by using the knob (4)
according to the size of the books, allow sufficient space.
• For your convenience there is an emergency stop (1) which you can press with
your feet.
Further to the unlocking of the switch, a push on button (2) is required to reset
the process.
• The fuses (3) are resettable after tripping.
• When the unit is full, the message “empty output unit” appears in the display.
Empty the BBR and press on the button (2).
1
2
3
4
4
1
2
3
Operator Manual
Page 9 - 32
Initial issue: 12/00
Latest revision: 11/01
Emergency stop
Reset button
Resettable fuses
Spline adjustment
2.12 Binding condition
Display *
Action
1. • Turn on the master switch
REMOV E PAP ER F ROM
B I NDER I F ANY
NB OF B I ND I NGS : 0
2.
☞
Warm up period
(± 35 minutes **)
PRE S S KE Y DRUM
TO S T AR T HEA T I NG
DRUM I S HEA T I NG BU T
I S S T I L L TOO COL D
• Turn on drum
Reset by pressing both
green buttons
heating
RE S E T
Duration
± 1/2 minute
NB OF B I ND I NGS :
0
If carriage is not in
home position press
both green buttons
B I NDER READY
NB OF B I ND I NGS :
0
NB OF B I ND I NGS :
3. • Press start buttons
*
**
no message: the start up timer is not satisfied. (if running)
10 minutes only if tank is already warmed up by start up timer.
Operator Manual
Page 9 - 33
Initial issue: 12/00
Latest revision: 11/01
0
2.13 Cycle description
• Insert the set of sheets in the carriage.
• The jogging can be interrupted by the footswitch or switch ON/OFF (see “control panel”).
• Close the carriage by pressing both green buttons simultaneously.
Automatic process
with cover
Cover
clamping
Note:
In mode N
1 with pre-feed: no,
the cover feeding is controlled by
pressing both green buttons
Glueing
Milling
Notching
Jogging
Glueing
Automatic process
without cover
evacuation: bottom
(Milling
Notching)
Jogging
Glueing
Automatic process
without cover
evacuation: top
(Milling
Notching)
Jogging
• Carriage goes back to loading area and stand-by.*
* The carriage opening is pre-adjusted to match the thickness of the previous book.
Operator Manual
Page 9 - 34
Initial issue: 12/00
Latest revision: 11/01
3. MAINTENANCE
3.1 Preventive maintenance
Due to the advanced nature of the materials used in the binder, the preventive maintenance is
reduced to the level of inspection, cleaning and occasional adjustments.
Warning: Disconnect
the main power before
you perform the
maintenance
1
3
2
Check the ejection path and
cover clamp for particles of glue.
Clean as required, otherwise the
clamps may freeze up and may
blow a fuse.
Use a cloth with spirit
(SOLVOID.RAP N° 9900 107).
4
9
8
6
8
Note: Silicone spray
can be used to
stop the glue from
sticking to the mechanism,
but if used, be very careful not
to spray in the glue tank or onto the
drum.This would ruin the glue.
5
7
Caution : The glue tank is hot. Use protection gloves to
work around it
Frequence
Ref
Description
1
Vibrating
table
2
Dust bag
X
3
Milling
housing
X
4
Glue tank
5
Suction cup
Cover nipping
plate
6
Daily
Weekly
X
Cleaning
Each time you change the dust bag check for stuffing in
the milling housing and for paper strips in the bag. If
the number of paper strips is excessive, call for
service
X
X
X
X
There should be no stuffing in the milling housing
Purge glue
Check the glue for quality and for oxidation. Refill by
operator. Call ingeneer for replacement of glue
X
Replace as necessary
X
X
Check state Teflon covering
Check from the top with clamping station fully open
Evacuation
guide
X
X
8
Nippers
X
X
9
Rear clamp
guard nipping
station
X
X
Page 9 - 35
Comment
X
7
Operator Manual
Replacement
Initial issue: 12/00
Latest revision: 11/01
Remove glue strings
3.2 Paper dust bag replacement
Dust bag
• Replacement about every 20 hours of binding is important, otherwise paper dust could
ruin the glue.
• Remove and throw away the bag.
• See the illustration above to hook a new one.
• A pressure switch detects the “Replace dust bag” situation.
Note : The message “Replace dust bag” is displayed on the control panel.
The machine will not start when this message appears.
Message and stop condition can be erased by depressing the 2 green knobs.
Glue smell suppression is provided (optional).
When smell neutralization decreases, it is time to replace the filters.
Call technician.
Operator Manual
Page 9 - 36
Initial issue: 12/00
Latest revision: 11/01
4. MECHANICAL TROUBLE SHOOTING
Symptom
Probable cause
Remedy
The cover is not square on
the paper offset (skewed).
The cover is not cut square.
The cover station and
paper pile are not square to
the machine.
Check the covers.
Check the squareness
with respect to the nippers.
The cover is too far on
the right.
The cover is too far on
the left.
Adjust the cover station stop
to the left.
Adjust the cover station stop
to the right.
There is not enough glue
on the back of the book.
The glue spreader is too
high.
Check the glue spreader.
The pages are warped
where the glue is applied
(spread out).
The paper is too weak for
milling.
Check the cutter.
Check the paper quality.
The covers suffer from
nail head.
The cover nipping is too
hard.
The cover is too weak for
the paper in the nippers.
Check the pressure.
There is poor ejection
and nipping.
There is glue on the exit
slide and nippers.
Remove the glue.
The book buckles
when cover is applied.
The book is too thin for the
cover weight.
Select a lighter cover
The cover does not show
a sharp crease on
the spine.
The card is heavy and the
covers varnished.
Cover cross grained.
Crease the covers.
Operator Manual
Page 9 - 37
Initial issue: 12/00
Latest revision: 11/01
Check the cover material.
5. SOME COMMON GLUEING DEFECTS
Gaps in glue film
Feather on book spine
Adhesive and/or roller
temperature too low.
Check:
- Glue and roller temperature.
- Running temperature.
- Adhesive level in tank.
Honeycomb film
Uneven glue line
Check:
- Glue and roller temperature.
- Level of adhesive in the tank.
- Moisture in the cover or book stock.
Insufficient adhesive applied.
Nail head
Check:
- Cover press too tight.
- Height of back pressure.
Cavity spine
Cover press too tight.
Sharpen the knife.
Cover register
Cover feed is not square
with the cover clamp.
Operator Manual
Page 9 - 38
Initial issue: 12/00
Latest revision: 11/01
6. ENVIRONMENTAL COMPLIANCE
Product Recycling and Disposal
ENGLISH:
Application of this symbol on your equipment is confirmation that you must dispose of this
equipment in compliance with agreed national Procedures.
In accordance with European legislation dealing with "end of life electrical and electronic
equipment", equipment subject to disposal must be managed within agreed procedures.
Prior to disposal please contact your local representative for end of life take back
information.
FRANÇAIS:
La présence de ce symbole sur cet équipement indique que ce dernier doit être mis au
rebut selon les conventions nationales.
Conformément à la législation européenne, tout équipement électrique et électronique en
fin de vie et destiné au rebut doit être manipulé selon les procédures convenues.
Veuillez contacter votre distributeur pour en savoir plus sur la reprise du matériel avant
toute mise au rebut.
ESPAÑOL:
La aplicación de este símbolo en el equipo es una confirmación de que en el momento
de deshacerse de este equipo debe de hacerlo de acuerdo con los procedimientos
nacionales acordados.
La legislación europea exige que para deshacerse de equipos eléctricos y electrónicos al
final de su duración útil deben seguirse los procedimientos acordados.
Antes de deshacerse de un equipo póngase en contacto con su distribuidor local o con el
representante para obtener información sobre su devolución.
Operator Manual
Page 9 - 39
Initial issue: 12/00
Latest revision: 03/06
DEUTSCH:
Geräte die dieses Symbol tragen, müssen den nationalen Richtlinien gemäß entsorgt
werden.
Den europäischen Bestimmungen zum Umgang mit elektrischen und elektronischen
Altgeräten ist Folge zu leisten.
Bei der Entsorgung des Geräts den Partner kontak-tieren.
ITALIANO:
Questo simbolo applicato sulla macchina indica la necessità di smaltire il prodotto in
conformità con le normative nazionali vigenti.
La legislazione europea richiede che lo smaltimento dei dispositivi elettrici ed elettronici a
fine vita venga gestito in conformità con le normative vigenti.
Prima di smaltire il dispositivo, rivolgersi al rivenditore autorizzato di zona per
informazioni sul ritiro dei prodotti a fine vita.
NEDERLANDS:
De aanwezigheid van dit symbool op uw apparatuur geeft aan dat u zich van deze
apparatuur moet ontdoen overeenkomstig de daarvoor in het betreffende land geldende
procedures.
Krachtens de Europese wetgeving moet de verwerking van afval van gebruikte
elektrische en elektronische apparatuur geschieden overeenkomstig de daarvoor
geldende procedures.
Neem voordat u de apparatuur wegdoet contact op met uw plaatselijke dealer of
vertegenwoordiger voor informatie over inzameling.
Operator Manual
Page 9 - 40
Initial issue: 12/00
Latest revision: 03/06
7. APPENDIX
National Coolbind 1300
Operator Manual
Page 9 - 41
Initial issue: 12/00
Latest revision: 08/06
c.p. bourg
C.P. Bourg S.A.
rue des Technologies, 22
B-1340 Ottignies (Belgium)
Tel.: +32 (0) 10 / 62 22 11
Fax: +32 (0) 10 / 61 69 03
E-mail: [email protected]
C.P. Bourg GmbH
70/1, Schweizerstrasse
D-72336 Balingen (Germany)
Tel.: +49 7433 9 98 16 80
Fax: +49 7433 9 98 16 86
E-mail: [email protected]
C.P. Bourg S.A.
Parc d'affaires Silic
32, rue des Gémeaux
BP 60410
F-94573 Rungis Cedex (France)
Tel.: +33 1 46 87 32 14
Fax: +33 1 46 87 52 17
E-mail: [email protected]
C.P. Bourg S.A.
14, rue Millewee, B.P. 85
L-7201 Walferdange (Luxembourg)
Tel.: +352 33 24 47
Fax: +352 33 19 99
E-mail: [email protected]
C.P. Bourg Inc
50 Samuel Barnet Blvd.
New Bedford Industrial Park
MA 02745-1285 New Bedford (USA)
Tel.:+1 508 998 2171
Fax:+1 508 998 2391
E-mail: [email protected]
http: //www.cpbourg.com
Operator Manual
Page 9 - 42
Initial issue: 12/00
Latest revision: 11/01
NOTES
Operator Manual
Page 9 - 43
Initial issue: 12/00
Latest revision: 11/01
NOTES
Operator Manual
Page 9 - 44
Initial issue: 12/00
Latest revision: 11/01
NOTES
Operator Manual
Page 9 - 45
Initial issue: 12/00
Latest revision: 11/01