1
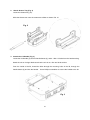
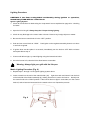
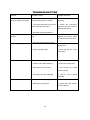
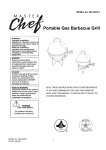
Portable Gas Grill
Item # 274676
Owner’s Manual
For Outdoor Use Only
ASSEMBLER/INSTALLER:
Leave these instructions with the consumer.
(Tank not included)
CONSUMER/USER:
Read entire manual and keep for future reference.
DANGER
DANGER
If you smell gas:
1. Turn off gas to the appliance.
2. Extinguish any open flames.
3. Open door.
4. If odor continues, keep away
from the appliance and
immediately call your fire
department.
Failure
to
follow
these
instructions could result in a fire
or explosion that could cause
property
damage,
injury or death.
personal
1. Never operate this appliance unattended.
2. Never operate this appliance within 10 feet (3.05m) of
any structure, combustible material or other gas
cylinder
3. Never operate this appliance within 25 feet (7.5m) of
any flammable liquid.
4. Never allow oil or grease to get hotter than 400°F or if
oil begins to smoke, immediately turn the burner or
gas supply OFF.
5. Heated liquids remain at scalding temperatures long
after the cooking process. Never touch cooking
appliance until liquids have cooled to 115°F or less.
6. If a fire should occur, keep away from the appliance
and immediately call your fire department. Do not
attempt to extinguish an oil or grease fire with water.
Failure to follow these instructions could result in a fire or
explosion that could cause property damage, personal
injury or death.
Questions, problems, missing parts? Before returning to your retailer, call
our customer service department at 1-877-447-4768, 8:30 a.m. – 4:30 p.m., CST,
Monday – Friday.
TABLE OF CONTENTS
F o r Yo u r S a f e t y. … … … … … … … … … … … … … … … … … … … … … … … 2 - 4
Illustrated Parts List………………………………………………………….4
Assembly Instructions……………………………………………………5-7
C o n n e c t i n g t h e L P Ta n k … … … … … … … … … … … … … … … … … … … … . 8
Operating Instructions…………………………………………………8-9
Tr o u b l e s h o ot i n g … … …… … … … …… … … … … … … … … … … …… … … 11
After-use Care and Maintenance…………………………………………12
L i mi te d Wa r r an t y… …… … …… … …… … … …… … …… …… … …… … .. .1 3
STATEMENT OF COMMITMENT
Congratulations and thank you for your purchase of this new Portable Gas Grill. We are pleased that
you have recognized the value of the design, function and quality of components used in this product.
We believe it is among the finest on the market.
We are committed to producing quality products that your family will enjoy for years to come. If for any
reason we have failed to meet or exceed your expectations, please allow us to make it right by calling
GHP Group Inc. toll-free at 1-877-447-4768 between the hours of 8:30 a.m. and 4:30 p.m., CST,
Monday – Friday. (It is recommended to avoid calling on Mondays, when wait times may be long.)
1
Safety Warnings and Precautions
PLEASE READ THE ENTIRE MANUAL BEFORE OPERATING YOUR PORTABLE GAS GRILL:
All installations must conform with local codes or, in the absence of local codes, with the
National Fuel Gas Code, ANSI Z223.1/NFPA 54, Storage and Handling of Liquefied Petroleum
Gases, ANSI/NFPA 58 or CSA B149.1, propane storage and handling CSA B149.2.
The gas canister must be constructed and marked in accordance with the specification for
LP-gas cylinders of the U.S. Department of Transportation (DOT) or the National Standard of
Canada, CAN/CSA-B339, cylinders, spheres and tubes for the Transportation of Dangerous
Goods.
CALIFORNIA PROPOSITON 65 WARNING The burning of gas cooking fuel generates some
by-products which are on the list of substances known by the State of California to cause cancer or
reproductive harm. California law requires businesses to warn their customers of potential exposure
to such substances. To minimize exposure to these substances, always operate this unit according to
the care and use guide, ensuring you provide the proper ventilation when cooking with gas.
WARNING
Carefully read all warnings, instructions, gas leak check procedures, lighting instructions and
general maintenance and storage information prior to the operation of this grill. Failure to do
so could result in a fire, which could cause property damage, personal injury or death. Retain
this manual for future reference.
1. When cooking, this grill must be on a level, stable noncombustible surface in an area clear of
combustible material. An asphalt surface (blacktop) may not be acceptable for this purpose.
2. The grill is for outdoor use only. It is NOT intended for commercial use.
3. Do not obstruct the flow of combustion and ventilated air.
4. This outdoor grill is not intended to be installed in or on recreational vehicles or boats.
5. Do not install or use the grill within 36 in. of combustible materials from the front, back or sides of
the grill.
6. The grill should be operated only in well-ventilated areas. Never operate the grill in an enclosed
space such as a garage or building.
7. The grill should not be placed under combustible structures such as an enclosed carport, garage,
porch, patio, etc.
2
8. Use only the standard one-pound disposable gas canisters marked PROPANE DOT-39 NRC
228/286 and should be arranged for vertical standing vapour withdrawal inside the unit pillar.
9. Propane canisters should be disconnected when not in use and the gas pressure regulator with
hose should be properly stored inside the unit column.
10. Do not leave the grill unattended while it is in use or hot. Keep children and pets away from the
appliance at all times.
11. This appliance is not intended for and never should be used as a heater.
12. The pressure regulator and hose assembly supplied with the appliance must be used and any
replacement of this assembly must be those specified by the manufacturer.
13. Indoor storage of this grill is permissible only if the one-pound propane canister is disconnected
and removed from the grill.
14. Keep the ventilation openings of the canister enclosure free and clear of debris.
15. Keep the grill area clear from combustible materials, gasoline and other flammable vapors and
liquids.
16. The propane canisters must be stored outdoors, out of the reach of children and not in a building,
garage or other enclosed area.
17. Visually check burner flames upon lighting the grill (ref. Illustration in lighting instruction).
18. The use of alcohol, prescription or non-prescription drugs may impair the users ability to properly
assemble and safely operate this appliance.
19. Always check the venturi tube and burner for insects and nests. A clogged tube or burner can
lead to fire beneath the grill or could adversely affect use of the grill.
20. Clean the venturi tube and/or burner with a small bottle brush or similar device.
21. Check all tubes and hoses before each use of the grill. If there is evidence of excessive abrasion,
wear or the tubes/hoses are cut they must be replaced prior to using the grill.
22. Clean and inspect the hose/tubes before each use of the grill. If there is evidence of abrasion,
wear, cuts or leaks, the hose/tubes must be replaced prior to using the grill. The replacement
hose assembly shall be that specified by the manufacturer.
3
23. Always light the grill with the lid open. Always turn the grill off after its use.
24. Always use a glove or hot pad when operating or handling a hot grill.
(A) DO NOT store tanks under or near the appliance.
(B) Never fill tanks more than 80% full.
If instructions (A) and (B) above are not followed exactly, a fire causing death or
serious injury may occur.
ILLUSTRATED PARTS LIST
Before attempting to assemble or use the unit, compare contents of carton with parts list and diagram
below. If any parts are missing or damaged, do not attempt assembly. Contact Customer Service for
replacements at 1-877-447-4768, Monday through Friday, 8:30 am to 4:30 pm CST.
Warranty
Part
Description
Qty
Part #
1
Lid assembly
1
501-01001
2
Lid handle base
2
501-01019
3
Lid handle
1
501-01002
4
Warming rack
1
501-01011
5
Grate
1
501-01009
6
Heat tent
1
501-01010
7
Electrode assembly
1
501-01027
8
Firebox assembly
1
501-01007
9
Lock – upper
2
501-01029
10
Lock – lower
2
501-01030
11
Ignitor
1
501-01023
12
Regulator assembly
1
501-01020
13
Ignition case
1
501-01032
14
Leg
2
501-01033
15
Grease tray
1
501-01017
16
Match holder
1
501-01028
17
Burner assembly
1
501-01022
-
Owner’s manual
1
501-01025
-
Hardware package
1
501-01026
The Hardware Package includes the following:
A
B
C
A
Bakelite handle base
2
B
Bolt – M5 x 15
8
C
Bolt – M6 x 16
2
Tools Required: Phillips Screwdriver
ewdriver (not included)
Estimated Time for Assembly:
15 minutes
4
ASSEMBLY INSTRUCTIONS
Preparation
∞
Read all instructions in this manual.
∞
Open the grill and remove all package and unassembled components from inside.
∞
Make sure the lid is locked close and turn the grill upside down on a level, firm surface. Use the
foam packing that the unit was packed in as a cushion to prevent damage to the top.
∞
Open the hardware bag containing 2 – Bakelite handle base, 2 – M6 x 16 bolt, 8 – M5 x 15 bolt.
A Phillips screwdriver (not included) is required for assembly.
1.
Attach the Legs (Fig. 1)
Locate the 2 Legs (14) and 8 – M5 x 15 bolts from the hardware package.
Align one leg with mounting holes on the bottom of the grill. Thread bolts through holes from
outside of unit. Nuts are pre-welded to the cabinet.
Tighten all bolts with a Phillips screwdriver.
Fig. 1
5
Repeat this procedure for the other leg.
2.
Attach Grease Tray (Fig. 2)
Locate the Grease tray (15).
Slide the Grease tray onto the grease tray slides as shown (Fig. 2).
Fig. 2
3.
Attach the Lid Handle (Fig. 3)
Locate the Lid Handle (3) and Lid handle bases (2), and 2 – M6 x 16 bolts from the hardware bag.
Stand the unit on its legs. Make sure that the unit is on a firm and level surface.
From the inside of the lid, thread the bolts through the mounting holes in the lid, through the
handle bases (2) and into the handle.
Use a Phillips screwdriver to secure the handle to the lid.
Fig. 3
6
4.
Attach the Regulator Assembly (Fig. 4)
Locate the Regulator assembly (12).
Thread the Regulator Valve into the stem of the burner until hand-tight.
Fig. 4
5. Install a Gas Cylinder – NOT INCLUDED (Fig. 5)
Screw the gas cylinder counter-clockwise into the thread underneath the Regulator valve until in
place.
Make certain the connection is secure and conduct a leak test as instructed on page 9.
Fig. 5
7
OPERATING THE GRILL
WARNING
Use only the regulator provided. If a replacement is necessary, call
our Customer Service Center. The use of unauthorized parts can
create an unsafe condition and environment.
Connect Gas Cylinder
The propane-gas supply cylinder to be used must be constructed and marked in accordance with the
Specifications for LP-Cylinders of the U.S. Department of Transportation (DOT).
marked “propane” must be used.
Only use 1-pound (16.4 oz) cylinders equipped with a cylinder
connection device compatible with the connection for outdoor cooking appliances.
cylinder must be arranged for vapor withdrawal.
must be disconnected.
Only cylinders
The propane
If the appliance is not is use, the gas cylinder
Storage of an appliance indoors is permissible ONLY if the cylinder is
disconnected and removed from the appliance.
Cylinders must be stored outdoors, out of the reach
of children and must be stored in a building, garage, or any other enclosed area.
never be stored where temperatures can reach over 125° F!
Your cylinder must
Before connection, be sure that there is
no debris caught in the head of the gas cylinder, head of the regulator valve, or in the head of the
burner and burner ports.
Connect regulator valve and hand-tighten firmly.
cylinder from the regulator valve when the grill is not in use.
Disconnect the propane
DO NOT obstruct the flow of
combustion air and ventilation air to the grill.
ALL INSTRUCTIONS AND SAFEGUARDS ON THIS PAGE MUST BE FOLLOWED TO
PREVENT FIRE, DAMAGE AND/OR INJURY.
All installations must conform with local codes or, in the absence of local codes, with the
National Fuel Gas Code, ANSI Z223.1/NFPA 54, Storage and Handling of Liquefied Petroleum
Gases, ANSI/NFPA 58 or CSA B149.1, propane storage and handling CSA B149.2.
The gas cylinder must be constructed and marked in accordance with the specification for
LP-gas cylinders of the U.S. Department of Transportation (DOT) or the National Standard of
Canada, CAN/CSA-B339, cylinders, spheres and tubes for the Transportation of Dangerous
Goods.
8
If there is a question on the identity of your unit and of the type of fuel to be used, please look on the
data plate. Units are factory equipped for use on only one type of fuel. These units can not be and
should not be used on other types of fuels. Doing so can cause severe damage to the unit and the
installation area and adds the risk of serious injury. Any attempt to operate these grills on the fuels for
which they are not design certified voids the manufacturer’s warranty.
Valve/pressure regulators are factory set to the correct operating pressures. No attempts should be
made to adjust these settings.
CHECKING FOR LEAKS
a. Make approx. 2-3 oz. of solution by mixing 1 part dishwashing liquid soap and 3 parts water.
b.
Make sure control valve is in the ‘OFF’ position..
c.
Spray some of the solution on the tank valve and regulator connection.
d.
Inspect the solution at the connections for bubbles.
e.
If bubbles appear, you have a leak – GO TO STEP ‘f’
If no bubbles, the connection is secure.
f.
Disconnect the regulator from the tank and reconnect.
g.
Re-test with soap and water solution.
h.
If you continue to see bubbles, replace the cylinder.
Make sure the connection is secured.
USE CAUTION AND COMMON SENSE WHEN OPERATING YOUR PORTABLE
GRILL.
READ ALL INSTRUCTIONS, WARNINGS AND SAFEGUARDS BEFORE ASSEMBLING
AND OPERATING. SAVE THESE INSTRUCTIONS.
Before first use
Remove all hangings or plastic straps, if present.
Before you cook food on your grill, it is important to burn off any residue used in the manufacturing
process of this grill.
Ignite you grill and burn at low temperature for 15 – 20 minutes with the lid
closed.
9
Lighting Procedure
CAUTION: If the flame extinguished accidentally during ignition or operation,
immediately TURN OFF the control knob.
Igniter Lighting System
1. Check all connections for leaks using the “soap water” test as explained on page 9 for “checking
for leaks.”
2. Open the lid of the grill. Always keep the lid open during lighting.
3. Check for any blockage to the venturi tube or burner. Remove any foreign objects or matter.
4. Be sure the burner control knob is in the “OFF” position.
5. Push and turn control knob to “HIGH.”
Push igniter on the regulator assembly down 3 to 4 times
or until unit is ignited.
6. If ignition does not take place in 5 seconds, immediately turn the knob to OFF. Wait 5 minutes
and repeat above step 5.
7. If burner still fails to light, try match lighting using the instructions below.
8. Once the burner is lit, close the lid to allow heat to accumulate.
Warning: Always light your grill with the lid open.
Match Lighting Procedure (Fig. 6)
1. Repeat steps 1 through 4 of the igniter lighting system above.
2. Insert a match into the end of the match holder (16).
Light the match and insert it into the hole
on the left side of the firebox assembly (8), making sure that it is next to the burner.
Quickly turn
the control knob to the “HIGH” position. If the burner does not light in 5 seconds, turn the control
knob off, wait at least 5 minutes and for the match to burn out. Repeat the process.
Fig. 6
10
TROUBLESHOOTING
Problem
Possible Causes
Possible Solutions
The burner will not light
using the igniter procedure.
1. The igniter electrode may be
covered with grease or residue.
1.
Clean
electrode.
2. The igniter electrode may have a
loose or disconnected wire.
2. Check the connection
and reconnect any loose or
disconnected wires.
the
igniter
The burner will not light with
a match.
3. No spark is being generated.
1. No gas flow or an obstructed gas
flow.
The flame goes out.
1. Disconnected gas supply hose.
1. Reconnect
supply hose.
2. High or gusting winds.
2. Move the grill out of the
windy area.
1. Excessive cooking temperatures.
1. Reduce the flame level.
2. Grease and residue build-up.
2. Clean the components.
3. Excessive fat in the meat.
3. Trim fat from the meat
before cooking.
4. Excessive oil in the marinade.
4. Use a non-oil based
marinade.
1. Excessive cooking temperature.
1. Reduce the flame level.
2. Obstruction of gas flow.
2. Check and clean venturi
tube and burner.
Flare-up
Yellow sooty flame
11
1. Check the fuel level.
Replace the cylinder. Clean
the venturi tube and burner.
the
gas
AFTER USE SAFETY AND MAINTENANCE
WARNING
Use caution when lifting and moving the portable grill to avoid injuries.
DO NOT store the grill near gasoline or other combustible liquids or where combustible vapors
may be present. Keep the area around the grill clear and free of combustible materials and
vapors.
DO NOT store this grill in an area accessible to children or pets. Store the grill in a dry, protected
location.
DO NOT allow anyone to conduct activities around the grill following use until it has cooled. It is
hot during operation and remains hot for a period of time following use.
The grill becomes extremely hot – allow the grill to cool completely before handling. If you must
handle the grill while it is hot, ALWAYS wear protective oven mitts or heat-resistant gloves. Allow
the grill to cool before removing and cleaning the grease tray.
CARE AND MAINTENANCE
CAUTION: All care and maintenance procedures are to be performed while the grill is turned off and
cooled.
Frequently check and clean the venturi and burner tube for insects and insect nests. A clogged tube
can lead to fire beneath the grill. Also make sure the rgill does not have any foreign objects
obstructing the flow of combustion and ventilation air.
To clean the inside and outside of the grill, simply use a damp cloth. Spray-washing with a water hose
is not recommended. Moisture should be wiped away and not allowed to stand inside or on top of the
grill.
To protect your rgill from weather conditions, always keep it covered while not in use.
To obtain replacement parts or accessories, call 1-877-447-4768.
12
LIMITED WARRANTY
This Portable Gas Grill is warranted against broken or damaged parts at the time of purchase.
The burner is warranted for 3 years. All other parts carry a one (1) year limited warranty.
This warranty does not cover damage or issues related to neglect, abuse or modifications to
the appliance. Repair labor is not covered.
All parts that meet the warranty requirements will be shipped at no charge via the discretion
of GHP Group Inc. (ground shipments, US Mail or Parcel Post ONLY). Any special handling
charges (i.e. Second Day, Over night, etc.) will be the responsibility of the consumer.
All warranty claims apply only to the original purchaser and require a proof of purchase
verifying purchase date. Do not return parts to GHP address without first obtaining a return
authorization number from our customer service. This service is available by calling toll free
1-877-447-4768, 8:30 am to 4:30 pm CST, Monday through Friday.
Some states do not allow the exclusion or limitation of incidental or consequential damages
or limitations on how long an implied warranty lasts, so the above limitations or exclusions
may not apply to you. This warranty gives you specific legal rights, and you may have other
rights that vary from state to state.
Item Name: Portable Gas Grill
Model # TT-1001
Item # 274676
Rated BTU: 12,000 BTU/Hr
Product Dimension: 25.19” x 16.14” x 12.40”
Product Weight: 14.75 lb.
Service: GHP Group Inc.
7500 N. St. Louis Ave.
Skokie, IL. 60076-4034. USA
Toll Free: 1-877-447-4768
Owner’s Manual - Part #501-01025
REV: 001-11-14-07
Printed in China
13