1
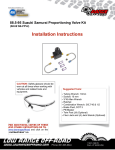
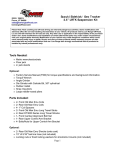
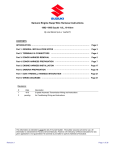
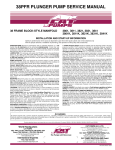
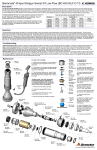
Instructions Created by an:
Samurai Updated Transfer Case Front Output Shaft
(SKU# STC-UO)
Installation Instructions
Suggested Tools:
CAUTION: Safety glasses should be
worn at all times when working with
vehicles and related tools and
equipment.
For additional copies of these
and other instructions go to:
www.lowrangeoffroad and click on the
“Instructions” tab.
•
•
•
•
•
•
•
•
•
•
•
•
•
•
•
•
•
•
•
•
Brake Cleaner
Scotch-Brite Pad (or Fine Emory Cloth)
Twin Post Lift (or Floor Jack and 4 Jack stands)
(2) 12 mm Box End Wrenches
3/8” Drive Deep Socket: 12mm
3/8” Drive Torque Wrench
1/2” Drive Torque Wrench
1/2” Drive Sockets: 12, 24 & 27mm
Impact Wrench, 1/2” drive (Optional)
1/2” Drive Impact Socket: 27mm (Optional)
Dead Blow Hammer
Small Sledge Hammer
Gear Puller- 3 Jaw (2 Jaw Would Work)
Socket and Ratchet to fit Gear Puller
Seal Puller (or Larger Standard Screwdriver)
Wheel Bearing Grease
Square Nose Cold Chisel (or Punch)
Bearing Grease
80 W 90 Gear Oil
Magnetic Pickup Tool (Magnet on a stick)
Lifting and Supporting the Vehicle
Lifting Option 1
Lift and support the vehicle on a twin post lift.
CAUTION: Always follow the safety guidelines associated with the lift you are using.
Front Support Location
Rear Support Location
Lifting Option 2
We used a twin post lift for these instructions, but this job could also be done with a
floor jack and (4) safety stands.
Front
Floor Jack
Rear
Floor Jack
Tech Tip
Step 1
When working on suspension, brakes or
drive train parts it is a good idea to
spray all fasteners with penetrating oil
before removal. We recommend a day
ahead if possible. If not done a day
ahead, an hour or even minutes before
is helpful.
Position a drain pan under the transfer
case.
Step 2
Remove the drain plug using a 24mm
socket. After the oil has drained reinstall
the drain plug and tighten 13.5 to 20 ft.
lbs.
Removing The Drive Shaft
Front
Driveline
From
Transfer
Case
To Front
Differential
Bolt
Nut
Lock
Washer
Step 3
Disconnect the front drive shaft at the
transfer case by removing all 4 bolts
using two 12mm box end wrenches.
(See Figure A)
Note: It is helpful to place the transfer
case shifter in “2H” position so you can
rotate the shaft allowing easier access
to the remaining bolts.
Figure A
Step 4
Disconnect the other end of the drive
shaft by removing the (4) bolts using two
12 mm box end wrenches.
Step 5
Step 6
It may be necessary to tap the drive
shaft using a hammer to jar it free from
the differential flange.
Remove the drive shaft and set it aside.
Shifter Parts
Shifter Lever
Shifter Lever
Boot
Shifter Lever
Boot Retainer
Shifter Lever
Lock
Shifter
Lever
Shifter Lever
Ball
Shifter Lever
Spring
Disconnecting The Shifter
Step 7
Step 8
Release the boot retainer by pushing
the 2 tabs together and slide the boot up
the shifter lever.
Disconnect the shifter lever by
depressing the shifter retainer and
turning it counter clockwise.
(See
Figure B)
Figure B
Step 9
Illustration showing shift lever guide
removal procedure.
Disconnect the shifter lever from the
transfer case by pulling up on the shifter
lever.
Step 10
Position the shifter lever up out of the
way as shown here.
Transfer Case Parts
Shifter
Bushing
Front
Housing
Gasket
Center
Housing
Rear
Housing
Front
Housing
Front Housing
Bolts (7 ea.)
Check and
Fill Plug
Drain Plug
4 Wheel Drive
Switch Ball
4 Wheel
Drive Switch
Removing the 4Wheel Drive Indicator Switch Assembly
Step 11
Step 12
Disconnect the 4wheel drive indicator
wire. Simply lift UP on the tab and pull
the connector halves apart.
Remove the 4Wheel drive indicator
switch using a 21mm open (or
adjustable) end wrench.
Step 13
Remove the four wheel drive switch ball
using a small magnet pickup tool or
small magnetic screwdriver.
Caution: Failure to remove this ball at
this point in the procedures may result in
loosing the ball down inside the transfer
case when the front housing is removed.
Removing the Front Housing
Step 14
Place the transfer case in 4H and
remove the front output flange nut using
a 27mm socket and breaker bar. Be
sure to turn the nut in a counter
clockwise direction.
Tech Tip 14
If you have a 1/2” drive impact wrench
(electric or pneumatic) and a 27mm
impact socket, this works very well.
Note: It may be necessary to hit the
breaker bar with a hammer to get the
nut to break loose.
Step 15
Step 16
Remove the output flange nut.
Remove the output flange washer.
Tab
Step 17
Remove the (7) front housing bolts
using a 12mm box end wrench or
socket.
Step 18
Jar the front output housing loose by
tapping it with a dead blow hammer on
the tab as shown here.
Note: There are 3 different length bolts
holding this housing on. Be sure to note
their location so they can be reinstalled
in the correct locations.
Pilot
Bearing
Step 20
Step 19
Remove the front housing and set it
aside.
Inspect the output shaft pilot bearing. If
it is scored, discolored (blue or brown)
or has cage damage it should be
replaced.
Click HERE for this bearing and many
other transfer case parts.
Inspect
Here
Step 21
Step 22
Inspect the output shaft bearing by
rotating output shaft and flange.
It
should turn smoothly with no binding. It
should not allow the shaft to move up
and down or in and out. If any problems
including looseness is felt, the bearing
will need replacing. We will show you
when and how this is done later.
Inspect the part of the output shaft that
fit inside the pilot bearing. Even though
we will be replacing this shaft, if the old
shaft (shown here) has discoloration,
scoring or wear of any kind you should
replace the pilot bearing along with the
output shaft.
Front Output Shaft Parts
Output
Shaft Seal
Output
Shaft
Output
Flange
Output
Flange
Washer
Output
Flange Nut
Output Shaft
Pilot Bearing
Output Shaft
Bearing
Output Shaft
Snap Ring
Inspect
Here
Step 23
Remove the front housing gasket. This
gasket will need to be replaced. It is a
specified thickness that maintains
specified tolerances inside the transfer
case and should not be substituted with
silicone gasket maker or sealer of any
kind.
Click HERE for this gasket and many
other transfer case parts.
Step 25
Remove the output flange by striking it
with a dead blow (or brass) hammer as
shown. If this method is unsuccessful,
see the next step.
Step 24
Inspect the front output housing where
the shifter rods are positioned. If there
is excessive wear, the front output
housing will need replacing.
Step 26
Skip this step if the flange came off in
the previous step. If the flange did not
come off in the previous step you will
need to use a three jaw puller as shown
here.
Seal
Groove
Step 27
Step 28
Remove the flange.
Inspect the flange seal surface for
grooving.
Note: If you can feel a groove with your
finger nail you may need to replace this
part.
Tech Tip 28 A
Some flange seal surfaces can be
improved by cleaning them with a
Scotch Bright pad.
Tech Tip 28 B
This is the hub sealing surface after
being cleaned with a Scotch Bright pad.
Notice the groove is no longer visable.
(See Step 28) This flange is reusable.
Removing the Front Output Shaft
Step 29
Tech Tip 29
Support the front housing in one hand
and strike sharply the front output shaft
with a dead blow hammer. It will take
several sharp blows to remove the shaft.
If the output shaft will not come out
using a dead blow hammer, it may be
necessary to use a small sledge
hammer. This is okay here because we
are replacing the shaft. You would not
want to strike this shaft with a hard
hammer if you wanted to reuse the
shaft. Using a hard hammer damages
the threads and the flange nut will not
reinstall.
Caution:
Glasses.
Be sure to wear Safety
Pry Here
Step 30
Continue pounding until the shaft comes
out of the housing.
Step 31
Remove the output shaft seal using a
seal puller or large standard
screwdriver.
Chamfer
Step 32
Step 33
If the bearing is good, skip this step. If
the bearing was determined to be bad
now is the time to replace it. Remove
the snap ring, press the bearing out in
the direction of the snap ring groove,
press in the new bearing and reinstall
the snap ring. When pressing in a new
bearing be sure to press against the
outside bearing race.
Clean the seal chamfered surface using
a standard screwdriver (or putty knife) to
make sure the seal slides into place
easily.
Caution: Do not gouge the aluminum.
Installing the Front Output Seal
Step 34
Tech Tip 34
Position the new seal as shown.
The garter spring goes down (or toward
the fluid being sealed).
Note: This seal is not supplied with the
front output shaft. Click HERE for this
seal and many other transfer case parts.
Chamfer
Step 35
Tap the seal into place using a hammer.
Note:
The seal must be driven in
evenly. It may be helpful to use a socket
that is a little smaller than the outside
diameter of the seal. Place the socket
on the seal and tap the socket driving
the seal into place.
Tech Tip 35
The seal is properly installed when it is
just below the chamfer.
Installing the Front Output Shaft
Step 36
Clean the output shaft using a good
degreasing solvent such as brake
cleaner or something similar.
Step 37
Place the front output shaft through the
bearing as shown here.
Step 38
Step 39
Place an 18 mm standard socket over
the shaft to protect it and support the
front housing in your hand . . . .
. . . then strike the socket sharply, using
a dead blow hammer, driving the input
shaft into the bearing. Continue striking
the socket (and shaft) until the shaft is
seated all the way into the bearing.
Figure C
Tech Tip 39 A
The Suzuki Samurai service manual
recommends what is shown above as
an alternative way of installing the front
output shaft into the bearing. You could
substitute tool (A) with a 1/2” driver 18
mm standard socket. (See Figure C)
Tech Tip 39 B
Using a flash light, look down between
the teeth and the front housing to see
that the shaft is all the way in.
Installing the Shifter Bushing
Step 40
Remove and inspect the shifter bushing.
It should be pliable and not cracked,
hardened or damaged in any way. If it is
damaged it should be replaced. For a
replacement part click HERE. If the
shifter bushing is in good shape,
reinstall it.
Important Notice: Even if the shifter
bushing appears to be in good shape,
we recommend replacing it with one of
our upgraded Nylatron shifter bushings.
Especially, if you are experiencing
looseness in your transfer case shifter.
This looseness is common in many
Suzuki Samurais. This newly designed
part is guaranteed to solve part, and
perhaps even all the loose shifter
problem.
Installing the LROR Nylatron Shifter Bushing
If you are not replacing the shifter bushing skip to the next section.
Step 41
Wipe the shifter bushing area clean.
Note: To see a YouTube Video of how
to install this shifter bushing click HERE.
Or you could continue to the next step.
Step 42
Turn the bushing upside-down, align the
(2) grooves in the bushing with the (2)
pins in the housing and install the
bushing on the pins.
Step 43
Tech Tip 43
Rotate the bushing, using the pins as a
pivot, 180° or until the bushing drops
into place.
This shows the shifter bushing properly
installed.
Installing the Front Output Flange
Step 44
Step 45
Apply some grease to the seal surface
of the flange.
Install the flange on the output shaft.
Note: This is to lubricate the seal.
Step 46
Leave the washer and nut off for now.
Installing the Shifter Lever
Groove Sides
Step 47
Step 47 Continued
Clean and inspect the shifter ball. It
should be uniformly rounded with no flat
spots or scoring.
The sides of both grooves should be
straight with no wear.
If wear is
observed the shifter lever should be
replaced.
Note: Some have found success with
filing the groove and getting it close to
its original shape. This can only be
done if the damage is minor.
Step 48
If the shifter is being reused, clean the
ball area with a Scotch Bright pad or
some very fine emery cloth.
Step 49
Push the shifter back up out of the way
for now.
Installing the Front Housing
Step 50
Step 51
Wipe the mating surface of the center
housing with a cloth. Be sure this area
is free of any dirt, grit, old gasket, gasket
sealer, etc.
Place a small amount of wheel bearing
grease on the pilot bearing surface of
the output shaft.
Step 52
Step 53
Place a new gasket on the front
housing.
Insure that the gasket is
aligned with the (2) alignment pins and
that the holes in the gasket align with
the holes in the housing.
Install the front housing on the middle
housing. Be sure the shifter rods are
properly positioned in the support holes
and that the output shaft fits into pilot
bearing.
Step 54
Continue installing the front housing
until it fits against the center housing.
There should be no gap between the
housings.
Caution: Do NOT force these two parts
together. If they do not go together
easily, remove the front housing and
check for obstructions.
Step 55
Install and hand tighten the (7) front
housing bolts making sure the bolts are
located in their original locations. (See
Next Tech Tip)
Medium Bolts
Short Bolts
Long Bolts
Tech Tip 55
Bolt length placement.
Step 56
Torque the bolts in an increasingly
tighter criss-cross pattern until 9.5 to
16.5 ft. lbs. is reached.
Installing the 4Wheel Drive Indicator Assembly
Step 57
Step 58
Install the 4Wheel drive indicator ball.
Install and tighten the 4Wheel drive
indicator switch.
Step 59
Plug in the 4Wheel drive indicator
connector.
Note 1:
Push the coupler halves
together until they snaps onto place.
Note 2: Be sure the wires are routed
properly and secure.
Installing the Shifter Lever
Step 60
Install the shifter lever. Be sure to align
the grooves of the ball with the pins in
the housing and the lower shift lever
with the shifting rods.
Note: It may take a bit of work to get the
lever to align with the shifter rods. Be
patient but persistent. It will go into
place.
Step 61
Slide the spring down into place and
position the shift lever retainer grooves
with the pins inside the front housing
and . . .
Step 62
. . . press down on the shift lever
retainer and lock it into place by rotating
it clockwise.
Step 63
Step 64
Slide the boot back into place.
Reposition the boot retainer.
Step 65
Place the shifter in 4H.
Note: This is done so the flange nut can
be torqued more easily.
Installing the Front Drive Shaft Assembly
Step 66
Step 67
Install the washer and flange nut.
Torque the flange nut 80 to 108 ft. lbs.
Note:
We recommend using a new
flange nut if possible. Click HERE to
purchase a new flange nut from Low
Range Off-Road.
Step 68
Tech Tip 68
Stake the nut collar using a hammer and
punch in 2 locations.
Flange nut properly staked.
Step 69
Position the front of the drive shaft on
the front differential flange and install the
(4) bolts, lock washers, and nuts.
Tighten the nuts 17 to 21.5 ft. lbs.
Step 70
Connect the other end of the drive shaft
to the transfer case output flange.
Tighten the nuts 17 to 21.5 ft. lbs.
Note: Be sure to reinstall the drive line
spacer if removed earlier.
Refilling and Final Testing
Step 71
Remove the check and fill plug using a
27mm socket
Note:
Be sure the DRAIN plug is
installed and tight.
Step 72
Add 80W90 Gear Oil until fluid begins to
run out; and quickly reinstall the plug.
Tighten the plug 13.5 to 20 ft. lbs. (See
Figure D for refill capacity)
Transfer Case Oil
Step 73
Shift the transfer case into all positions
to insure smooth operation.
Figure D
Congratulations!
You have successfully installed a front
output shaft on a Suzuki Samurai
transfer case. We sincerely hope these
instructions have been helpful. If you
have suggestions on how we could
improve our instructions or products
please
email
us
at
[email protected]
As always, If you experience any difficulty during the installation of this product
please contact Low Range Off-Road Technical Support at 801-805-6644 M-F
7:30am-5:30pm MST. Thank you for purchasing from Low Range Off-Road.
These instructions are designed as a general installation guide. Installation of many Low Range
Off-Road products require specialized skills such as metal fabrication, welding and mechanical
trouble shooting. If you have any questions or are unsure about how to proceed, please contact
our shop at 801-805-6644 or seek help from a competent fabricator. Using fabrication tools such
as welders, torches and grinders can cause serious bodily harm and death. Please operate
equipment carefully and observe proper safety procedures.
Rock crawling and off-road driving are inherently dangerous activities. Some modifications will
adversely affect the on-road handling characteristics of your vehicle. All products sold by Low
Range Off-Road are sold for off road use only. Any other use or application is the responsibility
of the purchaser and/or user. Some modifications and installation of certain aftermarket parts may
under certain circumstances void your original dealer warranty. Modification of your vehicle may
create dangerous conditions, which could cause roll-overs resulting in serious bodily injury or
death. Buyers and users of these products hereby expressly assume all risks associated with any
such modifications and use.
Revised 06/21/13©
Copyright 2013 Low Range Off-Road, LC All Rights Reserved