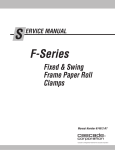
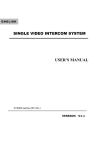
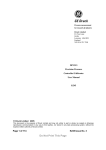
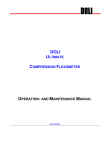
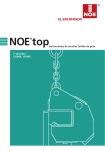
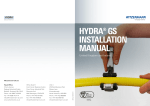
1
c Technical Bulletin This sheet describes pinion seal replacement procedures for rotator drives on Cascade paper roll clamps and rotating attachments. Different pinion bearing and seal arrangements are used. Use this technical bulletin to identify which type you have. IMPORTANT: The complete Rotator Drive Group should be serviced whenever component parts are replaced. See Service Manual procedures included for reference. TB 289 September 2006 Rotator Drive Pinion Seal Service 1 PINION BEARING WITH EXTERNAL SEAL (current design) Seal Housing Pinion Bearing (Non-sealed) Pinion Gear Seal Seating Area Bearing Seating Area RC2118.eps Identifying drive box pinion bearing and seal arrangement: 1 Current design uses an external pinion seal with unsealed roller bearing. If you have this type remove the seals from the sealed bearing supplied in the service kit. Install external seal and bearing as described in the service procedures on the following pages. 2 SEALED PINION BEARING WITHOUT EXTERNAL SEAL (earlier design) Housing Pinion Bearing (Sealed) 2 Earlier design uses a sealed roller bearing with no external seal. If you have this type discard the seal supplied in the service kit. Install bearing as described in the service procedures on the following pages. RC2648.eps NOTE: This information should not be interpreted as the basis for warranty claims unless so designated. cascade corporation For Technical Support . . . Call: 1-800-CASCADE (227-2233) OR Write: Cascade Corporation, PO Box 20187, Portland, OR 97294-0187 To Order Parts . . . Call: 1-888-CASCADE (227-2233) OR Write: Cascade Corporation, 2501 Sheridan Ave., Springfield, OH 45505 (NOTE: The following is reproduced from Cascade Paper Roll Clamp Service Manuals 674512 & 213744) 5.3 5.3-1 Drive Group 2 Drive Group Removal and Installation 1 Remove the Clamp from the truck as described in 3 Section 5.1. 2 Remove the four capscrews fastening the drive group to the baseplate. For reassembly, tighten the capscrews to 65–75 ft.-lbs. (90–100 Nm). 3 For reassembly, reverse the above procedures with the following exceptions: • After the drive group has been reinstalled, check the gearcase lubricant level. Lubricant must be up to the bottom of the fill plug hole. If necessary, fill with Cascade Gear Lube Part No. 656300, or SAE 90 wt. gear lube (AGMA 'mild' 6 EP Gear Lube). RC0171.eps Drive Group 5.3-2 Drive Group Disassembly and Service Cover Plate 1 Remove the drive group from the baseplate as 43 7 described in Section 5.3-1. 2 Lay the drive group, pinion down, on two 4 x 4-in. (10 x 10 cm) wood blocks placed on both sides of the pinion. 3 Remove the four capscrews fastening the cover plate Housing to the housing. 5 4 Remove the center capscrew plug from the cover plate and install a (early) 3/8-in. NC or (later) M10 capscrew with a minimum thread length of 2 in. (50 mm). Remove the cover plate by turning the capscrew clockwise while lightly tapping around the sides of the cover plate. 5 Drain the lubricant from the housing. 6 Remove the three capscrews fastening the end cover to the housing. 7 Remove the drive motor as described in Section 5.4-1. -2- 2 RC0172.eps 6 5.3-2 Drive Group Disassembly and Service (Continued) Bearing Outer Race 8 Tap the worm and bearing assembly out through the end-cover side of the housing. Remove the opposite outer bearing race through the motor side of the housing. RC0173.eps Worm 9 Press the pinion gear, seal, pinion bearings and 8 Worm Gear Assembly worm gear out of the housing as an assembly. 9 RC0174.eps Housing Pinion bearing Worm Gear Key 10 Remove the snap ring from the pinion gear shaft. Press the pinion gear from the worm ring gear and cover plate pinion bearing. Remove the pinion shaft key. 10 Pinion gear IMPORTANT: Heavy Duty Pinion uses two bearings with the first bearing retained by an additional snap ring (see illustration next page). Seal (if equipped) 11 11 Press the pinion gear out of the housing pinion bearing. Remove seal. 12 Clean and inspect all components. Remove all dried sealant or threadlocker residue. Replace all worn items. Remove any burrs or sharp edges with emery cloth. RC2111.eps NOTE: Two types of large pinion bearing used: sealed bearing, and bearing with separate seal (shown) -3- 5.3-3 Drive Group Reassembly Build up the pinion/worm gear assembly vertically with the pinion gear down. 1 PINION AND BEARING WITH EXTERNAL SEAL Housing Pinion Bearing (Non-sealed) Seal 1 Standard Pinion – Position the seal against the pinion gear, spring-side facing housing. Apply Loctite 271 (red) to clean and dry bearing seating area on shaft as shown. Press a non-sealed housing bearing onto the pinion shaft. IMPORTANT: Earlier design uses a sealed bearing. Pry out bearing seals when using an external seal. Remove excess Loctite. Pinion gear Seal Seating Area Bearing Seating Area RC2118.eps PINION WITH SEALED BEARINGS Heavy Duty Pinion – No external seal is used. Position the first bearing and snap ring on the pinion shaft. Apply Loctite 271 (red) to the second bearing seating area as shown. Press the second bearing onto the pinion shaft. Remove excess Loctite. Housing Pinion Bearing (Sealed) CAUTION: Assure Loctite does not squeeze into the seal or bearings. 2 Install the key, worm gear, cover plate pinion bearing and snap ring on the pinion. RC2648.eps 3 Apply Loctite 271 (red) to clean and dry housing seating area and shoulder for the housing pinion bearing and seal. Install the complete pinion assembly into the housing. Remove excess Loctite. HEAVY DUTY PINION WITH SEALED BEARINGS Baseplate Pinion Bearing CAUTION: Assure Loctite does not squeeze into the seal or bearings. 4 Install the worm's outer bearing race in the drive motor side of the housing. Make sure the race taper is inward as shown. 5 Install the drive motor as described in Section 5.4-1. 6 Install the worm and bearings in the housing. Fully Pinion gear First Bearing Seating Area engage the worm with the drive motor shaft. Install the remaining outer bearing race. Make sure the race taper is inward as shown. Second Bearing Seating Area Key 4 Additional Snap Ring Housing Pinion Bearing RC2124.eps Worm Gear, Bearing, Snap Ring 2 RC2125.eps 3 RC0179.eps 6 5 -4- RC0178.eps Housing 5.3-3 Drive Group Reassembly (Continued) 7 Temporarily install the end cover without shims. Tighten the capscrews sequentialy in 10 ft.-lb. (15 Nm) increments to 20 ft.-lbs. (30 Nm). 7 8 Measure the gap between the end cover and housing in three places with a feeler gauge or 'Pastigage' thread and determine the minimum gap. 9 Choose a combination of end cover shims equal to the minimum gap measured plus the next higher .005 in. (0.12 mm) increment. See examples below: (For .025–.029 in. measured gap, use .030 in. total shim thickness.) (For .010–.014 in. measured gap, use .015 in. total shim thickness.) (For .009 or less, use one(1) .010 in. shim, since a minumum of one .010 in. shim is required for a proper seal. NOTE: Shim Service kit 670578 contains the shims listed. A minumum of one(1) .010 shim is required to seal against leakage: Qty 10 Part No. Color Housing RC0180.eps 8 11 Thickness 2 671758 Clear/Yellow .020 in. (.50 mm) 2 671757 Pink .015 in. (.39 mm) 1 670574 Brown .010 in. (.25 mm) Remove the end cover. Apply Loctite 515 sealant (Cascade Part No. 668184) to both surfaces of the shims and the capscrews. Install the shim pack and end cover. Tighten the capscrews to a torque of 65 ft.-lbs. (90 Nm). Remove excess sealant. 11 With the gearcase laying flat, fill with 56 fluid ounces (540 ml) of Cascade Gear Lube Part No. 656300, or SAE 90 wt. gear lube (AGMA 'mild' 6EP Gear Lube). RC0181.eps 12 Install the cover plate and gasket. Install the four cover plate capscrews and tighten to 15 ft.-lbs. (20 Nm). Install the center hole plug. 13 Reinstall the drive group on the rotator baseplate as described in Section 5.3-1. 10 12 Cover plate RC0182.eps -5- End cover 9 Do you have questions you need answered right now? Call your nearest Cascade Service Department. Visit us online at www.cascorp.com Cascade Corporation U.S. Headquarters 2201 NE 201st Fairview, OR 97024-9718 Tel: 800-CASCADE (227-2233) FAX: 888-329-8207 Cascade Canada Inc. 5570 Timberlea Blvd. Mississauga, Ontario Canada L4W-4M6 Tel: 905-629-7777 FAX: 905-629-7785 Cascade N.V. Benelux Sales and Service Damsluisweg 56 PO Box 3009 1300 El Almere The Netherlands Tel: 036-5492950 FAX: 036-5492974 Cascade (UK) Ltd. Unit 4, 12 O'Clock Court Attercliffe Road Sheffield, S4 7WW England Tel: 0870-850-8756 FAX: 0870-850-8757 Cascade Scandinavia AB Hammarvägen 10 PO Box 124 S-56723 Vaggeryd Sweden Tel: 039-336950 FAX: 039-336959 Cascade France S.A.R.L. MHP 1D Rue De Charaintru BP 18, 91360 Epinay-Sur-Orge France Tel: 01-6454-7500 FAX: 01-6454-7501 Cascade Hispania S.A. Carrer 5, Sector C Zona Franca Duanera Poligono de la Zona Franca 08040 Barcelona Spain Tel: 93-264-07-30 FAX: 93-264-07-31 Sales Portugal FAG Santos Lda Rua do Mercado Lte 6, Loja 2-Tires 2785-630 S. Domingos De Rana Portugal Tel: 214-448-083 FAX: 214-458-098 Sales Switzerland Fahrzeugbedarf 8810, Horgen Switzerland Tel: 01-7279797 FAX: 01-7279798 Sales Poland Targowa 35/61 03-728 Warszawa Tel: 022-619 00 49 FAX: 022-619 00 49 Mobile Phone: 0501-27 29 55 Cascade Japan Ltd. 5-5-41, Torikai Kami Settsu, Osaka Japan, 566 Tel: 81-726-53-3490 FAX: 81-726-53-3497 Cascade-Xiamen No. 668 Yangguang Rd. Xinyang Industrial Zone Haicang, Xiamen City Fujian Province P.R. China 361026 Tel: 86-592-651-2500 FAX: 86-592-651-2571 © Cascade Corporation 2006 Cascade Korea 121B 9L Namdong Ind. Complex, 691-8 Gojan-Dong Namdong-Ku Inchon, 405-310 Korea Tel: 82-32-821-2051 FAX: 82-32-821-2055 Cascade GmbH Dahlener Strasse 570 41239 Mönchengladbach Germany Tel: 02166-68230 FAX: 02166-682323 Cascade Finland A. Petreliuksenkatu 3 01370 Vantaa Finland Tel: 09-8361925 FAX: 09-8361935 Sales Scotland Macade Systems Ltd. 18 Melford Road Righead Ind. Estate Bellshill ML4 3LR Scotland Tel: 01698-845777 FAX: 01698-845888 Cascade (Africa) Pty. Ltd. PO Box 625, Isando 1600 60A Steel Road Sparton, Kempton Park South Africa Tel: 27-11-975-9240 FAX: 27-11-394-1147 Cascade Australia 1445 Ipswich Road Rocklea, QLD 4107 Australia Tel: 1-800-227-223 FAX: 617-3373-7333 Cascade Roncari S.R.L. Via Dell'Artigianato 1 37050 Vago di Lavagno (VR) Italy Tel: 39-045-8989111 FAX: 39-045-8989160 Sales Russia EMCG Material Handling Equipment Moscow Tel: 095-795-2400 FAX: 095-795-2475 Email: [email protected] Cascade New Zealand 15 Ra Ora Drive East Tamaki, Auckland New Zealand Tel: 64-9-273-9136 FAX: 64-9-273-9137 Sunstream Industries Pte Ltd. No. 3 Tuas Link 1 2263 Singapore Tel: 65-6863-3488 FAX: 65-6863-1368 9-2006 Part No. 6068005