1
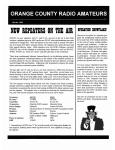
SPICER. AXLE MAINTENANCE MANUAL MODEL INDEPENDENT FRONT SUSPENSION � ",. �:!4:1'��':'��) :f';·:f(·�·�:·:� SPICER AXLE DIVISION .. �>. . DANA CORPORATION FORT WAYNE, INDIANA INDEX Page LUBRICATION - ---------------------------------------------------------------- 3 IDENTIFICATION OF SERVICE TOOLS --- --- ----------------------------------- 4 IDENTIFICATION OF AXLE ASSEMBLY COMPONENTS ----------------------,...------ 5 AXLE IDENT! FICATION ------- -------- ------ ---------- - -------- ---------- 6 DISASSEMBLY OF WHEEL ENDS------------------------------------------------ 7 SERVICING DIFFERENTIAL YOKE SHAFT BEARING -------------- - --- ------ -- 13 - - - - - - - - - LUBRICATING UNIT BEARING --------------------- -- - ------- - - ---- ------ -- - - - CARRIER SECTION------------------------------------------------------------ 15 19 IMPORTANT SA FETY NOTICE Proper service and repair is important to the safe, reliable operation of all motor vehicles or driving axles whether they be front or rear. The service procedures recommended and described in this service manual are effective methods for performing service operations. Some of these service operations require the use of tools specially designed for the purpose. The special tool should be used when and as recommended. It is impossible to know, evaluate, and advise the service trade of all conceivable ways in which service might be done or of the possible hazardous consequences of each way. Accordingly, anyone who uses a service procedure or tool which is not recommended must first satisfy himself thoroughly that neither his safety nor vehicle safety will be jeopardized by the se�:vice methods he selects. Should an axle assembly require component parts replacement, it is recommended that "Original Equip ment" replacement parts be used. They may be obtained through your local service dealer or other original equipment manufacturer parts supplier. The use of non-original equipment replacement parts is not recom mended as their use may cause unit failure and/or affect vehicle safety. NOTE Throughout this manual, reference is made to certain tool numbers whenever special tools are re quired. These numbers are numbers of Miller Special Tools, 32615 Park Lane, Garden City, Michigan 48135. They are used herein for customer convenience only. Dana makes no warranty or representation to these tools. 2 Litho in U.S.A. LUBRICATION It is not our intent to recommend any particular brand or make of lubricant for the Spicer hypoid axles. However, a S.A.E. 90 weight multipurpose gear lubricant meeting Mil. Spec. L-2105-B, or 80 W 90 multipur pose gear lubricant meeting Mil. Spec. L-2105-C, and suitable for A.P.I. Service Classification GL-5 is sug gested as a minimum requirement. COLD WEATHER OPERATION If the vehicle is operated below 0°F. (·18°C.), it is advisable to use S.A.E. 80 multipurpose gear lubricant meeting Mil. Spec. L-2105-B and suitable for A.P.I. Service Classification GL-5. IMPORTANT As special equipment, limited slip differentials are provided in many vehicles. The freedom from "chatter" is a function of the lubricant used and cannot be covered in the above specification. In some applications, a special limited slip differential lubricant may be required. If required, these special lubricants are normally available through equipment manufacturer. WHEEL BEARING LUBRICATION Wheel bearings are lubricated by packing the bearing with grease. It is recommended that a number 2 consistency, lithium base 12-hydroxy stearate grease containing an E.P. additive be used. NOTE We suggest that wheel bearing lubricants selected for use with disc brake applications, in addition to the E.P. properties expressed in this Manual, should be compatible with elevated temperatures, i.e., high temperature lubricant. For specified wheel bearing lubricant, refer to vehicle Service Manual. SUBMERSION OR DEEP WATER FORDING If the vehicle is exposed to water deep enough to cover the hubs of the front axle, it is recommended that the wheel ends be disassembled and inspected for water damage, and/or contamination daily. Clean, examine, and if necessary, replace damaged parts, prior to relubricating and assembling the wheel end components. Pay particular attention to the bearings. In the event the gear carrier housing should become submerged in water, particularly if over the breathers, it is recommended that the hypoid gear lubricant be drained daily and internal parts be inspected for water damage and/or contamination. Clean, examine, and if necessary, replace damaged parts, prior to assembling and refilling with the specified hypoid lubricant. NOTE It is recommended that whenever bearings are removed they are to be replaced with new ones, regardless of mileage. 3 Figure2 1020-2 The following is a detailed list of all special tools required to service the Spicer Model 44 Independent Front Suspension Axle Assembly. Item No. Tool No. 1 2 3 4 5 D-113 D-227 DD-914-P DD-914-9 C-293-39 6 C-293-18 7 C-293-3 *8 *9 * 10 *11 *12 *13 D-115 D-115·1 D-115-3 D-115-4 D-139 D-135 Description Item No. Tool No. Spreader Spreader Adapters Press Adapter Ring Adapter Set-Rear Pinion Bearing Cone Adapter Set-Differential Bearing Cones Adapter Plug -Differen· tial Hub Scooter Gauge (D-115·2 Scooter Block and D-106·5 Dial Indi· cator) Pinion Height Block Arbor Arbor Discs Master Pinion Block Master Differential Bearing 4 14 15 D-245 D-246 16 D-145 17 D-148 18 D-144 19 D-147 20 21 **22 C-4171 C-4291 D-150-1 **23 D-150·2 **24 D-150-3 Description Supporting Fixture Vise Adapter-Supporting Fixture Installer -Inner Pinion Bearing Cup Remover-Inner Pinion Bearing Cup Installer-Outer Pinion Bearing Cup Remover-Outer Pinion Bearing Cup Handle -Universal Extension-Universal Remover & Installer Front Axle Ball Joint Adapter-Ball Joint Removing Sleeve -Ball Joint Removing Item No. Tool No. **25 D-150-4 26 27 D-128 W-262 28 C-4170-A 29 D-155 30 D-140 31 D-259 32 D-122 33 D-154 34 D-260 35 36 ***37 ***38 ***39 ***40 ***41 Figure3 W-162-D C-452 D-127-1 D-127-2 D-127-3 D-127-4 SP-3020 Item No. Tool No. Description Sleeve - Ball Joint Installing Dial Indicator Set Installer - Inner Pinion Bearing Cone Wrench - Wheel Bearing Adjusting Nut Installer - Front Brake Hub Grease Seal Installer - Front Brake Hub Outer Bearing Cup Remover - Front Brake Hub Outer Bearing Cup Installer - Front Spindle Needle Bearing Installer - Front Brake Hub Inner Bearing Cup Remover - Front Brake Hub Inner Bearing Cup Installer - Flange or Yoke Remover - Flange or Yoke Installing Ring - Bearing Flange Plate - Axle Adapters Removal Forcing Plate Washers ***42 43 44 45 SP-5026 D-131 C-3281 D-249-A 46 47 48 49 50 C-4053 C-3952-A D-193 W-147-D D-156 Description Screws Puller - Slide Hammer Wrench - Flange or Yoke Installer - Inner Axle Shaft Seal Torque Wrench (300 Ft. Lb.) Torque Wrench (150 Ft.Lb.) Torque Wrench (50 In. Lb.) Installer - Pinion Oil Seal Installer - Differential Side Bearings *Pinion Setting Gauge and Master Differential Bearing Kit D-115-44 **40 Degree Steer Front Ball Joint Removing and Installing Kit D-150 ***Axle Shaft Bearing Removing and Installing Kit D-127 NOTE Torque Wrenches C-4053, C-3952-A and D-193 are optional and can be purchased separately. Arrangement of components 5 1020·3 ITEM 1 2 3 4 5 6 7 8 9 10 11 12 13 14 15 16 17 18 19 20 21 22 23 24 25 26 27 28 29 30 31 32 ITEM DESCRIPTION 33 34 35 36 37 38 39 40 41 42 43 44 45 Carrier Drive Gear and Drive Pinion Assembly Slinger-Oil (Drive Pinion) Inner Pinion Bearing (Cup and Cone) Pinion Position Shims Oil Seal Dust Slinger Pinion Bearing Preload Shims Outer Pinion Bearing (Cup and Cone) Pinion Oil Seal Slinger (Outer) Pinion .Oil Seal End Yoke Assembly (End Yoke and Dust Shield) Washer Pinion Nut Left Hand Support Arm Fill Plug Axle Identification Tag Cover Screws Differential Case Ring Gear Screws Differential Bearing Preload and Backlash Shims Differential Bearing (Cup and Cone) Differential Bearing Cap Differential Bearing Cap Screw Differential Cross Shaft Differential Side Gear Thrust Washer Differential Side Gear Differential Pinion Mate Differential Pinion Mate Thrust Washer Roll Pin Right Hand Support Arm Cotter Key 45-A 46 47 48 49 50 51 52 53 54 55 56 57 58 59 60 61 62 63 DESCRIPTION Slotted Nut Camber Adjuster Locknut Upper Socket Assembly Lower Socket Assembly Snap Ring Steering Knuckle Brake Splash Shield Bearing Retaining Ring Unit Bearing Oil Seal Retainer Plate Shaft Assembly and Slip Yoke Assembly Outer Shaft and Joint Assembly Retainer Plate Screws Dust Shield Oil Seal Wheel Bearing Spindle Spacer Grease Seal (Spindle) Needle Bearing (Spindle) Spindle Nut (Spindle Retaining) Grease Seal (Hub) Inner Wheel Bearing (Cone and Cup) Hub and Rotor Outer Wheel Bearing (Cone and Cup) Wheel Bearing Adjusting Nut (Inner) Wheel Bearing Nut Lock Washer Wheel Bearing Adjusting Nut (Outer) Hub Lok Assembly Stop Bolt (Steering) Nut (Stop Bolt) AXLE IDENTIFICATION All Spicer Model 44 Independent Front Suspen sion axles are identified with a manufacturing date and complete part number, which are stamped on the left hand support arm in an area between the fill plug and wheel end. � In this figure, the axle is identified with 1 /8" (3. 1 7mm) high stamped characters. For example: The manufacturing date or build date of the axle is interpreted as follows: The first number is the month, second number is the day of the month, the third number is year, the letter is the shift, and the last number is the line that built the axle. The next number is the part number. The digits reading from left to right is the basic number for identifying the particular axle assembly. The digit following the dash will identify ratio, differential, and end yoke options used in the assembly. The axle identification tag is required by the vehicle manufacturer, and pro vides their corresponding identification of the axle to the Dana Spicer part number. If the axle is equip ped with limited slip differential, the axle identifica tion tag will have the letters LS following the part number. Refer to the lubrication section of this manual for lubricant requirements involving limited slip differentials. NUMBER x xx xxx xxxxxx-x 0 �AXLE IDEKTIFICATION TAG Figure4 1020·4 6 NOTE In the event there are two build dates, the latter will be the date in which the brake components were assembled. The number stampeq next to the manufacturing date is the complete axle assembly part number. It is recommended that when referring to the axle, obtain the complete part number, and build date. To do this, it may be necessary to wipe or ·scrape off the dirt, etc., from the support arm. DISASSEMB LY O F WHEE L ENDS Follow the Vehicle Manufacturer's recommenda tions for the removal of the tire and rim, brake caliper and hub-lock assembly. Figure5 NOTE If it is necessary to replace brake components, refer to vehicle service manual. 1020·5 Remove the outer lock nut, lock nut washer, and the inner wheel bearing adjusting nut. Tool: C-4170-A Wheel Bearing Lock Nut Ad justing Wrench. Figure6 Figure7 1020·7 Remove grease seal and inner bearing cone. Discard seal and replace with new one at time of assembly. Tool: D-131 Slide Hammer Figure8 1020·6 1020·8 Remove outer wheel bearing cup. Tools: D-259 Bearing Cup Remover, C-4171 Han dle. Remove hub and rotor assembly. Outer wheel bearing cone will slide out as rotor is removed. 7 FigureS 1020-9 Remove inner wheel bearing cup. Tools: D-260 Bearing Cup Remover, C-4171 Han dle. NOTE The bearing bores must be free of nicks and burrs. Clean grease and dirt from hub and bearing bores with a standard metal cleaning solvent. Figure1 0 Figure1 1 1020·1 1 Assemble inner wheel bearing cup. Tools: D-154 Installer, C-4171 Handle. Distribute a sufficient amount of grease inside the hub between the bearing cups. Pack inner bearing cone full with the specified grease. Wipe the excess grease around the rollers. Assemble inner wheel bearing cone into cup. Figure1 2 1020·10 1020-12 Assemble new grease seal. Apply a small amount of grease around lip of seal. Tools: D-155 Seal Installer, C-4171 Handle. Assemble outer wheel bearing cup. Tools: D-140 Installer, C-4171 Handle. 8 Figure1 3 Figure1 5 1020·13 Place spindle in a vise. Do not locate on bearing diameters or threads. Remove the oil seal. Remove the axle shaft needle bearing as shown in Figure 15. Tool: D-131 Slide Hammer. If the tie rod has not been removed, do so at this time following vehicle manufacturer's recommenda tions.. Remove shaft and joint assemblies. Plastic slinger will come out with left hand assembly. Right hand assembly will separate at the slip yoke. Remove spindle nuts. NOTE If the nuts are of the torque prevailing design, they are to be replaced with new ones. Figure1 4 1020-15 Figure1 6 1020·14 1020·16 Remove cotter key from top socket. Loosen both the top and bottom nuts. Remove the top nut. Remove spindle. Tap lightly with a rawhide or heavy duty plastic hammer to break the spindle loose from the knuckle. Remove disc brake splash shield. 9 Figure1 7 1020-17 Using a rawhide or heavy duty plastic hammer, hit sharply on the top stud to free the knuckle from the tube yoke. After knuckle is free from the yoke, remove the bottom nut. Figure1 9 Place knuckle in vise as shown. If bottom ball socket is equipped with a snap ring, remove as shown. NOTE Discard bottom nut. The nut on the bottom socket is of the torque prevailing design, and is not to be reused. Figure1 8 1020-19 N OTE Bottom ball socket must be removed first. 1020·18 Remove camber bushing as shown. If the camber bushing cannot be removed by hand, use a Pitman arm puller or similar tool. Figure20 1020-20 Assemble ball socket tools as shown. Turn forcing screw and push out bottom socket. Discard ball socket. Tools: D-150-1 Ball Joint Remover & Installer ' D-150-2 Sleeve, D-150-3 Sleeve-Ball Joint Removing. 10 Figure21 1020·21 Assemble ball socket tools as shown. Turn forcing screw and push out top socket. Discard ball socket. D-150-1 Ball Joint Remover & Installer, Tools: D-150-2 Sleeve, D-150-3 Sleeve - Ball Joint Removing. Figure2 3 1020·23 Upper ball socket has a cotter key hole in the stud end. Assemble socket into knuckle. Make sure this area is free from dirt, etc., and that socket is straight. Assemble tools as shown. Turn forcing screw and push socket into knuckle as far as it will go. Tools: D-150-1 Ball Joint Installer & Remover, D-150-2 Sleeve, D-150-4 Installing Sleeve. Figure22 1020·22 Lower ball socket does not have a cotter key hole in the stud end. Assemble bottom socket into the knuckle. Make sure this area is free from dirt, etc., and that the socket is straight. Assemble tools as shown. Turn forcing screw and push socket into knuckle as far as it will go. Tools: D-150-1 Ball Joint Remover & Installer, D-150-2 Sleeve, D-150-4 Installing Sleeve. If required, assemble snap ring on bottom socket. 11 Figure 25 Assemble top nut on top socket. Tighten nut until it pulls the stud of the bottom socket into the tapered hole of the yoke. Torque top nut to 100 Lbs.- Ft. (135 N•m). After nut has been torqued, tighten nut until castellation aligns with cotter key hole. Tool: C-3952-A Torque Wrench. Figure24 1020-24 Assemble knuckle and socket assembly to yoke as shown. Slide camber bushing into place on stud of top ball socket. Be sure lugs on yoke engage the slots in camber bushing. Assemble new torque prevailing nut on bottom socket and torque to 20-30 Lbs.-Ft. (27-41 N•m). Place a tool such as a socket or similar object on top of the bushing, and strike with a plastic or rawhide mallet to seat the bushing. Make sure the tool rests on the bushing and has enough height to prevent striking the ball joint stud. Figure26 102o-2s Assemble cotter key. NOTE_ Do not loosen top nut to install cotter key. NOTE Install camber bushing on top ball joint stud with the arrow pointing outboard for "positive" camber. Install bushing with the ar row pointing inboard for "negative" camber. Zero camber bushings will not have arrows and may be rotated in either position as long as the lugs on yoke engage the slots in the bushing. For proper camber setting, refer to vehicle ser vice manual. Figure27 1020-27 Torque bottom nut to 90-110 Lbs.-Ft. (122-149 N•m). Tool: C-3952-A Torque Wrench. Figure25 N OTE In the event that knuckles are received with the sockets and snap ring assembled to the knuckle, along with new top and bottom nuts, and cotter key; follow procedures as illustrated in figures 24 through 27 for assembly. For steering angle setti�g. refer to vehicle service manual. 1020-25 12 N OTE It is recommended that all oil or grease seals be replaced with new ones whenever the axle is disassembled. Figure29 1020·29 Apply a light coat of hypoid lubricant or a good quality grease to the lip of the seal and position the seal on the Installer as shown. Tool: D-249-A Installer- Inner Axle Shaft Seal. _ Figure28 1020-28 Remove the inner axle shaft seal from the housing as shown. Pry seal out and discard. CAUTION When removing a seal, be careful so as to avoid nicking or gouging the housing. Figure30 1020·30 Slide the seal into the carrier seal bore. Make sure the seal is centered and is straight with the seal bore. Use a rawhide or heavy duty plastic hammer as shown to completely seat the seal in the bore. Tools: Screwdriver or similar tool, Plastic mallet. SERVICING DIFFERENTIAL YOKE SHAFT BEARING N OTE To remove axle shaft assemblies, follow procedures as illustrated in Figures 5 through 15. Figure_32 Figure31 1020·32 Place the shaft in a vise. Drill a 1;4 inch (6.4 mm) hole in the outside of the retainer ring to a depth ap proximately % the thickness of the ring. Do not drill all the way through the ring. The drill could damage the axle shaft. 1020·31 Remove retainer plate, slip yoke, and stub shaft assembly. Remove slip yoke and journal cross from stub shaft. 13 CAUTION Do not heat or cut the bearing cone assembly with a torch. Damage to the yoke shaft will result. Remove seal and retainer plate and discard. Replace the seal and retainer plate with new ones at the time of assembly. Inspect the machined surfaces of the yoke shaft, particularly the seal and bearing diameters. Clean the yoke shaft and carefully remove all nicks or burrs. Figure 33 1020-33 After drilling the ring, use a chisel positioned across the hole and strike sharply to break the ring. Discard and replace with a new one at time of assembly. Figure35 Figure34 1020-35 Position the press in a vise. Assemble a new re· tainer plate, and a new oil seal onto the yoke shaft. The oil seal lip should be coated with the proper hypoid lubricant. Slide a new unit bearing onto the shaft. The proper direction to install the unit bear ing is to have the large radius on the inner race towards the yoke end of the shaft. 1020-34 Push retainer plate and seal towards the yoke end of the axle shaft. Install the flange plate in a vise. Position the yoke shaft through the forcing plate, and install the adapters between the forcing plate and the unit bearing. NOTE The unit bearing is a complete pre-assembled bearing assembly consisting of cup, cup rib ring, cone, rollers, and cage. The cup and rib ring are bonded together to facilitate handling and installation. When the bearing is serviced, the cup will usually separate from the rib ring. Should separation occur, care should be taken so as not to damage the cone, rollers, and cage. Should damage occur to these parts, the bear ing assembly must be replaced with a new one. Slide the screws through the washer and forcing plate, then start them into the flange plate. Gradual ly tighten the screws until they draw the adapters tight to the bearing. Tools: D-127-2 Flange Plate, D-127-3 Adapters, D-127-4 Forcing Plate, SP 3020 Was hers, WP 5026 Screws Tighten the screws of the tool alternately and evenly until the bearing cone is removed from the yoke shaft. Be careful not to mar or nick the ma chined surfaces of the yoke shaft. 14 Put the installing ring on the yoke shaft and place in the press as shown. Use a small flat washer be tween the forcing screw and the yoke shaft to pro tect each one from damage during the installation of the unit bearing. Tighten the forcing screw until bearing is com pletely seated against the shoulder of the yoke shaft. To make sure the bearing is seated, use a .0015" (.038 mm) feeler gage between the bearing seat and bearing. If the feeler gage will enter, then continue to force the bearing further onto the yoke shaft until the feeler gage does not enter. Tools: DD-914-P Press DD-914-9 Adapter Ring D-127-1 Installing Ring - Bearing & Small Flat Washer CAUTION Extra care must be taken during installation of the retainer ring onto the axle shaft. The press fit of the retainer ring is greater than the press fit of the bearing. Caution must be used to pre vent crushing the bearing. Figure36 1020·36 To install the retainer ring on the yoke shaft follow the procedures as described in Figure 35. Use a .0015" (.038 mm) feeler gage between the unit bearing and retainer ring to be sure that the retainer ring is seated. At least one point should exist where the feeler gage cannot enter between the bearing and the retainer ring. If the feeler gage can enter completely around the circumference. the retainer ring must be forced further onto the yoke shaft. LUBRICATING THE UNIT BEARING WITH GREASE Figure37 Figure38 1020·37 1020·38 Fill the cavity with a good quality number 2 E.P. (extreme pressure) lithium base wheel bearing grease. Push seal and retainer plate away from the unit bearing to allow a cavity between the seal and bearing. 15 Figure41 Figure39 1020-41 Reassemble the slip yoke and journal cross to the stub shaft. Install the shaft assembly into the car rier. Torque the retainer plate screws to 30-40 Lbs.-Ft. (41-54 N•m). Install right hand shaft assembly into the slip yoke, giving special attention to the spline. If the slip yoke has a wide tooth space in the spline make sure that it is aligned with the wide tooth on the axle shaft spline. Tool: C-3952-A Torque Wrench. 1020-39 After cavity is full of grease, wrap some tape com pletely around the rib ring and seal to enclose the cavity. NOTE Prior to installing the right hand shaft assembly into the slip yoke, lubricate the splines with a good extreme pressure grease satisfying N.L.G.I. grade 1 or 2 specifications. For lubrication after assembly, refer to vehicle service manual. Figure40 1020-40 Pull the seal towards the bearing until it contacts the rib ring. This will force the grease between the rollers and the cup. NOTE If the grease is not apparent on the small end of the rollers, repeat the same steps until the grease is evident between the small end of the roller and cup. Remove the tape. Figure42 Assemble new needle bearing into spindle. Tools: D-122 Installer, C-4171 Handle. 16 1o2o-42 Figure 43 1020-43 Assemble grease seal into spindle. The lip of the seal is to be directed away from the spindle. Figure 46 1020-46 Assemble the plastic slinger onto the left hand shaft and joint assembly 5.000" (127 mm) from the inboard spline end. This slinger protects the inner axle seal installed in Figures 29 and 30 from stones, etc. Place a mark on the shaft at the slinger position for checking purposes after shaft assembly has been installed. Figure 44 1020-44 Some front axles are equipped with a "V" seal which is assembled to the axle shaft stone shield as shown. If seal is worn, remove and replace with a new one. Figure 47 1020-47 Inst�ll the left hand shaft and joint assembly. Assemble new plastic spacer, disc brake, splash shield and "V" seal if required as shown in Figure 44. Assemble spindle assembly. Check the plastic slinger for proper position as described in Figure 46, and correct if necessary. Figure 45 1020-45 NOTE Be sure the chamfer side of the thrust washer is toward the joint end of the axle shaft joint. Pack the thrust face area of the shaft and seal full of grease. Also, fill the seal area of the spindle with grease. 17 Figure48 1020·48 Assemble new nuts. Torque nuts to 20-30 lbs. ft. (27-41 N•m). Tool: C-3952-A Torque Wrench. NOTE To service hub and rotor assembly, refer to Figures 7 through 12. Figure50 1020·50 To adjust wheel bearing end play, torque inner ad justing nut to 50 Lbs.-Ft.(68 N•m) to seat the bear ings. Rotate the hub, then back off the inner ad justing nut one-fourth turn maximum. Assemble the lockwasher by turning inner locknut to nearest hole in lockwasher. Assemble outer locknut and tor que to 150 Lbs.-Ft. (203 N•m) Min. Refer to vehicle· manufacturer's specifications for wheel bearing end play. Tools: C-4170 Wheel Bearing Wrench C-3952-A Torque Wrench To assemble the hub lock assemblies, refer to vehi cle manufacturer's recommendations. Figure49 1020·49 Assemble hub and rotor onto spindle. Pack outer wheel bearing with specified grease, wipe . excess grease around the rollers. 18 CARRIER SECTION NOTE If it becomes necessary to service any parts inside the carrier, it is suggested that the entire left hand ·'Unitized support arm and carrier assembly be removed from the vehicle and held in a large heavy duty vise or stand. Refer to appropriate section of the service manual for removal and installation of the wheel ends and shaft assemblies. Refer to the vehicle service manual for removal and installation of the uni tized support arm. Loosen the carrier screws holding the carrier assembly to the left hand unitized support arm and allow the lube to drain out. Carefully remove the carrier screws and remove the carrier from the unitized sup port arm. Drain all the lube from the carrier assembly. Figure51 1020·51 Mount the carrier in a fixture as shown. Note the matched numbers or letters stamped on the bearing caps and the carrier. When assembled the number or letter on the caps must agree in both the horizontal and vertical position with the number or letter stamped on the carrier. Remove the bearing caps. Tools: D-245 Supporting Fixture, D-246 Vise Adapter. Figure52 Figure53 1020.53 Pry the differential case from the carrier with two pry bars. Use caution to avoid damage to any machined surfaces. Tag the bearing cups to indicate from which side they were removed. Remove spreader. 1020·52 Mount the spreader to the carrier. Use a dial in dicator as shown. DO NOT SPREAD THE CAR RIER OVER .010 .. (.25 mm). Remove the dial in dicator set. Tools: D-113 Spreader, D-227 Spreader Adapters, D-128 Indicator Set. Figure54 1020-54 Turn nose of carrier up. Hold end yoke or flange with a tool similar to the one shown and remove the pinion nut and washer. Tool: C-3281 Holding Wrench. 19 Figure55 Figure57 1020-55 Remove the end yoke or flange with the tools as shown. If the yoke or flange shows wear in the area of the seal contact, it should be replaced. Tools: C-452 Yoke Remover, C-3281 Holding Wrench. Figure56 1020·57 Pull out the pinion oil seal with the puller as shown. Discard the seal and replace with a new seal at time of assembly. Remove the outer pinion bear ing cone and outer pinion oil slinger. Tool: D-131 Slide Hammer. Figure58 1020·56 1020·58 Remove pinion by tapping with a rawhide or heavy duty plastic hammer. Catch the pinion with your hand to prevent it from falling to the floor and being damaged. Remove the inner pinion bearing cup with tools as shown. Tools: D-148 Remover, C-4171 Handle. NOTE On the spline end of the pinion, there are pinion bearing preload shims. These shims may stick to the outer bearing and then fall to the floor. Be sure to collect all these shims and keep them together since they will be used later in assembly. If shims are mutilated, replace with new ones. Shims are available in thicknesses of .003", .005", . 010", and .030" (mm .08, .13, .25 and .76). NOTE Shims are located between the inner bearing cup and carrier bore, which may also include an oil baffle. If shims and baffle are bent or nick ed, they should be replaced at time of assembly. Measure each shim individually and wire the shim stack together. If the stack has to be replaced, replace with the same thickness. 20 of measuring and adjusting backlash. If the original shim stacks are lost or cannot be ac curately determined, it is recommended that the shim stacks be found by using the procedures described in this manual. N OTE It is recommended that whenever bearings are removed, they are replaced with new ones, regardless of mileage. Figure59 1020·59 Turn the nose of carrier down. Remove the outer pinion bearing cup as shown. Caution: Do not nick the carrier bore. Tools: D-147 Remover, C-4171 Handle, C-4291 Extension. Figure61 1020·61 Place a few shop towels over the vise to prevent the ring gear teeth from being nicked. Remove the ring gear screws. N OTE It is recommended that whenever the ring gear screws are removed, they are replaced with new ones, regardless of mileage. Figure60 1020·60 Remove the differential bearings with a puller as shown. Wire the shims, bearing cup and cone together and identify from which side of the dif ferential case they were removed (ring gear side or opposite side). If any of the shims are bent or mutilated they should be replaced with new ones at the time of assembly. New shims are available in thicknesses of .003", .005", .010" and .030" (mm .08, . 1 3, .25, and .76). Tools: DD-91 4-P Press, DD-91 4-9 Adapter Ring, C-293-18 Adapter Set, C-293-3 Adapter Plug. If the original shim stack, or equivalent replace ment for each side is available, the shim stack may be used as a starting point to assemble the differen tial case. Assemble the shim stack and new bearings on the same side which they were taken from, and install the differential case into the carrier as de scribed later in this manual. Follow the procedures Figure62 1020·62 Tap the ring gear with a rawhide or heavy duty plastic hammer to free it from the case. Remove the case and ring gear from the vise. 21 Figure65 1020·65 Force the differential assembly as far as it will go in the opposite direction. Repeat these st�ps until the same reading is obtained. Record the reading of the indicator. This amount, in shims, will be included in the final assembly shim stacks to establish differential bearing preload and ring gear backlash. After making sure the readings are correct, remove the dial indicator and differential assembly from the carrier. · Figure63 1020·63 Install the master differential bearings onto the case. Remove all nicks, burrs, dirt, etc. from hubs to allow the master bearings to rotate freely. Tool: D-135 Master Bearings. Figure64 1020·64 Assemble differential case into carrier (less pinion). Mount a dial indicator with a magnetic base on the flange face as shown. Force the differential assembly as far as possible in the direction towards the indicator. With force still applied, set indicator at zero (0). Tool: D-128 Indicator. Figure66 1020-66 View of ring and pinion etched with inch iden tification. NOTE Indicator D-128 should be adjusted to provide for a minimum of .200" (5.08 mm) travel. 22 Figure68 Figure67 The distance from the centerline of the ring gear to the button end of the pinion for the Model 44 axle is 2.625 inches (66.68 mm). On the button end of each pinion, there is etched a plus (+) number, a minus (-) number, or a zero (0), which indicates the best running position for each particular gear set. The position of the pinion is con trolled by the amount of shims between the inner pinion bearing cup and the carrier bearing bore. For example - if a pinion is etched +3 (m+8), this pinion would require .003" (.08mm) less shims than a pinion etched "0". This means that by remov ing shims, the mounting distance of the pinion is increased to 2.628" (66.75mm), which is just what a +3 (m +8) indicates. Or if a pinion is etched -3 (m-8), we would want to add .003" (.08mm) more shims than would be required by a pinion that is etched "0". By adding . 003" (.08mm) shims, the mounting distance of the pinion is decreased to 2.622" (66.60mm); which is just what a -3 (m -8) etching indicates. If the old ring gear and pinion set is to be reused, measure the old shim stack and build a new shim stack to this same dimension. It is recommended that each shim be measured individually, and then added together to obtain the shim stack totaL To change the pinion P,Osition, shims are available in thicknesses of .003 ', . 005", and .010" (mm .08, .13, and .25). If a new gear set is used, notice the plus ( +), minus (- ), or zero (0) etching on both the old and new pinion and adjust the thickness of the new shim pack to compensate for the difference between these two pinion etchings. The chart in Figures 68 and 69 is helpful for determining this change. For example: If the old pinion is etched +2 (m+5) and the new pinion is etched -2 (m-5), then add .004" ( .10 mm) to the original shim stack thickness in order to install the new pinion at proper position. 1020·67 View of ring and pinion etched with metric iden tification. Ring gears and pinions are supplied in matched sets only. Matching numbers on both pinion and ring gear are etched for verification. If a new gear set is being used, verify the numbers on each pinion and ring gear before proceeding with assembly. Pinion Oil Baffle Pinion Oil Slinger Front and Rear Model 44 2.625 in. ( 66.68) mm. Centerline of 1 Figure 68 Ring Gear 1020·68 23 New Pinioa Markin1 Old Pinion Markin& -4 -3 -2 -1 0 +1 +2 +3 +4 +4 +0.008 +0.007 +0.006 +0.005 +0.004 +0.003 +0.002 +0.001 0 +3 +0.007 +0.006 +0.005 +0.004 +0.003 +0.002 +O.(X)l 0 -0.001 +2 +0.006 +0.005 +0.004 +0.003 +0.002 +0.001 0 -0.001 -0.002 +1 +0.005 +0.004 +0.003 +0.002 +0.001 0 -0.001 -0.002 -0.003 0 +0.004 +0.003 +0.002 +0.001 0 -0.001 -0.002 -0.003 -0.004 -1 +0.003 +0.002 +0.001 0 -0.001 -0.002 -0.003 -0.004 -0.005 -2 +0.002 +0.001 0 -0.001 -0.002 -0.003 -0.004 -0.005 -0.006 -3 +0.001 0 -0.001 -0.002 -0.003 -0.004 -0.005 -0.006 -0.007 -4 0 -0.001 -0.002 -0.003 -0.004 -0.005 -0.006 -0.007 -0.008 Figure69 1020·69 Pinion setting chart in thousandths of an inch. Old Pinion Markin& Hew Pinioa Mirkin& +5 +8 +10 +.08 +.05 +.03 0 +.08 +.05 +.03 0 +.08 +.05 +.03 0 +.08 +.05 +.03 +.08 +.05 +.03 +.08 +.OS +.03 0 -5 +.OS +.03 0 -8 +.03 0 0 -10 -8 -5 -3 +10 +.20 +.18 +.15 +.13 +.10 +8 +.18 +.15 +.13 +.10 +5 +.15 +.13 +.10 +3 +.13 +.10 0 +.10 -3 -10 0 -.03 +3 -.03 -.03 -.o5 -.03 -.os -.08 -.03 -.os -.08 -.10 -.03 -.os -.08 -.10 -.13 -.03 -.os -.08 -.10 -.13 -.15 -.03 -.o5 -.08 -.10 -.13 -.15 -.18 -.05 -.08 -.10 -.13 -.15 -.18 -.20 0 0 Figure70 1020·70 Pinion setting chart metric. Use these charts as a guideline to set pinion position. Figure71 View of master pinion block, pinion height block, scooter gage, cross arbor and arbor discs. NOTE Be sure that all carrier bores are free from all nicks, dirt or any other contamination. Figure71 1020·71 24 Figure74 Place pinion height block on top of master pinion block and against arbor as shown. Tool: D-115-1 Pinion Height Block. Figure72 1020-72 Place the master pinion block into the inner pinion bearing bore of the carrier as shown. Tool: D-139 Master Pinion Block. Figure75 1020-75 Place scooter gage on pinion height block. Apply light pressure with fingers at the back side of the scooter gage. Make sure the scooter gage is flat on the pinion height block, then set the indicator at zero (0). Tool: D-115 Scooter Gage. Figure73 1020·73 Place arbor discs and arbor into the cross bores of the carrier as shown. Tools: D-115-3 Arbor, D-115-4 Arbor Discs. Figure76 Figure74 Slide scooter gage towards the arbor. As the in dicator moves over the top of the arbor, the dial will move in a clockwise direction across the face of the indicator. When the indicator is at the top center of the arbor, the dial will stop traveling in a clockwise direction. If the dial starts to move in a counter clockwise direction, this means that you have pass ed the top center position on the arbor. Record only the reading when the indicator is at top center on the arbor and the dial has stopped moving clockwise on the indicator face. This reading indicates the thickness of the shim stack that is required to in- 1020-74 25 stall a pinion that is etched with a zero (0) at a zero (0) position. If the pinion being installed has a plus (+) or a minus (-) etching, then an adjustment of this shim stack is required. For example: If a pinion is etched +3 (m+8), then this pinion would require .003" (.08 mm) less shims than a pinion etched zero (0). If a pinion is etched -3 (m-8), we would want to add .003" (.08 mm) more shims to the shim stack than would be re quired if the pinion were etched to zero (0). Figure 78 Measure each shim, baffle, and slinger separately with a micrometer and add together to get the total shim stack thickness. Figure79 Figure77 Front and rear carrier sections may vary in the in ner pinion bearing bore depth because of the need for either a pinion baffle or a pinion slinger or both. The application of an axle assembly in a particular vehicle determines whether these two items are re quired. If a baffle or slinger is removed, then they should be replaced with a new one during assembly. A baffle or slinger, when installed properly, help control the position of the pinion in relation to the centerline of the ring gear. Therefore, these items, if used, must be measured and used as a part of the in ner pinion bearing shim stack. Figure80 Figure78 1020-1s �lac� the b�ffle an� �hen the required amount of _ �h1ms 1_n . the mn�r pm101?- bearmg bore. Drive the mner pmwn bearmg cup mto the carrier with tools as shown. Tools: D-145 Installer, C-4171 Handle. 1020·77 1020·80 Assemble the outer pinion bearing cup into carrier as shown. Tools: D-144 Installer, C-4171 Handle. 1020·78 26 Figure83 Figure81 1020·83 Insert the pinion into the carrier. Assemble the outer pinion bearing cone, slinger and end yoke onto the pinion spline. Do not assem ble the oil seal and pinion bearing preload shims at this time. Use the yoke installer (as shown) to draw the end yoke onto the pinion spline. Tools: W-162 Installer, C-3281 Holder. 1020·81 Remove the inner pinion bearing cone as shown. Tools: DD-914-P Press, DD-914-9 Adapter Ring, C-293-39 Adapter Set. Figure84 1020·84 Assemble the washer and pinion nut. Torque the nut until it requires 10 lbs. in. (1.1 N•m) to rotate the pinion. Rotate the pinion several revolutions before checking the pinion position. This is done to seat the bearings and assure a more accurate reading. Figure82 NOTE The reason for not assembling the pinion oil seal and preload shims at this time is due to the possibility of having to adjust pinion bear ing preload or pinion position. It would be necessary to again remove the oil seal; and as mentioned, whenever seals are removed, they are to be replaced with new ones. 1020·82 If an inner pinion slinger is used, assemble the slinger and then the inner pinion bearing cone onto the pinion. Drive the bearing on the shaft until it is completely seated. Tool: W-262 Installer. 27 Install the outer pinion bearing cone, outer slinger and end Y? ke ?nto the pinion. Use the yoke installer as shown m Figure 83. Assemble a washer and pin ion nut and torque the pinion nut to 200-220 lbs.-ft. (271-298 N•m). Using an inch pound tor ue wrench � a� �hown i r: Figure 84, me�sure the pre1oad on th� pmwn beanngs. The rotatmg torque of the pinion should read 20·40 lbs.-in. (2.3-4. 5 N•m) with new bearings. To increase preload, remove shims; to decrease preload, add shims. Remove the pinion nut, washer and end yoke as shown in Figures 54 and 55. Figure85 1020-85 Place the arbor discs and arbor into the cross bore of the carrier. Place the pinion height block on the button end of the pinion. Set the dial indicator of the scooter gage at zero (0). Slide the scooter gage towards the arbor. As discussed in Figure 76, the in· dicator will show the greatest clockwise reading when it is at the top center of arbor. This reading in dicates the position of the pinion. An indicator reading within .002" (.05mm) of the etching on the pinion is considered acceptable. If the pinion position is not within plus or minus (±).002" (± .05 mm) of the etching on the button of the pinion, refer to the pinion setting chart in Figures 69 or 70 as a guide to how much change in the shim stack is needed to position the pinion properly. For example: If the etch on the button of the pin ion is +2 (m±5) and the indicator reading is -.003" (-.08 mm), the pinion is installed too close to the centerline of the differential crossbore. It is not within the acceptable tolerance of ±.002" (±.005 mm) of the pinicn etch. Referring to the chart in Figures 69 or 70, in order to move from a position of 3 (-8) to the correct position of +2 (+5), we need to remove .005" (.13mm) of shims from the shim stack. Foll<_>w the recommended procedures for removing _ the shim stack and make the change. Remstall the pinion according to Figure 83 to 84. Tools: D-115-3 Arbor, D-115-4 Arbor Discs, D-115-1 Pinion Height Block, D-115.-2 Scooter Gage. When the pinion position is within the acceptable tolerance of ± .002" ( ± .05 mm) of the pinion etch, remove the pinion nut, washer, end yoke, slinger, outer pinion bearing cone and the pinion. Lubricate the inner and outer bearings by applying a small amount of the specified lube on the rollers of the bearing cone. Model 44 axles which use a pinion oil baffle re quire the pinion be installed into the carrier before the preload shims are assembled onto the pinion. In sert the pinion into the carrier, and hold in place. Assemble the preload shims, which are equal in thickness to the stack height of the original preload shims removed during disassembly, onto the pinion. Figure86 1020-86 Ap:pl.y a li �ht coat of hypoid lul;lricant to the lip of the pmwn 01l seal and assemble mto the housing. Tools: W-147-D Seal Installer, C-4171 Handle. - Figure87 1020-87 Assemble the end yoke, washer and a new pinion nut. Tools: W-162 Installer C-3281 Holder 28 Figure90 1020·90 Position the differential case in a vise and drive out the lock pin which secures the pinion mate shaft to the case. Use a small drift as shown. Figure88 1020·88 Torque pinion nut to 200-220 lbs. ft. (271-298 N•m). Tools: C-4053 Torque Wrench, C-3281 Holder. Figure89 Figure 91 1020·89 1020-91 Remove the pinion mate shaft with a drift as shown. Using an inch pound torque wrench as shown, rotating torque of pinion should read 20-40 lbs. in. (2.3-4.5 N•m) with new bearings. To increase preload, remove shims; to decrease preload, add shims. Tool: D-193 Torque Wrench. · NOTE If a limited slip differential is used, refer to the proper limited slip differential service manual. 29 Figure 92 Figure94 1020-92 Rotate the pinion mate gears and side gears until the pinion mates turn to the windows of the case. Remove the pinion mate gears and spherical washers. Lift the side gears and thrust washers out of the case. Inspect all the parts, including the machined surfaces of the case. If excessive wear is visible on all the parts, it is suggested that the com plete differential assembly is replaced. If any one of the gears need replaced, then both gears are to be replaced as a set. Figure 93 1020-94 Assemble the pinion mate shaft. Make sure the lock pin hole in the shaft lines exactly with the lock pin hole in the case. Assemble the lock pin. Peen some metal of the case over the pin to lock it in place. Figure95 1020-93 Place the differential case in a vise. Apply a good quality grease to the new side gear thrust washers and to the hub and thrust face of the new side gears, and assemble into the case. Lubricate the new pi nion mate gears and spherical washer. Hold the side gears in place with one han�. and assemble . the pi nion mate gears and sphencal washers with the other hand. Rotate the side gears and pinion mate gears until the holes of the washers and pinion mate gears line up exactly with the holes in the case. 1020-95 Be sure flange face of the differential case is free of nicks or burrs. Assemble ring gear to differential case, using new ring gear screws. Draw up screws alternately and evenly. Torque screws to 45-60 lbs. ft. (61-81 N•m). Tool: C-3952-A Torque Wrench. 30 INSTALLATION OF DIFFERENTIAL Figure 96 Figure 98 1020·96 Place the differential case onto step plate. Assemble the required amount of shims to the ring gear side hub as determined in Figure 97. Place the bearing cone on the hub of the differential case. Use the bearing installer to seat the bearing cone. The step plate is used to prevent possible damage to the hub and bearings while assembling bearing cones. Tools: C-4487-1 Step Plate, D-156 Installer, C-4171 Handle. Assemble the remaining shims of the total shim pack as determined in Figure 65. Add an additional .010" (.25 mm) to the remaining shims. Assemble the opposite side differential bearing cone as shown. EXAMPLE: In Figure 65 a total of .077" (1.96 mm) was recorded. In Figure 97 a total of .059" (1.50 mm) was recorded. This leaves a balance of .018" (.46 mm) for op posite side ring gear, and adds up to . 077" (1.96 mm) which was obtained at the start. To compensate for preload and backlash, add .010" (.25 mm) to the opposite side. The shim pack totals for this example are as follows: Ring gear side: .059" (1.50 mm) Opposite side: original balance of .018" (.46mm) plus .010" (.25 mm) gives . 028'' (.71 mm). Install master differential bearings onto case. Remove all nicks, burrs, dirt, etc., from hubs to allow master bearings to rotate freely. Place differential assembly into the carrier. Set up dial indicator as shown. Force the differen tial assembly away from the pinion gear until it is completely seated against the cross bore face of the carrier. With force still applied to the differential case, place tip of dial indicator on a flat machined surface of the differential case, if available, or on the head of a ring gear screw, and set the indicator at zero (0). Tools: D-128 Dial Indicator, D-135 Master Bearings. Figure 97 1020·98 1020-97 Force ring gear to mesh with pinion gear. Rock ring gear slightly to make sure the gear teeth are meshed. Repeat this procedure several times until the same reading is obtained each time. Be sure the indicator reads zero (0) each time the ring gear is brought back against the cross bore face of the car rier. This reading will be the necessary amount of shims between the differential case and differential bearing on the ring gear side. Remove the dial in dicator and the differential case from carrier. Remove master bearings from differential case. 31 Figure99 Figure1 01 1020·99 Install spreader and indicator to carrier as shown. DO NOT SPREAD CARRIER OVER .015" (.38 mm). Tools: D - 1 13 Spreader, D-227 Spreader Adapters, D- 128 Dial Indicator Set. Remove indicator. Install the bearing caps and screws. Make sure the letters or numbers stamped on the caps corres pond in both position and direction with the letters or numbers stamped into the carrier. Torque the bearing cap screws to 80-90 Lbs. ft. (108-122 N•m). Tool: C-3952-A Torque Wrench. Figure1 02 Figure1 00 1020·101 1020·102 Check ring gear and pinion backlash in three equally spaced points with a dial indicator as shown. Backlash tolerance is .005" (. 13 mm) to .009" (.23 mm) and cannot vary more than .003" (.08 mm) between points checked. High backlash is corrected by moving shims from the opposite side of the differential case to the ring gear side; thus moving the ring gear closer to the pinion. Low backlash is corrected by moving shims from the ring gear side of the differential case to the op posite side; thus moving the ring gear away from the pinion. 1020·100 Assemble differential bearing cups to differential bearing cones. Install differential assembly into carrier. Use a rawhide or heavy duty plastic hammer to seat differential assembly into cross bore of carrier. Care should be taken to avoid nicking the teeth of the ring gear or pinion during assembly. Remove spreader. CAUTION Before applying new silicone rubber sealer, make sure the c.arrier face and unitized support arm is clean and free of all foreign matter such as dirt, oil, and old silicone rubber sealant. 32 Figure1 03 Figure1 04 1020·103 1020·104 Mount the carrier to the unitized support arm be ing careful not to smear the silicone rubber sealant material. Torque the cover screws to 30-40 lbs. ft. (41-54 N•m). Torque the (2) left hand support arm to carrier side tab screws. Early models used .375-16 screws while later models used .500-13 screws. .375-16 screws-torque 30-40 Lbs.ft. (41-54 N•m). .500-13 screws-torque 85-100 Lbs. ft. ( 1 1 5- 1 36 N•m). Allow one hour cure time before filling the unit with the proper hypoid lubricant. When the carrier assembly is rebuilt to specifica tions, refer to the vehicle manufacturer's recommen dations for the proper installation procedure into the vehicle. Tool: C-3952-A Torque Wrench. The mating surfaces of the left hand unitized suP. port arm and the carrier should be free of dirt, ml, etc. Apply the sealer to the carrier face as shown. The sealer bead is to be 118 " ( 3. 1 8 mm) .to 1/4" (6.35 mm) wide and should not pass through or out side of the holes. Sealant material must meet specification of ASTM3, GE303, Al9, B37, E16, E36, Z1, Z2, and Z3 sealant. NOTE Use of cleaning solvents may prevent the silicone rubber sealant from adhering to the carrier face and unitized support arm, resulting in leaks of axle lubricant. 33 IMPORTANT NOTE: This page was updated; see publication 5717 dated 05/2002 IMPORTANT NOTE: This page was updated; see publication 5717 dated 05/2002