1
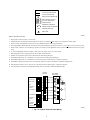
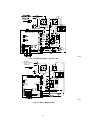
3/8-IN. DIA TIEDOWN
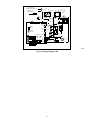
KNOCKOUTS IN BASEPAN
(2) PLACES
NOTE: Avoid contact between tubing and structure
OUTDOOR WALL
INDOOR WALL
CAULK
LIQUID TUBE
C
L
A
VAPOR TUBE
B
INSULATION
THROUGH THE WALL
JOIST
HANGER STRAP
(AROUND VAPOR
TUBE ONLY)
VIEW FROM TOP
8 3/16 ″
INSULATION
A97548
VAPOR TUBE
MINIMUM
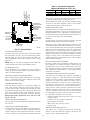
TIEDOWN KNOCKOUT
MOUNTING PAD
LOCATIONS
UNIT SIZE
DIMENSIONS
Support Feet Snow Stand
A
B
024
19 X 24
26 X 32
2-13/16
6-15/16
036-060
26 X 32
31 X 35
4
9-3/4
1″ MIN.
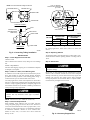
Fig. 3—Mounting Unit to Pad
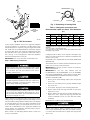
LIQUID TUBE
SUSPENSION
On rooftop applications, locate unit at least 6 in. above roof
surface.
A94028
Fig. 2—Connecting Tubing Installation
Step 4—Operating Ambient
The minimum outdoor operating ambient in cooling mode is 55°F,
and the maximum outdoor operating ambient in cooling mode is
125°F.
INSTALLATION
Step 1—Check Equipment and Job Site
UNPACK UNIT
Step 5—Elevate Unit
Move to final location. Remove carton, taking care not to damage
unit.
INSPECT EQUIPMENT
File claim with shipping company prior to installation if shipment
is damaged or incomplete.
Accumulation of water and ice in base pan may cause
equipment damage.
Step 2—Install on a Solid, Level Mounting Pad
Elevate unit per local climate and code requirements to provide
clearance above estimated snowfall level and ensure adequate
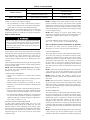
drainage of the unit. Fig. 4 shows unit with accessory support feet
installed. Use accessory snow stand in areas where prolonged
freezing temperatures are encountered. Refer to separate Installation Instructions packaged with accessories.
If conditions or local codes require the unit be attached to pad, tie
down bolts should be used and fastened through knockouts
provided in unit base pan. Refer to unit mounting pattern in Fig. 3
to determine base pan size and knockout hole location.
On rooftop applications, mount on level platform or frame. Place
unit above a load-bearing wall and isolate unit and tubing set from
structure. Arrange supporting members to adequately support unit
and minimize transmission of vibration to building. Consult local
codes governing rooftop applications.
Do not allow POE lubricant to come into contact with roofing
material. POE may deteriorate certain types of synthetic
roofing.
NOTE: Unit must be level to within ±2° (±3/8 in./ft).
Step 3—Clearance Requirements
When installing, allow sufficient space for airflow clearance,
wiring, refrigerant piping, and service. Allow 30-in. clearance to
service end of unit and 48 in. above unit. For proper airflow, a 6-in.
clearance on 1 side of unit and 12 in. on all remaining sides must
be maintained. Maintain a distance of 24 in. between units.
Position so water, snow, or ice from roof or eaves cannot fall
directly on unit.
A98533
Fig. 4—Accessory Support Feet
2