1
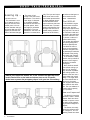
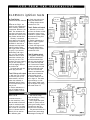
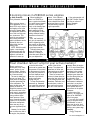
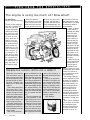
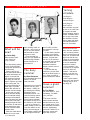
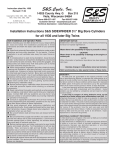
Summer 1993
The Kawasaki
Technical Magazine
Vol. 6 No. 2
by Patrick Kelly
Instructional Designer/
Instructor
Kawasaki ... Gear Up for
the Good Times! That’s
more than just a slogan—
and for proof, just examine the specifications for
the brand new 1994
KX125 and 250. One look
at these virtually all-new
machines will convince
you that Kawasaki is indeed “Gearing Up for the
Good Times!”
The KX125-K1
The heart of every motocross machine is its engine, and the KX125-K1
has the cardiovascular development to match the
best riders in the world. It
has been thoroughly redesigned to increase its
low- and mid-range power
while maintaining its
strong top end.
To increase intake velocity and improve low-end
torque, the reed valve has
been reduced in size and
the number of reed petals
reduced from six to four.
The reed valve material
has also been changed
from carbon fiber to epoxy
resin for increased durability.
The transfer and exhaust ports are changed
in size and shape to boost
low rpm torque. Transfer
port timing remains unchanged while exhaust
port timing is retarded
slightly from 95° BBDC
and ABDC to 94° BBDC
and ABDC.
CONTlNUED ON PAGE 2
ROUTE LIST: o
SERVICE
o PARTS
P L E A S ER E T U R NT OS E R V I C EL I B R A R Y
o
SALES
Inside!
n Service tips & more!
Gearing Up ...
CONTINUED FROM PAGE 1
The crankcase is new
too. It features a new intake port and new, lower
transfer ports. A new expansion chamber and ignition timing data map work
together to maximize the
effect of all these changes.
The power is fed
through a new clutch and
transmission. The clutch is
10mm larger in diameter
for increased durability
and features one less friction plate (seven, down
from eight) for smoother
engagement. The new
transmission has been designed for increased dura-
bility. The input and output
shafts have been moved
2mm farther apart to allow
for larger diameter gears
and the diameter of the
output shaft has also been
increased 3mm. The transmission also benefits from
stronger shift forks and a
needle bearing added to
the end of the shift drum,
(ABOVE) Port comparison between the ’93 and ’94 KX250 and (BELOW) KX125
models. Dashed lines are the intake and exhaust tracts on the ’93 models;
shaded areas represent the passageway shapes in the great new ’94 machinery.
as well as revised gear ratios to match the new
power characteristics.
The KX250-K1
The KX250-K1 engine
has also been revised to
improve low- and midrange torque without sacriicing top end. The area of
he carburetor holder and
air guide in the reed block
has been reduced in size
17 percent in order to increase intake velocity.
The cylinder also features
new porting designed to
boost low speed power.
The KX250-K1 also receives a new expansion
chamber and ignition timing data map to maximize
the benefit of the porting
and intake tract changes.
In the KX250-K1 transmission, the input shaft diameter is 3mm larger to
handle the increased
horsepower.
Both machines benefit
from refined cooling systems for ’94. Although
they still retain a parallelflow cooling system, the
radiator hoses are now a
single rather than a dual
design. The single radiator hose reduces flow resistance by 9 percent.
Both engines also benefit
from identical new radiators. The new radiators increase cooling capacity
by 8.4 percent.
New and improved
The KX125-K1 and the
KX250-K1 share a similar
chassis. Both have been
revised to improve cornering ability while maintaining excellent straight-line
abilities.
The frames are nearly
identical and feature similar changes for ’94. The
steering heads have been
2
l
K-Tech News
lowered and the frames’ dimensions changed to
shorten their overall
length. This contributes to
shorter wheelbases for improved cornering. The
rake angle on the 125
frame has been changed
from 25.5° to 26° while the
250’s rake remains unchanged at 26°. Rigidity of
both frames is improved
with new gusseting and
new steel rear sub frames.
The KX125-K1 and
KX250-K1 feature refined
suspension systems as
well. The front forks get a
special coating to reduce
initial harshness and the
125 gets new fork springs.
The 125’s fork spring rate
goes from .35 kg/mm to
.38 kg/mm while the 250’s
fork springs remain unchanged at .39 kg/mm. In
the rear, both machines
have stiffer spring rates.
The 125 shock spring
changes from 4.5 kg/mm
to 4.7 kg/mm and the 250
shock spring changes
from 4.7 kg/mm to 4.9
kg/mm. Both KX’s feature
new Uni-Trak linkage ratios and larger compression damping valves to
best match the new spring
rates.
The rear suspensions
also boast a stronger,
more rigid swingarm. The
pivot area and cross piece
are now hollow cast aluminum. This new cast piece
IS joined to new lightweight single box section
swingarm main tubes, replacing the dual box section main tubes used last
year.
The brakes on both
machines have also been
upgraded. The front master cylinder is changed to
reduce the amount that
the lever travels before
the brakes are applied.
The front caliper body has
also been increased in rigidity. The overall result is
improved braking and
brake lever feel. The rear
brake has been modified
to give the rider improved
control. Both the master
cylinder bore and the caliper bore have been reduced in size and the
brake hose has been
changed to a higher expansion type.
All of these front and
rear brake changes also
apply to the KX500 for ’94.
There are many other
polishing touches to the
’94 KX125 and 250 to
round out the overall packages. The seat height is
10mm lower and the seat
foam is now a dual-density type for improved
wear and comfort. A new
handlebar matches the
new lower seat height and
the KX250 handlebar now
features weights to reduce
vibration.
Both bikes receive
new Dunlop D737 rear
tires. Dunlop K490s, identical externally but with new
internal construction, are
retained on the front of
each bike.
The 1994 KX125-K1
and KX250-K1 confirm
Kawasaki’s commitment
to being the best. The
company is indeed
“Geared Up for the Good
Times”—good times in the
winners circle! o
(RIGHT) Another interesting comparison between ’93 (top) and ’94
(bottom) KX models:
This is the new cooling
system layout.
The Technical Magazine 3
l
Summer 1993
Vol. 6 No. 2
©1993 Kawasaki Motors
Corp., U.S.A. (KMC).
All rights reserved.
Service materials
mailings for ’93 models
K-Tech News Staff
Microby David Pyle
Parts Publications Specialist
by Ray St. John
Publisher
Kawasaki Tech Services
Publications Manager
Don Church
Executive Editor
Gary Herzog
Editor-in-Chief
Gregg Thompson
Communications Editor
Patrick Kelly
Regional Editors
North and East
Fred DeHart
Central and South
Walter Rainwater
Contributors
Dave Behlings,
Keith Pestotnik,
John Porno, David Pyle,
Mary Sola, Ray St. John
Graphics/Production
Graphic Art
Gregg Thompson
Copy Editor
Pat Shibata
Production
Nickless Communications
Published by Kawasaki.
All suggestions become
the property of KMC.
Sending a service suggestion gives Kawasaki permission to publish and/or
use it without further consideration.
Specifications subject to
change without notice.
4
l
K-Tech News
Supervisor, Technical Writing
We get a lot of calls from dealers asking about service
manuals and assembly and preparation manuals on the
’93 models. Most of the time we tell them, “Yup. We
mailed that out last month, and you’re on the list.”
But, just to fill everyone in, here’s what we’ve sent
out so far on the ’93 models:
Service Manuals
Manual for:
Sent:
KLF400-B1
ZR1100-A2
ZX750-L1/M1 (Supp.)
ZX1100-D1
ZX600-E1 (supp.)
KLX650-A1/C1
March 27, 1992
July 31, 1992
December 11, 1992
March 18, 1993
March 19, 1993
April 9, 1993
Assembly and Preparation Manuals
Manual for:
Sent:
KLF400-B1
ZR1100-A2
ZX750-L1/M1
ZX1100-D1
KLX650-C1
ZX600-E1
KAF620-A1/B1
KLX650-A1
EX250-F7
JH750-B1
KAF300-B1
May 5, 1992
July 31, 1992
October 23, 1992
January 22, 1993
January 22, 1993
January 22, 1993
February 5, 1993
February 12, 1993
March 26, 1993
April 16, 1993
May 6, 1993
Miscellaneous
Sent:
Item:
“How We Stack Up 1993” February 26, 1993
We mail out publications as soon as we get them,
so you may have gotten something after the last item on
our list here. The lead time between my writing this column and you receiving K-Tech News is about 60 days.
If you need to order any of these publications, look
on Grid A-2 of the parts catalog microfiche for the part
numbers.
There’s lots of interesting reading and important information in these manuals for you and your service personnel. o
Did you know that there is
more information on your
parts microfiche than just
part numbers? We include
extra information to make
each microfiche a multipurpose reference source. Below is some of the useful
information found on each
specific models microfiche.
Assy. & Prep sheet
An “Assembly and Prep
Sheet” is located on the
“M” row of each specific
model microfiche. Here is
a copy of this important
document that is less
likely to get lost or damaged. Use this as a backup to the paper copy filed
in your A & P binder.
The A & P sheet is included on the first edition
of the microfiche for a new
model if it is available; if
not, then it is included on
the first revision.
Bulletins
All bulletins pertaining
to a particular model are
included on the IN” row on
the first revision following
the issue of the bulletin.
And don’t forget about
the Service Bulletin microfiche: P/N 99961-0365
covers ’90-’92 Motorcycle
Service Bulletins and P/N
99961-0366 covers ’90’92 Watercraft Service Bulletins.
Part number list
Located at the end of
the “O” row is a list with
every part number found
on that microfiche. This
can be used to quickly locate a known part number
CONTlNUED ON PAGE 5
KLX650-C1 ignition tests
by Fred DeHart
Technical Services Instructor
Here at the “Big K”, we
prefer to use voltage tests
when checking electrical
components whenever possible. The resistance values given in the service manuals just don’t seem to find
the problem all that often.
Recently I conducted
some tests on the ignition
components of a running
KLX650-C1 with both a
voltmeter and the Kawasaki CD Ignition Tester,
just to get some numbers
to go by. If you are troubIeshooting a KLX ignition, you can use these
values but bear in mind
that these numbers are
from only one unit. The
numbers from the motorcycle you are working on
could be slightly different
and still be OK.
Do these tests with the
spark plug removed:
Test I: Pick-up coil output
1. With the 2-pin connector from the pick-up coil
disconnected, connect
either the voltmeter or
Kawasaki Ignition Tester
to the wires coming from
the p/u coil.
2. Set the voltmeter to a
low AC voltage scale or
Ignition Tester to Low 35.
Micro-K
CONTINUED FROM PAGE 4
on the microfiche. It can
also be used to find out if
a pat-l is used more than
once on a unit. For example: KX125-J2 microfiche
grid 0-13 shows that P/N
92015-1078 is used on
four different grids.
3. Crank the engine over
using the starter motor.
4. Voltage output should
be about 1/2 VAC.
Test II: Exciter coil output
1. With the 2-pin connector from the exciter coil disconnected, connect your
voltmeter or Ignition Tester
to the wires coming from
the exciter coil.
2. Set the voltmeter to a
high AC scale or Ignition
Tester to High 40.
3. Crank the engine over
using the starter motor.
4. Voltage output should
be about 50 VAC.
Test Ill: Igniter output
(CD Ignition Tester only)
1. With the black/white
wire disconnected from
the coil, connect the Ignition Tester and the load
coil. Connect the Tester’s
yellow lead and one lead
from the load coil to the
b/w wire. Connect the
Tester’s red lead and the
other load coil lead to a
good engine ground.
2. Set the Tester to Low
95 or High 10. The tester
light should go on with
either setting while cranking the engine over using
the starter motor. o
This can be handy
when deciding how many
of a part to stock.
Don’t forget that specs,
model I.D. photo, and beginning and ending frame
numbers can also be
found on the microfiche.
The parts microfiche is a
powerful tool; start taking
advantage of it today! o
The Technical Magazine 5
l
Service Contest #2: Still more winning results are in!
We had a great response
to our K-Tech News Service Contest #2, which appeared as an insert in our
last issue (Vol. 6 No. 1). In
the “diploma” on page 6
are the names of the technicians who scored 85 per-
cent or better. Once again,
all will be receiving an
award-and if your name
is there, congratulations!
If your name does not
appear, please don’t give
up; keep trying. You still
have one more chance to
R eady for the final K-Tech News Service Contest #3?
Well here it is! Whether you took the first two tests or are
a newcomer to the competition, it’s time to sharpen your
pencils and get right to it.
A complete list of contest rules has appeared in
each of the last two issues; please refer back to them if
you have any questions. “Rules Highlights” appear below:
win. Our final Service Contest #3 is included in this
issue. As we’ve explained,
each test is graded separately, so even if you didn’t
enter Contest #1 or #2,
you can still win awards
by entering this one.
l
In order to compete for the grand award, all three tests
must have been completed and returned by their respective deadlines.
l
Send completed tests to: Service Contest,
Kawasaki Motors Corp., U.S.A., 9950 Jeronimo Road,
Irvine, CA
92718.
Good luck!
Highlights of the Contest Rules
l
Contest #3 answer sheets must be mailed to the address printed below on or before Aug 13th.
l
The Service Contest is open to any full-line dealership
Service Department personnel.
l
The contestant may use any materials and information
available to answer the test questions.
l
Any contestant who scores higher than 85 percent will
receive an award for that test.
l
Copies or facsimiles of the answer sheet are OK.
The deadline for mailing
in Contest #3 (inserted
into the center of this issue) is Aug. 13. (Don’t let
Friday the 13th bother
you!)
Good luck and thanks
for participating! - Ed.
The award
for Service
Contest #2
is Snap-on
Tool’s neat
palm-style
ratchet with
3" wobbledrive extension.
DATA
Bayou 400 neutral switch improvements
S ome KLF400B model
ATVs may develop a problem with the neutral indicator switch making it
difficult to start the engine.
Typically, one must push
down or pull up slightly on
the shift pedal to get the
neutral lamp to illuminate,
allowing the starter circuit
to operate.
To correct this condition,
some improved parts are
now available as found in
later production units.
You’ll need one each of
the following parts to
make repairs:
P/N 13151-1077
Switch, neutral
P/N 13244-1055
Stopper, reverse
P/N 11060-1204
Gasket, bevel gearcase
P/N 11060-1209
Gasket, clutch cover
P/N 92015-1880
Nut, front clutch
Follow
the service
manual for
general repair information,
but to save labor time, do
not remove the engine
from the frame. Instead,
remove the shift shaft
from the right-hand side
providing clearance to get
the bevel gearcase off the
left-hand side, as detailed
in the Winter ’92 issue of
K-Tech News (Vol. 5, No.
4, pg. 7). - Keith Pestotnik
Vulcan voltage
T he Vulcan 700/750 service manual doesn’t give you
the open-circuit AC voltage
of the alternator. So we will:
Measure the voltage with
the stator wires unplugged
from the system and the engine running at 3000 rpm.
The voltage between any
two of the three yellow wires
coming from the stator
should be about 50 VAC.
The voltage will continue to
rise if the engine is rewed
above 3000 rpm. If the voltage is checked at these
same connectors with the
stator in-circuit (wires
plugged in), it will be about
14 VAC or so.
- Fred DeHart
The Technical Magazine 7
l
Choosing the right glue for those rubber parts
by Gregg Thompson
Product Support Supervisor
There has been some
confusion lately regarding
what kinds of glue to use
installing the various mats
and pads on our watercraft. There’s even some
incorrect information in our
service manuals. So here’s
some general information that
should get you
through installing just about
any of these rubber parts with
minimum hassle.
At this time,
there are three
basic types of
glued-on rubber
parts found on
our watercraft.:
thick soft foam
rubber (mats);
thin hard rubber;
and engine hood
gaskets.
The thick, soft,
foam rubber floor
mats used on
our stand-up
models should
be installed using a good quality waterproof contact cement. The cement should
be painted on the backside
of the mat and on the hull
(cover the whole surface)
and should be allowed to
dry before installing the
mat. This type of glue will
not adhere properly if the
mat is installed before the
glue is dry. You can get this
type of glue (and a cheap
throw-away paint brush with
which to apply it) from a lo8 K-Tech News
l
cal paint or hardware store.
The thinner, hard-rubber
mats that are used in the
footwells of our sit-down
models cannot be installed with the contact cement. It won’t adhere to
this type of rubber. For the
mats as well as handlebar
install some of these
larger floor mats. The little
tubes or bottles you find at
the local market just aren’t
big enough.
For that reason, we are
working to make an easyto-use cyanoacrylate glue
available from our Acces-
grips, and those rubber
blocks (“detents”) used to
keep cables and hoses
neatly routed in the hull,
you should use a cyanoacrylate glue (super
glue).
There are several different types of cyanoacrylate
glue, and they should all
work well for these mats,
but you may run into a little difficulty finding it in
large enough quantities to
sories Department in
larger bottles. We’ll get the
part number to you as
soon as we have it.
This glue is thicker and
slower to set up than most
super glues so it’s a little
easier to work with when
installing a large mat.
The weather strippinglike gaskets used on our
engine hoods and storage
compartment lids can be
installed with either of the
two glues already mentioned, but we also sell a
glue that’s ideal for this
kind of job. This is a very
high quality contact cement (you know, apply to
both surfaces, let it dry ...)
and it comes in a toothpaste-size tube that
makes it easy
to use for small
jobs. Order it
by P/N 921043701.
There is one
glued-on pad
that is different
from all the others and it requires another
method of installation. The
side rail pads
on the JF650-B
“Tandem Sport”
are glued on at
the factory using the same
green adhesive
used to bond
the top and bottom halves of
the hull together. This
glue is not available but you
can use Kawasaki’s Hull Repair Kit instead.
Rough up the
hull surface and the plastic base of the pad with
very coarse sand paper,
and drill a couple of 1/4”
holes in the pad base.
Then, mix up a batch of
Hull Repair Kit, apply it to
the hull, and press the
pad in place firmly.
Just make sure you let
this set up overnight before giving it the old
40mph submarine test. o
Knocking noises in ZX600-D series engines
by Keith Pestotnik
Rocky Mountain Kawasaki
Have you ever done a
valve adjustment on a “D”
Model ZX-6 only to have a
loud tapping noise in the
valve train appear after
the adjustment? Believe it
or not, this is a fairly common occurrence. This
model is very sensitive to
cam bearing clearance
and this clearance can be
affected by how you
tighten down the cam
bearing caps.
NOTE: With this model
engine, a cam bearing
clearance noise will usually be loudest when the
engine is cold and decrease as it warms up.
When installing the
cams in a ZX600-D engine, a good rule-of-thumb
is to push forward (toward
the front of the engine)
firmly on the bearing caps
as you begin to tighten
them against the head.
This is important to maintaining minimum bearing
clearance on these engines.
Also, use hand tools
only (no air wrenches!), follow the tightening procedure exactly as described
in the service manual. Use
a good torque wrench.
Following these procedures will reduce the
chances of creating a
noise that wasn’t there before you adjusted the
valves. If the customer
comes in complaining of a
noise, check all the usual
things and then re-torque
the cam bearing caps using this procedure.
If the noise persists, call
the KMC Product Support
Hot Line or call me at
Rocky Mountain
Kawasaki. o
FRONT
Float chamber ram air: a tip for your active memory!
H ere’s one that you
should store in the “easy
access” portion of your
memory banks. Knowing
this fact could save you a
lot of time some day:
The ram air intake systems on our latest “ZX”
street bikes are designed
to deliver pressurized air
to the carburetors. The
faster the bike goes, the
greater the boost. Although the pressure in the
air box never rises to the
levels seen in superchargers and turbochargers, it
does go above atmospheric pressure. Since
more conventional intake
systems run at pressures
well below atmospheric,
these new ram air systems are significantly better.
However, for the carburetor to deliver any fuel to
the engine, the pressure
on the fuel in the float
bowl must be greater than
the pressure in the venturi.
As the pressure in the air
box rises, the pressure in
the float chambers must
also rise or the fuel will
simply stop flowing
through the jets.
To keep float-chamber
pressures up, Kawasaki
has routed the carburetor
vent tubes forward to the
mouth of the air inlet
scoops. The shape and
placement of these vent
tube openings are critical
to their proper function.
There are several connectors in these tubes between the inlet at the front
of the fairing and the float
chambers. California models also have a valve in
the vent line that routes
the vent to the charcoal
canister when the engine
is off. If one of these tubes
becomes disconnected
anywhere in the system,
the pressure in the float
chamber goes down and
fuel flow through the jets
is reduced or even
stopped. The result of a
disconnected carburetor
vent tube is a very bad
throttle hesitation at moderate speeds that only
gets worse as the speed
increases.
In the case of the
ZX600-E, the engine just
signs off at 4000-5000
rpm in low gears.
If you ever find yourself
trying to diagnose a throttle hesitation on one of
these ram air units, don’t
forget to check out the carburetor vent system very
carefully.
- Gregg Thompson
The Technical Magazine 9
l
The engine is using too much oil? Now what?
by John Pomo
Product Support Specialist
Sooner or later (maybe today, eh?) a customer will
come into your shop
complaining that his
motorcycle is using
too much oil. If he
expects to have this
covered by warranty, there are a
few things you
should do to verify
the problem before
calling the Hot Line.
Depending on the
type of vehicle and
other factors, oil
consumption as
high as one quart
per 500 miles may
be considered normal. Before calling
us, determine exactly how much oil
the engine is using.
Have the customer
bring the bike to your shop
so you can put it up on its
center stand (if it has one)
on your shop floor and top
off the oil. If it has no center stand, hold the bike in
a position that can be precisely duplicated later. Record the mileage and send
TIP
Despite the rumors, dirt is not a defect!
Quite often, we on the Hot
Line will receive, from a
dealer, engine top end parts
that were replaced under
warranty because of abnormal wear. Generally, the
dealer has no idea what
caused it.
Well, nearly always this
“abnormal wear” was
caused by dirt that entered
theengine through the intake
system. The problem is that
unless there was a defect in
the intake system that let the
dirt in, this kind of failure is not
really covered by warranty.
Most likely, the dirt got into
the engine due to improper
maintenance (or lack of it), or
some modification to the air
cleaner system.
With our four-stroke en10
l
K-Tech News
gines, the damage from dirt
is pretty easy to spot. The
piston and rings receive the
most wear. The piston will
have a dull grey appearance,
as though it had been wetsanded with very fine sand
paper (the sanding strokes
all in avertical direction). The
circumferential machining
marks you would normally
see on a piston skirt are
gone.
The rings, meanwhile, will
be very polished on the
edges and sharp as a razor.
Other pans that will be noticeably worn are the wrist
pin, cylinder, and cam chain.
Parts that are pressure
lubed don’t suffer as much
wear because the oil filter
does a good job of removing
most of the dirt-that is, if
the filter getschanged often
enough.
Any time you spot abnormal wear in an engine’s top
end, inspect the parts with all
this in mind. If you were
thinking of submitting a warranty claim for the repair but
see the tell-tale signs of dirt,
you should reconsider
whether or not this really is a
warranty situation.
-Dave Behlings
the customer on his way,
with instructions to bring
the bike back to you when
be believes it needs to
have oil added.
When he brings
it back, add oil
carefully and keep
track of exactly
how much oil it
takes. Note the
exact number of
miles he has put
on since the last
check. (It’s probably best to do this
a couple of times—
adding up the oil
used and the mileage ridden—in order to get a more
accurate consumption rate.)
Make sure the engine is fully warmed
up each time you
check or add oil.
Sometimes your
test may cover only a few
hundred miles and a small
fraction of a quart of oil,
so you need to be consistent and precise.
For mileage readings,
use the odometer, not the
trip meter. For someone
who wants his engine rebuilt under warranty, it’s
pretty tempting to know
that all he has to do is
ride 100 miles, sort of
accidently bump the trip
reset knob, ride it another
100 miles and bring it to
you with his measured oil
consumption exactly doubled ...
Once you are confident
that you have an accurate
oil consumption figure,
call the Hot Line and we
can discuss what to do
and what not to do. o
Old news is good news!
As we launch head-on into another JET SKI® season,
we thought we’d reprint this old K-Tech News article that
hasn’t lost its appeal. -Ed.
What’s wrong with this picture?
by Gregg Thompson
Product Support Supervisor
How to be a hero
by Mary Sola
Assistant Manager,
Consumer Affairs
If you find yourself faced with a cracked Kawasaki water- W hat’s something you
craft hull that needs to be repaired under warranty, the
first thing you should do is call the Hot Line. The Hot
Line technician will probably ask you to take some pictures of the damage and send them along with a written
estimate for inspection. But taking good pictures of a
crack in a nice white hull can be a little tricky ...
A large percentage of the photos
we receive don’t
serve any purpose
because they don’t
clearly show the
damage. Most often
the photos are
either out of focus
or over-exposed.
Here are some suggestions for taking
better pictures that
will allow us to see
the damage:
l Take the pictures in a well-lighted area, preferably
outdoors but not in direct sunlight—direct sunlight is too
bright and the white hull will be overexposed, washing
out the crack completely. It’s best to take the picture on
a sunny day in the shade of a building.
l Don’t use a flash. Just like the sun, a camera flash
reflecting off the glossy white hull will overexpose the
area you’re trying to show.
l Increase the visibility of the crack. Rub some charcoal or graphite (pencil lead) into the crack. Then wipe it
off with a clean cloth. The charcoal will wipe right off the
paint, but stay in the fibers of the cracked area.
l Make sure your pictures are in focus. If you’re using
a Polaroid camera, don’t get too close! Most Polaroid
cameras won’t focus any closer than about three feet or
so. The same holds true for many “point and shoot” autofocus 35mm cameras. Check on the lens bezel or in the
owner’s manual to find the minimum distance for your
camera.
l Remember, if you take a picture that doesn’t clearly
show the damage, don’t send it. Take another one. We
can’t make a decision about warranty authorization if we
can’t see the problem. o
can give your customers
at little or no cost which
promotes good will and
makes you look like a
hero? Technical information and assistance! Here
in Consumer Services, we
get many calls asking for
technical advice or information. Unfortunately,
Consumer Services is not
set up to be a technically
oriented department, and
we cannot connect customers to those departments at KMC (like the
Hot Line) which do have
technical expertise.
What do we do? In most
cases, we refer customers
back to their dealers for help.
Surprisingly, the majority of customers who call
us are looking for rather
simple information, such
as the correct fork oil,
valve timing data, gear ratios, carburetor settings,
year and model of a unit,
maintenance schedules,
etc. All of this information
can be easily found by
checking the appropriate
microfiche, owner’s or
service manual, service
specification handbook, or
model recognition manual.
When you have a customer who needs this type
of information, you look
good when you are able to
provide it without having
to refer the customer elsewhere.
It is also an opportunity,
in many cases, to sell
service or parts, even if
it’s only an owner’s manual.
In cases where more
complex questions are involved, then Consumer
Services will always refer
the customer to an authorized dealer and suggest
that the dealer call the Hot
Line if unable to resolve
the problem alone. If you
have a customer with a
problem, question, or situation that you don’t know
the answer to, why not
take the time to call on
your toll-free number to
our technical staff. This
will not only save your customers money, but time
and ultimately frustration,
too, since we won’t have
to refer them right back to
you for help!
Remember what we always tell the customer:
Our dealers are our technical representatives in the
field. o
Get it while
it’s hot!
This issue marks your final opportunity to participate in the ’92 K-Tech
News Service Contest.
Hard, yeah, but the
prizes have made it all
worthwhile, right?
Contest #3 questions
and answer sheet are in
the middle of this newsletter. Go for it! -Ed.
The Technical Magazine
l
11
R E G I O N A L
N E W S
Training
Schedule
East Region
North Region
Central Region
South Region
West Region
KMC instructors are working now on the 1993 Training Program schedule.
Classes will begin again in
October. All dealers will receive a copy of the winter
class schedule, but don’t
forget to watch this space
in the Fall and Winter issues of K-Tech News.
WEST
What will be
new?
by Patrick Kelly
9950 Jeronimo Road
Irvine, CA 92718
(714) 770-0400
T he 1993 training season
s over, the final classes
having been presented at
the end of May.
Now it’s time for the
whole instructional staff to
sit down and analyze the
degree of success that
was achieved in training
this spring, and look for
ways to improve upon that
in the coming year. We
are always searching for
better ways to provide
dealers with technical information and knowledge.
By the time you read
this we will have already
had our national training
meeting and formulated
some new ideas and directions to take. Last year’s
meeting brought the Service Contest, as well as the
Tune and Service class
and the Precision Measurement class.
What new ideas did we
hatch up for you at this
12 K-Tech News
l
year’s meeting? Well, as I
write this, I don’t know yet,
but you can rest assured
that there will be something new in store.
To find out what it is,
keep your eyes peeled for
the fall training schedule
and the fall issue of KTech News! o
SOUTH & CENTRAL
The busy
summer
by Walter Rainwater
6110 Boat Rock Blvd. S.W.
Atlanta, GA 30378
(404) 349-2000
A ttendance at our training
classes was very good
this season. I always enjoy teaching and sharing
information about
Kawasaki products. The
1993-’94 training season
starts in October: Watch
for the training schedule
and please do sign up for
the classes of your choice.
Part of my summer includes working on the Hot
Line and I will be ‘on line’
during June and August. I
look forward to talking with
you during that time. Be
sure to call if you have
any questions I can help
you with!
I’m also looking forward
to helping out at various
Kawasaki demo rides this
summer; it’s great summer fun. I’ll get a chance
to work with the local dealers and to meet new
Kawasaki customers.
Maybe I will see some of
you there!
If you need help any
other time, you can reach
me at the South Region office. I hope you have as
great a summer as I will! o
NORTH & EAST
Have a good
summer!
by Fred DeHart
201 Circle Drive N., #107
Piscataway, NJ 08854
(201) 469-1221
This issue of K-Tech
News contains the third
and final test in our Service Contest series. To all
the dealership mechanics
who are participating:
good luck! Thanks for entering the contest and I
hope that everyone
learned some new information from the questions.
Our ’93 training season
came to a close at the end
of May, but ’94 classes will
begin in the fall. Be sure
to watch for a new training
schedule which should arrive at your dealership
sometime in October.
In the meantime, I can
be reached at our regional
office if you have any
questions. I will also be
working on the Hot Line
during the months of July
and August.
Have a good summer
season and I look forward
to talking with you as it
goes along! o