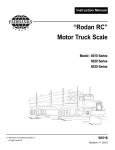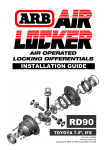
1
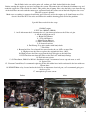
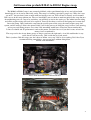
3rd Generation prelude B20A3 to B20A5 Engine swap
The B20A3 to B20A5 swap is not extremely difficult, with a good knowledge of cars and a friend with
knowledge of cars it can be done fairly easily. The swap is a learning experience, people say “Why don’t you
get an Si?” but you don’t learn as much with just buying a new car. You will need a factory service manual.
Don’t try to do the swap without one. They are invaluable; you use them so much not only for the swap but just
for maintaining your car. Just to let you know, you will have to rewire the entire car. The whole interior wiring
and all the engine wiring will need to be replaced. You will also have to add an Si fuel pump and a return fuel
line to the pump. I have broken the swap into the specific parts of the swap, the actual engine swap, fuel
system, and the wiring. I didn’t take picture while I was in the process of doing the swap, because I was moving
at fast pace and taking pictures every time I did something would have slowed me down considerably.
I chose to rebuild and do performance work on the motor, you don’t have to if you don’t want, or have the
money, but I recommend it.
The swap can be doe in any home garage as long as you have the right tools. A car lift would make is way
easier, but it is not necessary. I did it with the on 4 jack stands.
This is just how I did this swap; you don’t have to follow every step I did or do everything I did. Also I just
recommend doing some things; you can get away without doing them.
Before: with the B20A3
After: With the B20A5 and Chikara Header.
1
Engine Removal
In this section I will discuss in a general way, removing the engine. Going into specific details would make this
write up over 10 pages, and I think you can figure out how to remove your engine by following this and with a
helms manual.
Jack the car up and put jack stands under it so that the car is high enough off the ground that you can
comfortable get under it and take stuff out. Make sure you put the jack stands along the frame rail.
• Remove the hood
• Disconnect the battery and remove the tray.
• Drain the Cooling system, you don’t have to drain the oil if you don’t want to, it’s all sealed up inside the
engine.
• Remove:
• The air cleaner box
• All of the vacuum lines going to the engine
• Remove the Vacuum control box
• Cruise control
• Remove all accessories, alternator, power steering, a/c, starter and anything else connected to the motor
• Remove the splash shield and cross member under the car
• Take the exhaust downpipe out.
• Take the tranny bolts from the engine and support the engine with a lift.
• Remove the motor mount bolts, there are 3 motor mounts.
• Make sure nothing is connected to the engine in the engine bay, and make sure nothing will prevent it from
coming out
• Pull the engine out slowly and separate it from the tranny with a prybar.
• Slowly remove the engine
Fuel System
The Si fuel system is completely different than the S fuel system. For the Si fuel system you will need to install
a Fuel pump, And a return fuel line. You will utilize the existing metal lines. The fuel feed line and vapor pipe.
The return fuel line comes off of the Fuel pressure regulator on the Fuel rail, and returns unused fuel to the
tank.
Fuel Pump:
The fuel pump is located under the access cover on the driver’s side. It is a round cover sealed in place by glue.
It would be a good idea to drain the fuel tank by removing the drain plug Remove the cover and you will see
the fuel pump and the screws to remove it. Remove the fuel lines first. One is attached with a banjo bolt, and
the other is secured by a hose clamp. Remove both hoses. The fuel pump is geld in by 8 10 mm bolts. Remove
the bolts, and pull the fuel pump out. To fabricate a return fuel line you will need Metal fuel line to run under
the car. Approximately 10 ft of metal line was used, and 5 feet of rubber hose for the return fuel line. The hose
runs along the frame rail under the car and into the engine bay. I bent the line by hand so it would reach the fuel
pump. At the backside of the metal line I attached rubber hose to it and attached it to the return nipple on the
fuel pump. From under the engine bay, I used the rubber line to attach the line to the Fuel pressure regulator.
Secure all rubber lines with clamps.
Wiring
Here is a picture of the wiring that came out of the car to give you an idea how much is going to come out:
Most of it is the interior wiring.
This is the most time consuming part of the swap. All of the wiring will need to be replaced. This is easiest to
do before you install the engine.
Interior wiring: The interior wiring is located behind the dash and behind the heater box and blower motor.
Following the helm manual in this phase of the swap is crucial.
Remove the gauge cluster, the glove box, the plastic piece that goes around the shifter, the panel that holds the
2
radio, and the heater controls. Next, remove the dash itself. There are 5 bolts bolting it in. one behind the clock,
one in each side of the das and one in each front side of the dash behind a plastic panel. With the dash out, drop
the steering column to give you more room to and more space to get to the wiring. After the steering column id
dropped remove the metal braces on the driver’s side. They are like tubes with flattened ends. With those
removed, remove the heater ducting. Disconnect all connectors. Ex, the brake light switch, the clutch switch,
the fuse block, all the wires going into the little blue junction box on the left side etc. The wiring is held in
place by little clips, remove them if you can, but I just broke them off. Now, remove the heater core. It is bolted
in, inside the car and in the engine bay. Make sure the hoses are disconnected, and pull the box out. Remove the
blower motor next. It is bolted in inside the car. Disconnect all wiring from the junction on the passenger side
of the car. And the wires going to the ECU. . The harness runs under a blue piece of plastic on the passenger
side. You will have to pull up the carpet to access it. The wiring goes up along the passenger side under the rear
seat, and up to a hole where the wire split apart. The fuel pump and fuel gauge sending unit need to be
disconnected and pulled up through the holes. To access the fuel sending unit remove the passenger side access
cover. Disconnect all connectors an pull the harness out. The new harness goes exactly where the old one came
out. There is not much to it, just pull the old wiring out, put the new wiring in and put the dash back together.
Just connect the interior harness to the right and left side harnesses through the junctions on their respective
sides. Make sure you put the main relay in, the car wont run without it.
Engine Bay Wiring:
Remove the front bumper, it will give you access to the wiring the runs along the radiator.
While the engine is out, look for all connectors in the engine bay and disconnect them. Such as wires to temp
sensor in the radiator, headlights, headlight motors, ac pressure switch cruise control…etc. Pretty much if you
see wires, remove them. All wiring will need to be removed and replaced. Most of the wiring is held to the
body with a zip tie clip thing. I just cut the clip with wire cutters to get the wiring out. Unscrew the fuse box
and put it to the side.
Under each fender there is a plastic inner fender held on my plastic Screw clips. Try to remove the clips without
breaking them, but the screw heads will probably break and you will have to break them to get them out.
The old one is on the left, and the new one on the right. If you can’t unscrew them, just break them. They are
easily replaceable and easy to put back in. By removing the inner fenders you have access to the wiring going
into the car. With the wiring disconnected inside the car, pull the wiring out of inside the car through the hole it
is in. The wiring can now be pulled out through the holes in the fender. This is the same for the left and right
side harness. To replace the wiring feed the interior connectors through the hole and the engine connectors
through the fender. Pretty much put the new wiring exactly where the old wiring was.
Once all wiring is in place you are ready for dropping the new motor in
Engine Installation
The engine installation is the exact same as the engine removal. Before you install the engine, wire it with the
engine wiring harness. Put the oil filter on, spark plugs, and wires. The engine harness you have must be the
same year the right side harness. An 89 right side harness and a 91 engine harness will not work. Do not install
any accessories on the engine. Remove the harmonic balancer also, it will make installation easier.
Lift the engine with a lift and place it above the engine bay. Slowly lower the engine into the engine bay. When
it is almost in, you will need to stab the tranny into the engine. This took me about half an hour of fighting with
the tranny and motor. The tranny has to be inserted into the motor. I used prybars and different engine tranny
positions until I finally stabbed it in. At that point in installed a few tranny housing bolts. To keep the tranny
held in place.
Lower the engine and put the bolts in the engine mounts and torque them down. The engine is now installed.
Attach all hoses, the shift cables, and connect all wiring to the right side wiring harness. Now install the
accessories, and other items such as the new vacuum control box.
Do everything opposite from the engine removal. Check to make sure everything is installed and torqued down.
Install the battery and check the interior and lights. Put the key in the on position and check all electrical things
before trying to start it. Check lights, turn signals, head lights, dash lights, brake lights, radio, and anything else
you can think of. Leave the key in the on position and smell the inside of the car for burning wires. Make sure
you don’t smell anything burning; if you do you have something mixed up somewhere.
3
Put all fluids in the car at this point: oil, coolant, p/s fluid, brake fluid for the clutch
Before starting the engine up you need to prime the system. Disconnect the coil from the distributor cap, and
crank the engine for 5-10 seconds five times. This primes the oil pump. Now, take the little screw from the top
of the fuel filter out and crank the motor over again until only fuel comes out of the hole. Replace the screw.
The fuel system is primed.
Make sure everything is connected and looks good. Now try to fire the engine up. It should turn over. If it
doesn’t check the ECU fro codes and follow the trouble shooting guide to find the problem.
Specific Parts needed for the swap
1. B20A5 engine
2. ECU for a B20A5 (OBD 0)
3. An Si Alternator the S alternator has a 3 pin connector whereas the Si has a 4 pin.
4. All the wiring from an Si
a. -Right Side Harness
b. -Left side Harness
c. -Main Engine Harness
d. -Entire interior Harness
5. Si charcoal canister
6. Fuel Pump, Si or after market with banjo bolts
7. Fuel filter
8. Return fuel line, I used metal line routed under the car 10 Ft. or metal line
9. High pressure fuel line to replace the original fuel lines, 10 Ft.
10. High pressure fuel line to go from the fuel inlet pipe to the fuel filter
11. Fuel line that runs from the Filter to the Fuel rail, with banjo fittings
12. Fuel injector resistor
13. Si Distributor, B20A5 or B21A1 distributors work, I recommend a new cap and rotor as well.
14. Igniter Unit
15. Vacuum Control Box, I recommend replacing all the old rubber hose inside and outside the box with new
silicone hose.
16. PGM-FI Main relay, located under the dash. Its an important electrical part, so I recommend going to a
dealer to get it.
17. atmospheric pressure sensor
Before
After
4