1
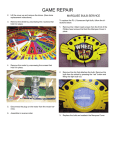
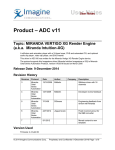
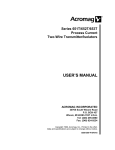
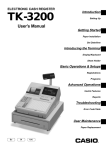
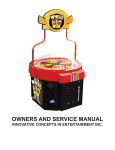
OWNERS AND SERVICE MANUAL
INNOVATIVE CONCEPTS IN ENTERTAINMENT INC.
10123 MAIN STREET, CLARENCE, NY 14031
SERVICE: 1-716-759-0360
FAX: 1-716-759-0884
E-MAIL: [email protected]
WEBSITE: icegame.com
1
TABLE OF CONTENTS
INTRODUCTION…………………………….………....PAGE 3
GAME FEATURES
GAME PLAY
INSTALLATION………………………….……………...PAGE 4
BEFORE YOU BEGIN
INSTALLATION
PROGRAMMING OPTIONS…………………………..PAGE 5 & 6
INTRODUCTION
USING THE PROGRAMMING OPTIONS
MAINTENANCE………………………………………...PAGE 7
QUICK TROUBLESHOOTING………………………..PAGE 8
GAME REPAIR………………………………………....PAGE 9 - 11
OPERATIONAL BACKGROUND
TROUBLESHOOTING PHILOSOPHY
MECHANICAL REPAIR
PARTS LISTINGS……………………………………....PAGE 12
SCHEMATICS…………………………………………..PAGE 13 - 15
WIRING DIAGRAMS……………………………...…...PAGE 16 - 28
WARRANTY INFORMATION………………………....PAGE 29
ICEDOC WS9001
REVISION C
12-01-08
2
INTRODUCTION
GAME FEATURES
GAME PLAY
Thank you for purchasing the new Hammerhead™ game
from I.C.E. This new “WACKY” game utilizes all the
proven technology of it’s predecessor Smack-n-Alien. ICE
has taken out the cost but not the quality, giving the customer a fresh look with full reliability.
The object of the game is to hit as many sharks as possible in the time allowed. (Note: the player must try to hit
the sharks that are in the up position to score points)
The player does not get penalized for missing a shark.
The high score for the day will be displayed for all new
players to try and match.
Game cabinetry is stylish, yet bright. The game has been
designed to be either a back-to-back centerpiece or a wall
unit that will enhance the look of any location. Thick 16
gauge metal panels and marine grade water resistant plywood make the game extremely durable. The boat bow is
made of a special high impact styrene that is easy to
maintain.
The distortion printed marquee is made of .187 PETG.
This is back printed, which will prevent the customer from
damaging the printing. The PETG is more durable than
acrylic and therefore will withstand impact better.
Electronics and sounds are the state of the art in digital
technology. Robust design ensures a long trouble free life
for your game. The game is very flexible with its programming options to allow it to be tailored to most locations
easily.
(NOTE: There is a bonus shark, the shark that pops up
before game play starts. If a player hits that on he will be
awarded one extra point.)
3
INSTALLATION
CAUTION: CHECK THAT THE A.C. VOLTAGE RATING
ON THE BACK OF THE GAME MATCHES THE A.C.
VOLTAGE OF YOUR LOCATION.
BEFORE YOU BEGIN
WARNING: WHEN INSTALLING THIS GAME, A
GROUNDED A.C. RECEPTACLE MUST BE USED.
FAILURE TO DO SO COULD RESULT IN INJURY TO
YOURSELF OR OTHERS. FAILURE TO USE A
GROUNDED RECEPTACLE COULD ALSO CAUSE IMPROPER GAME OPERATION, OR DAMAGE TO THE
ELECTRONICS
THE POWER SUPPLY IS NOT VOLTAGE ADJUSTABLE.
TO OPERATE THE GAME AT VOLTAGES OTHER
THAN THOSE IT WAS DESIGNED FOR, PLEASE CONTACT OUR SERVICE DEPARTMENT FOR VOLTAGE
CONVERSION INFORMATION.
DO NOT DEFEAT OR REMOVE THE GROUNDING
PRONG ON THE POWER CORD FOR THE SAME REASON AS GIVEN ABOVE. USING AN IMPROPERLY
GROUNDED GAME COULD VOID YOUR WARRANTY.
Plug the game into the A.C. outlet and turn on power to
the game. The switch for the game is located on a power
module on the outside rear of the game.
HAVE A QUALIFIED ELECTRICIAN CHECK YOU’RE
A.C. RECEPTACLE TO BE SURE THE GROUND IS
FUNCTIONING PROPERLY.
It is now time to program your game……..
TOOLS NEEDED
The game normally comes fully assembled and ready for
use.
If however, you need to disassemble or reassemble the
marquee to the game for any reason, all that is needed is
a 5/32 security Allen wrench.
INSTALLATION
The game comes ready to play with just a few simple
things to keep in mind.
1. When installing the game, be sure you use a
grounded A.C. outlet. If necessary, have it checked to
be sure the ground is good.
THIS GAME IS DESIGNED TO DISSIPATE STATIC
ELECTRICITY THROUGH THE GROUNDING PLANE
OF THE GAME. IF THE A.C. GROUND DOES NOT
WORK, THE GAME COULD DISCHARGE STATIC
ELECTRICITY THROUGH THE GAME CIRCUITRY,
WHICH COULD CAUSE DAMAGE.
2.
Make sure the game is level after installation. It is
necessary to make sure the game is level so the
game will work properly.
3.
Place the game into its final location and use the adjusting feet to level the game.
4
PROGRAMMING
INTRODUCTION
The Hammerhead™ game is extremely flexible from a programming standpoint. This allows the customer to “fine tune”
the game to his or her exact needs.
This section will describe in detail each of the programming options and how they work.
PLEASE READ THIS SECTION THOROUGHLY BEFORE CALLING OUR SERVICE DEPARTMENT. MOST QUESTIONS REGARDING SET-UP AND OPERATION WILL BE FULLY EXPLAINED HERE.
HOW TO USE THE PROGRAMMING OPTIONS
PROGRAMMING BUTTON – Use this button to enter and exit the programming mode. Press this button once to enter
the mode, and once again to exit the mode.
SELECT BUTTON – Use this button to scroll through and “step” through the various options.
ADVANCE BUTTON – Use this button to “change” the value of a particular option.
TICKET RESET BUTTON - Use this button to “reset” ticket counter.
PROGRAMMING BUTTON
SELECT BUTTON
TICKET RESET BUTTON
ADVANCE BUTTON
5
PROGRAMMING
OPTION
DEFAULT
MIN / MAX
DEFINITION
O
7
00
10
Volume adjustment
1
2
01
09
coins per credit switch 1
2
1
00
09
# of coin 1’s per credit switch 2
3
20
10
99
number of seconds per game
4
2
00
06
difficulty (lower = easier)
5
2
00
09
tickets just for playing
6
5
01
10
hits per tickets
7
25
00
99
ticket cap per game
8
5
00
99
minutes between attract mode
9
3
01
03
attract mode type
10
00
00
01
factory reset
NOTE: After the factory reset has been selected, the programming button must be
pressed twice to exit.
6
MAINTENANCE
TICKET DISPENSERS
GENERAL MAINTENANCE
The biggest problem ticket dispensers have is ticket dust
blocking the optical detectors. It is a good idea to occasionally use compressed air to remove the dust from the
dispensers.
This game has been designed to be as trouble and maintenance free as possible.
With this in mind the only basics are to keep the game
clean. Below are the main areas to take care of with specific directions.
SHARK HEAD
MARQUEE
The sharks should be cleaned with a soapy water solution. Be sure to wring the sponge out before cleaning.
Excess water may drip onto coil bed assembly and cause
permanent damage.
The MARQUEE should be cleaned with a soapy water
solution if covered with water-based dirt such as food
products. After cleaning with soapy water, polish with a
commercial plastic polish or a spray furniture polish.
These have lubricating oils that condition the plastic and
keep it shiny and clear looking. Never use regular glass
cleaners as the ammonia in them actually damages the
plastic and dulls it.
LUBRICATION
Any deep scratches can be reduced or eliminated with a
scratch removing polish and buffing wheel.
We do not recommend the use of any lubrication anywhere on the game.
The only moving parts on the game are the sharks. If you
notice any sticking or binding of the sharks check the following.
CABINET
- Dirt on the solenoid shafts – Remove the solenoid
shafts, clean with isopropyl alcohol. Finish wiping
clean with a good grade of spray polish only.
The cabinet plastic and decals can be cleaned with soapy
water or spray furniture polish. DO NOT use any alcohol
or petroleum based cleaners as they could damage the
plastic or printed parts.
- Wear – If excessive solenoid body wear is noted,
replace the solenoid coil.
COIN MECHANISMS
The coin mechanisms should be cleaned periodically, as
they will accumulate dirt, which will cause the coins to
stick.
Remove the coin mech and clean them in a dish detergent solution and a stiff brush. Dry thoroughly and reinstall.
7
QUICK TROUBLESHOOTING
GAME WILL NOT TAKE OR ADD MONEY CORRECTLY
• Micro switch not working or returning properly. Check and repair or replace as necessary.
• Bad Harnessing or connector. Check w/ohm meter and repair as necessary.
• Game programming set incorrectly. Check programming option and re-program if necessary.
• Bad Main P.C. Board. Check and repair or replace as necessary.
SHARKS WILL NOT POP UP DURING GAME PLAY
• Opto Sensor is not working properly. Test and replace as necessary.
• Reflective foil is not properly in place. Reapply foil correctly.
• Bad harnessing or connector. Check w/ohm meter and repair as necessary.
• Bad Main P.C. Board. Check and repair or replace as necessary.
GAME HAS NO SOUND
• Bad speaker. Check w/ohm meter for 4 or 8-ohm load. If not within this range, replace.
• Volume level set incorrectly. Check volume level in programming, and adjust if necessary.
• Bad Harnessing or connector. Check w/ohm meter and repair as necessary.
• Bad Main P.C. Board. Check and repair or replace as necessary
TICKET DISPENSER DOES NOT WORK OR WORKS IMPROPERLY
• Bad ticket dispenser. Repair or replace as necessary.
• Bad harnessing or connector. Check w/ohm meter and repair as necessary.
• Bad Main P.C. Board. Check and repair or replace as necessary.
• Game out of tickets. Add tickets
• Optical sensor on ticket dispenser dirty. Remove paper fuzz and debris with a soft brush.
NO FLORESCENT LIGHTING
• Bulb burned out. Replace bulb.
• Electronic ballast bad. Replace ballast.
• Harness bad or harness unplugged. Check w/ohm meter and plug in, repair or replace as necessary.
• No A.C. power to the game or Main fuse bad. Check fuse and A.C. power.
TICKETS OR HIGH SCORE DISPLAY Don’t WORK PROPERLY
• Bad Display P.C. Board. Repair or replace Display board
• Bad Main P.C. Board. Repair or replace Main board.
• Bad display harnessing. Repair as necessary.
CAN’T ENTER OR EXIT PROGRAMMING OR OTHER ADJUSTMENT MODES
• Bad programming or adjustment buttons. Replace buttons. Check harnessing.
• Bad Main P.C. Board. Repair or replace Main board.
8
GAME REPAIR
WARNING: ALWAYS REMOVE POWER TO
THE GAME BEFORE ATTEMPTING ANY
SERVICE, UNLESS NEEDED FOR SPECIFIC
TESTING.
FAILURE TO OBSERVE THIS PRECAUTION
COULD RESULT IN SERIOUS INJURY TO
YOURSELF OR OTHERS.
TROUBLESHOOTING
PHILOSOPHY
To find problems with the game, always first check
what should be obvious. See that the game is plugged
in, and that all of the fuses on the game are good. This
includes the fuse that is located INSIDE the power
module.
Next, check to see that all of the connectors are firmly
seated and that none of the wires have been pulled out
of them.
OPERATIONAL
BACKGROUND
When trying to find out if specific components are bad
or not. This will help you to know if you have a problem
with a specific component, or maybe a problem with
either the wiring or the Main P.C. Board.
The HAMMERHEAD™ game has been manufactured
with modular design in mind. Almost everything in the
game can be EASILY removed for servicing. This
makes it much easier for the repairman as he / she can
work in a quieter less distracting environment away
from the Game Room floor. The game relies on 1 coil
bed assembly which can be remove from the game
very easily.
Use extreme caution when using probes or voltmeters
if the game is powered up. If doing continuity checks, it
is important to disconnect the harnessing at both ends,
as attached they may yield erroneous results.
Coin and low ticket sensing are done with conventional
micro switches. In all areas of critical importance, optical sensors were developed specifically, and optimized
for their particular application.
If a P.C. Board is suspected as the cause of a problem,
check to see that all of the components on the board
are firmly attached. Pay special attention to any socketed devices.
All P.C. Boards are made of premium quality board
material and use time proven components to assure
you of the most reliable designs possible.
If light bulbs are suspected, swap them with a bulb that
is known to work to narrow the problem down to either
a bulb or P.C. Board.
We have put forth our best efforts and tested this game
extensively to assure the best possible performance
under the widest variety of operating conditions. We
are ALWAYS however interested in our customers input for product improvement. If you have any questions
or comments please feel free to contact our service
department.
I.C.E. SERVICE DEPARTMENT
716-759-0360
NORMAL BUSINESS HOURS ARE:
MONDAY – FRIDAY, 9:00 AM TO 6:00 PM EST
9
GAME REPAIR
COIL BED PARTS REPLACEMENT
REPLACEMENT & REPAIR
Service the coil bed as follows:
COIL BED SERVICING
1. Remove all the shark heads from the coil bed. To
remove sharks, turn the coil bed over so that the
coil bed is resting on the shark heads. Remove
the Allen head screw from the shaft. Cut the wire
tie and remove the locking pin. Pull the shark
heads through the coil bed.
To remove the coil bed:
1. Remove the 4 bolts that hold the boat bow on to
the cabinet. The bolts are located on the underside of the playfield, on the left & right sides of the
game.
REMOVE
SCREW
CUT WIRE TIE & REMOVE PIN
2. Unplug the Sensor PCB Assembly. Remove the
two Nylok nuts holding the coil cap.
2. Remove the 6 bolts holding the coil bed in position as shown in the photo below.
UNPLUG
REMOVE NUTS
4. Disconnect the wires to the coil & remove.
3. Unplug the multi pin connector by twisting off.
5. Assemble in reverse order.
10
GAME REPAIR
3. Using a Phillips screwdriver, remove the four
screws that hold the board in place.
MARQUEE BULB / DISPLAY
BOARD SERVICE
To replace a light bulb:
1. Remove the square drive screws on the rear of
the marquee, that attach the lamp mounting panels. Start with the side that looks like the light is
out.
4. Repeat the previous steps to remove the second
display.
IF YOU HAVE ANY QUESTIONS OR
COMMENTS, PLEASE CONTACT OUR
SERVICE DEPARTMENT AT:
716-759-0360
MON. THRU FRI. 8AM-5PM EST
Display Board follow the directions below:
1. CAUTION: Be sure that the power has been disconnected before attempting to unplug the Display Boards.
2. Remove the security Allen bolts around the perimeter of the marquee.
11
PARTS LISTING
Parts denoted with * indicate available as part of
a specially discounted spares kit.
ELECTRONIC / ELECTRICAL
WS2034X
Main PCB
WS2032X
Display Boards
2295
Fuse, MDQ6 (6 Amp Slo Blo)
2315Fuse, MDQ3 (3 Amp Slo Blo)
8212Flashing LED (Low Ticket)
MZ8284X
Ballast Workhorse 6
WA3001X
Coil
WS2002X
Transformer
WS2007X
Power mod
WS2039X
Shark opto
8312
Light Bulb
WSlightkit
Light + sensor kit
WSsparekit
Spare parts kit
MECHANICAL PARTS
211
BW250X
FP1004
HR1019
Ws1022
1026
AR2007
BW2017
BW2018
2027
CC2027
5101X
BW8284X
8312*
HH5005
WA4010
WS4011B
WS2011BX
WS4011G
WS2011GX
WS4011O
WS2011OX
WS4011PU
WS2011PUX
WS4011PI
WS2011PIX
WS4011Y
WS2011Y
175
1026
2289
CG2027
2364
WA1054
WS7027X
WS3004
WS8444X
WS2011X
WS9001
WS2011SX
WS3003X
WA3006
WSsharkkit
Low Ticket Micro Switch
PLL Bulb Socket Assembly
Leg Leveler Mounting Bracket
Leveler Foot
Ticket Bin Entropy Style
Bracket, Low Ticket Switch Mounting
Speaker, 6” x 9”
PLL Bulb Retaining Clip
PLL Bulb Support
Fan, DC 12 Volt
Power Cord, 20 ft.
Mech Holder Assembly
Workhorse 6 Ballast, ( WH6-120-L)
Bulb, PL-L 40W/41/RS/IS Fluorescent
Ticket Dispenser
Mallet
Shark head only Blue
Shark head w/base Blue
Shark head only Green
Shark head w/base Green
Shark head only Orange
Shark head w/base Orange
Shark head only Purple
Shark head w/base Purple
Shark head only Pink
Shark head w/base Pink
Shark head only Yellow
Shark head w/base Yellow
Immonex Mech.
Low Ticket Switch
Reset Button
Power Cord 9’
Coil Bed Fan
Limiting Pin
Marquee Vacuum Form
Boat Cleat
Jewel Light Assembly
Base Assembly
Service Manual
Full assembly of shark heads w/base
Playfield assembly
Shaft Cap
Shark + Mallet kit
DECALS AND GRAPHICS
WS7003
WS7005
WS7112
WS7110
WS7027
WS7006
12
BOAT DECK DECAL
FRONT DECAL
RIGHT SIDE DECAL
LEFT SIDE DECAL
MARQUEE (BACK DROP)
ICE LOGO
13
14
15
16
A
B
C
D
4
25 VAC 50/60~
18 AWG
100 VAC 50/60~
18 AWG
100 VAC 50/60~
18 AWG
5
6
3
4
BN/WT
BN
WT/BK
WT
BK/WT
BK
E
1
2
POWER MODULE BACK
#HH2050x - ASY POWER MODULE
3 MDQ
4
YL
YL
OR
RD
OR
GY
RD
GY
(6)
3
.250 FLAG
#648
(4)
12.4 VAC @ 4.0A
18 AWG
16 VAC @ 3.0A
18 AWG
22 VAC @ 6.0A
16 AWG
(3)
.250 FLAG
#648
115 VAC @ 1.25A
18 AWG
.250 FLAG
#648
.250 FLAG
#648
.250 FLAG
#648
.250 FLAG
#648
3
BROWN/WHITE
BROWN
WHITE/BLACK
BLACK/WHITE
WHITE
BLACK
#PC20217
To Transformer
(5)
(2)
(1)
18 "
DATE
2
DESCRIPTION
TITLE
14 "
ORANGE
YELLOW
ORANGE
RED
RED
YELLOW
7/9/01
1
2
3
4"
HAMMERHEAD
GREEN/YELLOW
GREEN/YELLOW
REVISED
3/14/02
1
2
3
4
5
6
16 VAC
12.4 VAC
16 VAC
22 VAC
22 VAC
12.4 VAC
To Main Board
115 VAC
EARTH GROUND
115VAC
To Marquee
Harness
#PC20217
To Transformer
1
PAGE
DRAWN BY
FILENAME
#639
.250
1 OF 13
MMARTIN
WS.VSD
To Power Module
6 PIN PLUG #2173
20-14 AWG MALE #8260
12 "
#WS2002X - ASY TRANSFORMER
#WS2004PX - POWER MODULE
GROUND HARNESS
#PC20217
GRAY
GREEN/YELLOW
GRAY
15 "
12 "
GREEN/YELLOW
1
3 PIN CAP #2288
PIN 2: FEMALE #2102
PINS 1 & 3: 20-14 AWG FEMALE #8259
#WS2004PX - POWER MODULE
GROUND
#WS2002
TRANSFORMER
(2-51-01107)
#WS2002XTRANSFORMER ASY
2
A
B
C
D
17
A
B
C
D
17 "
4
#8068
4
#PC20217
3"
22 "
3
3
29 "
DATE
2
DESCRIPTION
TITLE
GREEN/YELLOW
2
#8068
7/9/01
REVISED
3/14/02
#WS2004X - CABINET GROUND
HAMMERHEAD
3"
1
1
PAGE
DRAWN BY
FILENAME
#PC20217
#8068
#8068
2 OF 13
MMARTIN
WS.VSD
A
B
C
D
18
A
B
4
To Display Board
10
9
8
7
6
5
4
3
2
1
3
10 PIN AMP HOUSING #2291
CONTACT PIN #2201
PINS 1, 7, AND 10: KEY PLUG #2239
KEY
BLACK
BLACK
KEY
brown/red
brown/green
brown/white
ORANGE
ORANGE
KEY
9"
KEY
BLACK
BLACK
KEY
brown/red
brown/green
brown/white
ORANGE
ORANGE
KEY
P1
DATE
2
DESCRIPTION
TITLE
KEY
Ground
Ground
KEY
D CLK
D DATA
D LATCH
12 VDC
12 VDC
KEY
7/9/01
REVISED
3/14/02
1
PAGE
DRAWN BY
3 OF 13
MMARTIN
WS.VSD
PER GAME
FILENAME
QTY 1
To Display Board
HAMMERHEAD
#WS2051AX - DISPLAY
INTERCONNECT HARNESS
10 PIN AMP HOUSING #2291
CONTACT PIN #2201
PINS 1, 7, AND 10: KEY PLUG #2239
10
9
8
7
6
5
4
3
2
1
A
B
C
KEY
Ground
Ground
KEY
D CLK
D DATA
D LATCH
12 VDC
12 VDC
KEY
P2
1
C
2
D
3
D
4
19
A
B
C
D
Ground
Ground
KEY
D CLK
D DATA
D LATCH
12 VDC
12 VDC
To Main Board
4
4
1
2
3
4
5
6
7
8
P9
8 PIN AMP HOUSING #2405
CONTACT PIN #2201
PIN 3: KEY PLUG #2239
BLACK
BLACK
KEY
brown/red
brown/green
brown/white
ORANGE
ORANGE
3
3
61 "
DATE
2
DESCRIPTION
TITLE
2
10
9
8
7
6
5
4
3
2
1
P1
HAMMERHEAD
REVISED
3/14/02
#WS2051X - DISPLAY HARNESS
7/9/01
KEY
Ground
Ground
KEY
D CLK
D DATA
D LATCH
12 VDC
12 VDC
KEY
1
PAGE
DRAWN BY
4 OF 13
MMARTIN
WS.VSD
PER GAME
To Display Board
FILENAME
QTY 1
10 PIN AMP HOUSING #2291
CONTACT PIN #2201
PINS 1, 7, AND 10: KEY PLUG #2239
KEY
BLACK
BLACK
KEY
brown/red
brown/green
brown/white
ORANGE
ORANGE
KEY
1
A
B
C
D
M
M
M
20
A
M
12 VDC
12 VDC
orange
orange
white/brown
white/red
white/orange
white/yellow
white/green
white/blue
4
9 PIN PLUG #2292
SPLIT PIN #2100
1
2
3
4
5
6
7
8
9
M
1
2
3
4
5
6
M
Jewel
Jewel
Jewel
Jewel
Jewel
Jewel
Jewel 3
M
To Coil Bed Assembly
Jewel 2
M
white/blue
3
#651
.187
15 "
white/brown
M
M
white/green
15 "
6"
#651
.187
24 "
17 "
#651
.187
M
white/red
#651
.187
Jewel A
C
D
6"
DATE
2
DESCRIPTION
21 "
#651
.187
TITLE
#651
.187
#2909 #2909
.187
.187
B
M
17 "
6"
#651
.187
#2909
.187
A
Jewel B
25 "
#651
.187
#651
.187
6"
#651
.187
7/9/01
REVISED
3/14/02
#651
.187
1
PAGE
DRAWN BY
#651
.187
#2909
.187
5 OF 13
MMARTIN
WS.VSD
35-1/2 "
5"
#651
.187
#2909 #2909
.187
.187
1
FILENAME
33 "
#651
.187
#2909 #2909
.187
.187
HAMMERHEAD
29-1/2 "
6"
#651
.187
#2909 #2909
.187
.187
#WS2053X - JEWEL LIGHT HARNESS
6"
#651
.187
#2909 #2909
.187
.187
M
M
white/orange
#651
.187
#2909
.187
1
Jewel C
M
M
19 "
6"
#651
.187
#2909 #2909
.187
.187
2
M
white/yellow
#651
.187
#2909 #2909
.187
.187
3
F
E
Jewel D
M
21 "
6"
#651
.187
#2909 #2909
.187
.187
4
TOP VIEW
M
23 "
5"
#651
.187
#2909 #2909
.187
.187
5
6
Jewel E
M
24 "
#651
.187
#651
.187
#651
.187
#2909 #2909
.187
.187
#2909
.187
Jewel 6
2
M
B
C
Jewel 5
* WS8444X - ASY (JEWEL LIGHT)
Jewel 4
D
3
Jewel 1
4
Jewel F
M
M
M
A
B
C
D
21
A
B
4
AC L
EARTH GND
AC N
To Transformer
1
2
3
BLACK
GREEN
WHITE
59 "
TITLE
3 PIN CAP #2288
FEMALE #2102
BLACK
GREEN
WHITE
3 PIN PLUG #2206
SOLID PIN #2100S
3
# 8173 - 3 COND. SVT
1
2
3
DATE
2
DESCRIPTION
7/9/01
REVISED
3/14/02
#WS2056X - MARQUEE HARNESS
HAMMERHEAD
AC L
EARTH GND
AC N
1
PAGE
DRAWN BY
FILENAME
6 OF 13
MMARTIN
WS.VSD
To Ballast Assembly
A
B
C
1
C
2
D
3
D
4
22
A
B
C
D
4
12 VDC
Lockout Coil
Ground
Coin In 1
Coin In 2
Ground
To Mainboard
P12
4
1
2
3
4
5
6
P12
6 PIN AMP HOUSING #2944
CONTACT PIN #2201
orange * 2
gray/yellow
black
gray/brown
gray/red
black
3
3
DATE
2
DESCRIPTION
TITLE
2
7/9/01
#648
.250
#648
.250
#648
.250
#648
.250
#651
.187
#651
.187
HAMMERHEAD
black
gray/red
black
gray/brown
38-1/2 "
REVISED
3/14/02
PART OF #WS2057X - CABINET
HARNESS
40-1/2 "
orange
gray/yellow
6"
6"
#651
.187
gray/yellow
6"
#651
.187
#650
.110
orange
38-1/2 "
black
6 " orange
#650
.110
#650
.110
black
6"
#650
.110
41 "
orange
1
PAGE
DRAWN BY
FILENAME
7 OF 13
MMARTIN
WS.VSD
To Coin Switch 2
To Coin Switch 1
To Lockout
Coils
To Lockout
Coils
To Coin Lamps
To Coin Lamps
1
A
B
C
D
23
A
B
C
D
4
12 VDC
Ticket Sense
Ticket Run
Ground
To Mainboard
P8
4
1
2
3
4
P8
4 PIN AMP HOUSING #2429
CONTACT PIN #2201
ORANGE
violet/blue
violet/white
BLACK
3
3
39 "
23 "
DATE
T Sense
P GND
To Ticket
T Run
Dispenser
+ 12VDC
2
+ 12VDC
T Out
#651
.187
7/9/01
HAMMERHEAD
To Low Ticket
Switch
REVISED
1
3/14/02
1
PAGE
DRAWN BY
FILENAME
RED FLASHING LED #8212
WITH LED HOLDER #1017
PART OF #WS2057X - CABINET
HARNESS
black
#651
.187
2 PIN MOLEX HOUSING #2089
MINI KK PIN #2074
1
2
violet/green
DESCRIPTION
TITLE
28 "
orange
violet/green
9"
1
2
3
4
4 PIN MLX CAP #2158
MLX FEMALE PIN #2176
PINS 2 & 4: 20-14 AWG MLX FEMALE PIN #8177
violet/blue
BLACK + black
violet/white
ORANGE + orange
2
8 OF 13
MMARTIN
WS.VSD
A
B
C
D
24
A
B
C
D
4
4
Left Speaker Left Speaker +
Right Speaker Right Speaker +
To Mainboard
P1
1
2
3
4
5
P1
5 PIN AMP HOUSING #2419
CONTACT PIN #2201
brown/gray
red/gray
brown/white
red/white
3
3
DATE
2
DESCRIPTION
TITLE
2
#653T
.250
red/gray
7/9/01
REVISED
PART OF #WS2057 - CABINET
HARNESS
3/14/02
1
PAGE
DRAWN BY
FILENAME
9 OF 13
MMARTIN
WS.VSD
To Right Speaker
To Left Speaker
HAMMERHEAD
#653T
.250
29 "
#653T
.250
red/white
brown/gray
#653T
.250
brown/white
45 "
1
A
B
C
D
25
A
B
C
D
4
T CNT
12 VDC
C CNT
To Mainboard
P13
4
1
2
3
P13
3 PIN AMP HOUSING #2945
CONTACT PIN #2201
gray/blue
orange
gray/green
3
3
23 "
gray/blue
orange
gray/green
DATE
2
DESCRIPTION
TITLE
#2558
#2815
#2558
2
0000000000
COIN
0000000000
HAMMERHEAD
7/9/01
REVISED
3/14/02
1
PAGE
DRAWN BY
FILENAME
#PC20224
12v COUNTER
#PC20224
12v COUNTER
PART OF #WS2057X - CABINET
HARNESS
red
black
black
red
TICKET
1
10 OF 13
MMARTIN
WS.VSD
A
B
C
D
26
A
B
C
D
4
4
#2714 5 PIN IDC
violet/brown
violet/red
violet/orange
violet/yellow
black
#2909
M
.187
3
* Solder wires to button
black
black
2"
#2289X - BUTTON ASY
1
2
3
4
5
P7
#2909
M
.187
Ticket Reset
Program
Select
Advance
Ground
To Mainboard
P7
3
DATE
2
4"
4"
4"
#2909
M
.187
#651
.187
7/9/01
SEL
HAMMERHEAD
PRG
#2909
M
.187
#2909
M
.187
#2909
M
.187
#2909
M
.187
#651
.187
#651
.187
#651
.187
#651
.187
#2909
M
.187
#2909
M
.187
#651
.187
#651
.187
#2909
M
.187
#651
.187
REVISED
3/14/02
PART OF #WS2057X - CABINET
HARNESS
violet/brown
violet/red
violet/orange
violet/yellow
black
DESCRIPTION
TITLE
16-1/2 "
18 "
18-1/2 "
16-1/2 "
20 "
2
PRG
SEL
ADV
RESET
1
PAGE
DRAWN BY
FILENAME
11 OF 13
MMARTIN
WS.VSD
ADV RESET
1
A
B
C
D
27
A
B
C
D
2
1
4
3
5
6
Ground
Ground
Ground
Ground
Ground
Shark
Shark
Shark
Shark
Shark
Shark
4
4
1
2
3
4
5
P4
1
2
3
4
5
6
P2
52
63 PIN CIRCULAR PLUG #8111
FEMALE PIN #8112
CLAMP #8110
59
45
53
44
36
37
28
27
11
19
63
4
20
60
1
41
24
3
62
58
51
43
26
18
12
5
5 PIN AMP HOUSING #2419
CONTACT PIN #2201
black
black
black
65 "
6 PIN AMP HOUSING #2944
CONTACT PIN #2201
TAN/BLACK
RED/BLACK
ORANGE/BLACK
YELLOW/BLACK
GREEN/BLACK
BLUE/BLACK
44 "
3
3
VDC
VDC
VDC
VDC
VDC
VDC
VDC
VDC
VDC
DATE
2
DESCRIPTION
TITLE
1
2
3
4
5
6
7
8
9
10
11
12
P6
1
2
3
4
5
6
7
8
9
P5
1
2
3
4
5
6
7
8
9
P3
22
39
4
30
14
61
54
46
38
21
13
25
42
50
57
56
17
63
59
52
44
27
19
HAMMERHEAD
12 PIN AMP HOUSING #8428
CONTACT PIN #2201
orange
orange
orange
ORANGE/WHITE
ORANGE/WHITE
white/brown
white/red
white/orange
white/yellow
white/green
white/blue
45 "
9 PIN AMP HOUSING #8136
CONTACT PIN #2201
PIN 4: KEY PLUG #2239
yellow/blue
KEY
yellow/green
yellow/white
yellow/orange
yellow/red
yellow/brown
57 "
9 PIN AMP HOUSING #8136
CONTACT PIN #2201
BROWN
RED
ORANGE
YELLOW
GREEN
BLUE
42 "
7/9/01
REVISED
3/14/02
#WS2059X - MAIN TO COIL BED
HARNESS
12 VDC
12 VDC
12VDC
12 VDC
12 VDC
Jewel 1
Jewel 2
Jewel 3
Jewel 4
Jewel 5
Jewel 6
OPTO SENSE 6
KEY
OPTO SENSE 5
OPTO SENSE 4
OPTO SENSE 3
OPTO SENSE 2
OPTO SENSE 1
30
30
30
30
30
30
30
30
30
2
1
PAGE
DRAWN BY
FILENAME
1
12 OF 13
MMARTIN
WS.VSD
A
B
C
D
28
A
B
C
D
3
4
22
39
61
54
46
38
21
13
50
52
51
57
59
58
56
41
30
63
62
17 "
orange
orange
black
red
4
white/brown
white/red
white/orange
white/yellow
white/green
white/blue
yellow/orange
ORANGE
ORANGE/BLACK
21 "
yellow/red
RED
RED/BLACK
15 "
yellow/brown
black
ORANGE/WHITE
BROWN
TAN/BLACK
4
#653T
.250
#2909
M
.187
M
#236412 VOLT DC FAN
28-1/2 "
22-1/2 "
ORANGE
1
A SHARK OPTO
1
2
3
4
5
6
7
8
9
1
2
3
12 VDC
12 VDC
1
2
3
4
5
6
To Jewel Lights
C SHARK OPTO
B SHARK OPTO
Jewel
Jewel
Jewel
Jewel
Jewel
Jewel
3
2
17
19
18
25
27
26
42
24
14
44
43
3
* Put grommets (WA4011) on
flag FASTON wires before
FASTONS are put on.
9 PIN CAP #2551
FEMALE PIN #2102
orange
orange
white/brown
white/red
white/orange
white/yellow
white/green
white/blue
3 PIN PLUG #2206
SOLID PIN #2100S
yellow/orange
black
orange/white
#653T
.250
C SHARK SOL
3 PIN PLUG #2206
SOLID PIN #2100S
1
2
3
B SHARK SOL
yellow/red
black *2
orange/white *2
#653T
.250
#2909
.187
3 PIN PLUG #2206
SOLID PIN #2100S
PIN 3: 20-24 AWG MALE PIN #8260
ORANGE/BLACK M #2909
.187
18 "
RED
RED/BLACK
18 "
1
2
3
A SHARK SOL
yellow/brown
black *2
ORANGE/WHITE +orange/white
12-1/2 "
BROWN
TAN/BLACK
11 "
3
22 "
59
44
52
36
53
37
45
28
20
5
27
60
1
12
63
4
19
11
BLUE
BLUE/BLACK
GREEN
GREEN/BLACK
18-1/2 "
18 "
#653T
.250
#2909
.187
M
M
DATE
2
DESCRIPTION
TITLE
#651
.187
WHITE
WHITE/BLACK
22 AWG
2400 TURNS
SPN
F SHARK SW
6
E SHARK SW
5
SHARK COIL
6 PER GAME
1N4004
HAMMERHEAD
REVISED
D SHARK SW
4
3/14/02
1
PAGE
DRAWN BY
FILENAME
13 OF 13
MMARTIN
WS.VSD
#WA 3001X - ASY (COIL)
#654
M
.250
3 PIN PLUG #2206
SOLID PIN #2100S
1
2
3
F SHARK SOL
yellow/blue
black
orange/white
#653T
.250
#2909
.187
3 PIN PLUG #2206
SOLID PIN #2100S
1
2
3
E SHARK SOL
yellow/green
black *2
orange/white
#653T
.250
#2909
.187
#WS2060X - COIL BED HARNESS
7/9/01
1
2
3
D SHARK SOL
1
3 PIN PLUG #2206
SOLID PIN #2100S
PIN 3: 20-24 AWG MALE PIN #8260
63 PIN CIR.RECEP.PNL. MT. #8113
MALE PIN #8114
23-1/2 "
yellow/blue
BLUE
BLUE/BLACK
16 "
yellow/green
GREEN
GREEN/BLACK
15 "
M
yellow/white
black *2
ORANGE/WHITE +orange/white
YELLOW
YELLOW/BLACK
"
8"
12
yellow/white
black
ORANGE/WHITE
YELLOW
YELLOW/BLACK
2
A
B
C
D
WARRANTY
I.C.E warrants all components in the HAMMERHEAD™ game to be free of defects
in materials and workmanship for a period of 90 days from the date of purchase.
Furthermore, all MAIN P.C. BOARDS are warranted for 180 days.
This warranty does not cover items damaged due to normal wear and tear, subjected to abuse, improperly assembled by the end user, modified, repaired, or operated in a fashion other than that described in the service manual.
If your HAMMERHEAD™ game fails to conform to the above-mentioned warranty,
I.C.E.'s sole responsibility shall be at its discretion to repair or replace any defective
component with a new or remanufactured component of equal to or greater O.E.M.
specification.
I.C.E. will assume no liability whatsoever, for costs associated with labor to replace
defective parts, or travel time associated therein.
I.C.E.'s obligation will be to ship free of charge, replacement parts by domestic
U.P.S. Ground, U.S. mail, or other comparable shipping means. Any express mail
or overnight shipping expense is at the cost of the purchaser.
Products will be covered under warranty only when:
·
The serial number of the game with the defective parts is given.
·
The serial number of the defective part, if applicable, is given.
·
Defective parts are returned to I.C.E., shipping pre-paid, in a timely fashion, if
requested by I.C.E.
·
A copy of the sales receipt is available as proof of purchase upon request of
I.C.E.
I.C.E. distributors are independent, privately owned and operated. In their judgment, they may sell parts or accessories other than those manufactured by I.C.E.
We cannot be responsible for the quality, suitability, or safety of any non-I.C.E.
part, or any modification, including labor, which is performed by such a distributor.
29
WARRANTY
ICE Inc warrants that all of its products will be free from defects in material and workmanship.
When placing a warranty request, please be prepared to provide the following information:
·
·
·
Serial Number of Game or Bill of Sale
Machine Type
A Detailed Description of the Equipment Fault Symptoms
ICE product, including Cromptons, Sam’s Billiards, Uniana and Bell Fruit is warranted as follows:
·
·
·
·
·
·
180 days on the Main PCB and Computers
180 days on Motors
90 days on all other components (i.e. DBV’s, Ticket Dispensers, etc)
30 days on repaired items
3 years on all Crane Harnessing
9 Months on Printers
ICE Inc shall not be obligated to furnish a warranty request under the following conditions:
·
·
·
Equipment has been subjected to unwarranted stress through abuse or neglect
Equipment has been damaged as a result of arbitrary repair/modification attempts
Equipment that has failed through normal wear and tear
ICE Inc will assume no liability whatsoever for costs associated with labor to replace defective parts or
travel time associated therein.
All defective warranty covered components will be replaced with new or factory refurbished components
equal to OEM specifications. ICE Inc will cover all domestic UPS ground, or comparable shipping means,
freight costs during the warranty period. Expedited shipments are available for an additional charge.
Defective parts are returned to ICE Inc, at the customer’s expense, in a timely fashion.
ICE distributors are independent, privately owned and operated. In their judgment, they may sell parts
and/or accessories other than those manufactured by ICE Inc. We cannot be responsible for the quality,
suitability or safety of any non-ICE part, modification (including labor) that is performed by such a
distributor.
I.C.E. Parts/Service Dept.
Innovative Concepts in Entertainment
10123 Main St.
Clarence, NY 14031
Phone #: (716) - 759 – 0360
Fax #: (716) – 759 – 0884
30