1
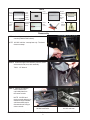
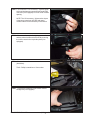
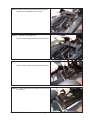
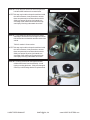
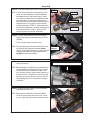
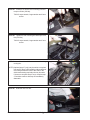
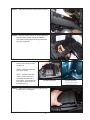
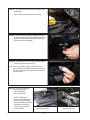
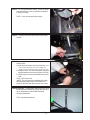
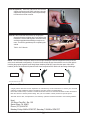
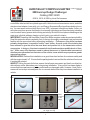
HURST BILLET COMP/PLUS SHIFTER
2009 and up Dodge Challenger
Catalog #391 6020
FORM 159 6020 8/14
K6862291
©2014, 2010, & 2009 by Hurst Performance
Thank you for purchasing the Hurst Billet Comp/Plus Shifter Shifter. This shifter is constructed of
a solid billet steel and chrome plated upper stick, billet aluminum transmission carrier, and billet
stainless steel adapter, lower stick, pin, and Energy Suspension® polyurethane bushing housing. You can expect reduced shift throw (over 30%), increased strength and better, firmer, yet
smoother and more precise feel thanks to extremely tight design and manufacturing tolerance
over the stock factory pieces while utilizing an industry-first teflon lined spherical bearing as the
main pivot; all while adding a classic or stock look to your vehicle’s interior.
IMPORTANT! Installing the Hurst Billet Comp/Plus Shifter requires moderate mechanical ability.
Read this instruction sheet completely first, so that you thoroughly understand it and can become
familiar with the procedure before attempting installation.. Furthermore, this shifter has been
primarily designed as a “competition” and/or “race” shifter. As such, much of the isolation has
been reduced to give the driver the most direct and positive link to the transmission without
compromise. In doing so, this does increase both tactile and sometimes audible levels of vibration. While every effort has been made to reduce the amount of objectionable transmission/
driveline noise transmitted into the interior of the vehicle, some vehicles may experience greater
amounts than others.
WORK SAFELY! Perform this installation on a good clean level surface for maximum safety and
with the engine turned “off”. Ensure that the parking brake is set and that the vehicle will not move
if accidentally started.
INSPECT! Using the parts list below, ensure that all parts are present and free from objectionable defects and/or blemishes prior to beginning installation. Every effort has been made to
ensure that these parts arrive to you in perfect and non-damaged order. However, Hurst Performance will not accept returned parts due to cosmetic defect after they have been installed in a
vehicle.
PARTS
Knob
Nut
Stick
Shifter
Screws(2)
Washers(2)
Boot
Support
& Tie
Wrap
*NOTE: Washers are designed
for single use only.
HURST PERFORMANCE
(707)544-4761
1
www.HURST-SHIFTERS.com
TOOLS
Wrench
1/2"&9/16”
Hex
Wrench
7/32”
Ratchet
& Torque
Wrench
7 mm,
8 mm,
10mm,
13mm
Socket
Long
Extension
Phillip’s
Screwdriver
Flat Blade
Screwdriver
Floor
Jack
Jack
Stands
(Optional)
(Optional)
Disassembly
STEP 1. Carefully unsnap the boot bezel from the center
console (2009-2014 MY shown).
NOTE: 2015MY vehicles - unsnap boot only. The bezel
does not unsnap.
STEP 2. Unbolt the upper stick assembly from the shifter
and remove knob, boot, stick assembly.
TOOL: 1/2” Wrench
STEP 3. Carefully unsnap the
center console trim/
cup-holder plate from
the center console.
NOTE: 2015MY and
newer console design (1) is
different than pre-2015MY
vehicles and will require
disconnection of wiring to
center controls.
2014MY and Earlier
HURST PERFORMANCE
SANTA ROSA, CA
2
2015MY and Later
www.HURST-SHIFTERS.com
STEP 4. Disconnect the 12V accessory / cigarette lighter
socket wiring harness connection and small USB
connector (if so equipped) in front of center console
opening.
NOTE: The 12V accessory / lighter socket is part
of the center console on 2015MY and newer
models and will not be necessary to disconnect.
STEP 5. Disconnect the cup-holder lighting connection
and any other wire harness before finally removing
the center console trim/cup-holder plate (if so
equipped).
STEP 6. Remove the two front center console screws
(both sides).
TOOL: Phillip’s screwdriver or 7mm socket
STEP 7. Remove the rubber tray in the center console
storage box (if so equipped).
HURST PERFORMANCE
(707)544-4761
3
www.HURST-SHIFTERS.com
STEP 8. Remove the screws in the
bottom of the center console
storage box.
TOOLS: Ratchet, long extension, 8mm socket
NOTE: 2015MY and newer
center console screws are
removed from the side of the
console. First remove the cover
(1); then the bolts (2) with a
10mm socket.
2014MY and Earlier
2015MY and Later
(as viewed from back seat with front
seats at full forward position)
STEP 9. Raise the center console to access and disconnect the center console storage box lighting
connection and any additional wiring connection
clips (if so equipped).
STEP 10. Slide reward or remove the center console to
gain access to the shifter.
STEP 11. Remove rear A/C duct by lifting at rear to
disengage push pin then pulling rear ward.
HURST PERFORMANCE
SANTA ROSA, CA
4
www.HURST-SHIFTERS.com
STEP 12. Remove the wiring routing ties from the rubber
shift boot cover and fold cover out of way.
STEP 13. Unscrew rear mounting nut.
TOOLS: ratchet, long extension and 13mm socket
STEP 14. Unscrew six tunnel cover mounting nuts.
TOOLS: ratchet, long extension and 10mm socket
STEP 15. Detach shifter boot from metal tunnel cover and
remove cover.
HURST PERFORMANCE
(707)544-4761
5
www.HURST-SHIFTERS.com
STEP 16. Unclip and pull out the two front lock pins that
hold the shifter bracket to the transmission.
*Photo taken from underneath vehicle
NOTE: This step may be able to be performed from inside
the vehicle however it may be easier to access
these components from underneath the vehicle.
Safely use proper lift points, jack stands, etc.
according to the vehicle service manual to help
avoid injury if working underneath the vehicle.
STEP 17. From inside the vehicle, lift up on the shifter
assembly to access the lower change rod connection bolt and remove both bolt and then shifter from
vehicle.
TOOLS: ratchet & 10mm socket
NOTE: This step may be able to be performed from inside
the vehicle however it may be easier to access
these components from underneath the vehicle.
Safely use proper lift points, jack stands, etc.
according to the vehicle service manual to help
avoid injury if working underneath the vehicle.
STEP 18. Carefully remove both the upper and lower
rubber shifter boots from the assembly. Avoid
ripping or tearing the boots. If they are damaged,
contact your local Dodge dealer for replacements.
HURST PERFORMANCE
SANTA ROSA, CA
6
www.HURST-SHIFTERS.com
Assembly
STEP 19. Install the rubber boots onto the Hurst Shifter.
boot flat
groove #2
NOTE: A small amount of grease on the openings of the
boots can ease installation. Position upper boot
flat towards the rear of the shifter/vehicle. Make
sure upper boot seals fit into Hurst Shifter bracket
grooves #1 & #2. The two front bushings in the
front arms of the Hurst Shifter have been purposely
designed to have a very tight to snug fit with the
lock pins removed in STEP 16. Ensure that these
pins can be installed into front shifter bushings prior
to attempting install in vehicle. Again, a small
amount of grease can aid with installation.
front bushings
groove #1
STEP 20. Position Hurst Shifter into vehicle and install
change rod, change rod bolt and torque to 20 Nm
(15ft-lbs).
TOOLS: torque wrench & 10mm socket
NOTE: The lower bushings in the Hurst Shifter stick have
been specifically designed to operate without
grease. Greasing this area will only attract dirt and
contaminents and will not improve performance.
DO NOT grease lower bushings.
STEP 21. Position Hurst Shifter into vehicle and install
and lock front pins.
lower
bushings
*Photo taken from underneath vehicle
NOTE: When working from inside the vehicle a small mirror
can be helpful to aid in alignment of the front pins.
Not only are the front bushings very tight on the
pins, they are also very tight in shifter brackets on
the transmission. The pins may need to be pryed
into place or pryed out for later removal. Use care
not to damage any of the components if prying is
necessary.
STEP 22. Replace the metal tunnel cover and install the
upper shift boot onto cover.
NOTE: Make sure the threads of the rear Hurst Shifter
mount come up through the tunnel cover. Install
the nut, finger tight several turns to hold it in place.
HURST PERFORMANCE
(707)544-4761
7
nut
www.HURST-SHIFTERS.com
STEP 23. Install the six tunnel cover mounting nuts and
torque to 20 Nm (15ft-lbs).
TOOLS: torque wrench, long extension and 10mm
socket
STEP 24. Tighten the rear mounting nut and torque to 20
Nm (15 ft-lbs).
TOOLS: torque wrench, long extension and 13mm
socket
STEP 25. Install the rubber shift boot cover and the wiring
routing ties.
NOTE: (Optional) step 37 (only) may be easier to complete
(see step 37 photo) after installing rubber shift boot
in this step as better access to the sides of the
shifter and inserting required tools may be easier.
If chosen to complete step 37 now, complete step
37 and then continue with step 26 immediately
afterwards.
STEP 26. Install the rear A/C duct.
HURST PERFORMANCE
SANTA ROSA, CA
8
www.HURST-SHIFTERS.com
STEP 27. Reposition the center console into the vehicle.
STEP 28. Raise the center console to access and reconnect the center console storage box lighting
connection and any additional wiring connection
clips (if so equipped).
STEP 29. Re-install the screws in the
bottom of the center console
storage box.
TOOLS: Ratchet, long extension, 8mm socket
NOTE: 2015MY and newer
center console screws are
re-installed from the side of
the console. First replace the
bolts with a 10mm socket (2);
then the cover (1).
2014MY and Earlier
2015MY and Later
(as viewed from back seat with front
seats at full forward position)
STEP 30. Replace the rubber tray in the center console
storage box (if so equipped).
HURST PERFORMANCE
(707)544-4761
9
www.HURST-SHIFTERS.com
STEP 31. Re-install the two front center console screws
(both sides).
TOOL: Phillip’s screwdriver or 7mm socket
STEP 32. Reconnect the cup-holder lighting connection
under the center console trim/cupholder plate and
any other wire harness that had been previously
disconnected (if so equipped).
STEP 33. Reconnect the 12V accessory/cigarette lighter
socket wiring harness connection.
NOTE: The 12V accessory / lighter socket is part of the
center console on 2015MY and newer models and
will not be necessary to reconnect in this manner
(see next step).
STEP 34. Carefully snap in the
center console trim/
cup-holder plate to
the center console.
NOTE: 2015MY and
newer console design (1) is
different than pre-2015MY
vehicles and will may require
reconnection of wiring to
center controls if disconnected in step 3.
HURST PERFORMANCE
2014MY and Earlier
SANTA ROSA, CA
10
2015MY and Later
www.HURST-SHIFTERS.com
STEP 35. To use original shifter handle: Bolt in the upper
stick assembly on to the Hurst Shifter and torque
to 20Nm (15 ft-lbs).
TOOL: 13mm socket and torque wrench
STEP 36. Carefully snap in the boot bezel on the center
console.
STEP 37 (optional). Install the Hurst upper stick and
Classic Knob:
A. Slide the boot support onto the Hurst stick (note:
some models (2015) may not use boot support and
leather boot can be attached directly to the Hurst stick).
B. Install the stick* onto the Hurst Shifter using the
supplied washers and screws (30Nm( 22 ft-lbs).
C. Install the jam nut onto the threads of the Hurst
stick.
TOOL: 7/32” hex wrench
*NOTE: The stick should be installed on the right
hand side (passenger side) of the shifter block
except on 2015MY and newer (mount driver side).
STEP 38 (optional). Disassemble leather boot from stock
stick/knob/boot assembly by prying open the boot
clip or disassembly of the shifter knob/shaft
removing leather boot.
TOOL: flat blade screwdriver
HURST PERFORMANCE
(707)544-4761
11
www.HURST-SHIFTERS.com
STEP 38 (optional). Install the leather boot onto the boot
support (except some 2015MY vehicles) using the
supplied tie wrap (trim away excess tie) and snap
boot bezel into center console.
STEP 39. Affix Hurst knob onto vehicle (if using option
above) being sure to tighten jam nut up against the
knob base. Ensure that all gears can be smoothly
and fully engaged without binding or rough movement. Correct any problems prior to operating the
vehicle.
TOOL: 9/16” Wrench
NOTE: The Hurst Billet Comp/Plus Shifter for the Dodge Challenger has been designed to fit any of Hurst’s
stick, knob, and handle combinations. Check the Hurst website at www.hurst-shifters.com for stick options
including the popular original E and B body Mopar handles (#538 8575) as well as the newer “Nitro Stick”
handles (#538 1001 & #538 1000) that all fit the Hurst Competition/Plus Shifters for the Dodge Challenger:
#538 8575*
#538 1001
#538 1000
*does not fit 2015MY and newer
Technical Service
A highly trained technical service department is maintained by Hurst Performance to answer your technical
questions, provide additional product information and offer various recommendations.
Hurst offers a wide variety of custom T-Handles and knobs that can be used with this shifter to allow the driver to
tailor the vehicle to his/hers personal liking. See your local retailer of Hurst products for specific prices.
Technical service calls, correspondence, and warranty questions should be directed to the following address:
Hurst
100 Stony Point Rd., Ste. 125
Santa Rosa, CA 95401
Phone (707) 544-4761
Monday-Friday 6AM to 5PM PST, Saturday 7:30AM to 5PM PST
HURST PERFORMANCE
SANTA ROSA, CA
12
www.HURST-SHIFTERS.com