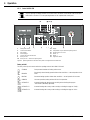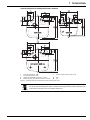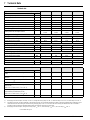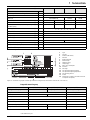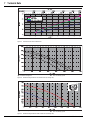
1
For the owner ROTEX GasSolarUnit Gas condensing boiler with stratified solar storage tank Operating instructions 0085 BM 0065 Type Rated thermal output ROTEX GSU 320 3 - 20 kW modulating ROTEX GSU 520S 3 - 20 kW modulating ROTEX GSU 530S 7 - 30 kW modulating ROTEX GSU 535 8 - 35 kW modulating Manufacture number Customer GB Edition 09/2007 Guarantee and conformity ROTEX accepts the guarantee for material and manufacturing defects according to this statement. Within the guarantee period, ROTEX agrees to have the device repaired by a person assigned by the company, free of charge. ROTEX reserves the right to replace the device. The guarantee is only valid if the device has been used properly and it can be proved that it was installed properly by an expert firm. As proof, we strongly recommend completing the enclosed installation and instruction forms and returning them to ROTEX. Guarantee period The guarantee period begins on the day of installation (billing date of the installation company), however at the latest 6 months after the date of manufacture (billing date). The guarantee period is not extended if the device is returned for repairs or if the device is replaced. Guarantee period of the burner, of the boiler body and of the boiler electronics: 2 years Guarantee exclusion Improper use, intervention in the device and unprofessional modifications immediately invalidate the guarantee claim. Dispatch and transport damage are excluded from the guarantee offer. The guarantee explicitly excludes follow-up costs, especially the assembly and disassembly costs of the device. There is no guarantee claim for wear parts (according to the manufacturer's definition), such as lights, switches, fuses. Declaration of conformity For the central condensing boiler units ROTEX GasSolarUnit We, ROTEX Heating Systems GmbH, declare under our sole responsibility that the products Product Order No. Product Order No. ROTEX GSU 320 15 70 25 ROTEX GSU 320 F 15 70 26 ROTEX GSU 520S 15 71 10 ROTEX GSU 520S F 15 71 20 ROTEX GSU 530S 15 71 21 ROTEX GSU 530S F 15 71 23 ROTEX GSU 535 15 71 40 ROTEX GSU 535 F 15 71 45 with the product identification number CE 0085 BM 0065, together with one of the following regulations Product Order No. ROTEX THETA 23R (N) 15 40 52 Product Order No. ROTEX ALPHA 23R 15 40 54 ROTEX THETA 23R (S) 15 40 53 comply, in their standard design, with the following European Directives: 2004/108/EC Electromagnetic compatibility directive 90/396/EEC Gas appliances directive 2006/95/EC Low voltage directive 92/42/EEC Boiler efficiency requirements directive Güglingen, 1.3.2007 2 Dr Eng. Franz Grammling Managing Director BA ROTEX GSU - 09/2007 List of contents 1 Safety . . . . . . . . . . . . . . . . . . . . . . . . . . . . . . . . . . . . . . . . . . . . . . . . . . . . . . . . . . . . . . . . . . . . . . . . . . . . . . . . . . . 4 1.1 1.2 1.3 1.4 1.5 2 Safety. . . . . . . . . . . . . . . . . . . . . . . . . . . . . . . . . . . . . . . . . . . . . . . . . . . . . . . . . . . . . . . . . . . . . . . . . . . . . . . . . . . . . . . . . . . . . . . Instructions for erection . . . . . . . . . . . . . . . . . . . . . . . . . . . . . . . . . . . . . . . . . . . . . . . . . . . . . . . . . . . . . . . . . . . . . . . . . . . . . . . . . Initial start-up . . . . . . . . . . . . . . . . . . . . . . . . . . . . . . . . . . . . . . . . . . . . . . . . . . . . . . . . . . . . . . . . . . . . . . . . . . . . . . . . . . . . . . . . . Instruction and handover to the owner . . . . . . . . . . . . . . . . . . . . . . . . . . . . . . . . . . . . . . . . . . . . . . . . . . . . . . . . . . . . . . . . . . . . . . Operating elements on the boiler control panel. . . . . . . . . . . . . . . . . . . . . . . . . . . . . . . . . . . . . . . . . . . . . . . . . . . . . . . . . . . . . . . . . Control THETA 23R . . . . . . . . . . . . . . . . . . . . . . . . . . . . . . . . . . . . . . . . . . . . . . . . . . . . . . . . . . . . . . . . . . . . . . . . . . . . . . . . . Display and modification of parameters. . . . . . . . . . . . . . . . . . . . . . . . . . . . . . . . . . . . . . . . . . . . . . . . . . . . . . . . . . . . . . . . . . . Control ALPHA 23R . . . . . . . . . . . . . . . . . . . . . . . . . . . . . . . . . . . . . . . . . . . . . . . . . . . . . . . . . . . . . . . . . . . . . . . . . . . . . . . . . Heating mode . . . . . . . . . . . . . . . . . . . . . . . . . . . . . . . . . . . . . . . . . . . . . . . . . . . . . . . . . . . . . . . . . . . . . . . . . . . . . . . . . . . . . . . . . Manual setting of the boiler temperature. . . . . . . . . . . . . . . . . . . . . . . . . . . . . . . . . . . . . . . . . . . . . . . . . . . . . . . . . . . . . . . . . . Pump setting for energy-saving operation . . . . . . . . . . . . . . . . . . . . . . . . . . . . . . . . . . . . . . . . . . . . . . . . . . . . . . . . . . . . . . . . . Information on operating noises . . . . . . . . . . . . . . . . . . . . . . . . . . . . . . . . . . . . . . . . . . . . . . . . . . . . . . . . . . . . . . . . . . . . . . . . Temporary shutdown . . . . . . . . . . . . . . . . . . . . . . . . . . . . . . . . . . . . . . . . . . . . . . . . . . . . . . . . . . . . . . . . . . . . . . . . . . . . . . . . . . . Re-commissioning . . . . . . . . . . . . . . . . . . . . . . . . . . . . . . . . . . . . . . . . . . . . . . . . . . . . . . . . . . . . . . . . . . . . . . . . . . . . . . . . . . . . . . Work to be done before re-commissioning . . . . . . . . . . . . . . . . . . . . . . . . . . . . . . . . . . . . . . . . . . . . . . . . . . . . . . . . . . . . . . . . . Checklist for returning to service . . . . . . . . . . . . . . . . . . . . . . . . . . . . . . . . . . . . . . . . . . . . . . . . . . . . . . . . . . . . . . . . . . . . . . . 27 27 28 28 29 Faults and malfunctions . . . . . . . . . . . . . . . . . . . . . . . . . . . . . . . . . . . . . . . . . . . . . . . . . . . . . . . . . . . . . . . . . . . 30 6.1 6.2 6.3 6.4 7 17 17 19 20 22 22 22 23 24 24 24 26 Inspection and maintenance. . . . . . . . . . . . . . . . . . . . . . . . . . . . . . . . . . . . . . . . . . . . . . . . . . . . . . . . . . . . . . . . . 27 5.1 General overview of inspection and maintenance . . . . . . . . . . . . . . . . . . . . . . . . . . . . . . . . . . . . . . . . . . . . . . . . . . . . . . . . . . . . . . . 5.2 Inspection and maintenance tasks . . . . . . . . . . . . . . . . . . . . . . . . . . . . . . . . . . . . . . . . . . . . . . . . . . . . . . . . . . . . . . . . . . . . . . . . . . 5.2.1 Checking the connections and conduits . . . . . . . . . . . . . . . . . . . . . . . . . . . . . . . . . . . . . . . . . . . . . . . . . . . . . . . . . . . . . . . . . . . 5.2.2 Checking and cleaning the condensate drain.. . . . . . . . . . . . . . . . . . . . . . . . . . . . . . . . . . . . . . . . . . . . . . . . . . . . . . . . . . . . . . . 5.2.3 Checking and cleaning the burner . . . . . . . . . . . . . . . . . . . . . . . . . . . . . . . . . . . . . . . . . . . . . . . . . . . . . . . . . . . . . . . . . . . . . . . 6 15 15 16 16 Operation . . . . . . . . . . . . . . . . . . . . . . . . . . . . . . . . . . . . . . . . . . . . . . . . . . . . . . . . . . . . . . . . . . . . . . . . . . . . . . . . 17 4.1 4.1.1 4.1.2 4.1.3 4.2 4.2.1 4.2.2 4.2.3 4.3 4.4 4.4.1 4.4.2 5 Design and components of boiler . . . . . . . . . . . . . . . . . . . . . . . . . . . . . . . . . . . . . . . . . . . . . . . . . . . . . . . . . . . . . . . . . . . . . . . . . . . . 7 Brief description . . . . . . . . . . . . . . . . . . . . . . . . . . . . . . . . . . . . . . . . . . . . . . . . . . . . . . . . . . . . . . . . . . . . . . . . . . . . . . . . . . . . . . . 10 Gas burner . . . . . . . . . . . . . . . . . . . . . . . . . . . . . . . . . . . . . . . . . . . . . . . . . . . . . . . . . . . . . . . . . . . . . . . . . . . . . . . . . . . . . . . . . . . 11 Connections . . . . . . . . . . . . . . . . . . . . . . . . . . . . . . . . . . . . . . . . . . . . . . . . . . . . . . . . . . . . . . . . . . . . . . . . . . . . . . . . . . . . . . . . . . 13 Storage tank . . . . . . . . . . . . . . . . . . . . . . . . . . . . . . . . . . . . . . . . . . . . . . . . . . . . . . . . . . . . . . . . . . . . . . . . . . . . . . . . . . . . . . . . . . 14 Start-up . . . . . . . . . . . . . . . . . . . . . . . . . . . . . . . . . . . . . . . . . . . . . . . . . . . . . . . . . . . . . . . . . . . . . . . . . . . . . . . . . 15 3.1 3.2 3.3 3.4 4 4 4 5 5 5 Product description. . . . . . . . . . . . . . . . . . . . . . . . . . . . . . . . . . . . . . . . . . . . . . . . . . . . . . . . . . . . . . . . . . . . . . . . . 7 2.1 2.2 2.3 2.4 2.5 3 See the manual . . . . . . . . . . . . . . . . . . . . . . . . . . . . . . . . . . . . . . . . . . . . . . . . . . . . . . . . . . . . . . . . . . . . . . . . . . . . . . . . . . . . . . . . . Warnings and explanation of symbols . . . . . . . . . . . . . . . . . . . . . . . . . . . . . . . . . . . . . . . . . . . . . . . . . . . . . . . . . . . . . . . . . . . . . . . . Danger prevention . . . . . . . . . . . . . . . . . . . . . . . . . . . . . . . . . . . . . . . . . . . . . . . . . . . . . . . . . . . . . . . . . . . . . . . . . . . . . . . . . . . . . . . Proper use. . . . . . . . . . . . . . . . . . . . . . . . . . . . . . . . . . . . . . . . . . . . . . . . . . . . . . . . . . . . . . . . . . . . . . . . . . . . . . . . . . . . . . . . . . . . . Instructions for operating safety . . . . . . . . . . . . . . . . . . . . . . . . . . . . . . . . . . . . . . . . . . . . . . . . . . . . . . . . . . . . . . . . . . . . . . . . . . . . Troubleshooting . . . . . . . . . . . . . . . . . . . . . . . . . . . . . . . . . . . . . . . . . . . . . . . . . . . . . . . . . . . . . . . . . . . . . . . . . . . . . . . . . . . . . . . Malfunctions . . . . . . . . . . . . . . . . . . . . . . . . . . . . . . . . . . . . . . . . . . . . . . . . . . . . . . . . . . . . . . . . . . . . . . . . . . . . . . . . . . . . . . . . . . Fault codes . . . . . . . . . . . . . . . . . . . . . . . . . . . . . . . . . . . . . . . . . . . . . . . . . . . . . . . . . . . . . . . . . . . . . . . . . . . . . . . . . . . . . . . . . . . Emergency operation . . . . . . . . . . . . . . . . . . . . . . . . . . . . . . . . . . . . . . . . . . . . . . . . . . . . . . . . . . . . . . . . . . . . . . . . . . . . . . . . . . . . 30 30 32 35 Technical data . . . . . . . . . . . . . . . . . . . . . . . . . . . . . . . . . . . . . . . . . . . . . . . . . . . . . . . . . . . . . . . . . . . . . . . . . . . . 36 7.1 7.2 Dimensions and connection dimensions . . . . . . . . . . . . . . . . . . . . . . . . . . . . . . . . . . . . . . . . . . . . . . . . . . . . . . . . . . . . . . . . . . . . . . 36 Wiring diagram . . . . . . . . . . . . . . . . . . . . . . . . . . . . . . . . . . . . . . . . . . . . . . . . . . . . . . . . . . . . . . . . . . . . . . . . . . . . . . . . . . . . . . . . 43 8 Glossary. . . . . . . . . . . . . . . . . . . . . . . . . . . . . . . . . . . . . . . . . . . . . . . . . . . . . . . . . . . . . . . . . . . . . . . . . . . . . . . . . 47 9 For the chimney sweep. . . . . . . . . . . . . . . . . . . . . . . . . . . . . . . . . . . . . . . . . . . . . . . . . . . . . . . . . . . . . . . . . . . . . 48 BA ROTEX GSU - 09/2007 3 1 x Safety 11.1 Safetythe manual See This manual is meant for the owner of the ROTEX GasSolarUnit. The installation, connection and the initial start-up of the ROTEX GasSolarUnit are carried out by authorised and trained heating engineers. The ROTEX GSU was properly handed over to you by the installer. The handover is documented in the handing over report. All the activities required for operation, for returning to service after a temporary shut down as well as a few basic maintenance jobs are described in this manual. Activities for start up, fault clearance and maintenance, which are not described in this instructions manual, should be carried out only by authorised and trained heating engineers. Please read carefully through this manual before operating the ROTEX GSU. Relevant documents – ROTEX GasSolarUnit: Installation and service manual for the heating expert. The document is included in the scope of delivery. – The documentation of the used ROTEX Control. It is included in the scope of delivery of the Control. 1.2 Warnings and explanation of symbols Meaning of the warnings The warnings are classified in this manual according to their severity and probability of occurrence. DANGER! Indicates imminent danger. Disregarding this warning results in serious physical injury or death. WARNING! Indicates a potentially dangerous situation. Disregarding this warning may result in serious physical injury or death. CAUTION! Indicates a possibly damaging situation. Disregarding this warning may cause damage to property and the environment. This symbol identifies user tips and particularly useful information, but not warnings or hazards. Special warning symbols Some types of danger are represented by special symbols: Danger of explosion Electrical current Danger of burning or scalding Validity Some information in this manual has limited validity. The validity is highlighted by a symbol. a Valid only for ROTEX Control ALPHA 23R q Valid only for ROTEX Control THETA 23R Order number References to order numbers can be recognised from the goods symbol . Handling instructions • Handling instructions are shown as a list. Actions where the sequential order must be maintained are numbered. Î Results of actions are identified with an arrow. 4 BA ROTEX GSU - 09/2007 1 x Safety 1.3 Danger prevention ROTEX GasSolarUnit conforms to the state-of-the-art and meets all recognised technical requirements. However, improper use may result in serious physical injuries or death, as well as property damage. The ROTEX GasSolarUnit must only be installed and operated as follows to avoid danger: – As stipulated, and in perfect conditions, – With an awareness of safety and dangers. This assumes the knowledge and use of the contents of this manual and training in the operation of the ROTEX GSU by the installer. Danger of explosion if you smell gas Escaping gas is a direct threat to human health and safety. Even a few sparks can cause major explosions. If you smell gas, please follow these rules: • Do not light an open flame and do not operate electrical switches. • Open windows and ventilate the room well. • Inform the authorised gas supply company. 1.4 Proper use The ROTEX GasSolarUnit may only be used as a hot water heating system. The ROTEX GasSolarUnit must be installed, connected and operated only according to the indications in this manual. The ROTEX GasSolarUnit may only be used with a controller approved by ROTEX (see declaration of conformity in Page 2 of this instruction manual). Any other use outside the above is considered as improper. The owner will be solely responsible for any resulting damage. Proper use also includes the adherence to the maintenance and inspection conditions. Spare parts must at least satisfy the technical requirements defined by the manufacturer. This is the case, for example, with original spare parts. 1.5 Instructions for operating safety Heating system • Work on the heating system (e.g. installation, connection and the initial start up) must be carried out only by authorised and trained heating engineers. • Switch the main switch off and secure it against unintended switching on when carrying out any work on the heating system. • Set up the heating system as an open or closed heating system according to the safety-related requirements of EN 12828. • The safety valves must conform to the DIN EN ISO 4126-1 and the components must be inspected. The safety valves must be installed in the safety flow. • The stickers on the gas condensing boilers must not be removed or damaged. Electrical installation • All control and safety devices in the ROTEX GasSolarUnit are connected ready to operate and checked. Modifications to the electrical installation are dangerous and are prohibited. The owner will be solely responsible for any resulting damage. • Work on the electrical installation should only be carried out by qualified electrical engineers observing the technical electrical guidelines and regulations of the relevant electric power supply company. Gas installation • Work on the heating and gas supply system should be carried out only by authorised and trained technical personnel. • Work on gas burners must be carried out only by authorised and trained technical personnel. Air/flue gas system (LAS) • The owner may not arbitrarily modify the air/ flue gas system (LAS). Modifications to the combustion air supply and the exhaust conduction may be carried out only by authorised and trained technical personnel after approval by the Chief District Chimney Sweep. BA ROTEX GSU - 09/2007 5 1 x Safety Hydraulic system connection • When operating the ROTEX GasSolarUnit, especially when using the solar energy, the storage tank temperature can exceed 60 °C. Protection from scalding (hot water mixing device e.g. VTA32 15 60 16) should therefore be included when installing the system. Device installation room • Operate ROTEX GasSolarUnit only if sufficient combustion air supply is ensured. If you operate the ROTEX GSU in ambientair-independent mode with an air/ flue gas system (LAS) dimensioned according to ROTEX standard, this is guaranteed automatically and there are no further conditions to be met in the device installation room. • Make sure that there is an opening to the open air for air inlet, of at least 150 cm2 if you operate in the ambient air dependent mode. • Do not operate the burner in the ambient air dependent mode in rooms with aggressive vapours (e.g. hair spray, perchloroethylene, carbon tetrachloride), heavy dust formation (e.g. workshops) or high humidity (e.g. laundries). • Always maintain the minimum distances from walls and other objects (see Chapter 7.1). Operation • Operate ROTEX GasSolarUnit only with the storage tank filled to overflow. • Operate ROTEX GasSolarUnit only with closed silencer hoods. Instruction by the installer • The handover includes instruction in the operation and control of the ROTEX GasSolarUnit by the installer, using the operating instructions. • Document the handover by filling in and signing the attached installation and instructions form together with the installer. Disposal • Through the environmentally-friendly design of the ROTEX GasSolarUnit, ROTEX has complied with the standards for environmentally-friendly disposal. • Proper disposal in compliance with the respective national stipulations of the country of use is the responsibility of the owner. Documentation • The technical documentation contained in the scope of supply is part of the device. It must be stored in such a way as to ensure that the operator or technical personnel can always refer to it. 6 BA ROTEX GSU - 09/2007 2 x Product description 22.1 Product description Design and components of boiler Cold water1) Hot water1) Hot water charging heat exchanger inflow Hot water charging heat exchanger return flow Heating flow (warm) Heating return flow (cold) Solaris flow Solaris return flow with valve insert Flue gas Air supply Immersion sleeve for storage tank sensor and Solaris return flow temperature sensor 12 Condensate overflow connection 12a Top filling connection (alternatively: condensate overflow connection to the front 1 2 3 4 5 6 7 8 9 10 11 21 22 23 24 25 27 28 29 30 31 32 33 34 35 36 Heating circulation pump) Gas fan burner 3-way diverting valve Inflow temperature sensor Return flow temperature sensor Safety valve Connection for diaphragm expansion tank Boiler control panel Control Pressure gauge Silencer hood Retaining screws for silencer hood Supply air hose Filling and draining fitting (KFE cock) Automatic aspirator 37 38 39 Shutoff ball valve Thermal insulation tray for boiler body Nameplate with manufacture number Safety devices 1) Prepares for the installation of gravity brakes to avoid cooling losses. Figure 2-1 Components of the ROTEX GasSolarUnit BA ROTEX GSU - 09/2007 7 2 x Product description A B C D E F G Gas condensing boiler Hot water layered storage tank Unpressurised storage tank water Hot water zone Solar zone Heating support zone RPS control and pump unit (Solaris accessories) Cold water1) Hot water1) Hot water charging heat exchanger flow Hot water charge changer return flow Heating flow (warm) Heating return flow (cold) Solaris flow Solaris return flow with valve insert Flue gas Air supply Immersion sleeve for storage tank sensor and Solaris return flow temperature sensor 12 Condensate overflow connection 12a Top filling connection (alternatively: condensate overflow connection to the front) 13 Condensate drain hose (by others) 14 Condensate pipe 15 Heating heat exchanger (boiler body) 16 Drinking water heat exchanger (TW-WT) 17 Heat exchanger for storage tank charging (SL-WT) 18 Heat exchanger for solar heating support (HU-WT) 19 Heat insulating jacket for HU-WT 20 Solaris flow layering pipe 21 Heating circulation pump 22 Gas fan burner 23 3-way diverting valve 24 Inflow temperature sensor 25 Return flow temperature sensor 26 Flue gas temperature sensor (accessory) 27 Safety valve 28 Connection for diaphragm expansion tank 1 2 3 4 5 6 7 8 9 10 11 Safety devices 1) Prepares for the installation of gravity brakes to avoid cooling losses. Figure 2-2 Schematic layout of GSU 520S and GSU 530S 8 BA ROTEX GSU - 09/2007 2 x Product description A B C D G Gas condensing boiler Hot water layered storage tank Unpressurised storage tank water Hot water zone RPS control and pump unit (Solaris accessories) Cold water1) Hot water1) Hot water charge changer flow Hot water charge changer return flow Heating flow (warm) Heating return flow (cold) Solaris flow Solaris return flow with valve insert Flue gas Air supply Immersion sleeve for storage tank sensor and Solaris return flow temperature sensor 12 Condensate overflow connection 12a Top filling connection (alternatively: condensate overflow connection to the front) 13 Condensate drain hose (by others) 14 Condensate pipe 15 Heating heat exchanger (boiler body) 16 Drinking water heat exchanger (TW-WT) 17 Heat exchanger for storage tank charging (SL-WT) 20 Solaris flow layering tube 21 Heating circulation pump 22 Gas fan burner 23 3-way diverting valve 24 Inflow temperature sensor 25 Return flow temperature sensor 26 Flue gas temperature sensor (accessory) 27 Safety valve 28 Connection for diaphragm expansion tank 1 2 3 4 5 6 7 8 9 10 11 Safety devices 1) Prepares for the installation of gravity brakes to avoid cooling losses. Figure 2-3 Schematic construction of GSU 535 and of GSU 320 BA ROTEX GSU - 09/2007 9 2 x Product description 2.2 Brief description The ROTEX GasSolarUnit is a completely pre-assembled gas condensation boiler, which is integrated in a hot water storage tank. This integration ensures that there are no external surface and cooling losses. The heat is given completely to the storage tank water and not to the surroundings. In addition, the excellent heat insulation of the plastic storage tank ensures minimum heat losses. The very flat cylinder-shaped aluminium boiler body is recessed into the cover of the storage tank. The combustion chamber is arranged centrally. The flue gas is directed in a spiral around the burner chamber and then taken away upwards. The flue gas temperature always remains below 90 °C. Solar utilisation The hot water storage tank of ROTEX GSU can also be heated by solar energy. In the models GSU 520S and GSU 530S, the gas condensing boilers are designed to maintain only the upper zone of the storage tank at the target temperature. In solar heating, the entire storage tank can be heated up, depending on the heat offered by the sun. The stored heat is now used for hot water generation as well as for the heating support. The high total storage capacity in the 500-litres tank even allows temporary tiding over without sunshine. In the models GSU 320 and GSU 535, the total storage tank is configured as zone for domestic water. It is possible to make thermal use of solar energy for hot water preparation. The solar component is optimised in combination with an upstream Solaris system (pre-heating stage). Operating principle The ROTEX GasSolarUnit is designed such that it can be operated independently of the ambient air. The combustion air is drawn in through an installation shaft or a double-walled flue gas conduit from the burner directly from the open air. This method has several advantages: – The heating room needs no ventilation opening to the open air and therefore does not cool down. – Lower energy consumption. – Additional energy recovery in the flue gas line by combustion air pre-heating. – Additional energy yield from a distinctive temperature layering system generated in all devices by the arrangement and flow through the heat exchanger. – Contamination from the environment around the burner is not sucked in. The heating room can therefore can also be used as a work-room, laundry or for similar purposes. – Possible to install as central roof unit and in garages. The drinking water is heated indirectly in a stainless steel corrugated pipe heat exchanger by the pressureless storage tank water from the hot water tank. This contains about 24 litres (19 litres in GSU 320) of hot drinking water at the temperature level of the domestic water zone. If a higher quantity of hot water is tapped, this water is heated in the geyser principle. The precipitating condensation is collected at the lowest point of the boiler body, directed to the storage tank through a plastic tube and neutralised there. From there, it is directed through the safety overflow connection. Safety management The entire safety management of the ROTEX GasSolarUnit is entrusted to electronic control. This effects a safety switch-off in the event of water shortage, gas shortage or undefined operating states. A corresponding fault message shows the expert all the necessary information for troubleshooting. Electronic control A fully electronic digital control combined with the "intelligent" automatic firing unit of the burner controls all heating and hot water functions fully automatically for the direct heating circuit, an optionally available mixed heating circuit as well as a storage tank charging circuit. The continuously modulating control adjusts the heating output flexibly to the changing requirements. All settings, displays and functions are made through the ROTEX Control THETA 23R or the ROTEX Control ALPHA 23R. The display and the keyboard offer comfortable operations. q A digital room station (ROTEX THETA RS, as option for greater convenience. a The room temperature control (ALPHA RTR-E, 15 70 18) or a room controller set (THETA RFF, 15 40 70) are available 17 51 26) is available as option for more convenience. Condensing technology The condensing technology makes optimum use of the energy contained in the heating gas. The flue gas is cooled down in the boiler and in the flue gas system -- in the ambient air-independent method, such that the temperature is below the dew point. Part of the water vapour generated on combustion of the gas thus condenses. The condensation heat is added to the heating, as opposed to the case with low temperature boilers. This makes it possible to achieve efficiency levels higher than 100%. 10 BA ROTEX GSU - 09/2007 2 x Product description 2.3 Gas burner Figure 2-4 Gas burner of ROTEX GasSolarUnit - View from front 1 2 3 4 5 6 7 8 9 10 11 12 13 Burner surface Fan Safety gas control block Gas/air compound controller Gas solenoid valve (1 x Class B and 1 x Class C) Automatic gas firing unit CVBC Gas connection G ½" female Venturi nozzle with air connection DN 50 Measurement connection IN - inlet gas pressure Measurement connection OUT - outlet gas pressure Set screw for gas/air mixture Set screw for gas pressure controller (under cover cap) Burner flange Figure 2-5 Gas burner of ROTEX GSU - View from rear BA ROTEX GSU - 09/2007 14/1 14/2 15/1 15/2 16 17 18 19 20 21 22 Ionisation electrode Ionisation cable Ignition electrodes Ignition cable Flue insert Burner flange seal (O-ring) Flue seal (flat graphite seal) Fan flange seal (flat silicon seal) Clamp plates Never unfasten! Air intake pressure hose Cover with strain relief for burner cable and locking screw for automatic gas firing unit Figure 2-6 Gas burner of ROTEX GSU - Side view from left 11 2 x Product description Burner setting and power limiting The gas burner is factory-set to a gas type, which is indicated on the yellow sticker on the fan housing of the burner. The burner can be operated with the following gas types: – Natural gas E/H – Natural gas LL/L – Liquefied petroleum gas. Only the heating engineer can change the gas type because this requires resetting the gas burner. The heating engineer can limit the burner output by entering parameters in the boiler control panel. – The limiting of the maximum burner output would be advisable, for example, in the event of better supply charges for lower installed outputs. – The limiting of the minimum burner output would be advisable, for example, if the flue gas resistance is relatively high and the flame becomes unstable on minimum load or if the requirements for the partial load are not fulfilled when making the calculations for the flue gas system. Controlling the burner output The controls ROTEX ALPHA 23R and ROTEX THETA 23R determine the requisite flow temperature (corresponding to the set operating parameters) continuously and feed them to the CVBC automatic firing units of the gas burner. The CVBC automatic firing unit calculates the necessary burner output from the target value and the values of the flow and return flow temperature sensors. The determined output is transmitted to the burner fan as a PWM signal. The burner fan immediately adjusts the fan speed and thus also the combustion air flow. The gas controller controls the gas volume accordingly. Gas/air compound control The gas/air compound control (pneumatic compound) ensures that the CO2 flow is maintained at a suitable level for every output and is set by the adjusting screw for the gas/air mix (Fig 2-6, item 11) and by the adjusting screw of the gas pressure controller (Fig 2-6, item 12) if required. The burner immediately responds to every change in the air flow volume through the gas/air compound control with a corresponding change in the gas flow volume. The gas/air compound control (pneumatic compound) consists of a Venturi nozzle with a ring-shaped gas inlet and a gas pressure controller. A vacuum forms in the centre of the Venturi nozzle depending on the volume flow of the combustible air. This causes the gas to be drawn into the centre of the Venturi nozzle, conveyed through the burner fan to the burner surface and optimally mixed. The gas valve can be adjusted for supply pressures from 5 to 60 mbar (zero pressure controller). 12 BA ROTEX GSU - 09/2007 2 x Product description 2.4 Connections Information about the dimensions and connecting dimensions is given in Chapter 7 "Technical data". Temperature sensor The ROTEX GSU has a weather-driven control of the flow temperature. This function requires an external temperature sensor. A 3 m flexible cable is already connected inside the device and placed in the control panel on the circuit board. The temperatures detected by the internal temperature sensors of the device (flow and return flow temperature sensors) are used for output control of the burner and the detection of a fault. The Storage tank temperature sensor is factory-assembled and connected (PTC resistance). The mixer circuit inflow sensor (TMKF, 15 60 62) is required for the control of the mixer circuit q . Additional information about the operating status is provided by a flue gas temperature sensor (TAGF1 , 15 70 52). The electronic control detects the existing sensor configuration automatically on switching on the ROTEX GSU. You will find more instructions and an exact description in the documentation "ROTEX Control". It is included in the scope of supply of the particular electronic control to be ordered separately. Mixer circuit (optional) A mixer circuit can be connected to the ROTEX GSU directly, which is controlled through the electronic boiler control. ROTEX offers the following: – The ready-to-connect mixer group AMK1 ( 15 60 44), which contains a circulation pump integrated in the heat insulated housing, a motor mixer and check valves with temperature displays. – The mixer circuit contact sensor TMKF ( 15 60 62). Cascading (optional) q By cascading from the heat circuit expansion modules THETA HEM1 ( 15 60 61), the system can be expanded by up to 5 mixer circuits and/or storage tank charging circuits. The required temperature sensors need to be ordered separately (mixer circuit docking sensor TMKF ( 15 60 62), storage tank temperature sensor TSF ( 15 60 63). Flue gas temperature sensor (optional) You can install the flue gas sensor connection set TAGF1 ( 15 70 52) for an optimum operating control. Room controller (optional) q You can connect a separate room controller THETA RFF ( 15 40 70) for each heating circuit remote setting of modes and room temperatures from another room. a You can connect a separate room controller ALPHA RTR-E ( modes and room temperature from another room. 17 51 26) for each heating circuit for remote setting of Room station (optional) q All temperature values and modes of the control unit THETA 23R (central unit) can be displayed and changed through the room station THETA RS ( 15 70 18). Apart from the chimney sweep and manual operation function, all operating elements (display, keys, rotary knobs) and functions (e.g. switching time programs ) are identical to those of the central unit. The room station THETA RS can be installed in a suitable place in the building and can be used for the remote operation of the boiler control. BA ROTEX GSU - 09/2007 13 2 x Product description 2.5 Storage tank Important instructions for hydraulic integration Observe the following instructions for hydraulic system integration of the ROTEX GasSolarUnit in order to avoid damage to persons and property. – Protection from scalding: When operating the ROTEX GasSolarUnit, especially when using the solar energy, the storage tank temperature can exceed 60 °C. It is advisable therefore to take measures that prevent scalding (hot water mixing unit such as VTA32 15 60 16) at the time of installation. – Preventing flue gas escape: To prevent flue gas from escaping, the storage tank must be filled to overflow when starting up the ROTEX GasSolarUnit. – Corrosion protection : In some regions, supply companies provide aggressive drinking water, which by can cause corrosion even to stainless steel. Ask your water company whether any corrosion problems are detected with the use of stainless steel hot water storage tanks in their area. Suitable water preparation may be needed. Design – Dual shell fully plastic construction (corrosion-free). – Space between internal and external tanks foam-filled with high heat insulation (low surface losses). – Outer skin 3-4 mm thick (impact and shock proof). Working method The pressureless storage tank water is used as water storage tank medium. Useful heat is fed in and out by completely submerged, spiral stainless steel corrugated tubes (1.4404). The hot water zone in the storage tank works as a combination of heat storage and geyser (see Fig 2-2 and Fig 2-3). The cold water flowing on removal of hot water is first fed down to the storage tank in the heat exchanger and provides maximym cooling for the lower storage tank. The hot water zone is heated up, if necessary, with the gas condensing boiler. The flow through heat exchanger for storage tank charging (SL-WT) is downwards from above. This raises the efficiency and the use of the solar unit. The drinking water continually absorbs the heat from the storage tank water on its way up. The direction of throughflow by the countercurrent principle and the spiral shape of the heat exchanger creates a distinct temperature layering in the storage tank. As high temperatures can continue in the top area of the storage tank, it can achieve a high hot water output even on long drawoff cycles. – In the GSU 520S and GSU 530S models, the SL-WT ends about 40 cm above the tank floor. Only the hot water zone above it is heated by the boiler. The tank volume below it is heated only if using solar energy. – In the GSU320 and GSU 535 models, the SL-WT is taken to the tank floor. The entire storage volume is heated by the boiler (greater hot water output readiness). Water hygiene The separation of pressureless storage tank water and hot water flowing through the corrugated tube heat exchangers ensures optimum water hygiene in ROTEX GSU: – Zones with low flow or no flow do not exist on the hot water side. – Deposition of sediment, rust or other precipitants, which can occur in large volume tanks, is not possible. – The water first stored is also removed first (First-in-first-out principle). Storage tank water heating The storage tank is first filled with pressureless storage tank water at the time of the initial start-up, and which is not exchanged at a later date. The storage tank water can be heated by different methods: – by the integrated gas condensing boiler, – by an additional solar system (ROTEX Solaris system) connected directly to the pressureless area, – by an additional heat source connected directly to the pressureless area (e.g. hot water heat pump). Maintenance Calcium residues are dislodged as a result of thermal and pressure expansion and the high flow speeds in the heat exchangers wash them away, scale deposits do not form. On the storage tank water side, the scale dissolved in the water can precipitate only once. The smooth surface of the stainless steel corrugated tube heat exchanger does not allow any calcium encrustations (no deterioration of the heat transfer performance during the operating period). The filling level is only checked at the annual boiler inspection and water is topped up if necessary. 14 BA ROTEX GSU - 09/2007 3 x Initial start-up 33.1 Start-up Safety WARNING! An improperly installed and operated gas condensing boiler can endanger human life and health and its function can be impaired. • Installation and start-up of the gas condensing boiler should be carried out only by gas or energy supply company authorised and trained heating engineers. The following instructions are especially applicable for transport, erection, installation and initial start-up: – Lift the ROTEX GasSolarUnit only by the handles provided for the purpose. Lifting or shifting the ROTEX GSU by the panels can damage the device (see Chapter 3.2). – The erection surface must be solid, even and horizontal. Install a pedestal if necessary (see Chapter 3.2). – Observe requirements in relation to installation room (see Chapter 1.5). – The country's firing ordinance in force and DIN 18160 are valid for the execution and measuring of the flue gas system. The properties of the flue gas system must be marked on the system (nameplate in the installation room). – The specialised company carrying out the work must come to an agreement with the district chimney sweep before beginning the work. We recommend documenting the participation of the district chimney sweeps in a form sheet. – The electrical connection should only be performed by electrical engineers in compliance with valid standards and guidelines as well as the specifications of the energy supply company. – Only heating specialists trained and authorised by the gas or energy supply companies should be allowed to work on gas systems. – Carry out gas connection conforming to the technical rules for gas installation as well as the relevant specifications of the country of destination and the gas supply company. Incorrect start-up voids the manufacturer's guarantee for the device. If you have questions, please contact your heating installer or our Technical Customer Support. 3.2 Instructions for erection WARNING! The ROTEX GSU is top-heavy in the empty condition and can tip over during transport. This could put persons in danger or cause damage to the unit. • Lift the ROTEX GSU carefully, use the handles. Scope of delivery – The ROTEX GSU (turnkey pre-assembled) consisting of solar storage tank, gas condensing boiler with modulating gas burner, the integrated circulation pump, 3-way switch valve, internal temperature sensors in the device (inflow, return flow, storage tank, safety group and ball cock. – The document folder with installation and maintenance instructions, operating manual, installation and training forms – Optional: Flue gas temperature sensor. . The ROTEX GSU cannot function without central control unit. The control in the correct version must be ordered and is delivered in a separate package. Installation versions The ROTEX GSU is designed basically for ambient air independent operation. They are fitted with a concentric flue gas/air supply connection DN 80/125. ROTEX recommends using the ROTEX GSU in ambient air independent operation. If possible, choose this installation version! In the conditionally ambient-air independent and ambient air -dependent operation modes, the installation room must have a ventilation opening of at least 150 cm2 to open air. As such, the installation room will not be assigned the heated building envelope under the Energy Conservation Ordinance (EnEV), which downgrades the energy rating of the building. BA ROTEX GSU - 09/2007 15 3 x Initial start-up Dirt filter in the heating return flow and cold water inlet If the ROTEX GasSolarUnit is connected to a heating or cold water system, in which piping or radiators made of steel or nondiffusion-proof floor heating pipes are used, sediment and swarf can enter the boiler or the stainless steel corrugated tube heat exchanger and cause blockage, local over-heating or corrosion damage. ROTEX therefore recommends the installation of a contamination filter in the heating return or cold water feed ( 15 60 11 for units up to 28 kW, 15 60 12 for units up to 50 kW). Surface temperature – In ambient air-independent mode, at rated power, the design does not allow temperatures > 80°C on any component located outside the unit cladding panels. Therefore, no minimum distance is required to components made from flammable materials. – A minimum distance of 50 mm between the flue gas duct and flammable components should be maintained in a partial ambient air-independent and ambient air-dependent mode. – Do not use easily flammable and easily combustible substances directly next to the ROTEX GSU. Installation in garages The ROTEX GSU is entirely suitable for installation and operation within a garage. Requirements: – Ambient air-independent operation, – A durable operating manual placed in a visible location near the boiler, – The construction must include a protective device against mechanical damage (vehicle!) for the entire system (e.g. a bracket or deflector). 3.3 Initial start-up WARNING! Improperly started ROTEX GasSolarUnit can cause damage to human life and health and impair its function. • Only heating engineers, authorised and trained by gas and energy supply companies are allowed to start up the ROTEX GSU. The requirements and the tests before start up, starting up activities and the necessary tests are described in detail in the installation and maintenance manual for expert operation. The technical staff can commission the ROTEX GSU after complete erection and connection. 3.4 Instruction and handover to the owner The ROTEX GasSolarUnit is handed over to you after the technical staff have commissioned it. The installer will instruct you in the servicing and operation of the ROTEX GSU at the time of handing over. The instructions contain at least the following topics: – Explanation of secure and proper use of the ROTEX GasSolarUnit as well as the legally imposed obligations, which are incumbent on you as the owner of a gas heating system, – Explanation of the operating elements and the setting options which you can make, – Explanation of the possible modes with reference to an economic and energy-saving operation, – Explanation of the necessary cleaning and maintenance jobs which you can carry out, – Action on malfunctions. The scope of delivery includes an installation and instruction form. Document proper handover by signing the form along with the installer. 16 BA ROTEX GSU - 09/2007 4 x Operation 44.1 Operation Operating elements on the boiler control panel The ROTEX GasSolarUnit can be operated with the THETA 23R control or only with the ALPHA 23R control. The electronic digital controls are to be used for controlling 2 heating circuits (direct heating circuit, mixer circuit) and a storage tank charging circuit. A more detailed description is given in the documentation of the "ROTEX Control". It is part of the scope of supply of the electronic control to be ordered separately. 4.1.1 Control THETA 23R 1 2 3 4 5 6 7 8 Mains power switch Common fault indicator Not assigned Pressure gauge Control: Central unit THETA 23R Rotary button for selecting and setting functions and parameters Selection of daytime room nominal temperature Selection of reduced room nominal temperature 9 10 11 12 13 14 15 16 Selection of nominal temperature of hot water storage tank Selecting the operating mode Setting the automatic timer program System information Manual button for emission measurement, manual operation, suppression function Display Compartment for quick reference operating manual Retaining bolts for control system Figure 4-1 Operating elements on the boiler control panel with integrated control THETA 23R Mains switch Switching the ROTEX GSU on and off When the heating system is on, the mains switch is illuminated in green. Collective fault signal During normal operation, the collective fault signal is off. If it lights up, this indicates a malfunction. Malfunctioning is generally indicated by an error code on the display. For troubleshooting information refer to Chapter 6 "Faults and malfunctions". Pressure gauge – Black pointer: Indication of the current water pressure in the heating system. – Green range: Permitted water pressure range. – Red pointer: Indication of the permitted minimum pressure. The black pointer must be in the green range. If it is to the left of the red pointer, the water pressure must be raised by topping up the system. BA ROTEX GSU - 09/2007 17 4 x Operation Rotary switch The rotary switch can be used for selecting operating settings, changing and storing target values. • Turn to the right (+): Increased regulation • Turn to the left (–): Reduced regulation • Tapping: Save the selected value • Press and hold (3 sec): Enter the programming level (select level) Day target room temperature Selection and setting of the target temperature in normal operation. Setting according to individual temperature sensitivity. Reduced target room temperature Selection and setting of the target temperature in economy operation (night reduction). Setting according to individual temperature sensitivity. Target temperature hot water storage tank Selection and setting of the target hot water storage tank temperature Setting according to specific hot water requirement. It is possible to trigger an unplanned storage tank charge by holding the key down for a long time (during an economy phase). Selecting the mode Setting the mode by tapping the mode selection key. The mode currently active flashes on the display. Selection and activation of another mode with the rotary switch. A mark on the display above the respective symbol shows the mode currently selected. * HOLIDAY Frost-protected shutdown of heating and hot water (e.g. during holidays). ABSENT Brief break in the heating mode during absence. PARTY Extended heating operation over and above the heating period preset in AUTOMATIC MODE. AUTOMATIC Automatic heating and economy mode according to timer program. SUMMER Hot water mode according to timer program, heating switched off with frost-protection. * HEATING Continuous heating mode without time restriction. REDUCED Continuous reduced heating mode without time restriction. STAND-BY Frost-protected shutdown of heating and hot water. This function is not available if a room controller THETA RFF is connected, or if the operating mode of the control has been set to different settings for the individual heating circuits. Settingautomatic timer program Selection of one of the 3 pre-installed timer programs P1, P2 or P3. You can find further instructions and a more exact description in the documentation for "ROTEX control“. It is part of the scope of supply of the electronic control to be ordered separately. System information Calling up all system temperatures and operating statuses of the system components. • Tap the system information key. • Call up the desired information successively by using the rotary dial. 18 BA ROTEX GSU - 09/2007 4 x Operation Emission measurement, manual operation, fault clearance function You can call up 3 functions by using the manual button. – Functions for emission measurement for the chimney sweep: Tap the manual button. First tap: the burner runs at maximum output, second tap: the burner runs at minimum output. – Manual operation: press the manual button for 5 sec. The ROTEX GSU is controlled according to the set target value (heat generator temperature). The storage tank charges until the maximum adjustable storage tank temperature is reached. It then switches over to heating. – Fault clearance: If the display shows "RESET", tap the manual button. If a problem recurs, the root cause must be eliminated. Display All system temperatures and operating conditions of the system components can be indicated on the display. In the event of a fault, the relevant fault signal is issued. Standard display in normal operation: Current day of the week, current date, current time, heat generator temperature and active operating mode (marking bar). 4.1.2 Display and modification of parameters This manual will give you an overview of the method of parameter modification in the THETA 23R Control. A detailed description is given in the operating manual of the control. Standard display You see the current operating parameters in the display during normal operation: Day of the week, date, clock time, heat generator temperature The marking bar identifies the active mode (the example shows the Automatic timer program II) Special displays: – Ice crystal: System anti-freeze active – Umbrella: Summer switch-off active Figure 4-2 Standard display Modifying parameters All parameters for the operation of the heater system can be displayed and set on the boiler control panel. You have no access to some of the setting areas. They are protected by an access code and can only be called up by authorised technicians. To modify a parameter, proceed as follows: • Press the selector keys of the parameters to be set (e.g. for setting the Automatic timer program). • Select the parameter value by turning the rotary knob to the left or to the right until the desired value appears in the display. • Accept the selection by pressing the rotary knob. BA ROTEX GSU - 09/2007 19 4 x Operation 4.1.3 Control ALPHA 23R Only the operating and display elements of the central units of the ROTEX Control ALPHA 23R are described below. Refer to Section 4.1.1 for the operating elements of the complete boiler control panel. 1 2 3 4 5 6 10 Mains power switch Common fault indicator Not assigned Pressure gauge Control: Central unit ALPHA 23R Rotary switch II Rotary switch I – selection of operating mode 14 15 16 17 18 19 Display Compartment for quick reference operating manual Fastening catch for control Button "+" Button "–" Suppression button Figure 4-3 Operating elements on the boiler control panel with integrated control ALPHA 23R Rotary switch I The rotary switch (I) can be used to select the operating modes of the ALPHA 23R Control. 20 STAND-BY Frost-protected shutdown of heating and hot water. REDUCED Permanently reduced heating operation without time restrictions — reduced operation for hot water. HEATING Permanent heating operation without time restrictions — normal operation for hot water. SUMMER Hot water operation, heating switched off with frost protection. AUTOMATIC I Automatic heating and reduction mode according to the switching time program "Professional" (individually adjustable). AUTOMATIC II Automatic heating and economy mode according to switching time program "Family". AUTOMATIC III Automatic heating and economy mode according to switching time program "Solar". BA ROTEX GSU - 09/2007 4 x Operation Rotary switch II You can use the rotary switch (II) to carry out settings on the ALPHA 23R Control. TARGET HOT WATER TEMPERATURE Display and modify targethot water temperature. NORMAL MODE Normal heating operation, no settings possible. ADJUSTING THE TEMPERATURE Displaying and modifying the correction value (parallel displacement of heating curve). SYSTEM STATUS Read off information about system status. DAY OF THE WEEK Display and modify day of the week. TIME Display and modify time. PARAMETER Select and modify parameters. Modification of values, navigation – Modification of values. – The keys are used for navigation within the menu items Parameter, Information and Switching time program (I). – Briefly pressing the and keys confirms and/or saves the selected setting. RESET – – – – Resetting the fault message in the event of a burner malfunction. Rejecting the inputs within the selection menu. Return to the higher-level item within the selection menu. Acknowledgement of fault messages by the user and return to standard display. Special functions Simultaneously pressing the and keys for longer than 2 seconds activates the Emission measurement Simultaneously pressing the and keys activates the Switching time programming program (I) (for more detailed information, see ROTEX Control ALPHA). . for the switching time Display All system temperatures and operating conditions of the system components can be indicated on the display. If there is a fault, a fault code is displayed. Standard display in normal operation: Inflow temperature. BA ROTEX GSU - 09/2007 21 4 x Operation 4.2 Heating mode In the normal mode, the boiler temperature control always works in an automatic or continuous operation mode. The boiler temperature is controlled irrespective of the weather. 4.2.1 Manual setting of the boiler temperature You can operate the ROTEX GSU in the manual mode for manual heating of the heating system or for temporary manual setting if the boiler temperature. • Switching on the mains switch. Wait for the start phase. press for approx. 5 s Target temperature Modify Current actual value Desired setpoint (flashing) Return to original operating mode, basic display, specified setpoint is saved Figure 4-4 Manual operation for THETA 23R (adjust temperature of heater) • • q Set the operating temperature for manual mode. To do this actuate the manual key for about 5 seconds and set the operating temperature on the rotary knob. a Set the rotary switch I to position . Press and simultaneously. 4.2.2 Pump setting for energy-saving operation The 25 kW versions of the ROTEX GasSolarUnit are fitted with a three-stage pump, normally having sufficient output to supply the complete heating system. Additional pumps are needed only if mixed heating circuits are installed. Depending on the heat requirement and design temperatures of the heating system, the pump can also be operated at a reduced speed, without having to restrict the heat supply. You can economise on the pump power in this way. The pump fitted in the ROTEX GSU consumes only about 75-80 W in output stage 3, about 55-60 W in output stage 2 and only about 40 W in output stage 1. Determining the pump stage needed Q Heating output mH Flow rate Figure 4-5 Heat output chart • Determine the throughput quantity needed for a certain heat output depending upon the design scatter from the heat output chart (Fig 4-5). The design scatter describes the temperature difference between the heat flow and heat return flow under the design conditions (as a rule -12 °C outdoor air temperature). 22 BA ROTEX GSU - 09/2007 4 x Operation ΔpR Residual discharge head mH Flow rate Figure 4-6 Residual discharge head of ROTEX GSU heating pump • Determine the hydraulic resistance in the heating network. • Determine the needed output stage of your heating pump by using Fig 4-6. In practice, the hydraulic resistance in the heating network is often not known. By observing the flow and return temperature at the heat generator, you can define whether the pump can still provide sufficient output at a lower speed stage. The difference between the flow and return temperatures must not be greater than the design scatter, and each room must still be adequately heated. 1 2 Heating pump Setting lever for pump output stage Figure 4-7 Setting the pump output stage • Set the pump to the required output stage (Fig 4-7). Example for the determination of the pump output stage – Heat requirement: 13 kW, design temperatures: 75/60 °C, Scatter: 15 K, required throughput quantity : 700l/h, hydraulic resistance in the heating network: 240 mbar. Î As designed, pump stage 2 is sufficient. Even pump stage 1 can suffice during the transition period. The 35 kW versions have a controlled heating pump for which the heating engineer makes the optimum setting at the time of commissioning. It is also possible to set the pump output stage manually, but it is not necessary. 4.2.3 Information on operating noises In some cases, resonance in the flue gas system can amplify the noise at the mouth of the flue gas duct. The noise level can be effectively reduced by using a silencer ( 15 45 78). Air suction noises are generated in ambient air-dependent operations. The noise level can be effectively reduced by using a silencer ( 15 45 77). BA ROTEX GSU - 09/2007 23 4 x Operation 4.3 Temporary shutdown CAUTION! A heating system which is shut down can freeze in the event of frost and may suffer damage. • Drain the shut down heating system if there is danger of frost. • If the heating system is not drained, the gas and power supplies must be maintained and the main switch must remain switched on. If no heating and no hot water supply is needed over a long period, the ROTEX GasSolarUnit can be temporarily shut down. ROTEX however recommend putting the system into Stand-By mode (see documentation for "ROTEX-Control“) and also discontinuing the heating and hot water supply. The heating system is then protected from frost. The pumps and valve protection functions are active. If it is not possible to guarantee the gas and power supply when there is danger of frost, then – the ROTEX GSU must be drained, – suitable antifreeze measures must be taken for the connected heating system and hot water storage tank (e.g. draining). If the danger of frost exists only for a few days, with uncertainly in the gas and power supply, you can omit draining the ROTEX GSU because the heat insulation is excellent, as long as the storage tank temperature is regularly monitord and does not fall below + 3 °C. This does not, however, provide any protection against frost for the connected heat distribution system! Draining the storage tank • Switch off the main switch and secure against re-actuation. • Close gas stop-cock. • Connect hose to the solar return flow using the hose connection from the accessories set (only this connection will open the foot valve automatically). Use the KFE cock on Solaris return flow in the connected Solaris system. • Drain the water from the tank. Drain heating circuit and drinking water heat exchanger • • • • • 4.4 Switch off the main switch and secure against re-actuation. Close gas stop-cock. Separate the heating flow and heating return as well as the cold water inlet and outlet. Connect the bleeding hoses such that the hose opening is just above floor level. Drain the heat exchanger in siphon mode. Re-commissioning If the ROTEX GasSolarUnit has not been in operation for a long time, you have to carry out a few preparatory jobs and tests before re-commissioning. 4.4.1 Work to be done before re-commissioning 1. Fill hot water heat exchanger • Open the shut-off valve in the cold water supply line. • Open the draw-off tap connection for hot water, so that you can set the highest possible draw-off quantity. • Do not interrupt the cold water supply when water exits from the tap connections so that the heat exchanger is vented completely and any contamination or residues are carried out. 2. Fill storage tank. WARNING! Escape of flue gas from the system is dangerous to health. • Top up the storage tank until it overflows, before starting up the ROTEX GSU. 24 BA ROTEX GSU - 09/2007 4 x Operation GSU with installed Solaris system: • Connect hose to the KFE cock of the control and pump unit (RPS). • Top up the storage tank with water until the condensate overflows. GSU without installed Solaris system: • Either fix hose to the supplied hose nozzle and the hose nozzle to the upper side tank connection (see Fig 2-1, item. 12a) or plug hose in the Solaris inflow connection (Fig 2-1, item 7). • Top up the storage tank with water until the condensate overflows. 3. Topping up heating system and storage tank charging circuit WARNING! Contamination of the drinking water is detrimental to health. • Prevent the boiler water from flowing back into the drinking water line when topping up the heating system. • Locate the hand lever on the 3-way valve (Fig 2-1, item 25) in the centre position (only possible if the system is not electrically connected or in the as-delivered state). The centre position is stable only if the valve is not electrically connected. The valve unlocks automatically, if voltage is present on the drive motor for the valve setting AB-A (storage tank charging). In order to ensure complete venting, the 3 way switch valve should be unlocked by pushing it in one hour after system start-up at the earliest. • Connect the filling hose with return flow inhibitor (½") to the filling and draining fittings (KFE cock, Fig 2-1, item 35) and secure from coming off using a hose clamp. • Open water cock on the supply line. • Open the KFE cock and observe the pressure gauge (Fig 2-1, item 31). • Fill the system with water until the mark for the system overpressure is roughly in the centre of the green range in the pressure gauge display. • Shut off the KFE cock. • Vent the entire heating network (open the system control valves). • Check the water pressure on the pressure gauge again and top up with water if necessary. • Close the KFE cock, remove the filling hose and return flow inhibitor from the filling and draining fittings. Function check after start-up The functioning of the heating must be checked after concluding the start-up activities (see section 4.4.2). If you notice irregularities during the function check after start-up or during the initial days of operation, please contact your heating supplier. • Set the target temperature manually (see section 4.2.1). Î The boiler temperature and the storage tank temperature should increase slowly. The gas condensation boiler charges the storage tank until the maximum adjustable storage tank temperature is reached. There fter it switches over to heating mode. • Check all heating lines for leakage in the hot condition. • Set the desired mode (see section 4.1.1 or section 4.1.3). BA ROTEX GSU - 09/2007 25 4 x Operation 4.4.2 Checklist for returning to service Checklist for returning to service 1. ROTEX GSU installed correctly according to an installation version and without recognisable damage? Yes 2. Combustion air supply secured? Yes 3. Sufficient venting of the heating room in ambient air-dependent operation? Yes 4. Does the mains connection conform to the specifications? Yes 5. Mains voltage 230 Volt, 50 Hz? Yes 6. LAS-flue gas line connected correctly and leak-proof? Yes 7. Storage tank topped up with water to overflow, condensate drain line connected correctly and leakproof? Yes 8. In restoration applications: Was the heat distribution network cleaned? Is a dirt filter installed in the heating return flow? Yes 9. Is a membrane expansion tank fitted according to specifications and of the requisite size? Yes 10. Is the safety valve connected to a free outlet? Yes 11. Is the system water pressure in the green range? Yes 12. Are boiler and heating system vented? Yes 13. Are all sensors connected and correctly positioned? Yes 14. Is the mixer group and the mixing circuit sensor (optional) connected correctly to the circuit board? Yes 15. Is the room control (optional) connected correctly to the circuit board? Yes 16. Is the gas connection installed according to specifications, expertly and correctly? Yes 17. Is the gas line vented expertly and leakproof? Yes 18. Do the gas type and gas inlet pressure correspond to the values indicated on the boiler sticker? Yes The system may be returned to service only if the answer to all the questions is "yes". 26 BA ROTEX GSU - 09/2007 5 x Inspection and maintenance 55.1 Inspection and maintenanceof inspection and maintenance General overview WARNING! Improperly executed inspection and maintenance jobs can put human life and health in danger and impair the functioning of the gas condensing boiler. • Work, especially on gas and flue gas-conducting components as well as on electrical systems may only be carried out by heating engineers who have been authorised and trained by the gas or energy supply company. Regular inspection and maintenance of the heating system reduces energy consumption and ensures a long life and smooth operation. Have the inspection and maintenance carried out by authorised and trained heating engineers once a year and, if possible, before the heating period. This will avoid malfunctions during the heating period. Tests during the annual inspection: – General condition of the heating system, visual inspection of connections and conduits. – Condensate drain, flue gas temperature and possibly optional flue gas temperature sensor. – Burner operation and burner settings. Maintenance work to be carried out annually: – Cleaning of the burner components, the combustion chamber and the heating surfaces. – Cleaning of the storage tank and the silencer hood. – Replacement of the wearing parts (if required). ROTEX recommends that you make an inspection and maintenance contract to ensure regular inspection and maintenance. • Have the inspection and maintenance confirmed in the maintenance log. The maintenance log is included in the scope of delivery. 5.2 Inspection and maintenance tasks WARNING! Live parts can cause electric shock on contact, and cause life-threatening burns and injuries. • Before beginning maintenance work, disconnect the ROTEX GSU from the power supply ROTEX GSU (switch off fuse, main switch) and secure against unintentional restart. WARNING! Danger of burning on hot surfaces. • Let the burner cool down for an adequate period before maintenance and inspection work. • Wear protective gloves. BA ROTEX GSU - 09/2007 27 5 x Inspection and maintenance Remove the silencer hood. For inspection and maintenance, it is necessary to remove the silencer hood placed on the storage tank. 1 2 3 Remove the fixing screws. Tilt the silencer hood. Lift the silencer hood off to the front. Figure 5-1 Remove the silencer hood. Cleaning silencer hood and storage tank • Clean the easy-to-maintain plastic only with soft cloth and a mild cleaning solution. • Do not use any cleaners with aggressive solvents, it may damage the plastic surface. 5.2.1 Checking the connections and conduits WARNING! Improperly carried out work on power or gas-conducting components can endanger human life and health and adversely affect the operation of the GasSolarUnit. • Only heating engineers authorised and recognised by the gas or energy supply company should replace damaged power or gas-conducting components in the ROTEX GSU. • Check all (flue) gas and water-conducting components and connections for leakage and intactness. Have damage corrected by a specialised agency. • Check all components of the flue gas system for leakage and damage. Have the damaged parts reconditioned or replaced. • Check all electrical components, connections and conduits. Have the damaged parts reconditioned or replaced. 5.2.2 Checking and cleaning the condensate drain. The connection and leakage line of the condensate drain must be free from impurities. • If a Solaris system is connected and is in operation, switch it off and empty the collectors. • Open the condensate drain (connection and drain conduit). • Check that the condensate drain is free from blockages and clean if necessary. • Unscrew the overflow hose. • Visual inspection of container filling level (water level at the overflow rim). • Correct the filling level if necessary and determine the cause for the shortfall in filling level and rectify it. • Check overflow hose connection and drain section for leakage, free flow and slope. Figure 5-2 Check condensate drain The condensate is a weak acid. It is conducted to the pressureless area of the storage tank. This ensures that, in normal system operation, the storage tank is always completely full. A long-term neutraliser in the container ensures that the fluid leaving the container has a neutral pH. Any precipitation remains in the pressureless area of the container. 28 BA ROTEX GSU - 09/2007 5 x Inspection and maintenance 5.2.3 Checking and cleaning the burner DANGER OF EXPLOSION! Escaping gas is a direct threat to human health and life. Even a few sparks can cause major explosions. • Only heating specialists trained and authorised by the gas or energy supply companies should be allowed to work on gas systems. As a rule, the burner is wear-free. If you detect contamination or unsatisfactory combustion values, have a Heating expert dismantler, clean and possibly reset the burner (also refer to installation and maintenance instructions for the Expert). Checking the burner The burner inspection includes visual inspection of the burner condition as well as flue gas measurements. The checking of the burner is done by the Heating expert as part of the legally specified flue gas check. In the course of maintenance work, safety-relevant components must also be checked to make sure that they are achieving the nominal service life: – CVBC automatic firing unit 10 years or 250.000 burner starts, – Safety gas control block 10 years or 250.000 burner starts, – Overpressure safety valve: 10 years. We recommend completing the service log provided with all the measured values and the tasks performed, with dates and signature. BA ROTEX GSU - 09/2007 29 6 x Faults and malfunctions 66.1 Faults and malfunctions Troubleshooting The electronics of the ROTEX GasSolarUnit detects faults and indicates them: – by a fault code in the display, for faults detected by the ROTEX THETA 23R or ROTEX ALPHA 23R. – by the collective fault signals in the boiler control panel and through a fault code on the display, for faults detected by the CVBC automatic firing unit, which leads to an interlocking failure. You will find exact information regarding the control and boiler control panel as well as the mode and parameter settings in the "ROTEX Control" documentation supplied with the corresponding control. Unlocking in the event of fault shutdown The CVBC automatic gas firing unit starts and monitors the firing program sequence. This is followed by a fault shutdown: – if the starting speed of the burner fan is not reached, – if a flame signal is present during pre-ventilation, – if no flame is produced at the start (fuel release) after 5 sec (safety period) (5 start attempts), – if no flame is able to start or a flame failure during operation, or failed program repetition. The fault shutdown of the burner is displayed by "E" and a fault code on the display of the boiler control panel. Fault resolution WARNING! If a fault is not found and rectified properly, it can pose a risk to human life and health and adversely affect the functioning of the gas condensing boiler. • Work, especially on gas and flue gas-conducting components as well as on electrical systems may only be carried out by heating engineers who have been authorised and trained by the gas or energy supply company. • Determine and rectify the cause of the malfunction (refer to Chapters 6.2 and 6.3). If the cause of the failure cannot be determined, please contact a specialised heating company. • Unlocking the burner on the control Fig 4-1, item 13) (maximum 5 times/hr). q Unlock the burner by pressing the a Unlock the burner by pressing the key on the control Fig 4-3, item 19) (maximum 5 times/hr). If there are several fault shutdowns successively, you must check the heating system (e.g. flue system, fuel supply). Please contact a specialised heating company. Non-interlocking failures are indicated as long as the failure conditions are present. If the cause has been eliminated the unit continues to work normally. 6.2 Malfunctions Malfunction Possible cause Possible solution No mains voltage Heating system not functioning (main switch not illuminated, no display) • • • • Heating does not heat up Central heating stand-by switched off (e.g. timer is in economy phase, outside temperature too high) • Check operating setting • Check demand parameters Heating does not heat up Heating characteristic too low enough • Raise parameter value Hot water does not heat up 30 Switch on boiler main switch Switch on heating room main switch Switch on house connection fuse Replace fuse on boiler control panel Storage charging stand-by switched off (e.g. timer is in • Check operating setting economy phase) • Check demand parameters BA ROTEX GSU - 09/2007 6 x Faults and malfunctions Malfunction Possible cause Hot water does not heat Storage tank charging temperature too low up enough Draw-off rate too high Possible solution • Raise hot water target temperature • Reduce the draw-off rate, limit throughput Burner output too low • See failure "Max. burner output too low" Burner does not start Interlocking failure • Establish cause of failure and eliminate it • Release the interlocking by briefly pressing the manual button (max. 5 times per hour) Burner fan not running despite burner demand No mains voltage on burner fan • • • • Fan motor faulty • Replace burner fan Ignition electrodes dirty, faulty or incorrectly set • Clean ignition electrodes • Set ignition electrodes • Replace burnt out or ignition electrodes which cannot be adjusted • Replace ignition electrodes which have faulty insulation Ignition cable burnt • 1. Establish cause and eliminate it • 2. Replace ignition cable Automatic firing unit faulty • Replace automatic firing unit No mains voltage on burner • Check the plug in the control panel and on the automatic firing unit and insert it correctly • Replace cables Flame monitoring switches off • Adjust ionisation electrode • Clean the oxidised electrode surfaces of the ionisation electrode (with fine emery paper) • Replace worn ionisation electrodes No gas pressure • Check gas connection Air in the gas line • Vent gas line Gas valve not opening • Check plug connection between gas valve and automatic firing unit and insert correctly • Realign connecting pins of the plug connection • Check gas valve (vacuum at outlet pressure measuring socket during pre-ventilation, zero pressure during the ignition) • Replace gas valve • Replace automatic firing unit No ignition • See "No ignition" failure Wrong burner setting • Correct the burner setting Bearing damage on burner fan • Reduce maximum output • Replace burner fan No ignition Burner fan not starting despite burner demand Loud operating noises Maximum burner output Incorrect setting parameters too low Air/flue gas resistance too high Tab. 6-1 Insert the 3-pin plug on the fan until it clicks in place Insert the 5-pin plug on the fan until it clicks in place Check the voltage at the terminals of the plug Check the plug in the control panel and on the automatic firing unit and insert it correctly • Adjust output parameters • Check ducts for dirt. • Use ducts with larger cross section for supply air or flue gas if necessary Possible faults on the ROTEX GSU BA ROTEX GSU - 09/2007 31 6 x Faults and malfunctions 6.3 Fault codes Control THETA 23R Fault code 10-0 Component/name Outside temperature sensor 10-1 Interruption Short circuit 12-0 Inflow temperature sensor, mixer circuit Interruption, mixer circuit pump is switched off, mixer motor is switched de-energised 12-1 Short circuit, mixer circuit pump is switched off, mixer motor is switched de-energised 13-0 Hot water storage tank temperature sensor Interruption 14-7 Modem contact Fault signal 15-7 Burner blockage contact Fault signal 16-0 Flue gas temperature sensor (if installed) Short circuit 16-1 Interruption 16-7 Fault signal 13-1 17-0 Return flow temperature sensor 17-1 30-2 Short circuit Interruption Short circuit Burner 30-3 No switching off No switching on 33-5 Flue gas temperature Overshooting 70-0 Address Address collision of the BUS subscribers 70-1 Activity No T2B signal, check BUS cable and connections 70-6 Communication between control THETA Interruption and CVBC automatic firing unit 71-0 EEPROM Internal fault 71-1 EEPROM faulty Internal fault Tab. 6-2 32 Fault Fault codes for the ROTEX GSU for control THETA 23R (detected from the central unit) BA ROTEX GSU - 09/2007 6 x Faults and malfunctions Fault code Component/name E 01 CVBC automatic firing unit interlocking fault E 02 Fault No flame detection during the 5 possible start attempts Wrong flame signal ionisation current outside the permitted range E 03 STB failure: Inflow temperature too high E 05 No speed signal from burner fan within 10 sec E 08 Fault in the flame monitoring routine E 10 EEPROM communication error E 11 CVBC automatic firing unit interlocking fault Sensor equalisation procedure for electronic STB function faulty or return flow temperature higher by 3 K than flow temperature for more than 3 min. E 19 Microprocessor H - I/O error E 20 Microprocessor L - I/O error E 21 Microprocessor H - A/D-converter error E 22 Microprocessor L - A/D-converter error E 25 Internal fault E 26 5 times flame stalling within 4 minutes B 09 CVBC automatic firing unit temporary failure B 30 Error in gas valve control routine Flow sensor short circuit B 31 Flow sensor interruption B 34 Low voltage (< 185 V) B 35 Fluctuating mains frequency (more than ±2 Hz) B 37 Internal fault B 43 Return flow sensor short circuit B 44 Return flow sensor interruption B 99 Internal communication between control and CVBC automatic firing unit interrupted. Tab. 6-3 Fault codes for the ROTEX GSU for control THETA 23R (detected from the automatic firing unit) Control ALPHA 23R Fault code Component/name Fault 10-0 Outside temperature sensor interruption The resistance of the outside temperature sensor is high or the calculated value is above 130°C. The system continues to work with a constant outside temperature value of 0°C until the measured values are in the correct range again. 10-1 Outside temperature sensor short circuit The resistance of the outside temperature sensor is zero or the calculated value is below -40°C. The system continues to work with a constant outside temperature value of 0°C until the measured values are in the correct range again. 11-0 Flow temperature sensor interruption The resistance of the flow temperature sensor is high or the calculated value is above 130°C. The system goes out of operation. The system resumes operation only after the measured values last for longer than 1 sec. 11-1 Flow temperature sensor short circuit The resistance of the flow temperature sensor is zero or the calculated value is below -40°C. The system goes out of operation. Control functions continue to run. The system resumes operation only after the measured values last for longer than 1 sec. 12-0 Mixer circuit temperature sensor interruption The resistance of the mixer circuit temperature sensor is high or the calculated value is above 130°C. The system goes out of operation. The system resumes operation only after the measured values last for longer than 1 sec. 12-1 Mixer circuit temperature sensor short circuit The resistance of the mixer circuit temperature sensor is zero or the calculated value is below -40°C. The system goes out of operation. The system resumes operation only after the measured values last for longer than 1 sec. BA ROTEX GSU - 09/2007 33 6 x Faults and malfunctions Fault code Component/name Fault 13-0 Storage tank temperature sensor interruption (if sensor registered) The resistance of the storage tank temperature sensor is high or the calculated value is above 120°C. A hot water demand with a fixed flow temperature of 40°C is generated at intervals of 30 minutes. This has a time limit of 10 minutes. The system resumes regular operation only after the measured values last for longer than 1 sec. 13-1 Storage tank temperature sensor short circuit (if sensor registered) The resistance of the storage tank temperature sensor is zero or the calculated value is below -40°C. A hot water demand with a fixed flow temperature of 40°C is generated at intervals of 30 minutes. This has a time limit of 10 minutes. The system resumes regular operation only after the measured values last for longer than 1 sec. 16-0 Flue gas temperature sensor interruption Measured value >150°C (if registered by parameter [1]) The system goes out of operation. The system resumes operation only after the measured value last for longer than 1 sec. 16-1 Flue gas temperature short circuit (if registered by parameter [1]) Measured value <-10°C 30-3 Burner failure: does not switch on There is a burner demand. However, no burner counter signal (oil) or burner flame signal (gas) could be detected after 20 minutes. The display issues a warning, which can be quit using "RESET". The control functions continue to work normally. 30-9 Burner failure, gas The automatic firing unit registers a failure through the bus. The burner can be reset by pressing the key. The control functions continue to work normally. 33-5 Flue gas temperature sensor: warning temperature reached Measurand > Parameter [23] The system goes out of operation. The system resumes operation only after the measured value last for longer than 1 sec. The display issues a warning, which can be quit using "RESET“. The system continues to work normally. 33-8 Flue gas temperature sensor: switch-off Measurand ≥ Parameter [22] temperature reached The burner is taken out of operation for 10 minutes. Then it is unlocked until the next time the temperature [22] is exceeded. The system resumes normal operation after expiry of the cooling phase. 70-1 Communication fault ALPHA 23R/CVBC The system is stopped until communication is restored or the fault is rectified. The display can be deleted via "RESET". 99-9 Undervoltage The mains voltage falls below 190 V for at least 1 sec. The processor backs up all data and goes into sleep mode. All relay contacts drop out. If the mains voltage goes over 195 V for at least 5 secs restart is triggered. uuuu Interruption of a sensor nnnn Short circuit in a sensor Tab. 6-4 34 Fault codes for the ROTEX GSU for control ALPHA 23R BA ROTEX GSU - 09/2007 6 x Faults and malfunctions 6.4 Emergency operation Note the following for emergency operation if the valve drive is faulty: • Press the unlocking key (Fig 6-1, item. 5.2) and rotate the motor head of the valve drive (Fig 6-1, item 5.1) 1/4 turn to the left and remove. Î The 3-way switch valve is set to the "Heating" position. Note the following for the temporary manual parallel operation of the heating circuit and the hot water storage tank: • Pull the 6-pin plug out on the valve drive. • Move the switch valve to the middle position using the hand lever (Fig 6-1, item 5.3). (Only possible if the valve drive was previously set to the "Heating" position. 1 2 3 4 Boiler inflow Heating inflow Inlet, storage tank charging 3-way diverting valve 5.1 5.2 5.3 Valve drive Release button for drive locking device Hand lever Figure 6-1 3-way diverting valve q In the event of failure or incorrect settings of the electronic control, emergency heating operation can be maintained. • Press the manual button on the controller for about 5 sec. Î The indication "Manual operation" appears on the display. • Adjust the desired temperature with the rotary switch (setting range 5 - 80 °C). In manual operation, the 3-way switch valve is in the "Storage tank charging" position first. On reaching the maximum adjustable storage tank temperature, the 3-way switch valve moves to the "Heating" position. BA ROTEX GSU - 09/2007 35 7 x Technical Data 77.1 Technical data and connection dimensions Dimensions A View from the side B View from the front C View from above Figure 7-1 Installation dimensions for flue gas connection towards rear (for values, see Tab. 7-1) A View from the side B View from the front C View from above Figure 7-2 Installation dimensions for flue gas connection on the side (for values, see Tab. 7-1) Dimension GSU 320 GSU 520S h1 1404 1384 1384 h2 1869 1846 1828 h3 1918 1896 1878 r1 202 299 264 GSU 535 r2 203 284 284 s1 213 115 150 s2 228 130 165 s3 377 295 295 t 615 780 780 w 590 780 780 Tab. 7-1 36 GSU 530S Dimensions table for assembly dimensions (relating to Fig 7-1, Fig 7-2) BA ROTEX GSU - 09/2007 7 x Technical Data Connecting dimensions for heating and hot water connection 1 2 3 4 Cold water (pipe thread 1“ male) Hot water (pipe thread 1“ male) Heating flow (pipe thread with ball cock 1“ female) Heating return flow (pipe thread with ball cock 1“ female) 5 Solaris flow (pipe thread flat sealing 1“ SN) A B front rear Figure 7-3 Connecting dimensions for heating and hot water connection (plan view)) ROTEX recommends installing gravity brakes or siphoning (connecting lines leading directly downwards) of the drinking water connection in order to avoid higher cooling losses. BA ROTEX GSU - 09/2007 37 7 x Technical Data Standard data Type (1)* Parameter Unit Total storage capacity Litres Empty weight (11)* GSU 320 GSU 520S GSU 530S GSU 535 300 500 500 500 kg 86 124 128 128 Total filled weight kg 386 624 628 628 Dimensions (L x B x H) cm 59.5 x 61.5 x 159 79 x 79 x 181 79 x 79 x 181 79 x 79 x 181 Maximum permissible storage water temperature °C 85 85 85 85 kWh/24 h 2,4 1,8 1,8 1,8 bar 6 6 6 6 Stainless steel 1.4404 Stainless steel 1.4404 Stainless steel 1.4404 Stainless steel 1.4404 Stand-by heating power Max. operating pressure, drinking water PMW (14)* Drinking water heat exchanger material Drinking water heating Drinking water capacity Litres 19,0 24,5 24,5 24,5 Drinking water heat exchanger surface m2 5,5 5,5 5,5 5,5 Average specific heat capacity W/K 1820 2470 2470 2470 Storage tank charging heat exchanger (stainless steel) Water capacity heat exchanger Litres 10,0 10,4 10,4 19,5 Heat exchanger surface area m2 2,1 2,3 2,3 4,3 Average specific heat capacity W/K 910 1040 1040 1950 Heat exchanger surface area m2 — 0,43 0,43 — Average specific heat capacity W/K — 200 200 — Cold and hot water Inch 1" MT 1" MT 1" MT 1" MT Heating inflow and return flow (with ball cock) Inch 1" FT 1" FT 1" FT 1" FT GSU 320 GSU 520S GSU 530S GSU 535 2,0 2,1 2,2 4,4 l/min 27 30 31 39 Continuous rating QD according to DIN 4708 kW 20 20 30 35 Continuous output l/h 440 615 630 860 Hot water quantity without reheating at 15 l/min draw-off rate (TKW = 10°C / TWW = 40°C / TSP = 60°C) Litres 200 220 220 412 Hot water quantity when reheating at nominal output and with 15 l/min draw-off rate (TKW = 10°C / TWW = 40°C / TSP = 60°C) Litres 360 500 1180 unlimited Litres 200 210 215 310 Solar heating support (stainless steel) Pipe connections Tab. 7-2 Standard data of ROTEX GasSolarUnit Type (1)* Parameter Unit Efficiency characteristic NL according to DIN 47081) D value (specif. water flow) according to EN 6252) (15)* 1) Short-term water quantity in 10 min3) Tab. 7-3 1) 2) 3) Thermal output data for ROTEX GasSolarUnit Recharging with nominal output, flow temp. TV=80 °C, storage tank starting temp. TSP=65 °C, cold water temp. TKW=10 °C, hot water temp. TWW =45 °C. The specific water flow according to EN 625 is the drinking water flow with an average temperature increase of 30 K that the ROTEX GSU can deliver with two consecutive draw-offs each lasting 10 minutes assuming a charging temp. of 65 °C. In this case a 20 minute waiting time between draw-offs is assumed in accordance with the standards. The ROTEX GSU achieves this value even after shorter waiting times. Recharging with nominal output, storage tank starting temp. TSP=60 °C, cold water temp. TKW=10 °C, hot water temp. TWW=40 °C. * Item number see Fig 7-4 38 BA ROTEX GSU - 09/2007 7 x Technical Data Type (1)* GSU 320 Parameter GSU 520S GSU 530S GSU 535 Unit CVBC Honeywell automatic firing unit S4965 V 1059 ROTEX Honeywell gas valve VK 4115 V2 Burner fan G1G118/NRG118 G1G126 RG148 Nominal output P (6)* kW 3,7-20,0 3,7-20,0 6,5-30,0 8,0-35,0 Rated thermal load Q (5)* kW 3,7-21,0 3,7-21,0 6,6-30,9 8,5-36,1 Electrical power consumption (including heating circulation pump) (9)* W < 114 < 114 < 135 < 148 Device type (2)* B23, C13x, C33x, C43x, C53x, C63x, C83x Product ID (CE number) (3)* CE-0085 BM 0065 NOx class (4)* 5 Voltage supply (8)* 230 V~, 50 Hz Protection type (10)* IP 20 Water content Litres 2,0 3,6 Max. permissable operating pressure: (12)* bar 3,0 Max. permissible operating temperature (13)* °C 85 % 110 Max. boiler efficiency Tab. 7-4 Heat generator characteristic data 1 2 3 4 5 6 7 8 9 10 11 12 13 14 15 16 Type Unit type Product ID (CE number) NOx class Rated thermal load Nominal output Operating country Voltage supply Electr. power consumption Protection Net weight Max. permissible operating pressure Max. permissible operating temperature Max. operating pressure D value Manufacturer's number (to be stated in the event of complaints and queries) Figure 7-4 Information on type plate on bottom right hand side of storage tank (for information on items see Tab. 7-2 to Tab. 7-4) Integrated connection group GSU Heating circulation pump GSU 320/GSU 520S GSU 530S/GSU 535 GSU Grundfos UPSO 15-50 CIL 2 Alphaplus 15-60 CIL 2 3-way diverting valve Voltage 230 V, 50 Hz Maximum power consumption 60 W 230 V, 50 Hz 75 W 4.3 W Capacity 2.5 µF — Protection type IP 44 IP 40 Permitted overpressure 3 bar 4 bar Maximum pumping height Changeover time Tab. 7-5 5m 6.2 m — — — 6s Technical data of the integrated connection group * Item number see Fig 7-4 BA ROTEX GSU - 09/2007 39 7 x Technical Data Q Burner load n Fan speed mH Flow rate, heating system Figure 7-5 Permissible burner loads of ROTEX GSU ΔpR Residual discharge head Figure 7-6 Residual discharge head GSU 320 and GSU 520S (on heating side) ΔpR Residual discharge head mH Flow rate, heating system Figure 7-7 Residual discharge head GSU 530S and GSU 535 (on heating side) 40 BA ROTEX GSU - 09/2007 7 x Technical Data Figure 7-8 Flue gas setpoint values for burner adjustment with reference to burner output P for GSU 320 and GSU 520S, O2 content or CO2 content* Figure 7-9 Flue gas setpoint values for burner adjustment with reference to burner output P for GSU 530S, O2 content or CO2 content* Figure 7-10 Flue gas setpoint values for burner adjustment with reference to burner output P for GSU 535, O2 content or CO2 content* * The points indicated identify the factory settings BA ROTEX GSU - 09/2007 41 7 x Technical Data Q Heating output mH Flow rate, heating system Figure 7-11 Required throughput volumes dependent on the heating output and the design temperature spread RS t PTC resistance external temperature, mixer circuit feed temperature NTC resistance feed temperature, return temperature Pt 1000 resistance Flue gas temperature Sensor resistance Temperature Figure 7-12 Resistance characteristics of the temperature sensor Sensor Temperature sensor Measured temperature in °C -20 -10 0 10 20 30 40 50 60 70 80 90 100 Outside temperature, Mixer circuit Inflow 1386 1495 1630 1772 1922 2080 2245 2418 2598 2786 2982 3185 3396 temperature NTC Flow temperature, return flow temper- 98660 56250 33210 20240 12710 8195 5416 3663 2530 1782 1278 ature Pt 1000 Flue gas temperature 922 42 120 519 395 Sensor resistance in Ohm according to standard or manufacturer's data PTC Tab. 7-6 110 961 932 690 1000 1039 1077 1116 1155 1194 1232 1270 1308 1347 1385 1423 1461 Resistance values of the temperature sensor BA ROTEX GSU - 09/2007 7 x Technical Data 7.2 1 2 4 5 20 21 22 23 24 25 Wiring diagram Mains power switch Common fault indicator Capillary tube pressure gauge Control: Central unit THETA 23R 4-pin circuit board connector with switch cable 4-pin circuit board connector with fault indicator cable 4-pin mains circuit board connector with clamped mains cable and earthing connection 3-pin circuit board connector with pump cable Heating circulation pump 3-pin circuit board connector for connecting a circulation pump 26 27 28 29 30 31 32 3-way diverting valve 33 4-pin circuit board connector with valve cable 34 6-Pin circuit board connector with connected 35 burner cable (voltage supply for automatic firing unit and burner fan) 36 Modulating gas burner automatic firing unit 7-pin circuit board connector for connecting a 37 mixer motor and mixer circulation pump 38 3-pin circuit board connector with communication 39 cable 40 12-pin circuit board connector for clamping 41 sensors, BUS and control lines External temperature sensor Storage tank temperature sensor 8-pin circuit board connector with terminating resistor or flue gas temperature sensor (optional) 16-pin MOLEX plug with cable for flow and return flow temperature sensor as well as fan control Flow temperature sensor Return flow temperature sensor Burner fan Control panel circuit board Stickers for terminal assignment Figure 7-13 Wiring diagram (showing the control THETA 23R) BA ROTEX GSU - 09/2007 43 Figure 7-14 Circuit diagram GasSolarUnit (shown on ROTEX Control THETA 23R) Connection cable colours bl blue br brown ye yellow gn green gr grey rd red bl black wt white n.a. contact not assigned 7 x Technical Data Circuit diagram 44 BA ROTEX GSU - 09/2007 x Notes BA ROTEX GSU - 09/2007 45 Notes 46 BA ROTEX GSU - 09/2007 8 x Glossary Flue gas mass flow Flue gas volume, which the flue gas system dissipates to open air, depending on the preset burner output. Filling water Water quantity, which is to be filled into the heating system before initial start-up. Burner setting Adjustments to the gas burner, which should be carried out only by technical staff, for example setting the gas type, gas air mixture, maximum and minimum output, of the gas pressure controller as well as the electrodes. Calorific value Energy which is generated during combustion of the fuel as well as of the condensation of the flue gas as heat, and can be used (synonym = gross calorific value) Condensing technology Heat engineering, which uses the condensation heat of the flue gas in addition to the sensitive combustion energy (calorific value) and raises the efficiency of the system. EnergySaving Regulation (EnEV) Legal specification, which defines the standards of the civil engineering and heat engineering and evaluates the efficiency of the heating and hot water preparation, and which replaced the heat protecting and heating system ordinance on 01-02-2002. Make-up water Quantity of water to be topped up on water loss. Automatic firing unit System, which starts and controls the gas burner, monitors the combustion process and switches off the gas burner in the event of a fault. Gas/air compound control System, which adjusts the gas volume flow through the gas pressure controller according to the air-mass flow. Thermal characteristic Mathematical relationship between outside temperature and target temperature of the inflow (synonym = Heat curve), required to reach the desired room temperature at every outside temperature. Heating circuit Circuit of the heated water from the heating boiler to the heating surfaces and back again. Heating return flow Section of the heat circulation which conducts the cooled water through the pipe system from the heating surfaces in the room back to the heating boiler. Heating circulation Section of the heat circuit, which conducts the heated water from the heating boiler to the heating surfaces in the rooms. Boiler control panel Operating unit in the front area of the heating boiler, which comprises main switch, fault indicators. water pressure gauge as well as program selection keys, rotary knobs and display. Condensation heat Energy, which is generated at the time of condensation of the water vapour in the cooling gas and is used in condensing technology for generating heat. Air/flue gas system (LAS) System made of flue gas and air suction tubes, which cools flue gas by counter current and heats the air being drawn in. On one hand, the generated condensation heat from the flue gas is used. On the other, the flue gas heats the drawn in combustion air. Both factors raise the efficiency of the system. Modulation Automatic and continuous adjustment of the heat output to the heat requirement at the time, without having to switch various heat stages or cycles. Nominal output Maximum heat output, which the heating boiler emits at certain operating temperatures. Ambient air-dependent mode Operating method of the system, in which the heating unit takes the air needed for combustion from the installation room. Ambient airindependent mode Operating method of the system, in which the heating unit draws the air needed for combustion not from the installation room, but through the air-flue gas system from the open air. Water shortage protection/ overheating protection Safety device which switches the heating boiler off if there is water shortage, to avoid overheating. Timer program Times which you can set on the operating unit to define regular heating, economy and hot water phases. 8 Glossary BA ROTEX GSU - 09/2007 47 For the chimney sweep For the chimney sweep Data 8 for designing the flue gas conduit Rated output in kW Appliance GSU 320 (F) GSU 520S (F) GSU 530S (F) GSU 535 (F) Tab. 9-1 Burner load in kW Flue gas mass flow in g/s 40/30 °C 80/60 °C Natural gas E/H 5.4 10.7 15.8 20.8 21.4 7.6 16.0 21.1 26.3 31.1 8.6 16.0 21.1 26.3 37.3 5.0 9.9 14.7 19.4 20.0 7.0 14.9 19.6 24.4 29.1 8.0 14.9 19.6 24.4 34.9 2.01 4.20 6.30 8.40 8.65 2.94 6.30 8.40 10.50 12.60 3.36 6.30 8.40 10.50 15.12 5.0 10.0 15.0 20.0 20.6 7.0 15.0 20.0 25.0 30.0 8.0 15.0 20.0 25.0 36.0 Liquefied Natural gas petroleum LL/L gas 2.10 1.90 4.21 3.80 6.31 5.70 8.42 7.61 8.67 7.83 2.95 2.67 6.31 5.70 8.42 7.61 10.52 9.51 12.62 11.41 3.37 3.04 6.31 5.70 8.41 7.61 10.52 9.51 15.15 13.69 Flue gas temperature in °C 40/30 °C 80/60 °C 34 37 40 44 44 37 41 43 45 47 38 41 43 45 48 64 66 68 70 70 63 68 70 72 73 64 68 70 72 74 Available delivery pressure in Pa 40 110 170 200 200 40 120 180 200 200 40 120 180 200 200 Triple values for chimney design Check measurement ROTEX THETA 23R Check measurement ROTEX ALPHA 23R The check measurement can be carried out by an easily 1. The rotary switch II (Fig 4-3, item 6) is or must be put in position . selectable automatic function (see also the supplied "Short • Pressing the and Fig 4-3items 8 and 9 keys simultaneously for the first time instruction manual" or the "Operating manual for ROTEXensures that the emission measurement can be conducted within 20 minutes in full load Control“. operation. • Press manual key (Fig 4-1, item 13). • Pressing the and keys simultaneously once more ensures that the emission measurement can be conducted within 20 minutes in partial load operation. Î The gas condensing boiler controls the maximum During emission measurement, the display alternates between the remaining time for the boiler temperature for a period of 20 minutes. emission measurement and the inlet temperature. • Press the manual key again. Î The gas condensing boiler regulates back to the 2. After 20 minutes, for safety reasons, the control automatically switches back to the mode selected earlier. The emission measurement can be restarted, if necessary. minimum output. The period for this setting is If the function is to be interrupted, simply press the and keys simultaneously. also 20 minutes. If you press the key once more during these 20 minutes, the emission measurement is terminated prematurely. Remaining time from activation Remaining time from activation Current heater temperature Current heater temperature Ending emission measurement prematurely Figure 9-1 Symbolic quick-reference manual for chimney sweep mode, THETA control 23R 48 Figure 9-2 Symbolic brief instructions for chimney sweep mode control ALPHA 23R BA ROTEX GSU - 09/2007 008.15 107 44· Errors and technical modifications reserved · Original manual 09/2007 · 008.15 107 49 · German 9