1
Pump Service
3. Lubricate outside rubber surface of ceramic seat with soapy water and
press firmly into seal cavity with finger pressure. If seat will not locate
properly in this manner, place cardboard washer over polished face
of seat and press into seal cavity using a 3/4” socket or 3/4” piece of
standard pipe.
4. Dispose of cardboard washer. Be sure polished surface of seat is free
of dirt and has not been damaged by insertion.
Installation of Rotating Part of Seal Unit (Figure 3D)
1. Reinstall seal plate.
2. Inspect shaft to make sure that it is clean.
3. Clean face of sealing washer with clean cloth.
4. Lubricate inside diameter and outer face of rubber drive ring with soapy
water and slide assembly on motor shaft (sealing face first) until rubber
drive ring hits shaft shoulder.
5. Screw impeller on shaft until impeller hub hits shaft shoulder. This will
automatically locate seal in place and move the sealing washer face
up against seat facing. Reinstall impeller screw (if used).
Due to the simple, rugged construction of the pump, it should require little
service. However, if it should be necessary to replace a part, the following
procedure should be used.
1. Remove the capscrews, Key No. 8, which hold the pump body to the
engine adapter.
2. The pump body can now be removed.
3. A tap on the volute diffuser, Key No. 18, will enable you to remove it,
exposing the impeller.
4.Remove the impeller from the engine shaft by turning counterclockwise.
5. Seal replacement. The shaft seal consists primarily of two parts, a
rotating member and a floating seat.
The highly polished and lapped faces of this seal are
easily damaged. Read instructions and handle the seal with care.
Some models are equipped with an impeller screw, which has a left hand
thread. Before unscrewing the impeller, remove the impeller screw.
MAINTENANCE
Removal of Old Seal
Be sure to drain pump during freezing weather to prevent damage from
frost. To drain, remove drain plug directly below the suction inlet of the
pump; also remove the priming plug. Drain the suction pipe at a point
below the frost line. All pipe exposed to freezing temperatures should
also be drained. Before restarting pump, replace all connections and
plugs and reprime.
For service and maintenance to the engine, see the booklet which comes
with the engine.
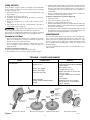
1. After unscrewing impeller, carefully remove rotating part of seal by
prying up on sealing washer, using two screwdrivers (see Figure 3A,
below). Use care not to scratch motor shaft.
2. Remove seal plate from motor and place on flat surface, face down.
Use a screwdriver to push ceramic seat out from seal cavity (see
Figure 3B, below).
Installation of Floating Seat (Figure 3C)
1. Clean polished surface of floating seat with clean cloth.
2. Turn seal plate over so seal cavity is up. Clean cavity thoroughly.
Trouble – Causes and Remedy
Remedies
Fill pump body with water
Pump should operate about 3500 RPM
- Check engine
Clean suction screen
Put pump closer to water
Tighten connections or replace with
new hose or pipe
Use pipe compound to seal all male
threads
Clean impeller
Submerge suction hose or piping
enough so that no air enters while
pump is operating
Probable Cause
Pump not primed
Speed too low
Trouble
No water delivered or not enough
water delivered.
Suction line clogged
Suction lift too high
Air leak in suction line
Impeller plugged
Suction end not submerged deep
enough
3/4" socket
or pipe
Shaft
shoulder
Cardboard
washer
Rubber drive
ring
(supplied w/seal)
Polished
surface
Mechanical seal
rotating half
Mechanical seal
stationary half
Rubber
surface
Sealing
face
Impeller
Seal Plate
A-Seal removal-rotating half
B-Seal removal-stationary half
C-Stationary half installation
Figure 3
D-Rotating half installation
685 0294
3