1
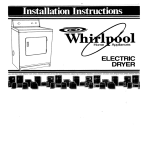
CONVERTIBLE COMPACT
DRYER 120 VOLT
Before you start.. .
Check locol~on where dryer will
be vistalIed
Proper rnstallotron
IS
your responslblllty Make sure you
have everythIng
necessary
for
correct I”StollotlO”
Check
Protection trom weather:
Proper
operation
of the dryer requires
temperatures
above
45 F
Location: must be large enough
to fully open dryer door See Panel
B for recessed
area requrremenls
and product
dlmens~ons
Important:
Observe all
governing
codes and
ordinances.
code
requiremenls:
Sane codes do not permit
or llrnlt rnstollotron
of clothes
dryers in goroges.
closets,
mcbrle homesand
sleeping
quarters
Contact
your locot
buslding
inspector
Grounded
electrical
IS requrred
See ElectrIcal
1
WARNING:
Potential Fire Hazard
It is the personal
responsibility of the customer
to ensure that gasoline, paint
thinners and other flammable
materials are not used or
stored near dryer. Fumes from
these materials could result
in fire or explosion.
l Never
install dryer up
against draperies or curtains.
Keep any and all items from
falling or collecting behind the
dryer.
l Replace
all access or service
panels before operating the
dryer.
l
outlet
For Your Safety:
Do not exhaust dryer into a
chimney, furnace cold air duct,
attic or crawl space, or any
other duct used for venting.
Accumulated lint could
become a fire hazard or
moisture could cause damage.
l The exhaust
system should
be cleaned at least once every
2 years.
l Flexible
duct should never
be installed concealed in wall,
ceiling or floor.
l
fron
the
Assistance
WIII be needed
auring cenan
sleps 10 move
dryer
yr-’
cI’
2-c
1
\
Support:
Floor must be sturdy
enough
lo support dryer weight
of 9’2 pounds
/\
”
INSTRUCT1
PANEL B.
recommended.
It is also recommended
ihot a separate
crrcutt serving only this
appliance
be provrded
WARNING:
AN EXTENSION CORD
SHOULD NOT BE USED WITH THIS
APPLIANCE.
SUCH USE MAY RESULT IN A
FIRE, ELECTRICAL SHOCK, OR OTHER
PERSONAL INJURY
Tools needed
for installation
R$?;;dmmended
grounding
Alternate
grounding
method
DO NOT. UNDER ANY CIRCUMSTANCES,
REMOVE THE POWER SUPPLY CORD
GROUNDING
PRONG.
If changing
and properly
grounding
the
wall receptacle
is impossible
and
where local codes permit @onsuIt your
electrical
inspector).
a temporary
adapter
may be plugged
into the
existing 2-prong
wall receptacle
to mote
with the 3-prong
power supply cord.
MIS. HOWEVER, IS NOT RECOMMENDED.
Parts sup lied
for instal Pation
Remove parts from packages.
that all parls were included
Check
Do Not. modify the plug provided
with
the appliance.
If the plug will not fit the
outlet. hove a proper outlet installed
by
a qualified
electrician.
Electrical ground is required on this
appliance.
Note:
For permanent
rnstollatrons.
leveling
legs, Part No. 233550. are
ovorlable
from your Whrtlpool
dealer.
Four legs are required
The legs should
extend about 1” below the bottom
of the dryer
EIectricaI
requirements
A three-wire.
single phase. 120 volt, 60 HZ.
AC only 15 or 20 ampere.
fused
electrical
supply is required
[Time-delay
fuse orcrrcuit
breaker
IS recommended.1
If Your home has o circuit wired and
fused for 20 amperes.
this IS preferred.
If
you ore instollrng
a new circuit, one
wrred and fused for 20 amperes
IS
PANEL A
For your personal
safety, this opplronce
must be grounded.
This dryer is
equrpped
with a power supply cord
having
a &prong
groundrng
plug. To
minimize
possible shock hazard,ihe
cord must be plugged
into a matrng
3-prong
grounding
Npe wall receptacle.
grounded
in accordance
with the
Nationol
Electrical
Code. ANSI/NFPA
70-1987 and loco1 codes and
ordinances.
See Figure 1. If a mating
wall
receptacle
is not available,
it is the
personal
responsibility
If thrs is done, you must connect
a separate
copper
groundrng
wire
[No. 14 minimum)
to a grounded
cold
water pipe’
by means of o clomp
and
then to the external
ground
connector
a gas supply plpe
opplionce
permanently
grounded.
is
See
Exhaust Hoods
Exhaust
requirements
WARNING: Potential
. Metal,
flexible duct may
Not use non-metal
flexible
a potential
fire hazard.
should
with
nol be used.
magnetic
latches
Maximum length of the exhaust system
depends
upon the type of duct used.
number
of elbows and type of exhaust
hood. The maximum
length for both rigid
and flexrble duct is shown In chari
Fire Hazard
be used. Do
duct since it IS
. Four-Inch Metal Exhaust Duct is
required.
l Before
installing
the exhaust system or
exhaust deflector.
make sure to remove
the wire exhaust guard that is located
at the exhaust outlet. See Figure 4.
Use Duct
all joints.
Tape
Washer
will:
. Accumulate
lint.
. Shorten the life of the dryer.
. Reduce
Ihe performonce
- cause
longer drying times and increase
energv
usage.
For Exhaust Systems not covered
by
the exhaust
length chart, see Whirlpool
Service Manual.
Exhausting
Whirlpool
b,
Part NO. 603197, available
from
your Whirlpool
parts distributor.
The back
pressure rn any exhaust
system used must
not exceed
0.3 Inches of water column.
measured
with an incline manometer.
Ot
the point that the exhaust
system
connects
b the dryer.
Exhausting the dryer outsid
recommended.
A closet insi
must be exhausted
outside
lnslallation
that is not exhausted
outslde
must use Exhaust Deflector
Kit Part No.
346001 available
from your Whirlpoo
dealer
See Recessed
and Closet
lnslollatron
instructions
on Panel 6 for
adequate
unobstructed
air opening
requirements.
Mobile
home
inslollalion
For permanent
Figure 5
stationary
Moblle Home Exhaust Requirements:
The dryer must have an outside exhaust.
If the dryer is exhausted
through the floor
and the area under the mobile home is
enclosed,
the exhaust system must
terminate
outside the enclosed
area.
Extension beyond
the enclosure
will
prevent lint and moisture buildup
under
the mobile home.
If the dr)rer is Installed in a contined
area such as a bedrcam. bathroom,
closet, it must be exhausted
lo the
outside. and provisions
must be made
enough
air for combustion
and
ventrlation.
[Check
governing
codes
and ordinances
] Also, refer to Ihe
Recessed
and Closet Installation
instructions
The Exhaust Outlet is located
at the
or
for
exhaust
Installations.
system
down. left. right or straight out the bock
of the dryer Detailed
space
requirements
can be found in Recessed
and Closet Installation
instructions.
Panel B. and on the label on the back
panel of the dryer.
Metal, Flexible Duct must be fully
extended
and supported
when the dryer
is in ifs final position.
DO NOT KINK OR
CRUSH THE DUCT
An Exhaust Hood should cap the
exhaust duel to prevent exhausted
air
from returning
into dryer. The outlet of the
hood must be ot least 12 Inches from
the ground or any object that may be in
Ihe path of the exhaust.
A 2%inch outlet Exhousl Hood may be
used only with shori systems (This outlet
creates greater back pressure than
other hood bpes ]
Minimum
installation
spacing
a
is required
Recessed and
Closet Installation
Thlr dryer may be lnslalted In a
recessed area or closet.
The installation
spacing
is in inches and
is minimum
allowable.
AddItional
spacing
should be
considered
for ease of installation.
servicing.
and compliance
with local
codes and requirements.
If a closet door is installed.
the minimum,
unobstructed
air openings
in top
and bottom are required
Louvered
doors
with equrvalent
air openings
are
acceplable.
Unobstructed
air openings
are required
for laundry
equipment
Companion
appliance
spacing
should
be consldered
Detailed
space
requrrements
are located
on the label
on back panel of the dryer
PANEL B
Recessed
Front Vlew
WARNING: Polentlal Fire Hazard
Exhaust Systems longer than SpeClfied
to seal
This compact
dryer may be installed
with the compact
washer companion
appliance
using one 01 the Stack Stand
Kits. Part Nos. 695570.3390175
(white)
or 3390196 (almond].
The electric
dryer
may also use Wall Mount Kit, Par-i No.
345994. Do Not use in mobile home.
Other installations
must use the minimum
dimensions
Indicated
TO PREVENTLARGE AMOUNTS OF UNT
AND MOISTURE FROM ACCUMULATING
AND TO MAINTAIN EFFICIENCY, THIS
DRYER MUST BEMHAUSTED OUTDOORS.
24
sq. In.
r‘J’omPrevlc
:k Stand.
ckXet
Side vtew
nor non-exhausted
lnstollotion.
use Exhaust
Deflector
LCK4OW.
To permanently
exhaust the dryer. see
Exhaust requiremenk.
RemOVe the wffe
exhaust guard lccoted ot the exhaust
Outlet. Connect
exhaust duct to exhaust
hwd
Use duct tape to seal all joints in
the exhaust duct. Use caulking
compound
to seal exterior wall opening
around
exhoust
hood.
10
Corefully
n into place
push timer knob
on the timer shaft
ot the front of the dryer.
11
Check that 011 ports ore now
.
instolled.
See ports list. Panel
A. If there is on extra port. 60 back
through
the steps to see which step was
skipped
Numbers
correspond
to steps.
Now start...
4
Stand
in front of dryer. With
from o&her
person. firmly grosp the bcdy of the
dryer ond gently Ioy it rfght side dawn
on the cardboard
comers
n ossistonce
12
13
1
n
Toke tape
of dryer.
off of front corners
5
6
n
n
2
that
you hove
011 the
with.
n
Plug the electricof
into the grounded
CO
Ou
Screw casters into
holes ot corners of dryer.
With osslstonce.
stand the
W dryer up.
CAUTION:
Be careful
that dryer does
nol roll 0uI on coders.
7
Check
n tools thot you started
Move
where
the dryer to the location
it will be used
14
Take o few minutes
to reod
to
fully understand
your new dryer. Now
start the dryer and allow it to complete
0
cycle to make sure it is working
properly
When cycle is complete.
unplug
the
power supply cord and wrap it around
the brackets
for sioroge.
n the Use and Core Guide
Remove the tape that holds the
n drum to the cabinet. [Some
dryer drums ore not toped for shipping.)
Move the drum by hond to moke certain
oil tope hos been removed.
Wipe the
interior of the drum thoroughly
with 0
domp cloth before using the dryer.
Remove tape flom lint screen.
( Congratulations!
3
Toke two of the cordboord
n corners from the carton ond
place them on the floor to right side
of i he dryer.
PANEL C
rear panel.
Insert cord
reorponel,
panel using
The power
around
the
not in use.
brackets
into slotted holes in
Secure cord brackets
to rear
the two screws provided.
supply cord may be stored
brackets
when the dryer is
)
-.
When moving the dryer...
Disconnect electrical cord and wrap
securely around cord brackets.
l Tape the drum to the front panel.
l Tape the dryer door
and the lint screen.
9 Make sure casters are secure in dryer
base or screw leveling legs all the
way in.
l Before installing
your electric compact
dryer in your new home, check with a
licensed electrician to confirm that the
supply voltage matches the voltage
specified on the nameplate.
l
Use caution when moving this
appliance
to prevent damage
to
floor coverings. Before moving,
slide dryer onto cardboard
or hardboard
to prevent damage.
If the dryer does not operate
properly...
Check to be sure that:
A. Electric supply is connected.
B. Fuse is intact and tight.
C. Door is closed.
D. Controls are set in o running or “on”
position.
E. Start button has been pushed firmly.
During the normal business hours, the
Whirlpool COOL-LINE@ Service will
answer any questions about operating
and maintaining your dryer not covered
in your Operating Instructions. The
Whirlpool COOL-LINE@ Service number is
(800) 2531301. Dial just as you normally
dial long distance-the
call is free.
Vhpool *C0!?FoRA10N
Port No. 3390354
Prepared by Whirlpool Corporatron. Benton Harbor, Michrgan 49022
Printed in US A