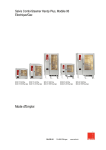
1
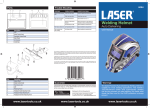
PART NO G4113
HANDBOOK
Gunson Inductive Xenon Timing Light
Inductive Xenon Timing Light
CONTENTS
Page
1. DESCRIPTION
4
2. PRINCIPLE OF OPERATION
4
3. CONVERTING TO UNLEADED PETROL
4
4. PRECAUTIONS
5
5. GENERAL WARNING
6
6. GENERAL NOTES
7
7. INSTRUCTIONS
7
A. Preparation for setting initial timing
B. Setting engine speed
C. Setting initial timing
D. Simple testing of advance mechanisms
E. Detailed testing of advanced mechanisms
F. Further notes
G.Trouble shooting
8. GUARANTEE
10
3
Gunson Inductive Xenon Timing Light
1. DESCRIPTION
Suitable for any petrol engined vehicle with 12v ignition system including electronic
types where applicable, (some ignition systems with ECU are not externally
adjustable.).
- indicates ignition timing and allows adjustment to manufacturers specification
- inductive pickup clips directly on the ignition H.T. lead
- powered by vehicle's own 12V battery
The special Xenon bulb will provide the ultrabright flash needed to see engine timing
marks under normal daylight or bright workshop conditions.
2. PRINCIPLE OF OPERATION
In order for an engine to function, four elements are necessary: air, fuel, spark and
compression to ignite the air/fuel mixture and create an explosion. The precise instant
of that explosion must be such that the maximum power is delivered to the engine’s
piston,This is timing!
It is essential to the correct operation of the car that the ignition timing is correct as
recommended by the car manufacturer. The requirement for accurate engine speed
setting is particularly important if timing is carried out at above idle speed when the
advance mechanisms are in operation.
Incorrect ignition timing is a very common cause of many engine symptoms
- POOR FUEL ECONOMY - LOW ENGINE POWER - DIFFICULT ENGINE STARTING - ENGINE OVERHEATING (ignition too retarded) - BACKFIRES (ignition too advanced) - ENGINE "PINKING" (ignition too advanced) - ENGINE "RUNNING-ON".
3. CONVERTING TO UNLEADED PETROL
Converting an early model of engine to run on UNLEADED PETROL entails
RETARDING the ignition timing to a new setting recommended by the vehicle
manufacturer. Care must be taken in making this conversion as not all cars can be
converted without the danger of damage to the engine parts, particularly exhaust
valves and their seats.
If in doubt about the ignition setting for your car, or whether your car can be
converted to un-leaded petrol, consult a manual for the model concerned or a
manufacturers agent. There are numerous variations with engine type and year of
manufacture.
4
Gunson Inductive Xenon Timing Light
Manufacturers’ recommended timing is given in degrees:
Before Top Dead Centre (BTDC or ADVANCED)
After Top Dead Centre (ATDC or RETARDED)
In order to completely burn the air/fuel mixture in the vehicle’s engine cylinders, most
timing is set so that the spark occurs at a point several degrees before Top Dead Centre
when the full power of the explosion is obtained
For example: 4(degrees) BTDC or Retarded
Engine timing is changed by adjustment of the ignition distributer
In order to allow setting and adjustment of the engine timing, special Timing Marks are
provided on each engine, by the manufacturer, during assembly. In most cases these
marks appear on the engine vibration damper or fan pulley at the lower front of the
engine. On some early engines, these marks were shown on the flywheel at the rear
of the engine.
ALWAYS CONSULT YOUR VEHICLES SERVICE MANUAL FOR MANUFACTURERS
TIMING RECOMMENDATIONS.
PLEASE READ THE FOLLOWING SAFETY PRECAUTIONS BEFORE USING THIS
PRODUCT
4. PRECAUTIONS
Using this timing light necessarily involves working under the bonnet while the engine
is running. This is a potentially hazardous situation, and the user should take every precaution to avoid any possibility of injury. The following guidance should always be followed:
1. Never wear loose clothing, particularly ties, long sleeves etc that can catch in
moving engine parts, and always tie-up or cover long hair.
2. Ensure that the car is on firm level ground, and is out of gear and the handbrake
firmly applied at all times.
3. If for any reason the car is jacked up or the wheels removed, always ensure that the
car is well supported, and never rely on a car jack alone, always use ramps or axle
stands. Be wary of axle stands and jacks sinking into soft ground, and remember
that asphalt surfaces may appear firm, but may give way under the concentrated
load of a jack or axle stand.
4 Do as much of the work as possible without the engine running.
5 Always route cables well away from hot or moving parts, (particularly the exhaust
pipe and cooling fan) and check that cables are in a safe position before starting the
engine.
6 Always guard against getting the timing light or fingers too close to moving, hot or
electrical parts. Be especially wary of the fan, fan belt, fan belt pulley, exhaust
manifold, exhaust pipe, and HT parts of the ignition system. Remember that
thermostatically controlled fans may suddenly start with no warning.
7 Take care to avoid placing metal tools where they may cause an electrical short,
5
Gunson Inductive Xenon Timing Light
8
9
10
11
12
13
such as near the car battery.
Take care not to place tools etc where they may be dislodged by engine vibration.
Treat High Tension components with respect, remembering that electrical shocks
can cause involuntary movement which may result in secondary injury. Remember
that sparks can jump quite a distance. Also remember that severe unexpected HT
shocks can be received from old, worn, damaged or wet components (e.g. HT leads,
coil, and distributor).
Keep all sensitive electronic equipment away from HT voltages, and do not make
any electrical connection to HT voltages except as expressly advised by the makers
of the electronic equipment.
Remember that Low Tension Voltage, present on the LT terminal of the ignition coil
and at the contact breakers, can also give a slight electrical shock.
Store this timing light in a dry place and do not use it if allowed to become wet.
Take care not to inhale exhaust gas. Never run the engine inside a garage or in a
confined space. When running the engine, always ensure there is adequate
circulation of fresh air. Ensure that there are no leaks in the exhaust system near
where you are working.
Keep children and pets away from the car while work is being carried out.
5. GENERAL WARNING
This equipment has been designed to operate in the harsh environment close to spark
ignition engines but the user should be aware of the following:
1. Spark ignition engines and related electronics can emit high levels of interference
which could effect test and maintenance equipment together with other electrical
items such as radio or television receivers, computers etc.
2. Any interference emitted from the engine area could be increased by:
(a) Opening the engine cover.
(b) Making an electrical connection to the vehicle wiring loom or the vehicle
battery. (c) Any faulty components particularly if those associated with the
ignition system.
3. If this equipment has any display which behaves in an erratic nature the user is
advised to refer to the advice given in the detailed instructions to minimise the pos
sibility of interference. In cases of difficulty the user is advised to check for the
following.
a) A faulty vehicle battery or poor connections to it.
b) Poor ground connection to engine or other electrical equipment
c) Faulty ignition components particularly rotor arms, ignition coils or HT leads
with an internal break or with a resistance outside vehicle manufacturers
limits.
The user is therefore advised, due to the potential emitting of interference, that
vehicle maintenance and testing should be undertaken with due care and not in an
area close to sensitive electronic equipment.
6
Gunson Inductive Xenon Timing Light
6.GENERAL NOTES
With the timing light power leads connected and inductive pickup clipped externally
to a spark plug, a flash of light is produced every time that particular spark plug fires.
These flashes of light are directed at the ignition timing marks (which are located
either on the fan belt pulley or the engine flywheel) and effectively "freeze" the motion
of the rotating parts. This enables the ignition timing of the engine to be measured and
checked against the car's technical service data.
The ignition timing can then be adjusted as required. Adjusting the timing is a simple
operation as described below or as given in the car's workshop manual or handbook.
Some vehicles may be fitted with an Electronic Control Unit (ECU) which not only
controls the advance curve at various engine RPM, but also fixes the basic setting. On
these systems inspection of the timing and ignition advance may be possible and setting options may be available for alternative fuel octane ratings but conventional
adjustment may not be possible.
7. INSTRUCTIONS FOR USE
A. PREPARATION FOR SETTING INITIAL TIMING
i. Before commencing the job, check the details of the required timing data in the
car's workshop manual.
ii. Initial timing is generally specified at idle rpm which will be given. It is extremely
unusual for vacuum advance to be in operation at idle speed so this pipe may remain
connected for setting initial timing unless clearly stated otherwise, (the vacuum
advance pipe is a small pipe that leads from the carburettor to the distributor)
With the engine switched off, make any preliminary adjustments as required in the
workshop manual and slacken the distributor bolt sufficiently to enable the
distributor to be turned by hand. (Do not loosen it completely as some resistance
to turning is required in order to maintain a set position).
iii. Slide open the inductive pickup clip and attach to the spark plug lead for number
one cylinder. Observe the marking which indicates the direction of attachment i.e.
in which direction the spark plug is located. The inductive clip should always be
handled with care as the materials from which the sensor is constructed include
glass.
Also connect the red and black clips of the Timing Light to the positive and
negative terminals of the car battery (red to positive). The circuit is continuously
powered when connected to the battery as this model does not have an on/off
trigger switch.
7
Gunson Inductive Xenon Timing Light
B SETTING ENGINE SPEED
i. Start the engine and check the engine speed to ensure it is within the
manufacturers recommended settings. If no idle speed data is available check that
the setting is reasonable or set to a typical idle i.e. 850 RPM for a 4 cylinder car
engine. Advance rarely commences below 1000 RPM therefore ignition timing
accuracy will be unaffected by slight variations (whereas for CO emissions setting
the correct speed is important).
ii. Adjust the engine speed, as required, using the idle speed screw (i.e. throttle stop
screw or idle by pass screw if the throttle stop is locked). Check the correct speed
is achieved.
C. SETTING INITIAL TIMING
i. Direct the timing light towards the timing marks. The movement of marks on the
moving part (i.e. the fan belt pulley or engine flywheel) will now appear to be
"frozen". Observe the alignment of the stationary and moving marks.
ii. Rotate the distributor body to advance or retard the ignition timing as required
until the timing marks are aligned correctly. Keep hands away from the area where
HT leads are attached as the insulation may be imperfect and extremely high
voltages are present
iii. Check that engine speed is still as required.This can vary if ignition timing has been
corrected, adjust and recheck timing marks as required.
iv. Carefully clamp the distributor and re-check the timing to confirm that it has not
been disturbed. (If tightening the clamp entails using tools near rotating parts stop
the engine first then restart to check).
v. Switch off the engine, disconnect the timing light or continue as below if required.
D. SIMPLE TESTING OF ADVANCE MECHANISMS
Engines normally have vacuum and centrifugal mechanisms to automatically increase
ignition advance with manifold vacuum and engine rpm. Alternatively this process is
controlled by an ECU. By speeding up the engine and observing the timing marks it
is possible to carry out simple tests to confirm that the vacuum and centrifugal
advance are working or the ECU is performing an ignition advance function depending
on manifold pressure (from MAP sensor) and RPM signals (If no mark exists a white
paint spot should be applied to the crankshaft pulley in a position which is visible with
the engine running. Accurate positioning ref to TDC is not required to visually heck
advance with increasing RPM).
i. To check the centrifugal advance mechanism, disconnect the vacuum advance pipe,
and increase the engine speed. The timing marks should be seen to move to a more
8
Gunson Inductive Xenon Timing Light
advanced setting (i.e. move in the opposite direction to pulley rotation).
ii. To check the vacuum advance mechanism, reconnect the vacuum advance pipe and
repeat the above procedure. A greater increase in advance should be seen.
iii. To check an ECU advance function, observe the pulley mark, first at slow and then
increased speed. Advance (movement opposite the direction of rotation) will occur
in all cases except if the ECU is in "vehicle limp home mode" due to a serious
malfunction of ECU or sensor.
E. DETAILED TESTING OF ADVANCE MECHANISMS
Car manufacturers often specify the ignition timing advance at various engine RPM in
order to fully check the correct operation of automatic advance mechanisms, and also
to check electronic Engine Management Systems.
i. Fit the enclosed timing disc to the flywheel pulley or mark the pulley (see the
instructions on the timing disc).
ii. Carefully follow the car manufacturer's instructions regarding the connection
or disconnection of the vacuum advance pipe, and any other instructions.
iii. Set the engine RPM at the various speeds as required, and measure the degrees of
ignition timing at each engine speed, using the timing disc. Compare the results
with those specified in the workshop manual.
F. FURTHER NOTES
i. The use of quick drying white paint (such as typist's correction fluid) may be
found beneficial in highlighting the timing marks.
ii. In order to achieve a steady speed the engine should be at normal operating
temperature.
iii The inductive HT connector contains a delicate ferrite material.Take care
when handling and do not allow it to snap shut
G.TROUBLE SHOOTING
i. If this timing light fails to operate correctly, switch off the engine and check
that the leads are making good connection.
ii. if the engine will not start and there is no timing flash check that there is no HT
leakage to earth and there is a good spark at the number one plug (Lay a plug on
the engine with number one HT lead connected to it while an assistant operates the
starter).
iii. If the engine is running and there is no flash check the sensitivity adjustment is fully
9
Gunson Inductive Xenon Timing Light
anticlockwise and that spark energy is not being reduced by an ignition system fault.
8. GUARANTEE
This warranty is in addition to the statutory rights of the purchaser.
The Tool Connection has made every effort to ensure that this product is of the highest quality and value to the customer. However, The Tool Connection cannot accept
any responsibility for consequential damage howsoever caused arising from the use of
this product.
All technical enquiries regarding this product should be made to:
The Tool Connection on 01926 818181
Please note that The Tool Connection cannot provide technical information or advice
or service data on particular motor cars.
If this product should require service or repair, it should be returned to:
The Tool Connection,
Kineton Road Industrial Estate,
Southam,Warwickshire,
CV47 0DR
Please include details of the fault, and if possible a daytime telephone number.
When sending goods for service or repair, please give full details of faults requiring
attention.
10
Gunson Inductive Xenon Timing Light
11
Part of the connection