1
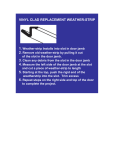
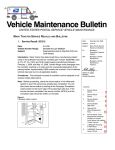
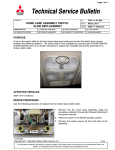
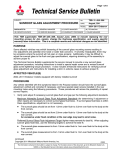
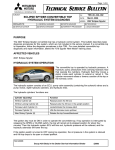
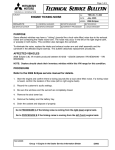
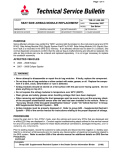
Page 1 of 3
Technical Service Bulletin
SUBJECT:
WATER LEAK AT WINDSHIELD HEADER
No:
TSB−11−42A−005
DATE:
June, 2011
MODEL:
2007−12 Eclipse
Spyder
CIRCULATE TO:
[ ] GENERAL MANAGER
[ X ] PARTS MANAGER
[ X ] TECHNICIAN
[ X ] SERVICE ADVISOR
[ X ] SERVICE MANAGER
[ X ] WARRANTY PROCESSOR
[ ] SALES MANAGER
PURPOSE
Some affected vehicles may experience a water leak at the top corners of the windshield header. This
TSB provides procedures to improve the sealing performance at the header seal and header garnish
to correct this condition.
AFFECTED VEHICLES
2007−2012 Eclipse Spyder
REPAIR PROCEDURE
Required Material
D Kent High−Techt Clear Seam Sealer P10200 (5 oz. Tube) or P10195 (11 oz. Cartridge) or
equivalent.
Kent High−Techt Clear Seam Sealer is only available on−line from Kentt Automotive
(www.kent−automotive.com).
Contact a local auto body supply center for equivalent sealers.
D 3Mt 03615 double−sided automotive attachment tape − ⅞” x 5 ft . (or equivalent).
Obtain locally.
Required Operations
1. Use the Water Leak Check procedures (e.g. hose size and water flow) shown in Section 42 − Body
of the service manual to confirm a water leak exists at one of top the corners of the weatherstrip. If
confirmed on a vehicle built through 10/19/2010, perform BOTH of the following repairs. For newer
vehicles, reseal the header header garnish only. If the weatherstrip is damaged (cut, torn, etc.)
replace it regardless of the production date.
NOTE: Ensure that all drains are open and the header latches are properly adjusted prior to testing.
! CAUTION
TAKE CARE TO NOT SCRATCH THE PAINTED SURFACE OF THE GARNISH,
HEADER OR OTHER TRIM PARTS.
Header Garnish
(Molding, drip)
2. Seal the Header Garnish (ALL VEHICLES)
NOTE: The left and right header garnish are available as
service parts, but their component parts are not
available separately.
Use the following
instructions to seal the leaking garnish.
a. Remove the affected header garnish.
Slide a plastic or resin trim stick between the
windshield frame and the garnish and and work
around the edges to release the double−sided
tape and retaining clip.
b. Clean the area of all old double−sided tape. Wipe
the area with Isopropyl alcohol.
Continued
Copyright 2011, Mitsubishi Motors North America, Inc.
(3760)
The information contained in this bulletin is subject to change. For the latest version of this document, go to the Mitsubishi Dealer Link,
MEDIC, or the Mitsubishi Service Information website (www.mitsubishitechinfo.com).
Page 2 of 3
TSB−11−42A−005
If the Header Garnish Clip IS NOT Broken:
c.
Cut a section of double−sided tape to size and
replace the tape at both locations shown.
(1) ≈ ⅝” x 1 ⅛”
(2)
(2) ≈ ⅜” x 1 ⅛”
Use a razor knife or similar tool to cut a hole in
the tape.
d. If the clip is reusable, but the black gasket is
damaged, discard the gasket and use waterproof
sealant at this location.
(2)
Follow the
instructions.
sealant
manufacturer’s
usage
e. Peel the backing from the double−sided tape and
reinstall the garnish.
If the Header Garnish Clip IS broken:
The garnish must be replaced. Use the following
instructions to eliminate painting the new part.
Attaching section
f.
Locking tab
Place a clean rag on a flat surface to protect the
painted surface of the garnish and place the
garnish face down on the rag.
g. Remove the painted section of the new garnish
from the attaching section as shown.
(1) Press the locking tab with a small screwdriver
to separate the attaching section.
Push in
on tab
(2) Lift the attaching section free as shown below.
h. Using the same method, remove the attaching
section of the garnish being replaced.
Painted section
i.
Assemble the new attaching section to the painted
section of the original garnish.
j.
Peel the backing from the double sided tape and
install the garnish.
Page 3 of 3
TSB−11−42A−005
3. Seal the corners of the header weatherstrip
(VEHICLES BUILT THROUGH TO 10/19/2010).
a. If replacing the weatherstrip, add sealer to the
weatherstrip retainer immediately prior to
installation.
b. If repairing a leak without replacing the
weatherstrip, peel back the weatherstrip at the
curved corners (circled) of the weatherstrip
retainer to expose the retainer surface for sealing.
Legend:
1. Header Weatherstrip
2. Weatherstrip retainers
c.
Apply clear seam sealer to the length of the curved
section of the weatherstrip retainer and reinstall
the weatherstrip.
NOTE: Sealer colored blue for photographic visibility.
End of
sealer
Right side shown,
left side similar.
PARTS INFORMATION
If replacement parts are required, use only Genuine Mitsubishi Parts as listed in ASA−CAPS
WARRANTY INFORMATION
This bulletin is supplied as information only and is not an authorization to repair. If an affected vehicle
is reported with the described condition, diagnose the condition, repair as described in this bulletin
and submit a normal warranty claim as follows:
RESEALING HEADER WEATHERSTRIP & HEADER GARNISH (BOTH SIDES) − VEHICLES
BUILT THROUGH 10/29/2010
Nature Code: 407
Cause Code: 200
Labor Operation No.: 423861 95
Time Allowance: 1.1 hrs.
RESEALING HEADER GARNISH ONLY (ONE SIDE) − VEHICLES BUILT AFTER (10/19/2010)
Nature Code: 407
Cause Code: 200
Labor Operation No.: 516233 95
Time Allowance: 0.4 hrs.
Warranty Coverage: Basic Coverage Refer to the Superscreen for basic warranty coverage terms
applicable to each vehicle.