1
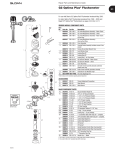
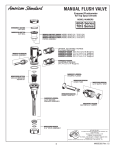
Repair Parts and Maintenance Guide
SMOOTH® Flushometer
Side-Mount-Over-The-Handle
Battery powered, sensor activated retrofit unit for
exposed closet and urinal flushometers.
PARTS LIST
Item
No. Code No. Part No.
1. 3325201 EBV-200-A
032008
Description
Side Mount Operator for Water Closets (Toilets)
and Urinals
3.2.17
Repair Parts and Maintenance Guide
SMOOTH® Flushometer
Side-Mount-Over-The-Handle
3.2.18
ADJUSTMENT PROCEDURES
TROUBLESHOOTING GUIDE
Mode A
1. Red LED light in the sensor window flashes
twice as fast as normal.
A. When a user enters the sensor’s effective range and the Red LED
light in the sensor window flashes twice as fast as normal, the
batteries need replacement. Refer to the Battery Replacement
Instructions on Page 4.
The SMOOTH unit may be reset to normal range by fully pressing and
holding in the Override Handle until the Red LED light in the Sensor Window
illuminates. Then immediately release the Override Handle.
Mode B
The SMOOTH unit may be set to reduced range for closet applications by
pressing and holding in the Override Handle until the Red LED light in the
Sensor Window flashes a slow long blinking light. Then immediately release
the Override Handle.
Mode C
The SMOOTH unit may be set to reduced range by pressing and holding
in the Override Handle until the Red LED light in the Sensor Window
displays a rapid on and off blinking light. Then immediately release the
Override Handle.
CARE AND CLEANING OF CHROME AND SPECIAL FINISHES
DO NOT use abrasive or chemical cleaners to clean Flushometers as they
may dull the luster and attack the chrome or special decorative finishes.
Use ONLY mild soap and water, then wipe dry with clean cloth or towel.
While cleaning the bathroom tile, the Flushometer should be protected
from any splattering of cleaner. Acids and cleaning fluids can discolor
or remove chrome plating.
BATTERIES
When required, replace batteries with four (4) alkaline type C batteries.
1. Release Mounting Clamp by turning the Mounting Screw
counterclockwise with a 1/8” hex wrench.
2. Swing the Mounting Clamp into the open position.
3. Slide the unit from the flushometer body.
4. Open Battery Compartment Door and remove old batteries from unit.
Replace batteries with 4 (four) new C-size batteries. Close Battery
Compartment Door. Reinstall unit as instructed on front page.
1
2
3
4
032008