1
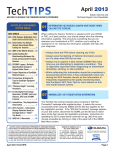
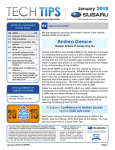
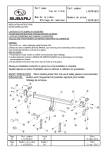
January 2013
Subaru Service and
Technical Support Line Newsletter
HELPING TO ACHIEVE THE PREMIUM SERVICE EXPERIENCE
ARTICLES CONTAINED
IN THIS ISSUE
CODEARTICLE....................... PAGE
(00) New STIS Releases from
12/01/2012 to 12/31/2012.... 6
01
ADDITIONAL TIE-DOWN PLUG FOR 2012-13
IMPREZA AND XV CROSSTREK™ MODELS
Beginning with the VIN numbers listed in the chart below, additional plugs
to be installed during PDI into the tie-down holes will be included with the
(01)Additional Tie-Down Plug for
2012-13 Impreza Models..... 1
plug set found in the glove box. These additional plugs will help prevent
(09)Air Fuel Ratio Sensor and
Oxygen Sensor Removal ..... 2
ahead of the rear wheel arch on both sides of the vehicle. If needed, the
dust intrusion into the vehicle. The illustration provides the location
plugs are available separately by ordering part number 90371CA010.
(12)Windshield Cracks on the
Inside, a Reminder ............ 5
(14)SDI Interface Box and Self
Shut Timer ...................... 2
MODEL
(14)2014 Forester Select Monitor
Operation ....................... 2
Impreza and
XV Crosstrek
(15)2013 Legacy/Outback
Navigation System Volume
Adjustment ..................... 3
TYPE
STARTING VIN NUMBER
4-Door
010889
5-Door
802448
(15) WVX-34 Reminder............. 4
(15)Wheel Locks ................... 5
(18)WQA-37 Information .......... 3
Tie-Down Hole
CAUTION: VEHICLE SERVICING PERFORMED BY UNTRAINED PERSONS
COULD RESULT IN SERIOUS INJURY TO THOSE PERSONS OR TO OTHERS.
SUBARU OF AMERICA, INC. IS
“ISO 14001 COMPLIANT”
The Subaru TechTIPS newsletter is intended for use by professional technicians ONLY. Articles
are written to inform those technicians of conditions that may occur in some vehicles, or to
provide information that could assist in the proper servicing of the vehicle. Properly trained
technicians have the equipment, tools, safety instructions, and know-how to do the job correctly
and safely. If a condition is described, DO NOT assume that your vehicle has or will have that
condition. Impreza, Legacy, Justy, Loyale, Outback, Forester, Subaru SVX, WRX, WRX STI,
L.L. Bean, Baja, Tribeca, BRZ, XV Crosstrek and “Quality Driven” are Registered Trademarks.
The international standard for excellence
in Environmental Management Systems.
Please recycle or dispose of automotive
products in a manner that is friendly to our
environment and in accordance with all
local, state and federal laws and regulations.
January 2013 TechTIPS Page 1
09
AIR FUEL RATIO SENSOR AND OXYGEN SENSOR REMOVAL
When replacing a catalytic converter on any model, the A/F
sensor and/or Oxygen sensor can be reused in most cases.
After the converter has cooled down, spray the threaded portion
of the sensor with penetrating oil and allow it to soak for at least
one minute or more. Remove the sensor using appropriate
special tool or box wrench. When installing the new sensor
always apply a small amount of anti seize compound to the
threaded portion only prior to installation. Torque the sensor to
the proper specification (15.5 ft-lbs).
14
Rear
oxygen
sensor
Front oxygen
(A/F) sensor
SDI INTERFACE BOX AND SELF SHUT TIMER
Should you have an SDI Interface Box that keeps powering down after 30 minutes or less, particularly
a loaner unit from Nuispire, you must change the self shut timer to “OFF”. There is a very good chance
that an ECM will be damaged if this happens during a system reflash. To access the menu to change
your timer settings follow the procedure below.
• There are 4 choices to choose from in the self shut timer menu, 2 minutes, 10 minutes,
30 minutes or off
• Hold down the Menu and C keys to put the SDI box in standalone mode
• From the main menu screen choose function set up
• Scroll all the way down to the bottom using the up/down arrow keys
• Select self shut timer
• To change the time use the up/down arrow keys and make your selection. It is best
to set it to off so there is no chance of timing out during a test or a reflash
14
2014 FORESTER SELECT MONITOR OPERATION
If you plug either the SDI box or Subaru Select Monitor in to a 2014 Forester and your current version
is December 2012 or prior, it is possible to render the Rear Power Tailgate inoperative if you do not
properly cycle the ignition switch off and on. You may also set a code B2514 (Power Tailgate Ignition
Failure). To check your version of software, click on the Help button and “About Application” from
the main menu screen of the Select Monitor. The Power Tailgate does not have a warning light in
the combination meter. This code would appear in the Power Rear Gate Control Module. If this code
is stored in memory perform “Clear Memory Mode”. Select Monitors that are updated to the current
January 2013 version should not encounter this condition.
January 2013 TechTIPS Page 2
18
WQA-37 INFORMATION
Please be advised of the following kit part numbers
64665SC040AP and 64665SC040AR both contain a
Tack for the rear seatbelt. If this tack is broken during
installation it is available separately under part number
64715SC060AP or 64715SC060AR. Please direct any parts
related questions to the Parts Information Coordinators.
15
2013 LEGACY / OUTBACK, NAVIGATION SYSTEM VOLUME ADJUSTMENT
In the event you receive a customer inquiry or concern about adjusting the volume of the voice
guidance on their navigation system, the following steps and screen shots will make it easy to adjust.
This will help to clarify the procedure in the 2013 Legacy / Outback Navigation System Owner Manual.
Feel free to copy and provide this information to your customers as needed. The initial volume setting
has been changed (lowered) during production starting in January, 2013.
Step 1 - Push the MAP button to display the map
screen.
Step 2 - Push the MENU button.
Step 3 - Press the MORE button (the vehicle must be
stopped for this button to be active).
Step 4 - Press the SETTINGS button.
Continued...
January 2013 TechTIPS Page 3
15
2013 LEGACY / OUTBACK, NAVIGATION SYSTEM VOLUME ADJUSTMENT (CONTINUED)
Step 5 - Press the SOUND and WARNINGS button.
Step 6 - Press the VOLUME button.
Step 7 - Press then move the cursor left then right to
the desired volume setting.
Step 8 - After selecting the desired setting, push the
MAP button again to complete the procedure.
18
WVX-34 REMINDER
As with any campaign, it is critical that all outlined procedures be followed exactly as written. In the
case of WVX-34 Front Lower Control Arm (Transverse Link) Corrosion, a step that should never be
skipped is the punch testing of the upper side of the control arms. Never assume that just because the
bottom of the control arm (s) passed the punch test that the upper portion does not require testing (IT
DOES.). Failure to test this area may result in not finding a weakness in this spot and lead to a failure
of the control arm. If testing of this area has been neglected in the past, those vehicles need to return
for additional inspection. Don’t put yourself, your dealership, your customer, or other drivers on the
roadways at risk. Always follow all procedures in every campaign (or service bulletin) completely.
January 2013 TechTIPS Page 4
15
WHEEL LOCKS
Investigations performed by the vendor in to Subaru Wheel Locks B321SFG000 have found that
improper application resulted in the failure. Wheel locks are not to be used on steel wheels or spare
wheels. The following information should be followed whenever wheel locks are installed.
• Remove one lug nut from each wheel. If the studs are dirty, clean them with a wire
brush prior to wheel lock installation
• By hand, install one lock on each wheel
• Using the special key supplied in the wheel lock set and a torque wrench, tighten the
wheel lock to the proper specification listed in the Service Manual for the vehicle you are
working on
• Retain the lug nuts that were removed in the lock package for use on the spare wheel
if necessary
Notes and Cautions
For ease of installation and removal, the wheel lock should
always be the last lug nut tightened on each wheel and should
always be the first one removed.
Use of an impact wrench may result in permanent damage to
the wheel lock and key.
Use of wheel locks are for alloy wheels only. Use of wheel locks
on steel wheels or temporary spare wheels may result in the
condition as shown.
12
WINDSHIELD CRACKS ON THE INSIDE, A REMINDER
The Techline is beginning to see Authorization Requests
submitted for windshield replacement where the glass is
cracked on the inside of the vehicle. When cracked on
the inside, it is often indicative of the wiper blade being
dropped or allowed to slap back down onto the glass after
clearing snow and ice or replacing a wiper blade / insert.
This can easily be duplicated using a windshield that is
already in need of replacement with damage in another
area of the glass. The energy from the tip of the blade is
transmitted into the glass through the outer layer of glass
then the vinyl in the center and cracks the inside glass
layer. These cracks will usually be found in the vicinity of
where the wiper blade rests on the windshield. These types of failures are not stress cracks as often
reported and not a matter for Warranty. The photo shows an example of this type of damage.
January 2013 TechTIPS Page 5
00
2013 Calendar of
Subaru Holidays
NEW STIS RELEASES FROM 12/01/2012 TO 12/31/2012
11-125-12; Technical Service
Bulletin, DTCs P0365, P0366,
P0390 and P0391. Misfire DTCs
P0301, P0302, P0303 and P0304.
16-86-12; Technical Service
Bulletin, Reprogramming for
Illumination of AT Oil Temperature
Warning Lamp
President’s Day
Monday, February 18, 2013
E551SSG200; Accessory
Installation Guide, 2014 Forester
Front Bumper Under Guards
16-80-11R; Technical Service
Bulletin, Oil Temperature Warning
Lamp Flashing (Legacy, Outback &
Tribeca) (revised)
Independence Day
Thursday, July 4, 2013
H7110SG100; Accessory
Installation Guide, 2014 Forester
AC Power Outlet
Thanksgiving Day
Thursday, November 28, 2013
SAJ; Troubleshooting Guide,
Remote Engine Start Systems
(2010-2013MY Legacy and
Outback)
Memorial Day
Monday, May 27, 2013
Labor Day
Monday, September 3, 2013
*** NOW YOU CAN E-MAIL YOUR TECHTIPS INPUT AND SUGGESTIONS TO: [email protected] ***
This is your chance to offer suggestions for use in future issues of TechTIPS! Make sure that if you
e-mail us, you place in the subject line of your e-mail “For TechTIPS Newsletter”. Thank you!
MODEL:
YEAR:
VIN:
Description of situation encountered:
Your suggestion for repair procedure, product improvements, etc.:
Please attach separate sheets, if necessary. You may also want to include Service Manual diagrams or references, or
your own drawings to assist in describing your suggestion. All information submitted becomes the property of Subaru of
America, Inc. Permission is granted to Subaru of America, Inc. to print your name and suggestions in TechTIPS and other
Subaru of America, Inc. publications. Mail items to: PO Box 6000, Cherry Hill, NJ 08034-6000.
Your Name:Signature:
Dealer’s Name: City:
Date: Dealer Code:
SUBARU TECHLINE
Hours of Operation
January 2013 TechTIPS Monday – Thursday 8:30am to 6:30pm
Friday 10:30am to 5pm
Page 6