1
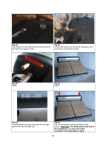
SS14R
SAFARI R-SPEC SNORKEL
Nissan GQ Patrol
2.8L 6 Cylinder Diesel (RD28T Engine)
01/04/2015
Parts List
ITEM
1
PART NO
DESCRIPTION
470-133-300R BODY - SNORKEL
QTY
1
2
000-135-800 3 ½" AIR RAM ASSEMBLY
1
3
470-032-200 BRACKET - UPPER MOUNTING
1
4
000-002-100 BOLT - HEX - S/S - 6mm x 1.0 x 14mm (SEMS)
3
5
000-951-300 SCREW - S/T - 4.2mm x 16mm - S/S
3
6
000-960 INSERT - PLASTIC
3
7
000-110 STUD - S/S - 8mm x 1.25 x 25mm
7
8
000-311-300 WASHER - BODY - S/S - 8mm x 32mm
7
9
000-205-300 NUT - NYLOC - S/S - 8mm x 1.25mm
7
10
475-123-000 DUCT - AIR CLEANER
1
11
000-958-500 POP RIVET - 4.8mm x 15.75mm
6
12
000-910 CLAMP - HOSE - 90/110mm
1
13
470-017-500 FIXTURE - HOLESAW CENTRE
1
14
000-914/B CLAMP - HOSE - No. 56 (BLACK)
1
15
470-017-200 TEMPLATE – GUARD PANEL
1
16
475-017-200 TEMPLATE - AIR CLEANER HOUSING
1
Copyright Safari Automotive Pty Ltd Melbourne Victoria Australia – www.safarisnorkel.com
SS14R Page - 1 of 11
SS14R
SAFARI R-SPEC SNORKEL
Nissan GQ Patrol
2.8L 6 Cylinder Diesel (RD28T Engine)
Installation Guide
Fitment to:
•
Left Hand Side
Fitting Time:
•
180min
Special Tools:
•
•
•
•
•
•
•
105mm hole saw
150mm long hole saw arbour
5.0mm & 6.5mm drill bits
Body Saw (reciprocating)
Step drill
Heat gun
Masking tape
•
•
•
•
•
•
Prep-wash
Sikaflex 227 (Adhesive Sealant)
Loctite 243 Threadlocker
touch-up paint
Black Spray Paint (Satin Black)
Pop rivet gun
Prior to commencing the installation, it is the installer's responsibility to verify that all
components and particularly the template (Item 15) are correct.
1
Remove the following in accordance with the factory service manual.
• LHS Flare (if fitted to vehicle)
• LHS guard mounted indicator
• LHS mud flap
• Air cleaner Housing
• Inner guard liner
• Radio antenna
• Radiator overflow bottle
• Air cleaner housing rear mounting bracket
2
Align the template (Item 15)
with the upper and rear
edges of the left hand guard
panel. Tape the template to
the guard panel with
masking tape.
Mark all of the hole
positions with a felt tip pen
and remove the template.
Copyright Safari Automotive Pty Ltd Melbourne Victoria Australia – www.safarisnorkel.com
SS14R Page - 2 of 11
3
Drill a pilot hole for each of
the marked positions.
Use the step drill to drill the
7 mounting holes to 16mm
diameter.
Drill the snorkel body outlet
hole with the105mm hole
saw with the long arbour
installed and keep the drill
horizontal at all times whilst
drilling the snorkel body
outlet hole in the guard
panel.
The hole saw will bottom
out while cutting this hole,
so you will need to stop and
trim some of the metal out
of the lower part of the hole
with the body saw as
shown. Take care to not
trim away any part of the
hole saw centre hole
section.
4
Install the hole saw centre
fixture (Item 13) over the
hole in the inner guard
panel and fasten to the
panel with hex bolts (Item
4).
Mark the hole position onto
the inner guard panel.
Drill through the inner guard
panel as shown with a
105mm diameter hole saw
using the fixture's central
hole as a locating guide.
Remove and discard the
hole saw centre fixture and
retain 2 of the 3 hex bolts
(Item 4) for later use.
Copyright Safari Automotive Pty Ltd Melbourne Victoria Australia – www.safarisnorkel.com
SS14R Page - 3 of 11
5
Drill a pilot hole at the
previously marked hole
position.
Use a 105mm diameter
hole saw to drill the hole in
the inner guard panel and
mark a straight line top and
bottom between the two
105mm diameter holes.
Use a body saw to trim the
section of panel shown
between the two 105mm
diameter holes.
Deburr and paint all holes
hole to prevent rust.
6
Remove the air cleaner
housing lid, air cleaner
element, vacuum solenoids
(if fitted) and vacuum hoses
from the air cleaner housing
body.
Carefully drill a pilot hole in
the centre of each of the
spot welds that secure the
air inlet and vacuum hose
mounting bracket to the air
cleaner housing body as
shown.
Use a 5mm drill bit to drill
out all the pre-drilled spot
welds.
HINT: Try not to drill all the
way through the air cleaner
housing body.
Use a flat blade screwdriver
or small pry bar to carefully
remove the air inlet duct
and the bracket from the air
cleaner housing body.
Copyright Safari Automotive Pty Ltd Melbourne Victoria Australia – www.safarisnorkel.com
SS14R Page - 4 of 11
7
Stand the air cleaner
housing body up vertically
on a flat surface.
Measure up 135mm and
mark the side mounting
bracket as shown.
8
Use the body saw to cut
through the bracket at the
marked position (extreme
care must be taken to
ensure that the air cleaner
housing body is not
damaged during the cutting
process).
Carefully drill a pilot hole in
the centre of each of the
spot welds in the section of
bracket that is to be
removed and use a 6.5mm
drill bit to drill out the spot
welds.
HINT: Try not to drill all the
way through the air cleaner
housing body.
Use a flat blade screwdriver
or small pry bar to carefully
remove the bracket from the
air cleaner housing body.
Copyright Safari Automotive Pty Ltd Melbourne Victoria Australia – www.safarisnorkel.com
SS14R Page - 5 of 11
9
Mark a diagonal line across
the corner of the air cleaner
lid retaining bracket 10mm
from the corner and trim as
shown.
10
Mark the raised edge of the
top air cleaner lid retaining
bracket 20mm on the front
edge and 25mm on the rear
edge. Use a file or grinder
to remove both raised
edges from the bracket as
shown.
11 Align the air cleaner
housing template (Item 16)
onto the air cleaner housing
body and ensure that the
template is positioned under
the roll lip of the housing.
With the template correctly
positioned, secure the
template in place with
masking tape and mark the
required cut out section and
hole position.
Copyright Safari Automotive Pty Ltd Melbourne Victoria Australia – www.safarisnorkel.com
SS14R Page - 6 of 11
12
Remove the template and
drill a 5.0mm diameter hole
at the marked position.
Use a body saw to trim
away the marked section of
the air cleaner housing
body.
Remove the service sticker
and clean off any sticky
residue with prep wash or
similar solvent.
13 Position the air cleaner duct
(Item 10) onto the air
cleaner housing body and
locate the duct by inserting
a pop rivet (Item 11) to the
previously drilled 5.0mm
hole.
Push down firmly onto the
duct to locate it onto the air
cleaner housing body. With
the duct correctly
positioned, mark the
remaining five mounting
hole positions onto the air
cleaner housing body.
Remove the duct and drill
the marked hole positions
with a 5.0mm drill bit.
Deburr all areas of the air
cleaner housing that have
been cut or drilled and
prepare for painting.
Use the satin black spray
paint to paint the air cleaner
housing body.
Copyright Safari Automotive Pty Ltd Melbourne Victoria Australia – www.safarisnorkel.com
SS14R Page - 7 of 11
14 Mark 50mm from the edge
shown on the air cleaner
housing rear mounting
bracket. Cut the bracket
along the marked line and
retain the 50mm section.
Deburr and paint the
modified bracket.
15
Trial fit the air cleaner duct
entry (Item 10) over the
snorkel body outlet (Item 1)
and ensure that the two
parts are a slip fit.
If the connection is too tight,
use emery cloth or abrasive
flap wheel to remove the
high spots from the inner
mating surface of the air
cleaner duct (Item 10).
16
Install the upper mounting
bracket (Item 3) to the
snorkel body (Item 1) with
hex bolts (Item 4). Apply
Loctite 243 to each of the
mounting studs (Item 7) and
install the studs finger tight
into the snorkel body (Item
1) mounting inserts.
Copyright Safari Automotive Pty Ltd Melbourne Victoria Australia – www.safarisnorkel.com
SS14R Page - 8 of 11
17
Place a strip of masking
tape along the A-Pillar and
install the snorkel body
(Item 1) to the guard panel.
When the snorkel body is
correctly positioned, mark
the 3 upper mounting
bracket hole positions (Item
3) onto the masking tape as
shown.
18 Remove the snorkel body
(Item 1) from the vehicle.
Drill a pilot hole for each of
the 3 marked hole positions
on the A-Pillar.
Drill each hole to 8mm
diameter.
Deburr and paint holes to
prevent rust.
Install the 3 plastic inserts
(Item 6) into the upper
mounting bracket holes in
the A-Pillar.
19 Apply adhesive sealant to
the air cleaner duct
mounting flange.
Install the air cleaner duct
(Item 10) to the air cleaner
housing body and insert all
six pop rivets through the
duct and air cleaner
housing.
Secure the pop rivets with
the pop rivet gun and clean
up any excess adhesive
sealant.
Copyright Safari Automotive Pty Ltd Melbourne Victoria Australia – www.safarisnorkel.com
SS14R Page - 9 of 11
20
Install the air cleaner back
into the engine bay with the
standard fasteners and
place a 90/110mm hose
clamp (Item 12) loosely
over the end of the air
cleaner duct as shown.
21 Apply adhesive sealant to
the outer mating surface of
the snorkel body outlet and
to the inner mating surface
of the air cleaner duct inlet.
Install the snorkel body to
the guard panel whilst
guiding the snorkel body
outlet into the air cleaner
duct.
With the snorkel body
correctly positioned, fasten
to the guard panel using a
body washer (Item 8) and
Nyloc nut (Item 9) on each
of the stainless steel
mounting studs (Item 7).
Fasten the upper mounting
bracket to the A-Pillar with 3
stainless steel screws (Item
5).
22
Ensure that the snorkel
body outlet is well placed
inside the air cleaner duct.
Tighten the 90/110mm hose
clamp (Item 12)
Clean up any excess
adhesive sealant.
Copyright Safari Automotive Pty Ltd Melbourne Victoria Australia – www.safarisnorkel.com
SS14R Page - 10 of 11
23
Reinstall the vacuum
solenoids, hoses, brackets
etc. that were removed
during the installation
process.
Reinstall the air filter
element and air cleaner lid.
Reconnect the air cleaner
outlet hose.
Install the radiator coolant
overflow bottle.
24
Loosely install the black
hose clamp (Item 14) to the
base of the air ram (Item 2)
and install the air ram to the
snorkel body (Item 1). Align
the air ram and tighten the
hose clamp (Item 14).
25 Install the guard panel mounted indicator, radio antenna, inner guard liner, flare, mud flap (and
any other items that may have been removed) in accordance with the factory service manual.
26 N.B: It is the installer's responsibility to ensure that all connections are watertight.
Copyright Safari Automotive Pty Ltd Melbourne Victoria Australia – www.safarisnorkel.com
SS14R Page - 11 of 11