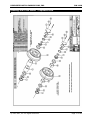
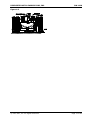
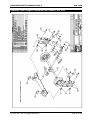
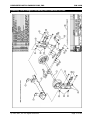
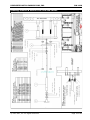
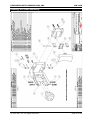
1
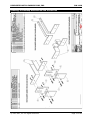
DIVERSIFIED METAL FABRICATORS, INC. Installation and Parts & Service Manual RW-1420 May 2015 SERIAL NUMBER (FRONT) ________________________ SERIAL NUMBER (REAR) ________________________ NOTE: Please refer to the serial numbers when ordering parts or inquiring about warranty items. DMF 665 Pylant Street Atlanta, Georgia 30306 Parts (404) 607-1684 Parts Fax (404) 879-7888 [email protected] Service Department (404) 879-7882 [email protected] Phone (404) 875-1512 Fax (404) 875-4835 [email protected] http://www.dmfatlanta.com DIVERSIFIED METAL FABRICATORS, INC. RW-1420 TABLE OF CONTENTS Table of Contents ........................................................................................................ 2 Set-Up ......................................................................................................................... 4 I. Pre-Installation ................................................................................................... 4 II. “ABS” Brake System ............................................................................................ 6 III. Initial Instructions ............................................................................................... 7 1.0 Railgear Components & General Information ....................................................... 8 1.1 1.2 1.3 1.4 Front Railgear ..................................................................................................... 8 Rear Railgear...................................................................................................... 9 Railgear Installation Rails ................................................................................... 10 Preliminary Installation ...................................................................................... 11 2.0 Hydraulic System Connection .............................................................................. 12 2.1 New Hydraulic System ....................................................................................... 2.2 Hydraulic System with Brakes ............................................................................. 2.3 Hydraulic Brakes Only ........................................................................................ Drawing: Hydraulic System (Old Style)........................................................................ Drawing: Hydraulic System (New Style) ...................................................................... Drawing: Brake Valve Manifold Assembly ..................................................................... Drawing: Valve Assemblies & Hydraulic Schematic ........................................................ 12 13 13 14 15 16 17 3.0 Front Railgear Installation .................................................................................. 18 3.1 Front Railgear ................................................................................................... 18 3.2 Align Front Railgear ........................................................................................... 21 3.3 Final Front Installation ....................................................................................... 23 Drawing: Front Railgear Assembly .............................................................................. 24 Drawing: Front Wheel & Axle Assembly I ..................................................................... 25 Drawing: Front Wheel & Axle Assembly II .................................................................... 26 Drawing: RW-1420 Wheel – Exploded View .................................................................. 27 Drawing: RW-1420 Wheels – Identification Chart .......................................................... 28 Drawing: Front Hydraulic Cylinders ............................................................................. 29 4.0 Rear Railgear Installation ................................................................................... 30 4.1 Location of Rear Railgear.................................................................................... 30 4.2 Spacer Installation ............................................................................................ 32 4.3 Square Rear Railroader with Truck Axle ................................................................ 34 4.4 Final Rear Installation ........................................................................................ 35 Drawing: Rear Railgear Assembly with Manual Pin-offs .................................................. 36 Drawing: Rear Railgear Assembly with Remote Pin-offs ................................................. 37 Drawing: Rear Mounting Brackets ............................................................................... 38 Drawing: Manual & Remote Pin-offs and Cables ............................................................ 39 Drawing: Rear Wheel and Axle Assembly – Exploded View ............................................. 40 Drawing: Rear Hydraulic Cylinders I ............................................................................ 41 Drawing: Rear Hydraulic Cylinders II........................................................................... 42 4.5 Rear Link Variations .......................................................................................... 43 4.6 Rear Link Variations (with Tapered Links) ............................................................. 45 Drawing: Rear Link Dimensions .................................................................................. 47 5.0 Front To Rear Alignment ..................................................................................... 48 5.1 Final Alignment ................................................................................................. 48 Drawing: Alignment Procedure and Traction Adjustment ................................................ 50 © 2015 DMF, Inc. All Rights Reserved. Page 2 of 80 DIVERSIFIED METAL FABRICATORS, INC. RW-1420 6.0 Installation of Options ........................................................................................ 51 6.1 Rail Sweeps...................................................................................................... Drawing: Railsweep Assemblies and Variations ............................................................. 6.2 Remote Pin/Off Pins........................................................................................... 6.3 Steering Wheel Locks ........................................................................................ Drawing: Steering Wheel Lock Assemblies ................................................................... 6.4 Hydraulic Brake Connections ............................................................................... Drawing: Hydraulic Brake Assemblies .......................................................................... Drawing: Hydraulic Brake Adjustment ......................................................................... 6.5 Air Brake Connections ........................................................................................ Drawing: Air Brake Assembly ..................................................................................... Drawing: Air Brake Control System Assembly ............................................................... Drawing: Air Brake Installation................................................................................... Drawing: Air Brake Adjustment .................................................................................. 6.6 Instruction and Safety Decals ............................................................................. 51 52 53 54 55 56 58 59 60 62 63 64 65 66 7.0 Final Checklist ..................................................................................................... 67 DMF RW-1420 Railroader Installation Check Sheet ........................................................ 67 8.0 Engaging the Rail ................................................................................................ 68 8.1 Getting On the Rail ............................................................................................ 68 8.2 Getting Off the Rail............................................................................................ 68 9.0 Routine Maintenance ........................................................................................... 70 9.1 Inspection & Maintenance................................................................................... 70 9.2 Lubrication Specification..................................................................................... 71 Drawing: Grease Point Locations ................................................................................ 72 Appendix A: Technical Data ....................................................................................... 73 A.1 A.2 A.3 A.4 A.5 A.6 A.7 A.8 Working Pressure Ratings for SAE Hose and Fittings ............................................... Welding Information .......................................................................................... SAE O-ring Fitting Installation ............................................................................. NPT Pipe Thread Fitting Installation ..................................................................... SAE (JIC) 37 Deg. Flare Fitting Installation ........................................................... Purchased Fastener Torque Specification .............................................................. Railwheel Bearing Adjustment Guidelines.............................................................. Hi-rail Cylinder Assembly Procedure ..................................................................... 73 73 74 75 76 77 78 79 DMF Limited Warranty Policy .................................................................................... 80 © 2015 DMF, Inc. All Rights Reserved. Page 3 of 80 DIVERSIFIED METAL FABRICATORS, INC. RW-1420 SET-UP I. Pre-Installation NOTE: Read all instructions and check that all required parts and Kits are included before beginning the installation. The proper installation of this equipment is solely the responsibility of you, the authorized installer. When in doubt, contact DMF for assistance. Tools Required for Installation: • • • Electric Welder (Arc or Mig) Hoist or Floor Jack Frame Drill w/5/8” Drill Bit • • • General Mechanic Tools 8’L x 1-1/2”dia. Tube or Bar Protective Clothing • • • Cutting Torch Hand Grinder Goggles Supplied Parts Check List: Part Manuals (P.& S. and Install) (Including Decal Package) Front RW-1420 Rail Gear Rear RW-1420 Rail Gear Rear Mounting Plates (4”X 6”X ½” w/4 Holes) Front Frame Extensions (if Required) Front Valve Plate Assembly w/Hydraulic Hoses & 2 Push Button Switch (1 Installed) Monarch Hydraulic Power Unit Assembly 1/0 Power Cable X 86” w/lugs Qty. 1 1 1 2 2 1 1 1 Optional Parts Check List: Part Rail Sweeps (Front) (Right or Left or Axle Set) Rail Sweeps (Rear) (Right or Left or Axle Set) Remote Pin/Off Assembly (on Rear Rail Gear) Remote Pin/Off Cable w/T-Handle Hydraulic Brake Assembly (Front or Rear) (Right or Left) Hydraulic Brake Control System (Front and/or Rear) Air Brake Assembly (Front or Rear) (Right or Left) Air Brake Control System (Front and/or Rear) Steering Wheel Lock Kit Shim Kit for Rear Bracket (12”x 12”-2 ea.1/8,1/4 & 3/8”) © 2015 DMF, Inc. All Rights Reserved. Qty. 1 each 1 each 2 each 2 each 1 each 1 each 1 each 1 each 1 each 1 kit Page 4 of 80 DIVERSIFIED METAL FABRICATORS, INC. RW-1420 Additional Material that may be Required: Item Hydraulic Hose (Appropriate Size & Rating for System) Swivel Hose Ends (Appropriate Size & Rating for System) Diverter Valve (Appropriate Size & Rating for System) Hydraulic Oil – Unax RX-46 (or Equivalent) Bolts & Lock Nuts – 5/8”-18 Gr.8 (if Frame Extensions are Required) Bolts & Nylock Nuts – 5/8”-11 Gr.5 (Rear Mounting Bracket Plates) Steel Channel, 3” wide x 4’ long (for Front Installation Rails) Steel Channel, 3” wide x 10’ long (for Front Installation Rails) Steel Flat Bar, 1/2”x 3”x 56-1/2” long (for Installation Rails) Steel Square Tube, 6”x 6”x 3/8”x 12” long (Temporary Spacer) © 2015 DMF, Inc. All Rights Reserved. As As As As As Qty. Required Required Required Required Required 8 each 2 each 2 each 4 each 2 each Page 5 of 80 DIVERSIFIED METAL FABRICATORS, INC. II. RW-1420 “ABS” Brake System Trucks Equipped With “ABS” Brake System All medium and heavy duty trucks manufactured after March 1, 1998, and equipped with air brakes, are required by federal law to also include “ABS” (“Anti-Lock Brake System”). The system is designed to prevent wheel lock-up and jackknifing during braking. It also provides increased vehicle stability and driver control. The “ABS” consists of wheel speed sensors, an “ECU” (electronic control unit) and all wiring and airlines that link the “ABS” components to the brakes and the truck’s electrical system. During braking, the sensors will detect if one or more of the wheels are locking and automatically engage the “ABS”. The “ECU” then signals the system to apply and release brake pressure as much as 15 times per second, allowing the wheel(s) to turn just enough to maintain optimum traction. Vehicles equipped with “WABCO” or “Allied-Bendix” “ABS” have an amber dash- mounted warning / diagnostic lamp. During normal road operation, the lamp will come ON when the truck engine is started and, depending on the type of system, will go OFF after about 3 seconds or when the truck reaches a speed of approximately 5-7 mph. A self -diagnostic check of the “ABS” is conducted during this time. If the lamp stays on, or comes on any other time during road operation, a possible malfunction is indicated, which will shut off only the part of the system at fault. The affected wheel(s) will revert back to conventional braking. For complete information and instructions relative to the “ABS” system, please refer to the truck’s ‘operation manual’. Rail Operation of Trucks with “ABS” Brake System Active While operating on track with the railgear down, the “ABS” becomes ineffective in brake application at lower speeds. If the “ABS” is active and the truck moving on rail with front wheels elevated, the amber dash light may come on. Since the front wheels are not rotating, the motion sensors may transmit a fault indication to the “ABS”, which signals the dash lamp to illuminate inadvertently. This will not affect rear truck braking or rail wheel braking, if applicable. When the truck is returned to road operation, the “ABS” fault must be cleared, by turning the engine off and re-starting. At this time the diagnostic check will repeat as stated above. NOTE: This procedure is applicable only to “WABCO” and “Allied-Bendix” “ABS” Brake Systems. For any other “ABS” Brake System, contact DMF for assistance. © 2015 DMF, Inc. All Rights Reserved. Page 6 of 80 DIVERSIFIED METAL FABRICATORS, INC. III. RW-1420 Initial Instructions Work Area: The area in which the Railgear installation is to occur should meet minimum requirements in order to facilitate the process and provide adequate conditions in which the work can be completed safely, accurately and in a timely manner. • • • Floor - The floor should be level in order to provide good measurements required to check the alignment of the Railroader. Lighting - The work area should be adequately lighted. Space - There should be enough space to maneuver the Railroader components into position and to safely work around other equipment. Truck Condition: Before installation, the truck should be checked in some important areas. • • • • Tires - The tire pressure should be checked for the manufacturer’s recommended inflation and for consistent pressure readings from all the tires. This will ensure correct traction of the tires on the rails. Also the condition of the rear tires needs to be determined. If the rear tires are worn, they should be replaced. Alignment - Rear truck axle must be square with truck frame. DMF recommends that a reputable alignment shop check this. 0-degree thrust angle (which can be different than the factory specification) is required for proper Railroader operation. Frame & Suspension - On a new truck, these should be in good condition. On a used truck, the frame should be inspected to insure that it has not been damaged or bent. The suspension bushings should also be examined for excessive wear and replaced if necessary. If any problems in these areas are not corrected, it will cause difficulties aligning and operating the rail gear. Transverse Torque Rods - On vehicles that will regularly experience high center of gravity loads on rail (e.g. spray trucks, material loaders), it is advisable to install rear tandem control rods to limit transverse axle displacement. This is also necessary of long wheel base vehicles to limit front tandem walking off in curves. Front and Rear Installation Rails: In order to install the Railroader to get proper tire traction on the rail, it is necessary that standard gauge rails or Installation Rails be fabricated from 3” square tubing per Figure. 1-5 Drive the truck into the work area (pulling forward and back several times to align the axles) and up onto the Rear Installation Rails. The rear inside tires should be on the rails with the rear outside tires off the floor. The Front Installation Rails are not needed at this point. NOTE: Before proceeding, be certain that the front truck tires are chocked and the brakes are set. © 2015 DMF, Inc. All Rights Reserved. Page 7 of 80 DIVERSIFIED METAL FABRICATORS, INC. RW-1420 1.0 RAILGEAR COMPONENTS & GENERAL INFORMATION 1.1 Front Railgear Figure 1-1 shows the individual parts of the installed front Railgear with the Rail Wheels in the rail position (down). The item descriptions will be used throughout this installation manual. DMF Railgear assemblies are also referred to as guide wheels, rail wheels or railroaders. Figure 1-1 Figure 1-2 © 2015 DMF, Inc. All Rights Reserved. Page 8 of 80 DIVERSIFIED METAL FABRICATORS, INC. 1.2 RW-1420 Rear Railgear Figure 1-3 shows the individual parts of the installed rear Railgear with the Rail Wheels in the rail position (down). The item descriptions will be used throughout this installation manual. Figure 1-3 Figure 1-4 © 2015 DMF, Inc. All Rights Reserved. Page 9 of 80 DIVERSIFIED METAL FABRICATORS, INC. 1.3 RW-1420 Railgear Installation Rails In order to install the Railroader to get proper tire traction on the rail, it is necessary that standard gauge rails or Installation Rails be fabricated from 3” standard channel per Figure 1-5. Drive the truck into the work area (pulling forward and back several times to align the axles) and up onto the Rear Installation Rails. The rear inside tires should be on the rails with the rear outside tires off the floor. The Front Installation Rails are not needed at this point. NOTE: Before proceeding, be certain that the front truck tires are chocked and the brakes are set. Figure 1-5 Figure 1-6 © 2015 DMF, Inc. All Rights Reserved. Page 10 of 80 DIVERSIFIED METAL FABRICATORS, INC. 1.4 RW-1420 Preliminary Installation Remove the truck front bumper. Bolt the Frame Extension to the truck frame (refer to Figure 1-1 & Figure 1-2). Make sure that tilt cabs of hoods will clear the Frame Extensions. Trim the brackets and re-gusset them if necessary. All truck Frame Extensions that are bolt-on brackets must use 5/8”-18 (fine thread) bolts, hardened steel washers and Grade 8 prevailing torque locknuts. All of the 5/8-18 Gr. 8 fasteners should be tightened per Purchased Fastener Torque Specification Table (Dwg. # PP006) in Appendix A. Check that the Frame Extension tubes are level front to rear and side to side with the frame. NOTE: DMF front frame extensions are designed to support the front hi-rail gear, only. It is the installer’s responsibility to properly engineer bracketry for rail racks, boom rests, etc. In normal applications, mount the Front Valve Plate Assembly between the Frame Extensions (with the Energy Valve on the underside and the handle facing forward) and weld in place. In case this is not possible, mount Valve Assembly in the most appropriate and easily accessible location. NOTE: If the vehicle has been supplied with an integral extended front frame (or set back front axle), the Frame Extensions will not be required. The Front Valve Plate can be attached directly to the extended truck frame. Roll the Rear Railgear up on the Rear Installation Rails under the truck frame in the back. The rear rail gear is usually installed with the Safety Pin-Offs (either manual, cable or air operated) towards the rear. However, truck body work may dictate locating the Pin-Offs on the front side. (If the Rear Pin-Offs must be located toward the front and the Railgear is supplied with insulated Rail Wheels, make sure to swap the left and right Rail Wheels. The insulated Rail Wheels should always be on the driver’s side of the rail gear.) The unit can be leaned upright against the truck frame (block the wheels to prevent movement) during the hydraulic system connection. © 2015 DMF, Inc. All Rights Reserved. Page 11 of 80 DIVERSIFIED METAL FABRICATORS, INC. RW-1420 2.0 HYDRAULIC SYSTEM CONNECTION 2.1 • • • • • • New Hydraulic System If only DMF Railroaders are to be installed and there is not an existing hydraulic system, outfit the truck with the supplied 12 Volt DC power unit. This unit will be used to actuate the railgear raise and lower cylinders only. Refer to schematics on the following pages. Mount the Power Unit Assembly in the desired location. This might be under the hood, behind the cab, under/behind the steps to the cab or another location that will provide suitable vandal protection. Connect the large stud on the Power Unit solenoid to the battery with the supplied 1-0 cable. Connect the (grounding) control terminal on the solenoid to an ignition switch energized push button switch to be located near each manual valve. When either push button is held down the power unit should function. The hoses that connect the directional valves to the cylinders are supplied in the kit. All hoses to/from the Power Unit and between the valves are to be supplied by the installer. All hoses are to be SAE 100R1 (1 wire braid) -4 with female swivel JIC-4 ends. Using a pair of 38” hoses supplied loose in the kit, connect the rod end of each front cylinder to one working port on the front manual directional valve with a #4 JIC tee. Use the other pair of 38” hoses to connect the blind ends of the cylinders to the other work port. The rear valve is pre-plumbed to the cylinders and mounted on the rear mounting bracket. This may be relocated as required. Plumb from the pressure port on the Power Unit to the inlet of the front directional valve. Plumb from the outlet of the front directional valve to the inlet of the rear directional valve; and, from the outlet of the rear directional valve to the tank return fitting on the Power Unit. ****WARNING**** Be certain that the front and rear valves are plumbed correctly. Each valve port is marked "IN" or "OUT". Plumbing the valves backward will cause an unsafe condition, possible injury and/or damage. © 2015 DMF, Inc. All Rights Reserved. Page 12 of 80 DIVERSIFIED METAL FABRICATORS, INC. 2.2 RW-1420 Hydraulic System with Brakes NOTE: The rail wheel brake system is intended to assist the existing vehicle brakes when in the rail mode. As the vehicle rear tires are in contact with the railhead, the primary braking effort is derived from the rubber tires. Rail wheel brakes alone are insufficient to stop the vehicle in a reasonable distance. • • Kits supplied with guidewheel brakes have the Power Unit plumbed to the braking valves. The Power Unit Assembly will be used to operate the railgear to raise and lower functions and operate the guidewheel brakes. Refer to schematics on the following pages. Install the hydraulic system as in the basic system above; however, Plumb from the pressure port on the Power Unit to port P on the solenoid diverter brake valve. Plumb from port DH on the solenoid diverter brake valve to the inlet of the front directional valve. 2.3 Hydraulic Brakes Only NOTE: The rail wheel brake system is intended to assist the existing vehicle brakes when in the rail mode. As the vehicle rear tires are in contact with the railhead, the primary braking effort is derived from the rubber tires. Rail wheel brakes alone are insufficient to stop the vehicle in a reasonable distance. • • • If the chassis has been outfitted with a PTO hydraulic system, The railgear raise and lower function may be plumbed into that system. Using an appropriately sized manual diverter valve (such as a Gresen S-50) the railgear may be tapped into the loop and plumbed as in section 2.1 above. To operate the railgear brakes the 12 Volt DC Power Unit may be used to operate the braking circuit only. This prevents having to run the PTO circuit while traveling down the rail. Install the Power Unit and connect to the battery as above. Plumb from the outlet of the brake system pressure control valve to the brakes per the OPTIONS section that follows. ****WARNING**** Railroader valves have built-in pressure reliefs and the hydraulic working pressure of the system is 2000 psi. The front valve is preset to 2000 psi at the relief. The rear valves are preset to 1500 psi and all other parts supplied by DMF are rated to 2500 psi. Care must be exercised that the relief in any of the valves is not inadvertently exceeded. It is possible for a relief to be adjusted much higher than it's valve can withstand. To ensure correct system pressure, check with a gauge. • • • Fill the Power Unit tank with Dextron ll ATF. Hold the front push button down while spooling the front valve. Operate the front railgear to fill the cylinders with fluid (remember to re-fill the tank). Repeat the procedure for the rear railgear. © 2015 DMF, Inc. All Rights Reserved. Page 13 of 80 DIVERSIFIED METAL FABRICATORS, INC. RW-1420 Drawing: Hydraulic System (Old Style) © 2015 DMF, Inc. All Rights Reserved. Page 14 of 80 DIVERSIFIED METAL FABRICATORS, INC. RW-1420 Drawing: Hydraulic System (New Style) © 2015 DMF, Inc. All Rights Reserved. Page 15 of 80 DIVERSIFIED METAL FABRICATORS, INC. RW-1420 Drawing: Brake Valve Manifold Assembly © 2015 DMF, Inc. All Rights Reserved. Page 16 of 80 DIVERSIFIED METAL FABRICATORS, INC. RW-1420 Drawing: Valve Assemblies & Hydraulic Schematic © 2015 DMF, Inc. All Rights Reserved. Page 17 of 80 DIVERSIFIED METAL FABRICATORS, INC. RW-1420 3.0 FRONT RAILGEAR INSTALLATION 3.1 Front Railgear NOTE: The Railroader unit that we have shipped to you has been designed for your specific truck. However, before starting the front Railroader installation, check the vehicle’s front tire spacing. The front rail gear operates between the front steering tires; therefore, you must have a minimum of 65" between the tires. If this is not the case, contact DMF. With the front Railroader under the truck frame, Spacer thickness can be determined. Spacers may be required to place the front rail gear at the proper height. Measure the ground clearance of the front spring just in front of the front axle beam ("A", as shown in Figure 3-1). The correct distance from the ground to the center of the Rear Mounting Pin (with the front truck tires on the ground) should be 11-3/4”. In order to obtain this 11-3/4” distance, 1” Spacers should be used between the spring and the Spring Bracket. Spacer distance is dependent on the Spring Hanger Bracket supplied (Nominal 4” or 6”, c/top dimension 2-7/8 or 5-1/2). To determine which Spring Hanger Bracket is supplied, measure the distance from the Rear Mounting Pin center to the top of the Spring Hanger Bracket as shown in Figure 3-1. (For Spring Hanger Brackets other than the 4” or 6”, please call DMF.) See the following table to determine the number of Spacers. The number of Spacers shown in this table does not include the top Spacer that is used above the truck springs. The top Spacer has no effect on the height of the rail gear and is only used for clamping purposes. Table A - Spacers Required RW-1420 “A” Distance 14-5/8 15-1/4 16-1/4 17-1/4 18-1/4 to to to to to 15-1/8” 16-1/8 17-1/8 18-1/8 19-1/8 w/ 4” Spring Hanger Bracket (2-7/8” c/top) Spacer [“A” - 14-5/8”] 0 to 1/2 5/8 to 1-1/2 1-5/8 to 2-1/2 2-5/8 to 3-1/2 Use 6” Spring Hanger Bracket # of Spacers 0 1 2 3 NA w/ 6” Spring Hanger Bracket (5-1/2 c/top) Spacer [“A” – 17-1/4”] Use 4” Spring Hanger Bracket Use 4” Spring Hanger Bracket 0 0 to 7/8” 1” to 1-7/8 # of Spacers NA NA 0 0 1 Figure 3-1 © 2015 DMF, Inc. All Rights Reserved. Page 18 of 80 DIVERSIFIED METAL FABRICATORS, INC. RW-1420 Figure 3-2 Frame Extension Frame Mounting Bracket If they are required per Table A, the 1” x 2” flat bar Spacers are placed between the Spring Bracket and the underside of the truck spring. (Use the 8’ bar to lever the Long Arms and Spring Brackets up to the springs as in Figure 2-1). After lifting the Long Arms, attach each Spring Bracket to the truck spring using a Rubber Spacer directly above the spring, a 1" x 2" flat bar Spacer on top of the Rubber Spacer and two 3/4"-10 hex nuts per stud. Push the Spring Brackets back against the axle beam and tighten the hex nuts (two per stud) onto the top Spacer to cage the springs. The nuts should be tightened down until the Rubber Spacer begins to deform from the downward pressure (squeezes out between the top Spacer and spring). Remove the Front Pin-Offs and set the steering tires straight ahead. The front Railgear can now be actuated with the hydraulic system which will cause the Long Arms to be raised up to the Frame Extension (see Figure 3-2). The Cross Tube Mounting Bracket only needs to be brought up to where it touches the Frame Extension or truck frame (not raised all the way to lift the truck frame and raise the truck tires). In order to install the front of the front Rail Gear at the correct height, the center of the Front Mounting Pins must be located at 24-1/2” from the ground (with the truck tires on the ground) as shown in Figure 3-1. If required, shim the Cross Tube Mounting Bracket to obtain this 24-1/2”. Any shims used should be load bearing members (no thin wall tubing). If necessary, a different Frame Mounting Bracket can be used to obtain the desired height of the Front Mounting Pin. Check for truck frame, spring, steering gear or other truck component interference with the Railroader equipment (particularly the Long Arms - see CLEARANCE NOTE in this section). Front Mounting Pin ground clearance may be reduced to as low as 22" to provide for proper fit. NOTE: If the vehicle is supplied with an integral extended front frame (or a set-back front axle), the Frame Extension will not be required. The Frame Mounting Bracket can be brought up to the extended frame as shown in Figure 3-3. Follow all instructions for finding the Front Mounting Pin height with the Frame Extensions. Solid or load bearing Spacers may be required between the bracket & the bottom of the frame to obtain the desired 241/2” from ground to Front Mounting Pin. © 2015 DMF, Inc. All Rights Reserved. Page 19 of 80 DIVERSIFIED METAL FABRICATORS, INC. RW-1420 Figure 3-3 Figure 3-4 CLEARANCE NOTE: Proper clearances will allow the rail gear to move up and down with the truck front suspension. As the truck tire hits bumps in the road, the truck spring allows the front axle to move upward (see Figure 3-4). Since the rail gear is attached to the spring just in front of the axle, sufficient clearance must be allowed to prevent interference with other parts on the truck (i.e. frame, steering boxes, shocks, oil filters, spring hangers, hydraulic lines, etc.). The Front Mounting Pin does not move in relation to the vehicle frame because it is fastened through the Frame Extension (or directly to the truck frame). As the Front Mounting Pin does not move and the Rear Mounting Pin (at the axle) does, the rail gear effectively rotates about the Front Mounting Pin. Therefore, the part of the rail gear near the Rear Mounting Pin moves more than the part near the Front Mounting Pin and attention needs to be paid, to the possible clearance problems that can be caused by this movement. © 2015 DMF, Inc. All Rights Reserved. Page 20 of 80 DIVERSIFIED METAL FABRICATORS, INC. 3.2 RW-1420 Align Front Railgear The front Railroaders now are ready to be squared up and aligned. Three measurements need to be taken to insure that everything is aligned properly. To align the Long Arms, check: (1) That they are parallel with each other and the truck frame. The outside Long Arms should be the same distance apart at the Rear Mounting Pin as they are at the Front Mounting Pin. This prevents the mechanism from binding during up/down operation of the rail gear. Also the distance from the Long Arms to the truck frame should be the same on each side. (2) That they are the same distance forward. Measure the distance from the Front Mounting Pin to a common point in the truck frame (i.e. a grease fitting on the Spring Hanger). If the measurements are off, square the Railroaders by loosening the nuts on one spring hanger and moving forward on the truck spring and re-tighten. To check the Spring Bracket location, check: (3) That the Spring Bracket to truck axle distance is same on both sides. Measure the distance from each Spring Bracket back to the truck axle. Since the forward position of the Long Arms has been verified (Check #2), an off measurement here probably means the front truck axle is mis-aligned and needs to be corrected. After these alignment checks and after insuring there are sufficient clearances, the Frame Mounting Brackets can be tack welded to the Frame Extensions. NOTE: Do not attach the welding machine ground clamp onto the Rail Wheels. This will cause arcing across the bearings inside the wheels and lead to premature bearing failure. Raise the front Rail Wheels just above the floor, enough to slide the front Installation Rails into place under the Rail Wheels. Because the Railroader Axle assembly is not fixed to the Pivot Arms, the Rail Wheels need to be centered. To center, measure the distance from the inside of the Rail Wheel to the truck frame. If the measurements are off, slide the Rail Wheels and Axle assembly to one side (the Axle Tube will slide through the holes in the Pivot Arms). Depending on the brake configuration used, the Axle Tube will need to be rotated in order to locate front Railroader components in the right position. The possible configurations are: Without Brakes: If the rail gear is not supplied with any brakes, the Steering Wheel Locks must be aligned as shown in Figure 3-5. When the front Railroaders are down (in the rail position), these Steering Wheel Locks prevent the front truck wheel from interfering with the rail gear operation. With Cobra Hydraulic Brakes: If the rail gear is supplied with Cobra Hydraulic Brakes (factory-installed), then they need to be rotated around so that they are oriented in the correct position (see Figure 6-4). For the rest of the Brake installation, see Section 6.3 © 2015 DMF, Inc. All Rights Reserved. Page 21 of 80 DIVERSIFIED METAL FABRICATORS, INC. RW-1420 Figure 3-5 With the Axle Tubes now centered and brake configuration determined, the Axle Tubes should be tacked to each outside Pivot Arm. The inside Pivot Arms should not be welded to the Axle Tube to facilitate ease of disassembly for repair or future maintenance. Final welding is performed after alignment in Section 5.0. The front Railroaders are ready to be lowered on the Installation Rails. As the rail gear is lowered, check the clearance from the truck tire to the Rail Wheels. (If there is interference, stop lowering the wheels, and retrace the installation steps to fix the problem.) When the Railroaders are completely lowered, the front truck tires should be approximately 2 inches above the Installation Rails. If rail gear will not lift the truck, check that the cylinders are not cross plumbed, that the system pressure relief valve (if present) is set high enough and that the pressure relief on the Front Railroader Valve is set high enough. Re-check the center alignment of the Rail Wheels to the truck frame. (If it is off, break the tacks between the outside Pivot Arms and Axle Tube and slide the Axle Tube to the correct position and re-tack in place.) © 2015 DMF, Inc. All Rights Reserved. Page 22 of 80 DIVERSIFIED METAL FABRICATORS, INC. 3.3 RW-1420 Final Front Installation If the Spring Bracket location had to be adjusted, make sure that the hex nuts (two per stud) on both Spring Brackets have been tightened down. Then with a torch, cut the excess stud length on the Spring Brackets. If these studs are not trimmed down, they may pose a clearance problem with other parts on the truck (see CLEARANCE NOTE and Figure 3-4 in section 3.1). Remount the truck front bumper or use 8" std. channel welded onto the ends of the Frame Extensions. © 2015 DMF, Inc. All Rights Reserved. Page 23 of 80 DIVERSIFIED METAL FABRICATORS, INC. RW-1420 Drawing: Front Railgear Assembly © 2015 DMF, Inc. All Rights Reserved. Page 24 of 80 DIVERSIFIED METAL FABRICATORS, INC. RW-1420 Drawing: Front Wheel & Axle Assembly I © 2015 DMF, Inc. All Rights Reserved. Page 25 of 80 DIVERSIFIED METAL FABRICATORS, INC. RW-1420 Drawing: Front Wheel & Axle Assembly II © 2015 DMF, Inc. All Rights Reserved. Page 26 of 80 DIVERSIFIED METAL FABRICATORS, INC. RW-1420 Drawing: RW-1420 Wheel – Exploded View © 2015 DMF, Inc. All Rights Reserved. Page 27 of 80 DIVERSIFIED METAL FABRICATORS, INC. RW-1420 Drawing: RW-1420 Wheels – Identification Chart © 2015 DMF, Inc. All Rights Reserved. Page 28 of 80 DIVERSIFIED METAL FABRICATORS, INC. RW-1420 Drawing: Front Hydraulic Cylinders © 2015 DMF, Inc. All Rights Reserved. Page 29 of 80 DIVERSIFIED METAL FABRICATORS, INC. RW-1420 4.0 REAR RAILGEAR INSTALLATION 4.1 Location of Rear Railgear NOTE: It is important that the truck tire pressure (especially the rear tires) be checked and brought to the manufacturers recommended level. With the truck on the rear Installation Rails, position the Rear Railgear as close to the rear tires as practical (allowing clearance for mud flaps). The following table gives standard location and clearance guidelines for the rear rail gear and these dimensions are shown in Figure 4-1. Generally, leave a minimum of 2” clearance to any tire, spring, or suspension components. Minimum Distance from: Tire to Rail Wheel Center Min. Truck Frame Extension (from tire) Overall Rail Gear Clearance (from tire) Single Axle 13-1/4” 19-1/4” 20-1/4” x 19” Tandem Axle 9-1/4” 15-1/4” 16-1/4” x 19” If the truck frame does not extend the minimum of 19-1/4” for single axle or 15-1/4” for tandem axle trucks, it should be properly lengthened to provide the necessary mounting clearance for the rail gear. In addition, because the rail gear typically drops straight down, but it can also articulate from side- to-side to allow alignment of the vehicle with the rail, a clear space of 19 inches must extend outward from each side of the frame in this area to allow for proper articulation (see Figure 4-1). It is important that nothing encroach upon this space (i.e. outriggers, lift-gates, body tie-down bolts). Figure 4-1 © 2015 DMF, Inc. All Rights Reserved. Page 30 of 80 DIVERSIFIED METAL FABRICATORS, INC. RW-1420 Figure 4-2 © 2015 DMF, Inc. All Rights Reserved. Page 31 of 80 DIVERSIFIED METAL FABRICATORS, INC. 4.2 RW-1420 Spacer Installation Before proceeding, place a temporary 6”x 6”x 3/8” wall steel tube spacer between the truck frame and Rear Mounting Bracket (see Figure 4-2). Actuate both Rear Cylinders to raise the Rear Frame Bracket up to the truck frame. NOTE: With the Rear Railroader in position, temporarily secure (clamp, chain, etc..) in place to prevent any movement during the remaining installation. Then raise the Rear Mounting Bracket (with temporary 6” spacer) and the truck frame and lift the truck wheels up off of the rear Installation Rails. Measure the Gap from the top of the rear Installation Rails to the bottom of the tire with this 6” spacer in place (as shown in Figure 4-2). The truck spring and tire deflection equals 6.0” minus the measured Gap. To calculate the required Spacer thickness, multiply the spring and tire deflection by 60%. The formula is: Calculated Spacer thickness = (6.0” - Gap) x 60% The following table shows the calculated Spacer thickness given a certain Gap. (This table is given as an example. Actual gaps may include fractions and the Spacer thickness will need to be calculated for that specific gap.) NOTE: Some customers require a minimum ½” spacer for future adjustability. Contact your customer to determine his requirements. If Gap = 5” 4” 3” 2” 1” Spring & Tire Deflection (6.0” - Gap) 1” 2” 3” 4” 5” Calculated Spacer thickness (6.0” - Gap) x 60% 3/4” 1-1/4” 1-3/4” 2-3/8” 3” Release the clamps holding the Rear Frame Bracket to the truck frame. Collapse the Rear Railroader to the folded position (which will lower the truck wheels back down on the Installation Rails). Replace the temporary 6” spacers with the permanent Calculated Spacers and tack in place onto the Rear Frame Bracket. These permanent Spacers should be solid steel pieces because they will experience the full structural load seen by the rear frame. Extend the Rear Railroader to the rail position (which will raise the truck frame). The truck inner duals should be flat to slightly cupping the installation rails. Too much weight on these tires (truck frame too low) will cause rapid tire wear. Not enough weight (truck frame too high) will cause wheel spin and poor braking (see Fig. 4-3). If necessary, adjust the Spacer thickness to achieve the proper tire cap on the Installation Rails. © 2015 DMF, Inc. All Rights Reserved. Page 32 of 80 DIVERSIFIED METAL FABRICATORS, INC. RW-1420 Figure 4-3 Frame Properly Set Frame Too High Frame Too Low Figure 4-4 © 2015 DMF, Inc. All Rights Reserved. Page 33 of 80 DIVERSIFIED METAL FABRICATORS, INC. 4.3 RW-1420 Square Rear Railroader with Truck Axle Once the proper height and tire-to-rail gear location has been achieved, the Rear Railroader needs to be made absolutely square with the rear truck axle. Four measurements (shown in Figure 4-4) need to be taken to insure this requirement: (1) The distance from the truck axle to the Rear Railroader Axle at each end. In Figure 4-4, distance “A” must be equal to “B” (within 1/16”). This is an important alignment check. (2) The diagonal from the truck axle to the opposite Rear Rail Wheel. In Figure 4-4, distance “C” must be equal to “D” (within 1/8”). NOTE: Although the previous mounting conditions and alignment may be met, be certain that enough room exists between the Rear Railroader and other equipment. In general, this should include a 2” clearance around the rail gear (more clearance will be needed if Remote Pin-offs are installed). Also insure that there is clearance to remove the Pin-Offs from their holes. © 2015 DMF, Inc. All Rights Reserved. Page 34 of 80 DIVERSIFIED METAL FABRICATORS, INC. 4.4 RW-1420 Final Rear Installation NOTE: If more than 1/16 inch of space exists between the truck frame and the Rear Frame Bracket on each side, it will be necessary to install shim plates to center the Railroaders. These should be 12” x 12” shims of the proper thickness with equal thickness used on each side… These can be fabricated or DMF shim plates may be used. Using the Mounting Plate as a drill template, drill four 5/8” holes through the truck frame. Locate the Mounting Plate so as to allow for maximum adjustment of the Rear Frame Bracket (see Figure 4-5). Bolt the Mounting Plate to the Rear Frame Bracket (through the shims if required) and truck frame with 5/8-11 Grade 5 bolts & nylock nuts. Tack weld the Mounting Plate to the Rear Frame Bracket. If re-adjustment is later needed, the welds may be ground off & the Rear Frame Bracket slid up or down by loosening the bolts in the slots. Also tack the Spacer into place as shown in Figure 4-6. Figure 4-5 Figure 4-6 © 2015 DMF, Inc. All Rights Reserved. Page 35 of 80 DIVERSIFIED METAL FABRICATORS, INC. RW-1420 Drawing: Rear Railgear Assembly with Manual Pin-offs © 2015 DMF, Inc. All Rights Reserved. Page 36 of 80 DIVERSIFIED METAL FABRICATORS, INC. RW-1420 Drawing: Rear Railgear Assembly with Remote Pin-offs © 2015 DMF, Inc. All Rights Reserved. Page 37 of 80 DIVERSIFIED METAL FABRICATORS, INC. RW-1420 Drawing: Rear Mounting Brackets © 2015 DMF, Inc. All Rights Reserved. Page 38 of 80 DIVERSIFIED METAL FABRICATORS, INC. RW-1420 Drawing: Manual & Remote Pin-offs and Cables © 2015 DMF, Inc. All Rights Reserved. Page 39 of 80 DIVERSIFIED METAL FABRICATORS, INC. RW-1420 Drawing: Rear Wheel and Axle Assembly – Exploded View © 2015 DMF, Inc. All Rights Reserved. Page 40 of 80 DIVERSIFIED METAL FABRICATORS, INC. RW-1420 Drawing: Rear Hydraulic Cylinders I © 2015 DMF, Inc. All Rights Reserved. Page 41 of 80 DIVERSIFIED METAL FABRICATORS, INC. RW-1420 Drawing: Rear Hydraulic Cylinders II © 2015 DMF, Inc. All Rights Reserved. Page 42 of 80 DIVERSIFIED METAL FABRICATORS, INC. 4.5 RW-1420 Rear Link Variations Manual Pin-off with Standard Lower Links Link Kit Short Links 10717 Link Kit Long Links 10715 Link Kit X-Short Links 10719 Position Upper Front Passenger Upper Front Driver Upper Rear Passenger Upper Rear Driver Lower Front Passenger Lower Front Driver Lower Rear Passenger Lower Rear Driver Position Upper Front Passenger Upper Front Driver Upper Rear Passenger Upper Rear Driver Lower Front Passenger Lower Front Driver Lower Rear Passenger Lower Rear Driver Position Upper Front Passenger Upper Front Driver Upper Rear Passenger Upper Rear Driver Lower Front Passenger Lower Front Driver Lower Rear Passenger Lower Rear Driver P/N 10765 10764 10767 10766 10233 10233 10783 10782 P/N 10761 10760 10763 10762 10230 10230 10781 10780 P/N 10769 10768 10771 10770 10235 10235 10785 10784 (BO) 10234 " " " 10233 " " " (BO) 10231 " " " 10230 " " " (BO) 10236 " " " 10235 " " " P/N 10765 10764 10767 10766 10245 P/N 10761 10760 10763 10762 10243 P/N 10769 10768 10771 10770 10247 (BO) 10234 " " " 10233 (BO) 10231 " " " 10230 (BO) 10236 " " " 10235 Manual Pin-off with Slotted Lower Links Link Kit Short Links 10718 Link Kit Long Links 10716 Link Kit X-Short Links 10726 Position Upper Front Passenger Upper Front Driver Upper Rear Passenger Upper Rear Driver Lower Position Upper Front Passenger Upper Front Driver Upper Rear Passenger Upper Rear Driver Lower Position Upper Front Passenger Upper Front Driver Upper Rear Passenger Upper Rear Driver Lower Front Passenger © 2015 DMF, Inc. All Rights Reserved. Page 43 of 80 DIVERSIFIED METAL FABRICATORS, INC. RW-1420 Remote Pin-off with Standard Lower Links Link Kit Short Links 10722 Link Kit Long Links 10720 Link Kit X-Short Links 10724 Position Upper Front Passenger Upper Front Driver Upper Rear Passenger Upper Rear Driver Lower Front Passenger Lower Front Driver Lower Rear Passenger Lower Rear Driver Position Upper Front Passenger Upper Front Driver Upper Rear Passenger Upper Rear Driver Lower Front Passenger Lower Front Driver Lower Rear Passenger Lower Rear Driver Position Upper Front Passenger Upper Front Driver Upper Rear Passenger Upper Rear Driver Lower Front Passenger Lower Front Driver Lower Rear Passenger Lower Rear Driver P/N 10765 10764 10775 10774 10233 10233 10783 10782 P/N 10761 10760 10773 10772 10230 10230 10781 10780 P/N 10769 10768 10777 10776 10235 10235 10785 10784 (BO) 10234 " " " 10233 " " " (BO) 10231 " " " 10230 " " " (BO) 10236 " " " 10235 " " " P/N 10765 10764 10775 10774 10245 P/N 10761 10760 10773 10772 10243 P/N 10769 10768 10777 10776 10247 (BO) 10234 " " " 10233 (BO) 10231 " " " 10230 (BO) 10236 " " " 10235 Remote Pin-off with Slotted Lower Links Link Kit Short Links 10723 Link Kit Long Links 10721 Link Kit X-Short Links 10725 Position Upper Front Passenger Upper Front Driver Upper Rear Passenger Upper Rear Driver Lower Position Upper Front Passenger Upper Front Driver Upper Rear Passenger Upper Rear Driver Lower Position Upper Front Passenger Upper Front Driver Upper Rear Passenger Upper Rear Driver Lower Front Passenger © 2015 DMF, Inc. All Rights Reserved. Page 44 of 80 DIVERSIFIED METAL FABRICATORS, INC. 4.6 RW-1420 Rear Link Variations (with Tapered Links) Manual Pin-off with Standard Lower Links Link Kit Short Links 10735 Link Kit Long Links 10695 Link Kit X-Short Links 10797 Position Upper Front Passenger Upper Front Driver Upper Rear Passenger Upper Rear Driver Lower Front Passenger Lower Front Driver Lower Rear Passenger Lower Rear Driver Position Upper Front Passenger Upper Front Driver Upper Rear Passenger Upper Rear Driver Lower Links Position Upper Front Passenger Upper Front Driver Upper Rear Passenger Upper Rear Driver Lower Links P/N 10765 10764 10767 10766 10733 10733 10787 10786 P/N 10761 10760 10763 10762 10750 P/N 10769 10768 10771 10770 10737 (BO) 10234 " " " 10732 " " " (BO) 10231 " " " 10753 (BO) 10236 " " " 10739 P/N 10765 10764 10767 10766 10730 P/N 10761 10760 10763 10762 10755 P/N 10769 10768 10771 10770 10738 (BO) 10234 " " " 10732 (BO) 10231 " " " 10753 (BO) 10236 " " " 10739 Manual Pin-off with Slotted Lower Links Link Kit Short Links 10736 Link Kit Long Links 10697 Link Kit X-Short Links 10799 Position Upper Front Passenger Upper Front Driver Upper Rear Passenger Upper Rear Driver Lower Position Upper Front Passenger Upper Front Driver Upper Rear Passenger Upper Rear Driver Lower Position Upper Front Passenger Upper Front Driver Upper Rear Passenger Upper Rear Driver Lower Front Passenger © 2015 DMF, Inc. All Rights Reserved. Page 45 of 80 DIVERSIFIED METAL FABRICATORS, INC. RW-1420 Remote Pin-off with Standard Lower Links Link Kit Short Links 10722 Link Kit Long Links 10720 Link Kit X-Short Links 10724 Position Upper Front Passenger Upper Front Driver Upper Rear Passenger Upper Rear Driver Lower Front Passenger Lower Front Driver Lower Rear Passenger Lower Rear Driver Position Upper Front Passenger Upper Front Driver Upper Rear Passenger Upper Rear Driver Lower Front Passenger Lower Front Driver Lower Rear Passenger Lower Rear Driver Position Upper Front Passenger Upper Front Driver Upper Rear Passenger Upper Rear Driver Lower Front Passenger Lower Front Driver Lower Rear Passenger Lower Rear Driver P/N 10765 10764 10775 10774 10233 10233 10783 10782 P/N 10761 10760 10773 10772 10230 10230 10781 10780 P/N 10769 10768 10777 10776 10235 10235 10785 10784 (BO) 10234 " " " 10233 " " " (BO) 10231 " " " 10230 " " " (BO) 10236 " " " 10235 " " " P/N 10765 10764 10775 10774 10245 P/N 10761 10760 10773 10772 10243 P/N 10769 10768 10777 10776 10247 (BO) 10234 " " " 10233 (BO) 10231 " " " 10230 (BO) 10236 " " " 10235 Remote Pin-off with Slotted Lower Links Link Kit Short Links 10723 Link Kit Long Links 10721 Link Kit X-Short Links 10725 Position Upper Front Passenger Upper Front Driver Upper Rear Passenger Upper Rear Driver Lower Position Upper Front Passenger Upper Front Driver Upper Rear Passenger Upper Rear Driver Lower Position Upper Front Passenger Upper Front Driver Upper Rear Passenger Upper Rear Driver Lower Front Passenger © 2015 DMF, Inc. All Rights Reserved. Page 46 of 80 DIVERSIFIED METAL FABRICATORS, INC. RW-1420 Drawing: Rear Link Dimensions © 2015 DMF, Inc. All Rights Reserved. Page 47 of 80 DIVERSIFIED METAL FABRICATORS, INC. RW-1420 5.0 FRONT TO REAR ALIGNMENT 5.1 • • • • • • • • • Final Alignment The rear guidewheel axle is set parallel to the rear drive axle first (see Drawing: Alignment Procedure & Traction Adjustment). With the guidewheels in the rail position, recheck the side and diagonal measurements to the drive axle housing. The side measurements should be within 1/16" and the diagonals within 1/8". Loosen the mounting bolts and slide the mounting bracket as necessary. Tighten the bolts. The front guidewheel axle must be set square to the rear guidewheel axle: diagonally measure from the right front guidewheel to the left rear guidewheel ("D-1") then from the left front guidewheel to the right rear guidewheel ("D-2"). These measurements must be within 1/4 inch. Measure from the left front guidewheel to the left rear guidewheel ("C-1") then from the right front guidewheel to the right rear guidewheel ("C-2"). These measurements must be within 1/8 inch. If "D-1" and "C-2" are shorter than "D-2" and "C-1", shim the right front railwheel forward. The left front guidewheel should be shimmed forward in the opposite case. These shims can be flat bar located between the bottom of the long arms and the welded stop block on the pivot arms. If the "C" dimensions are equal and the "D" dimensions are not, the front guidewheel axle can be slid to the side (within space limitations) to help equalize these dimensions. Maintain a minimum 1/4" gap between the guidewheel and the inside of the steering tire. Start with a 1/8th inch shim and place it between the stop block (welded to the pivot arm) and bottom of the stationary arm near the axle mounting bracket. All four pivot arms have stop blocks. Add shims as required so the load is carried by all blocks. When the proper spacer thickness has been found to square the guidewheels, tack each shim to the top of its stop block (per drawing below). If equipped with railsweeps, rotate each front axle tube half until the railsweep rubber is vertical. Weld (three 1/2" tacks) each axle tube half to its outside pivot arm. The inside pivot arms are not welded (allowing cylinder removal). After the Front and Rear Railroaders have been properly aligned, complete structural welds may be applied at these locations that were previously only tacked: o On the Front Railroader, between the Frame Mounting Bracket and Frame (or Frame Extensions, if required) o On the Front Railroader, between the Axle Tube and outside Pivot Arms (a continuous weld on the inboard side of the outside Pivot Arm is required) NOTE: For all structural welds, either low hydrogen rod or dual shield Mig wire should be used (refer to Appendix). © 2015 DMF, Inc. All Rights Reserved. Page 48 of 80 DIVERSIFIED METAL FABRICATORS, INC. RW-1420 Figure 5-1 © 2015 DMF, Inc. All Rights Reserved. Page 49 of 80 DIVERSIFIED METAL FABRICATORS, INC. RW-1420 Drawing: Alignment Procedure and Traction Adjustment © 2015 DMF, Inc. All Rights Reserved. Page 50 of 80 DIVERSIFIED METAL FABRICATORS, INC. RW-1420 6.0 INSTALLATION OF OPTIONS 6.1 Rail Sweeps The components that make up the standard Front and Rear Rail Sweeps are the same for Railroaders without any brakes For Rail Sweeps provided with Cobra Brakes, the mounting brackets are shorter. Installation of Rail Sweeps is done while the Railgear is in the rail position. For standard Rail Sweeps (without brakes), weld the Mounting Bracket directly to the Railgear Axle Tube oriented so that the Rubber is flush with the rail as shown in the Railsweep Drawing. For Rail Sweeps with Cobra Hydraulic Brakes, bolt the shorter Mounting Bracket directly to the Brake structure (on the front: bolt on the side facing forward, on the rear: bolt to the top of the Air Brake which faces backward). For more information, see the Railsweep Drawing. © 2015 DMF, Inc. All Rights Reserved. Page 51 of 80 DIVERSIFIED METAL FABRICATORS, INC. RW-1420 Drawing: Railsweep Assemblies and Variations © 2015 DMF, Inc. All Rights Reserved. Page 52 of 80 DIVERSIFIED METAL FABRICATORS, INC. 6.2 RW-1420 Remote Pin/Off Pins Reference Drawing: Manual & Remote Pin-offs and Cables in section 4.4. Cable operated Pin-Offs are available on the Front (Single 3/4”) or Rear (Dual 1”). The Front Cable Remote Pin-Offs weld onto either the outer or (preferably) inner Long Arms. The Rear Remote Pin-Offs components are shown in the Pin/Off Drawing. The Rear Remote Pinoffs can be operated with a manual cable assembly or air actuated. Remove the 1/4-20 hex nut, 7/16-14 hex end cap, and the internal tooth lock washer. Slide the cable through the fixed pin off plate. Replace the internal tooth lock washer, 7/16-14 hex end cap, and the 1/4-20 hex nut. Add a 1/4" lock washer on the end of the cable, and screw the cable into the sliding pin plate. Tighten the 1/4-20 hex nut on to the lock washer and pin plate. Mount two, cable handle, mounting plates (not supplied). These plates should have a 3/4" hole to attach the handle end of the cable to. This plate should be securely located near the rear rail wheel valve. Remove the "T" handle and the 5/8-11 hex end cap. Thread the cable through the mounting plate and replace the 5/8-11 hex end cap. Replace the T- handle on the cable. © 2015 DMF, Inc. All Rights Reserved. Page 53 of 80 DIVERSIFIED METAL FABRICATORS, INC. 6.3 RW-1420 Steering Wheel Locks Carefully remove the face cover from the steering wheel. Position the Lock Bracket at the 12 o'clock position on the steering wheel hub. The "U" should be facing the speedometer, and at the lower edge of the steering wheel. The Lock Bracket should not interfere with any other part of the truck as the steering wheel is turned. Mark the hole locations and drill (2) 3/16" holes. Using the #10-24 flat socket head screws and the #10-24 nuts; attach the Lock Bracket. Strap the Latch Weldment around the column and tighten until the clamp starts to grip. With the latch in the down position, move the Latch Pin into line with the Lock Bracket. There should be a 1/2" gap between the Lock Bracket and the Latch Weldment. Tighten the Latch Weldment hose clamp securely. NOTE: Check to be sure that nothing interferes with the normal operation of the steering wheel. Check the operation of the latch for fit and operation with the Lock Bracket. After making all necessary adjustments, drill a .125" hole through the column strap at the loose end, near the truck’s turn signal. Use a 1/8" x 3/4" pop rivet to secure the column strap and the Latch Weldment into place. Replace steering wheel cover. For more information, see the Steering Wheel Lock Drawing. © 2015 DMF, Inc. All Rights Reserved. Page 54 of 80 DIVERSIFIED METAL FABRICATORS, INC. RW-1420 Drawing: Steering Wheel Lock Assemblies © 2015 DMF, Inc. All Rights Reserved. Page 55 of 80 DIVERSIFIED METAL FABRICATORS, INC. RW-1420 NOTE: There are two types of brakes available for the RW-1420 Railgear. Be sure to correctly identify which brake system you will be or are currently using. Read all instructions and check that all required parts and Kits are included before beginning the installation. The proper installation of this equipment is solely the responsibility of you, the authorized installer. When in doubt, contact DMF for assistance. 6.4 Hydraulic Brake Connections NOTE: The rail wheel brake system is intended to assist the existing vehicle brakes when in the rail mode. As the vehicle rear tires are in contact with the railhead, the primary braking effort is derived from the rubber tires. Rail wheel brakes alone are insufficient to stop the vehicle in a reasonable distance. • • Refer to Drawing: Hydraulic System (Old Style) and Drawing: Hydraulic System (New Style) in section 2.3 for more information. The wheels and brake assemblies are on the axles. The brake valving is pre-plumbed from the solenoid diverter valve through the brake relief valve. Attach the 48” braided steel hoses to the wheel cylinders on the brake assemblies. Run the lines along the outboard side of the pivot arms to the pivot pin. Leave a little slack hose looping around the front side of the pivot pin and run the hose up along the outboard side of the outboard long arms and over the top of each pair of long arms to the center of the vehicle. The hoses are attached to the long arms with “J” clips just above the pivot pins. These hoses are joined at the center of the vehicle, above the railgear with a brass tee. Connect the brake relief valve port marked “FB” to this tee with a 48” braided steel hose. Four wheel brake kits only: • Connect the rear pressure reducing valve port “RB” to the rear braided steel hose tee with the supplied 25' steel line. Shorten or coil the excess of this line as necessary. Tie-strap the upper end of the rear, braided hose to the center of the rear mounting bracket. All Units with Optional Brakes: • • The brake control panel consists of a double pole, single throw switch and an indicator lamp. The lamp is connected to the switch by the red lead and is to be grounded by the black lead. Locate a suitable spot for the control panel. Connect the lamp ground to a location under the instrument panel. Connect the center terminals of the switch (the ones with the jumper wire) to the "cold" side of the stop lamp switch (at the brake pedal) with a wire tap connector. NOTE: On Fords, connect the center terminals of the brake switch to the “C210” terminal under the instrument panel. One of the two remaining terminals of the switch is wired out to the (grounding) control terminal on the power unit (the same one that the push button switches are wired to). The last terminal is wired out to the tab terminal on the brake solenoid diverter valve. • When the control panel is properly wired, the indicator lamp will illuminate, the solenoid valve will spool (the coil will get warm), and the power unit will operate when the switch is © 2015 DMF, Inc. All Rights Reserved. Page 56 of 80 DIVERSIFIED METAL FABRICATORS, INC. • RW-1420 in the "on" position and the brake pedal is depressed far enough to trip the stop lamp switch. While an assistant depresses the brake pedal, loosen the bleeder fitting at each brake until the air is expelled. As the system is bled, keep fluid in the reservoir to prevent pumping air back into the lines. Bleed each wheel once then repeat to make certain that all the air is bled out. © 2015 DMF, Inc. All Rights Reserved. Page 57 of 80 DIVERSIFIED METAL FABRICATORS, INC. RW-1420 Drawing: Hydraulic Brake Assemblies © 2015 DMF, Inc. All Rights Reserved. Page 58 of 80 DIVERSIFIED METAL FABRICATORS, INC. RW-1420 Drawing: Hydraulic Brake Adjustment TO ADJUST, REMOVE ROD END PIN AND THREAD ADAPTER TO DESIRED LENGTH, TIGHTEN JAM NUT TO CYLINDER BODY, REINSERT ROD END PIN 1/8" MIN. SHOE THICKNESS ADJUST TO 1/16" (REPLACE SHOE IF UNABLE TO ADJUST TO MAX. ALLOWED 1/4") © 2015 DMF, Inc. All Rights Reserved. Page 59 of 80 DIVERSIFIED METAL FABRICATORS, INC. 6.5 RW-1420 Air Brake Connections Mechanical Installation • • • • • • • • • • • • • Remove the guide wheels from the axle(s) to receive airbrakes. Remove the electric brake assemblies. The brakes are attached to the guide wheel axle tube with three one inch welds. Torch (or air-arc) the welds loose. Disconnect and remove the brake controller and wiring. Remove the front guide wheel steering guide bars. Torch off the 1-1/4" diameter guide bars that are welded to the guide wheel axle, pass over the guide wheel flange, and extend out beyond the tread rim. Grind the axle tube clean. Operate the guide wheels into the Hi-Rail position. On the front axle, the airbrake assemblies replace the steering guide bars. The brake assembly has a 1" diameter steering guide bar built-in. Remove the Cobra shoe from each assembly by unbolting the shoe retainer blocks from the pivot arm weldment. Refer to Drawing: Air Brake Assembly. Position the assembly vertically (over the guide wheel axle) and one inch in from the end of the axle tube. Refer to Drawing: Air Brake Installation. Tack the mounting plates to the axle tube. Refer to Drawing: Air Brake Assembly. On the rear axle, the airbrake assemblies are mounted on the rearward side and angled slightly below horizontal. Remove the Cobra shoe from each assembly by unbolting the shoe retainer blocks from the pivot arm weldment. Refer to Drawing: Air Brake Assembly. Position the brake assembly, one inch from the end of the axle tube and leave 1/8" clearance between the chamber and the lower scissors link. Refer to DWG 818402. Tack the mounting plates to the axle tube. Refer to Drawing: Air Brake Assembly. Weld the mounting plates to the axle tubes with 1/8 to 3/16" fillets. Install the guide wheels. Check for clearance. On the front axle, the brake assembly should be located vertically over the axle and vertically behind the wheel. The assembly should be roughly 1/4" clear of all parts of the wheel. On the rear axle, the assembly is angled slightly down from horizontal so that the chamber will clear the scissors link by 1/8". All other clearances to the wheel should be roughly 1/4". Replace the Cobra shoes in the brake assemblies. Adjust the chamber clevis until the shoe is just clear of the wheel. Plumbing Installation • • • • • An air toggle valve, labeled brakes "on/off", is located on the vehicle instrument panel. This valve disconnects the guide wheel braking system from the vehicle airbrake system by interrupting the CONTROL line air pressure to the guide wheel system only. Near the front (and rear, if equipped) guide wheel axle an airbrake relay valve will be located. The CONTROL line to this relay valve comes from the toggle valve described above. The SUPPLY line to this relay comes from the vehicle supply system or directly from the main air tanks. There is a ball valve and an adjustable pressure regulator in the SUPPLY line before the relay valve. The ball valve will disconnect the guide wheel braking system from the vehicle airbrake system (regardless of the position of the toggle valve) by interrupting the SUPPLY line air pressure to the guide wheel system only. The adjustable pressure regulator allows the braking effort on each axle set to be set so that the guide wheels do not lockup and slide. The guide wheel brake chambers are connected to the SERVICE ports on the guide wheel air brake relay valve. Install the airlines and valves per DMF instructions. Make certain that the valve assembly for the front indicates that it has been preset to 75 psi. © 2015 DMF, Inc. All Rights Reserved. Page 60 of 80 DIVERSIFIED METAL FABRICATORS, INC. RW-1420 Testing Put the vehicle on a test track. With the "on/off" toggle valve "on" and the ball valve(s) open, check that: The guide wheel brakes tightly clamp the rail wheel when the vehicle brake pedal is depressed. The brakes properly release when the brake pedal is released. The guide wheels do not slide when the guide wheel brakes are applied. NOTE: The rail wheel brake system is intended to assist the existing vehicle brakes when in the rail mode. As the vehicle rear tires are in contact with the railhead, the primary braking effort is derived from the rubber tires. Rail wheel brakes alone are insufficient to stop the vehicle in a reasonable distance. © 2015 DMF, Inc. All Rights Reserved. Page 61 of 80 DIVERSIFIED METAL FABRICATORS, INC. RW-1420 Drawing: Air Brake Assembly © 2015 DMF, Inc. All Rights Reserved. Page 62 of 80 DIVERSIFIED METAL FABRICATORS, INC. RW-1420 Drawing: Air Brake Control System Assembly © 2015 DMF, Inc. All Rights Reserved. Page 63 of 80 DIVERSIFIED METAL FABRICATORS, INC. RW-1420 Drawing: Air Brake Installation © 2015 DMF, Inc. All Rights Reserved. Page 64 of 80 DIVERSIFIED METAL FABRICATORS, INC. RW-1420 Drawing: Air Brake Adjustment © 2015 DMF, Inc. All Rights Reserved. Page 65 of 80 DIVERSIFIED METAL FABRICATORS, INC. 6.6 RW-1420 Instruction and Safety Decals © 2015 DMF, Inc. All Rights Reserved. Page 66 of 80 DIVERSIFIED METAL FABRICATORS, INC. RW-1420 7.0 FINAL CHECKLIST Rail test the truck to check for good traction and braking. A good industrial siding or some authorized track time will be required. Check that rail wheels with brakes do not lock-up or slide. Adjust the rail gear height as required Cross check the Rear Railroader to the rear axle again. Weld the Mounting Plate to the Rear Frame Bracket with one 2” weld on the horizontal edges (two welds per Mounting Plate). Welding the plates must be done; DO NOT forget it. Double check all welds and fasteners, and Mounting Pin cotters. Tie strap all hydraulic, air hoses and electrical wires away from exhausts and moving parts. Insure that all hydraulic and air hoses have sufficient radius at bends. Top off the hydraulic oil in the tank. Touch-up the black acrylic enamel paint on the Front and Rear Railroaders. Raise the Railroaders (road position) and install all of the pin-offs. Apply the Decal Kit. Check tire pressures. DMF RW-1420 Railroader Installation Check Sheet Front Alignment Front Mounting Pin height: Rear Mounting Pin height: 23-1/2 inches 10-3/4 inches Rear Alignment Tire to Rail Wheel center: Minimum Truck Frame extension: Calculated Spacer thickness (w/ 6” spacer) Single Axle 13-1/4 inches 19-1/4 inches = (6.0” -GAP) x Tandem Axle 9-1/4 inches 15-1/4 inches 60% Check overall measurements: Rear Truck Axle to Rear Railroader Axle (straight) Rear Truck Axle to Rear Railroader Axle (diagonal) Front Railroader to Rear Railroader (straight) Front Railroader to Rear Railroader (diagonal) © 2015 DMF, Inc. All Rights Reserved. A = B (within 1/16”) C = D (within 1/8”) E = F (within 1/8”) G = H (within 1/4”) Page 67 of 80 DIVERSIFIED METAL FABRICATORS, INC. RW-1420 8.0 ENGAGING THE RAIL 8.1 Getting On the Rail Lower rear guide-wheels first: • • • • • • • At the track crossing, drive past the track, then back the vehicle onto the rails. Engage the truck’s parking brake to prevent the truck from rolling. If the railgear has brakes, turn brake switch on. Engage the PTO. Remove the safety pin-off pins (one each side). Push / Pull valve handle to lower wheels to engage rail. When both wheels are fully down and properly engaging rail, replace safety pin-off pins. NOTE: Rear end can be articulated to facilitate alignment by operating one spool at a time. Lower front guide-wheels: • • • • If necessary drive the truck into position to line up the front guide-wheels with the rail. Engage the PTO. Remove the safety pin-off pins (one each side) and stow in provided storage tubes. Check and make sure that the front guide-wheels line up with the rail, then engage wheels. NOTE: The front guide-wheel assembly is an over-center design and does not require safety pin-off pins engaged in the rail mode. On the tracks: • • • • • • • Do not exceed 30 MPH while on the track. All railroad speed rules should be observed. Be aware that some high rail gear is insulated, and will not operate the crossing gate circuits. Reduce speed at all crossings, curves, branch lines, switches and frogs. Traction is reduced on the track, especially in wet conditions. Tire damage may result from spinning wheels on track. Braking distance is increased on the track, especially in wet conditions. Do not slide tires or guide-wheels on the tracks. Do not exceed the maximum rated capacity of the equipment. On newer trucks with Anti-Lock braking systems, the amber ‘ABS’ dash light may remain on with the front wheels elevated. This will not effect rear truck braking or rail wheel braking. 8.2 Getting Off the Rail Removing truck from track: • • • • • • • Engage the PTO and the truck parking brakes. Leave the truck running and the transmission in neutral gear. Lift both sets of railgear (there is no preference for removal order). Engage the safety pin-off pins in highway position. Disengage the switch that controls the railgear brakes (if applicable). Disengage the PTO before moving the truck. If the amber ‘ABS’ dash light remains on during rail operation, the truck engine must be turned off and restarted after returning to highway operation. This will clear the ‘ABS’ after a few seconds. If the amber light remains on during road operation, the truck’s brake © 2015 DMF, Inc. All Rights Reserved. Page 68 of 80 DIVERSIFIED METAL FABRICATORS, INC. RW-1420 system may have an active fault and should be checked out. Please refer to the truck’s operation manual. © 2015 DMF, Inc. All Rights Reserved. Page 69 of 80 DIVERSIFIED METAL FABRICATORS, INC. RW-1420 9.0 ROUTINE MAINTENANCE 9.1 Inspection & Maintenance If your hi-rail vehicle is high-use or operated under extreme conditions, such as operating in mountainous regions or extreme temperatures, the levels of inspections listed below may need to be performed more frequently than stated. The following are instructions for routine inspections recommended by Diversified Metal Fabricators. In some circumstances, government or corporate regulations may require additional inspections be performed. Please ensure that you are aware of any inspection requirements that pertain to your rail gear and that you abide by all local and national laws regarding rail gear maintenance and safety. Daily Maintenance: • • • • Visually inspect for hydraulic fluid leaks. Check and make sure that all threaded fasteners are secured. NOTE: All hex nuts are either nylon insert or slotted hex nuts with cotter pins. Check and make sure all tie straps that secure hoses from moving parts and exhaust systems are in place. Replace if cracked or worn. Inspect wheel flanges for excessive wear, primarily noting difference in wear between wheels on the same axle or diagonally. If abnormal pattern is noted, check railgear alignment (see alignment procedure). Weekly Maintenance: In addition to the items listed in Daily Maintenance, perform the following: • Grease and lubricate all grease fittings on front and rear railgear and guidewheel assemblies. NOTE: There are six (6) locations on front assemblies and fourteen (14) locations on rear assemblies. • • Check level of hydraulic oil and all other fluids. Check air pressure in tires and inflate to proper inflation pressure (if necessary). Bi-annual Maintenance or as required: In addition to the items listed in Daily Maintenance and Weekly Maintenance, perform the following: • Remove the hubcaps from the railwheels and inspect for deterioration or loss of wheel bearing grease. Unless there is a problem, the cavity may be topped off with the recommended grease without removing and/or re-packing the bearings. • Clean the hubcap and mating surfaces and apply a bead of silicone gasket and re-attach securely. • Clean the strainer / filter in the hydraulic power unit tank. • Inspect wheel flanges for excessive wear. If abnormal pattern is noted, check railgear alignment (see alignment procedure). • Rail test for proper traction and braking. If abnormal, adjust properly (see traction procedure). © 2015 DMF, Inc. All Rights Reserved. Page 70 of 80 DIVERSIFIED METAL FABRICATORS, INC. RW-1420 Annual Maintenance or as required: In addition to the items listed in Daily Maintenance, Weekly Maintenance and Bi-annual Maintenance, perform the following: • Disassemble, inspect repack and reassemble Rail Wheel Bearings as shown in Section 5 (5.4.11/5.4.12 & 5.5.5). 9.2 Lubrication Specification Hydraulic oil: • Unax RX-46 hydraulic oil (or equal) Wheel bearings / Grease Fittings: • Factory Standard: Citgo Syndurance Premium Synthetic 460 #2 • Warm Climates: Mystik JT-6 Hi-Temp Multi-Purpose Grease #2 (or equivalent) © 2015 DMF, Inc. All Rights Reserved. Page 71 of 80 DIVERSIFIED METAL FABRICATORS, INC. RW-1420 Drawing: Grease Point Locations © 2015 DMF, Inc. All Rights Reserved. Page 72 of 80 DIVERSIFIED METAL FABRICATORS, INC. RW-1420 APPENDIX A: TECHNICAL DATA A.1 Working Pressure Ratings for SAE Hose and Fittings The following table gives the recommended working pressures for SAE J517 Hose and SAE J516 Fittings: Hose Diameter -4 -6 -8 -12 100-R1 2750 psi 2250 psi 2000 psi 1250 psi 100-R2 5000 psi 4000 psi 3500 psi 2250 psi Contact hose supplier to confirm that the hydraulic hoses and fittings meet these pressures ratings and that they conform to SAE J517 (Hydraulic Hoses) and SAE J516 (Hydraulic Fittings). NOTE: The SAE ratings for hoses can be found stamped on the hose outer surface. A.2 • • Welding Information Dual Shield Wire spec. Æ AWS E71T-1 Low Hydrogen spec. Æ AWS E-7018 Low Hydrogen Electrodes (AWS E-7018) Manufacturer Air Products Airco Arcos Air Products Chemtron Hobart Marquette McKay Co Reid-Avery Uniblaze Westinghouse Lincoln Equivalent AP-7018, 7018IP 7018C, 7018-A1 Ductilend 70 170-LA, SW-47,616 170-LA, SW-47,616 718, 718-SR 7018 7018 7018 7018 Wiz-18 Jetweld LH-70 © 2015 DMF, Inc. All Rights Reserved. Page 73 of 80 DIVERSIFIED METAL FABRICATORS, INC. A.3 RW-1420 SAE O-ring Fitting Installation © 2015 DMF, Inc. All Rights Reserved. Page 74 of 80 DIVERSIFIED METAL FABRICATORS, INC. A.4 RW-1420 NPT Pipe Thread Fitting Installation © 2015 DMF, Inc. All Rights Reserved. Page 75 of 80 DIVERSIFIED METAL FABRICATORS, INC. A.5 RW-1420 SAE (JIC) 37 Deg. Flare Fitting Installation © 2015 DMF, Inc. All Rights Reserved. Page 76 of 80 DIVERSIFIED METAL FABRICATORS, INC. A.6 RW-1420 Purchased Fastener Torque Specification © 2015 DMF, Inc. All Rights Reserved. Page 77 of 80 DIVERSIFIED METAL FABRICATORS, INC. A.7 RW-1420 Railwheel Bearing Adjustment Guidelines © 2015 DMF, Inc. All Rights Reserved. Page 78 of 80 DIVERSIFIED METAL FABRICATORS, INC. A.8 RW-1420 Hi-rail Cylinder Assembly Procedure © 2015 DMF, Inc. All Rights Reserved. Page 79 of 80 DIVERSIFIED METAL FABRICATORS, INC. RW-1420 DMF LIMITED WARRANTY POLICY Diversified Metal Fabricators (DMF) products are designed to provide the utmost service and reliability. Competent workmen, guided by stringent quality standards, manufacture the products from high-grade material. DMF warrants products of its manufacturer to be free of defects in material and workmanship, under normal use and service, for a period of ONE CALENDAR YEAR. DMF’s obligation under this warranty is limited to repairing or replacing at its factory, or other location designated by us, any part or parts there-of which shall, within 30 DAYS of the date of failure or notice of defect, be returned, and which upon examination shall appear to DMF’s satisfaction to have been defective. Such repair or replacement does not include the cost of installing the new part or any other expenses incident thereto; however, the outbound direct ground freight on the part will be prepaid to locations within the continental United States and Canada. DMF shall not be liable for other loss, damage, or expense directly or indirectly arising from the use of its products. Ordinary wear and tear, abuse, misuse, neglect, or alteration is not covered by this warranty. DMF assumes no liability for expenses or repairs made outside its factory except by written consent. Warranty is null and void if instructions and operating procedures specifically referring to warranty coverage are not followed. Equipment or parts not manufactured by this company, but which are furnished in connection with DMF products are covered directly and solely by the warranty of the manufacturer supplying them. This warranty is in lieu of other warranties, expressed or implied, including any implied warranties of merchantability or fitness for a particular purpose and any liability for special or consequential damages. All warranty claims must reference a serial number. Returns must reference a RMA number. DMF 665 Pylant Street Atlanta, Georgia 30306 Parts (404) 607-1684 Parts Fax (404) 879-7888 [email protected] Service Department (404) 879-7882 [email protected] Phone (404) 875-1512 Fax (404) 875-4835 [email protected] http://www.dmfatlanta.com © 2015 DMF, Inc. All Rights Reserved. Page 80 of 80