1
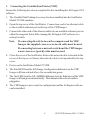
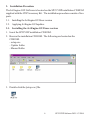
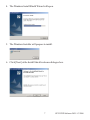
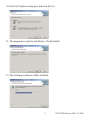
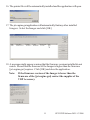
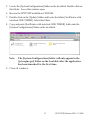
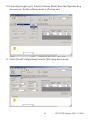
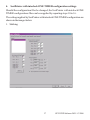
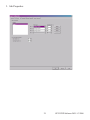
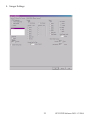
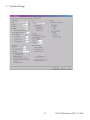
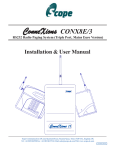
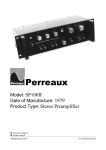
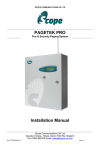
Variable Data Printer
Software Installation
Manual
Version 1.1-3
This documentation or any part of it may not be reproduced, stored or transmitted
in any form, including, but not limited to electronic, photocopying, mechanical copying, electrostatic copying, recording or other means without express written permission of SeriPrint SA (Pty.) Ltd.
SeriPrint, SeriPrinter, SP100II, SP25, SeriInk, SeriLink, SeriInk-Jet and all other
related brand names are registered trademarks of SeriPrint South Africa (Pty)
Ltd. ZipRIP, is a trademark of SMA (Australia) Ltd.
Jet Engine is a trademark of inc. jet Inc.
PostScript is a trademark of Adobe Systems Inc. Windows is a registered
trademark of Microsoft Inc. Other brand or product names, throughout this
document, are trademarks or registered trademarks of their respective holders.
Contents
1. Connecting the Variable Data Printer [VDP] ..................................... 4
2. Installing the Jet Engine GUI Software .............................................. 5
2.1. System Requirements ......................................................................... 5
3. Installation Procedure.......................................................................... 6
3.1. Installing the Jet Engine GUI base version ....................................... 6
3.2. Applying Jet Engine GUI updates. .................................................... 12
4. SeriPrinter with interlock ONE TIMER configuration settings. ..... 17
5. Supporting Documentation ................................................................ 24
1. Connecting the Variable Data Printer [VDP]
Ensure the following have been completed before installing the Jet Engine GUI
software.
1. The Variable Data Printing Accessory has been installed into the SeriPrinter
Model 25 VDE machine.
2. Open the top cover of the SeriPrinter. Connect one end of an ethernet cable
to the available ethernet port on the top of the VDP Imager.
3. Connect the other end of the ethernet cable into an available ethernet port on
either the computer that will be running the Jet Engine GUI software or a
network switch.
Note:
If connecting directly between the computer and the VDP
Imager, the supplied cross-over network cable must be used.
If connecting between a network switch and the VDP Imager,
a non cross-over [patch] cable must be used.
4. Close the cover of the SeriPrinter. Ensure the network cable is located in the
recess of the top cover. Ensure the network cable is not squashed by the top
cover.
5. Power on the SeriPrinter Model 25 VDE.
6. The third LED from the left (Image Configuration Indicator) on the VDP
Imager will turn red and after a few seconds turn green.
7. The first LED from the left (100MBit Ethernet Activity Indicator) of the VDP
Imager will turn green intermittently. This indicates the network cable is
plugged in.
8. The VDP Imager is now ready for configuration and the Jet Engine software
can be installed.
4
SP25 VDP Software IM 1.1-3 2006
2. Installing the Jet Engine GUI Software
2.1.
System Requirements
The following are suggested minimum system requirements for the computer the
software will be installed onto.
1. Windows XP Operating System [Windows 2000 compatible]
2. 1 Ghz Processor
3. 256 MB RAM
4. 2 GB available Hard Drive space
5. 100Mbit Ethernet Adapter
5
SP25 VDP Software IM 1.1-3 2006
3. Installation Procedure
The Jet Engine GUI Software is located on the SP25 VDP installation CD ROM
supplied with the VDP Accessory Kit. The installation procedure consists of two
parts.
3.1. Installing the Jet Engine GUI base version
3.2. Applying Jet Engine GUI updates
3.1.
Installing the Jet Engine GUI base version
1. Insert the SP25VDP installation CD ROM.
2. Browse the installation CD ROM. The following are located on the
CDROM.
- setup.exe
- Update folder
- Manual folder
3. Double click the [setup.exe] file.
6
SP25 VDP Software IM 1.1-3 2006
4. The Windows Install Shield Wizard will open.
5. The Windows Installer will prepare to install.
6. Click [Next] at the Install Shield welcome dialogue box.
7
SP25 VDP Software IM 1.1-3 2006
7. Accept the terms of the license agreement and click [Next].
8. Insert [User Name] ,[Organization] and select users preference. Click
[Next].
9. Select the destination folder and click [Next].
8
SP25 VDP Software IM 1.1-3 2006
10. Select [Complete] setup type and click [Next].
11. The program is ready for installation. Click [Install].
12. The Jet Engine software will be installed.
9
SP25 VDP Software IM 1.1-3 2006
13. Click [Finish] to complete the Jet Engine software installation.
14. Select [jet.engine.gui] from [Programs] in the [Start] menu and click [Launch
jet.engine.gui].
Note:
When [jet.engine.gui] is opened for the first time on the
completion of the installation the printer driver is automatically installed.
15. Click [Continue Anyway] or [Yes], (depending on the Windows Operating
System), at the Microsoft license window.
10
SP25 VDP Software IM 1.1-3 2006
16. The printer files will be automatically installed and the application will open.
17. The jet.engine.gui application will automatically find any other installed
Imagers. Select the Imager and click [OK].
18. A message might appear warning that the firmware versions installed do not
match. Ensure that the firmware of the Imager is higher than the firmware
[jet.engine.gui] requires. Click [OK] and close the application.
Note:
If the firmware version of the Imager is lower than the
firmware of the [jet.engine.gui] contact the supplier of the
VDP Accessory.
11
SP25 VDP Software IM 1.1-3 2006
3.2. Applying Jet Engine GUI updates.
On completion of the installation procedure the following must be performed to
ensure the correct performance of the software for the SeriPrinter.
- Updating the [jet.engine.gui] executable file
- Copying and applying the [SeriPrinter with interlock ONE TIMER] configuration file. Follow the procedure below.
1. Browse to the location of the [jet.engine.gui] folder on the local disk of the
computer. Locate the [jet.engine.gui.exe] file. Delete [jet.engine.gui.exe] file.
2. Browse the SP25VDP installation CD ROM.
3. Double click on the [Update] folder and locate the [jet.engine.gui.exe].
4. Copy [jet.engine.gui.exe] file from the CD-ROM to the [jet.engine.gui]
folder on the local disk.
12
SP25 VDP Software IM 1.1-3 2006
5. Locate the [SystemConfigurations] folder on the local disk. Double click on
this folder. Leave this window open.
6. Browse the SP25VDP installation CD ROM.
7. Double click on the [Update] folder and locate the folder [SeriPrinter with
interlock ONE TIMER]. Select this folder.
8. Copy and paste [SeriPrinter with interlock ONE TIMER] folder into the
[SystemConfigurations] folder on the local disk.
Note:
The [System Configurations] folder will only appear in the
[jet.engine.gui] folder on the local disk after the application
has been launched for the first time.
9. Close all windows.
13
SP25 VDP Software IM 1.1-3 2006
10. Launch [jet.engine.gui]. Select [Software Mode] from the [Options] drop
down menu. Set the software mode to [Technician].
11. Select [Load Configuration] from the [File] drop down menu.
14
SP25 VDP Software IM 1.1-3 2006
12. Select [SeriPrinter with interlock ONE TIMER] and click OK.
13. Select [Imager Configuration] from the [Options] drop down menu.
15
SP25 VDP Software IM 1.1-3 2006
14. Select the [Imager Settings] tab. Locate the [Output Polarity] setting and
select [Inverted]. Click on [OK].
15. Select [Imager Configuration] from the [Options] drop down menu.
16. Select the [System Settings] tab. Locate the [Other Settings] section and
select [Service Station Enabled]. Click on [OK].
17. The [jet.engine.gui] is now ready to use.
16
SP25 VDP Software IM 1.1-3 2006
4. SeriPrinter with interlock ONE TIMER configuration settings.
Should the configuration files be changed, the SeriPrinter with interlock ONE
TIMER configurations files can be reapplied by repeating steps 10 to 16.
The settings applied by SeriPrinter with interlock ONE TIMER configuration are
shown in the images below.
1. Stitching
17
SP25 VDP Software IM 1.1-3 2006
2. IO Events
18
SP25 VDP Software IM 1.1-3 2006
2.1. Event 1 - Refresh Cap & Quality Timer
2.2. Event 2 - Start Print Quality Timer
19
SP25 VDP Software IM 1.1-3 2006
2.3. Event 3 - Stop Print Quality Timer
2.4. Event 4 - CAP if Print Quality Timer Expired
20
SP25 VDP Software IM 1.1-3 2006
3. Ink Properties
21
SP25 VDP Software IM 1.1-3 2006
4. Imager Settings
22
SP25 VDP Software IM 1.1-3 2006
5. System Settings
23
SP25 VDP Software IM 1.1-3 2006
5. Supporting Documentation
In addition to this manual, the SP25 Operators manual, the SP25 VDP Accessory
Kit Operators Manual and the SP25 VDE Service Manual the following
documentation is available.
1. Inc.Jet Technical Manual - manual is installed onto the local disk of the computer the software is installed onto.
Location: c:\jet.engine.gui\Docs
2. jet.engine.gui help - software help manual.
Location: Start\Programs\jet.engine.gui\Lanuch jet.engine.gui Help or selecting help from the drop down menu in the application.
24
SP25 VDP Software IM 1.1-3 2006