1
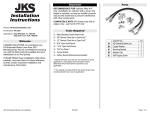
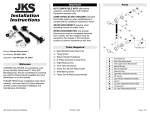
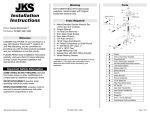
Heavy-Duty Dual Diaphragm Brake
Booster & High-Pressure Master
Cylinder
Part #: RT31023, RT31024
This Heavy-Duty Power Brake Conversion Kit is
designed for 1997-2006 Jeep® TJ Wrangler. It
converts the factory single diaphragm brake
booster to a dual diaphragm brake booster,
resulting in more stopping power with less pedal
pressure.
1. Ensure all components in the kit are accounted for.
2. Secure the vehicle with chock blocks to prevent it from rolling.
3. Place a catch can under the brake lines and disconnect the brake lines from the master cylinder to the proportioning valve.
Allow all brake fluid in master cylinder to drain into a catch can prior to removing. Be careful to not allow brake fluid to
come in contact with paint as it will damage the clear coat.
4. Disconnect the brake booster from the brake pedal by removing the clip from the stud on the brake pedal. If the vehicle
has a switch mounted to the brake pedal, note the position of the switch prior to removal.
5. Remove the vacuum line at the brake booster.
6. Unbolt the brake booster, master cylinder, and bracket assembly at the firewall and remove from the vehicle.
7. The new Master Cylinder (#1) will require bench bleeding prior to installation. Separate the new master cylinder from the
brake booster. Bench bleed using the included bleeding kit (#3) using a factory service manual for bleeding procedure.
Take care that the rear plug insert of the Master Cylinder does not fall out.
8. Bolt the heavy duty booster and bracket to the firewall using the existing hardware. After having bench bled the master
cylinder bolt it back to the booster.
NOTE: Some applications may require small adjustments to the push rod at the front of the booster.
9. Install the included adjustable push rod adapter (#2) onto the push rod on the backside of the booster. Adjust it until
there is no free play.
10. Once adjusted, properly tighten the jam nut on the
push rod and connect to the brake pedal using the
factory clip. If the vehicle has a switch mounted to
the brake pedal, install it in the same orientation it
was when it was removed.
NOTE: The brake pedal will be higher with the
heavy duty master cylinder and brake booster
than with the factory assembly. Adjusting the
push rod adapter so the brake pedal is at the
factory height will cause damage to the brake
booster and master cylinder.
11. Install the vacuum line onto the booster.
12. Install the brake lines from the master cylinder to the proportioning valve. Replacement of the factory brake lines is
suggested. Ensure to add a loop in the brake line to accommodate any movement of the master cylinder (See Figure 1).
NOTE: The front port of the master cylinder goes to the front brakes. If running 4-wheel disc brakes or heavy duty
axles, we recommend installing an adjustable proportioning valve in place of the stock proportioning valve to get
adequate pressure to the rear brakes for optimum stopping power.
13. Once the brake system is sealed and all the lines are tight the brake system should be bled. Refer to a factory service
manual for brake system bleeding procedure.
14. Ensure proper function of the brake lights.
a. To adjust the brake light switch on a CJ simply loosen the jam nuts and
adjust the position of the switch so it functions properly; then tighten
the jam nuts to the bracket. (See Figure 2)
b. The YJ Wrangler brake light switch should not require adjustment to
work properly. If the brake lights are not functioning properly ensure
the switch is installed properly.
c. An inline hydraulic brake light switch is another option to get the brake
lights to work properly.
Kit Contents
1. Heavy Duty Brake Master Cylinder & Booster w/ Bracket
2. Adjustable Push Rod Adapter
3. Brake Bleeding Kit
Warranty: All merchandise is warranted to be free from defects in material and workmanship prior to installation.
Any alteration or improper use will void this warranty. Because this item is intended for heavy-duty applications, it is
not possible to warranty or guarantee the performance of this product.
While every attempt is made to ensure that the information contained in these instructions is correct, no liability can be accepted by the
authors for loss, damage, or injury caused by any errors in, or omissions from the information given. All service should be performed by
qualified mechanics. Crown Automotive Sales Co .,Inc. cannot be held responsible for any mechanical work performed. Standard and accepted
safety precautions should be used in every procedure. Jeep® , Wrangler®, CJ® and YJ® are registered trademarks of Chrysler LLC. Crown
Automotive Sales Co., Inc. is not affiliated with Chrysler LLC.