1
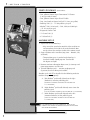
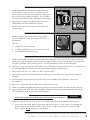
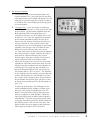
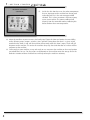
TABLE OF CONTENTS
C H A P T E R
1
GETTING STARTED . . . . . . . . . . . . . . . . . . . . . . . . . . . . . .1
C H A P T E R
2
MANUFACTURER’S RECOMMENDED MAINTENANCE . . . . . 6
C H A P T E R
3
FREQUENTLY ASKED QUESTIONS . . . . . . . . . . . . . . . . . 7
C H A P T E R
4
DIAGNOSIS & TROUBLESHOOTING . . . . . . . . . . . . . . . . . 10
C H A P T E R
5
MODES & OPERATION TIME . . . . . . . . . . . . . . . . . . . . . . 19
C H A P T E R
6
ADMINISTRATOR MODE . . . . . . . . . . . . . . . . . . . . . . . . . 22
C H A P T E R
7
SERVICE MANUAL . . . . . . . . . . . . . . . . . . . . . . . . . . . . . . 23
C H A P T E R
8
SCHEMATICS & DIAGRAMS . . . . . . . . . . . . . . . . . . . . . . . 52
1.
GETTING
STARTED
1.
GETTING STARTED
START UP PACKAGE
(INCLUDED):
• One gallon of Storm Super Concentrate™ Cleaner
(1 oz. per tank of water)
• One gallon of Storm Super Shine™ Polish
• One 8 oz. bottle of Storm Sur-Fresh™ (4 oz. per gallon)
• Polishing Pads (3) – 75-100 polishes per pad
• Abralon ® Pads (20 of each) – 500, 1000, and 2000 grit
– 25-30 sands per pad
• Diagnostic Power Cord
• 3” Center Pads (3)
• 6” Velcro Pad (1)
MACHINE SET UP
1. Open crate and remove keys.
• Keys are either attached to outside of the machine or
are located on the inside of the main electrical door
on the side of the machine inside of the money catch.
2. Open all doors to the machine (top, front – bottom, side,
and back).
• To open door, press in on the lock where key is
inserted. Handle should pop out. Turn handle
90 degrees and pull.
3. Remove moisture absorption boxes two (2) from top and
front compartments and discard.
4. To install Abralon ® pads – remove sandpaper pads
(if present) that have been pre-installed.
Abralon ® pads MUST be installed in the following order for
machine to operate properly:
A. 500 Abralon ® pad installs directly to the right
(clockwise) from the polishing pad.
(NORTH IF STANDING IN FRONT OF MACHINE OR
12:00 POSITION)
B. 1000 Abralon ® pad installs directly across from the
polishing pad.
(EAST IF STANDING IN FRONT OF MACHINE OR 3:00 POSITION)
C. 2000 Abralon ® pad installs directly to the left
(counter-clockwise) of the polishing pad.
(SOUTH IF STANDING IN FRONT OF MACHINE OR
6:00 POSITION)
NOTE
1
IT IS IMPORTANT TO PUT THE ABRALON ® PADS IN THE
CORRECT LOCATIONS IN ORDER TO ENSURE THE MACHINE
WILL OPERATE PROPERLY.
5. Inside the bottom front compartment you will find the
water reservoir. Close the valves (2) on the hose that
comes out of the reservoir by rotating the two wing nuts
on each side of the coupler 90 degrees. This will allow
you to proceed without spilling liquid from the reservoir.
WING NUT
6. Disconnect the coupler by pulling back the ring and
pulling both ends of the coupler to separate.
7. Remove drain pipe from the top of the reservoir and
leave hanging.
COUPLER
8. Remove reservoir from compartment. There will be
several components inside the reservoir that must
be removed.
They are:
A. A black filter for the reservoir
B. A supply of polishing pads and a cloth center pad
C. Any additional maintenance items
9. Install the black filter by stretching opening around the top edge of the reservoir. This will keep all of the
debris away from the opening where the hose is attached to the reservoir and will allow clean water to be
used in the polishing and resurfacing process. This will also prolong the life of the water pump.
10. Add one (1) ounce of Storm Surface Factory Super Concentrate Cleaner to the reservoir. It is important to
use only one ounce. Any more may cause foaming and damage to your machine.
11. Fill reservoir with 2 to 2-1/2 gallons (9.5 liters) of clean water.
12. Add bottle of Sur-Fresh™ to water to keep the water fresh and to protect the machine from corrosion
and wear.
13. Resecure the lid on the top of the reservoir and put in the bottom compartment the same way it
was removed.
14. Reinsert the drain hose into the opening on the lid of the reservoir.
15. Attach the coupling by pulling back the ring, placing the two ends together and then releasing the ring.
16. Open both valves on each side of the coupling by rotating the wing nuts counter-clockwise 90 degrees.
This will allow the water to flow freely to the machine.
IMPORTANT
VALVES MUST BE OPEN DURING OPERATION TO PREVENT DAMAGE TO MACHINE!
17. Familiarize yourself with the contents that are included on the door of the bottom compartment.
A. On the side of the door, closest to the hinge and near the top, is a safety switch. This will keep the
machine from running while this door is open. There is another safety switch on the back door.
These switches do not cut power to the machine.
STORM’S SURFACE FACTORY SERVICE MANUAL
2
1.
GETTING STARTED (CONTINUED)
NOTE
IF YOU ARE DOING MAINTENANCE ON THE MACHINE IT IS IMPORTANT TO SWITCH THE
CIRCUIT BREAKER (POWER ON/OFF) AND UNPLUG THE MACHINE BEFORE STARTING SERVICE
B. The Coin Hopper – take the keys and unlock the padlock that is attached to the middle
compartment. This is where you will keep quarters for change for customers. While supplying
your machine with change, make sure to fill the hopper above the line. After stocking your
machine with quarters close and lock the coin vault.
C.
WARNING
The third compartment is the polish reservoir tank.
Fill this reservoir full with Storm Super Shine Polish
(included) and secure the lid. It is important to keep
the polish tank at least half way full at all times. It is
also very important to only use Storm Super Shine
Polish as any other polish may cause the tubes
to clog and will void the one year warranty on
your machine.
IF SURFACE FACTORY IS OPERATED WITH ANY POLISH OTHER THAN
CERTIFIED STORM SURFACE FACTORY POLISHES, WARRANTY WILL BE VOID
18. Open the side compartment – there are many very important components inside this compartment
and on the side compartment door.
19. The Circuit Breaker (Power ON/OFF):
N O T E : Ve r y I m p o r t a n t
A. Attached to the door, on the bottom left is the circuit breaker. When you are servicing the machine
it is important to turn off the circuit breaker by switching down, to avoid damaging your machine.
While the circuit breaker is turned OFF there will be no lighting on the display on the front of the
machine; this will help you know the power is OFF and the machine is safe to service.
B. After you turn the switch on the circuit breaker ON the machine will go through a brief power up
cycle. When the machine is ready to use the display will read “It will be able to use now.”
20. The Primer Switch (Compound ON Switch):
A. Attached to the door also is the primer (Compound ON) switch. This is located on the top half of
the machine right below the controller panel. This switch will allow you to pull the polish from the
reservoir tank up through the hose and up to the nozzle. To prime the machine, place the switch
in the up position and you will be able to hear the motor pumping the the polish up through the
hose. Open the top compartment and you will see the polish coming through the hose attached
to the top door. Turn the switch OFF when the polish reaches the nozzle. This process may take
several minutes for the polish to be pulled from the polish tank to the spout.
WHEN THE SWITCH IS IN THE DOWN POSITION, YOU CAN PRIME THE COIN HOPPER.
IN ORDER TO OPERATE THE MACHINE, MOVE THE SWITCH TO THE NEUTRAL POSITION (MIDDLE).
3
NOTE
21. The Remote Controller:
A. Also attached to the side compartment door is the
remote controller. This is the panel that has the three
red buttons on top and five black tabs below. This will
allow you to set which mode the machine is running
in (VEND or FEE), and will allow you to change prices
in the vend mode.
B. Changing Prices – press the service for which you
would like to change price (i.e. 500 sand) on the front
of the machine. On the remote controller move the
black tab labeled FEE to the up position. Press
CANCEL on the front – the LCD should read “It will
be able/Fee: 2.00.” Press the appropriate red button
on the remote controller to adjust the price up or
down and it will show on the display what the price
has been adjusted to. After you have chosen your
desired price, press the red SET button on the remote
controller. After you press the SET button the light
below the service will move to the next service
(i.e. 1000 sand). You can adjust this price by following
the same procedure as above. Continue this process
until you have adjusted all of the prices to your
desired setting. After you are finished make sure to
switch the black tab FEE to the down position.
C. Along with changing prices you can use the remote
controller to adjust your maintenance alerts that will
tell you when your machine needs new Abralon ® or
polishing pads. To change the alert schedules first
locate the black tab labeled D-SET and switch it up.
The machine will say “disk set 400/25.” The 400 refers
to the sandpaper that the machine is programmed for
which is the equivalent of a 500 Abralon ® pad, and
the 25 refers to the amount of times the pad should
be used before the machine alerts you that it is time
to change that particular pad. The default number of
times is 25.
To adjust up or down press the red buttons on the
remote controller and the numbers will increase or
decrease. After setting the number press the SET
button. This will move the disk set to the next pad
(800 grit sandpaper or 1000 Abralon ®). Follow the
steps until all three pads are done (1000 sandpaper is
2000 Abralon ®). The final step in programming alerts
is adjusting the polishing pad. The default number for
the polishing pads is 100. Use the same steps from
above to adjust that up or down to your preference.
Don’t forget to switch the D-SET tab to ON.
STORM’S SURFACE FACTORY SERVICE MANUAL
4
1.
GETTING STARTED (CONTINUED)
THE REMOTE CONTROLLER
(CONTINUED)
D.
Inside the side door there are also other components
that are important to the machine but do not need
to be adjusted. First is the coin acceptor and bill
validator. This is where customers will insert money
to use your machine. The money collected will
dispense into the removable money collecting bin
located below these two components.
22. Move the machine so you can access the back panel. Open the door and notice the accessibility
to the different pumps, motors, switches, wires and belts. Remember that there is a safety switch
attached to the door as well and the machine will not work while this door is open. There will still
be power to the machine. To service the machine always flip the circuit breaker off so there will be
no power to the machine.
23. Once you have your machine set up and ready to use, maneuver the machine to the exact location
you would like it to stay. On the castors on the bottom of the machine rotate the orange dial in the
clockwise motion to lower the black feet and help to keep the machine stationary.
5