1
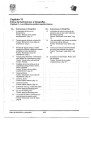
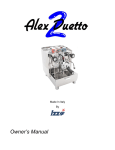
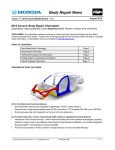
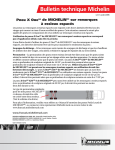
Two-Piece Radial Truck Nail Hole Repair Method Instructions
Please follow the exact step by step procedures
contained in this manual to attain a safe and
quality repair. Only qualified and trained
personnel should do tire repairs. The goal is to
return the repaired tire to service and provide
the customer with a sound and safe product.
Repair products and materials used should be
from the same manufacturer to ensure
compatibility in the curing process.
Warning!
Always demount the tire from
the wheel and complete a
thorough tire and wheel
inspection prior to returning
the components to service.
Check the tire for signs of underinflation / run
flat and other damages such as bulges, bead
damage, bad repairs, anything that would
require the tire to be inspected by a
professional retread and repair facility.
Never inflate a tire that has signs of heat
damage or with indications of running
underinflated.
Use safety glasses,
and keep repair area,
tools, and materials
clean and in
good working order.
Always place the
mounted tire in a
safety cage or an
OSHA-approved
restraining device
with the valve core
still removed !!!
When inflating an assembly after a repair, be
sure to follow all procedures outlined by the
tire and wheel industry.
Inspect sidewall area for any signs of ‘zipper’
damage, such as bulges, and listen for popping sounds. If any of these are present,
deflate the tire immediately by disconnecting
the air line at the quick connect, remove from
the cage/restraining device, and scrap the tire.
Michelin X One Tire
®
Remember, if there are any concerns or
questions regarding the safety and integrity
of the tire, err on the side of caution, and
forward tire to a professional retread and
repair facility.
Always follow correct procedures when
demounting and mounting tires and wheels.
Nail Hole Limitations
Chart
Safety First
®
• X One tires: There are no special repair
techniques or materials required when
repairing a Michelin X One tire.
• For further information refer to:
Michelin X One Tires Service Manual
(MWL43101).
CROWN AREA – 3/8” or 10 mm, Repair Unit: CT20
T
T
Repairable Area
Maximum repairable
nail hole diameter is
3/8 inch (T-T area).
All injuries larger than
3/8 inch or outside the
specified T-T area, must be
treated as a section repair.
S
SHOULDER AREA – 1-1/2” or 40 mm
SIDEWALL AREA –
Consult your Michelin
Dealer or your Michelin
Representative.
BEAD AREA –
NON-REPAIRABLE!
1
Truck Tire Nail Hole Repair Procedures
1
2
Locate and mark the injury on the outside and inside of
the tire.
REMOVE the object from the tire. Inspect the injury to
determine the location, size and angle of penetration.
Probe into the injury and make sure that no air
infiltration exists or excessive rust has formed. Refer to
the Nail Hole Limitations Chart on Page 1 to determine
repairability and to select the proper repair material. Use
Injury Sizing Tool if available. Make sure to measure the
injury to assure the damage does not exceed 3/8” (10 mm).
7
8
Remove spiral cement tool from the injury and feed the
small end of the wire puller through the injury from
inside of the tire.
Grasp the wire puller from the outside of the tire and
begin pulling the stem into place. If the wire puller
comes off, grasp the stem with a pair of pliers and pull
the stem until it fills the injury, exposing approximately
1/2 inch (13 mm) of the gray cushion bonding gum
above the face of the tread.
13
14
Using Chemical Vulcanizing Fluid (cement), brush a thin,
even coat into the clean textured area. Allow 3 to 5
minutes to dry, the vulcanizing cement should be tacky.
Areas with high humidity may require a longer dry time.
Make sure the cement used is compatible with the repair
units you are installing.
With the tire beads in a relaxed position, center the repair
unit over the filled injury. Press the repair unit down into
place over the injury. Make sure the directional bead
arrows on the repair unit are aligned with the beads of
the tire, and press into place. Roll the protective poly back
to the outer edges of the repair unit. This enables you to
handle the repair unit without contaminating the
bonding gum layer. You are now ready to stitch the repair.
2
3
4
Prepare the injury with the proper size carbide cutter on
a low r.p.m. drill (max. 1200 rpm). Following the direction
of the injury, drill from the inside out. Repeat this process
three times. Repeat this procedure from the outside of
the tire to ensure damaged steel and rubber are removed
(be careful when drilling, you do not want to make the
injury any larger than necessary).
Apply rubber cleaner to the inner liner at the injured area.
While the area is still moist, use a rubber scraper to
remove contaminating substances.
9
10
Remove the template and cut off the stem 1/8" (3 mm)
above the inner liner on the inside of the tire. NOTE: If
you do not have a repair template. Go to this step and
cut the stem, then using correct size patch and centering
it correctly on the injury – arrows towards the beads –
draw your perimeter approximately 1/2" larger than the
repair patch.
On the inside of the tire, center the appropriate repair
unit template over the stem, make sure to correctly align
the template in relationship to the tire beads and draw a
perimeter around the template.
15
16
Stitch the repair unit firmly pressing down from the
center toward the outer edges. This will eliminate
trapping air under the repair unit.
Remove the rest of the poly backing. Stitch the repair
unit from the center to the outer edges. Remove the top
clear protective poly.
Please follow the instructions closely so you can put
your customer back on the road with a quality tire repair!
3
5
6
Using a Spiral Cement Tool, cement the injury from the
inside of the tire with Chemical Vulcanizing Fluid. Turn
the tool in a clockwise direction both into and out of the
tire. This step should be repeated 3 to 5 times. Leave the
tool in the injury as you go to the next step.
Place the wire puller in the middle of the black exposed
portion of the stem. Remove the protective poly from the
stem and brush a light coat of Chemical Vulcanizing Fluid
(cement) on this area. For lubrication, apply a coat of
cement to the wire puller where it contacts the stem.
11
12
Use a low rpm (max. 5000 rpm) buffer and texturizing
wheel to mechanically buff the stem flush to the inner
liner. Then buff the outlined area to achieve an even
RMA-1 or RMA-2 buffed texture. Use a clean, soft wire
brush, remove all dust and debris from the buffed area.
Vacuum all buffing dust and debris from the tire. If the
buffed surface is touched or contaminated after cleaning
the area, you must repeat Step 11 to guarantee your
surface is clean for proper repair bonding.
17
18
To cover over-buffed areas in tubeless tires, apply Security
Sealer to the outer edge of the repair unit and overbuffed area.
*If tube type, cover the repair with Tire Talc to prevent
the repair from vulcanizing to the tube.
Cut the stem off on the outside of the tire 1/8"(3 mm)
above the tire’s surface. The tire is now ready to be
returned to service.
4
Michelin Truck Nail Hole Repair Procedures
®
To learn more please contact your Michelin Sales Representative or visit
www.michelintruck.com
To order more books, please call Promotional Fulfillment Center 1-800-677-3322, Option #2
Monday through Friday, 9 a.m. to 6 p.m. Eastern Time
United States
Michelin North America, Inc.
P.O. Box 19001, One Parkway South
Greenville, SC • 29602-9001
Consumer Relations: 1-888-552-1213
Customer Service: 1-800-847-3435
Canada
Michelin North America (Canada), Inc.
3020 Avenue Jacques-Bureau
Laval, Quebec H7P 6G2
1-877-838-8473 (English)
1-888-707-7638 (French)
Mexico
Industrias Michelin, S.A. de C.V.
Av. 5 de febrero No. 2113-A
Fracc. Industrial Benito Juarez
7 6120, Ouerétaro, Qro. Mexico
011 52 442 296 1600
An Equal Opportunity Employer
Copyright © 2007 MNA, Inc. All rights reserved.
MWT40163 (04/07)