1
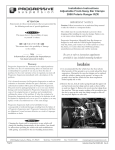
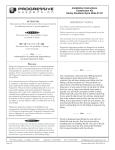
Page 1 or 2
Instruction Sheet Part # 3082
Rev. C
Installation Instructions
465 Series Single Shock
ATTENTION
Statements in these instructions that are preceded by
the following words are of special significance:
Important Notice
Caution: Removing and replacing the shock absorber must
be performed by a qualified mechanic or according to steps
outlined in an authorized shop manual that relates to your
particular make, model and year motorcycle.
W a r n i n g
This means there is the possibility of injury
to yourself or others.
These are general instructions. For specific instructions
relating to your particular model please read the enclosed
supplemental instructions, as well as referring to an
authorized shop manual.
Caution
This means there is the possibility of damage
to the vehicle.
The vehicle must be securely blocked to prevent it from
dropping or tipping when the shock absorber is removed.
Failure to do so can cause serious damage and/or injury!
Note
Progressive Suspension 465 Series shocks are designed to
work with the OEM (Original Equipment) chassis
components. Use of this product on any chassis components
other than OEM may produce an unsatisfactory ride and void
the warranty.
Information of particular importance
has been placed in italics.
Warranty
Progressive Suspension Inc. warrants to the original purchaser
this Part to be free of manufacturing defects in materials and
workmanship for a period of one (1) year from the date of
purchase. In the event warranty service is required, you must call
Progressive Suspension immediately with a description of the
problem.
If it is deemed necessary for Progressive Suspension to make an
evaluation to determine whether the part is defective, a return
authorization number will be given by Progressive Suspension.
The parts must be packaged properly so as to not cause further
damage and returned prepaid to Progressive Suspension with a
copy of the original invoice of purchase and a detailed letter
outlining the nature of the problem. If after the evaluation by
Progressive Suspension the part was found to be defective it will
be repaired or replaced at no cost to you. If we replace it, we may
replace it with a reconditioned one of the same design.
Installation
n
Read all the instructions carefully before installing this shock on your
motorcycle. Use your factory authorized manual as a reference while
installing this shock.
n
Support and lift the motorcycle securely so the rear wheel is off the
ground.
n
Remove stock shock absorber from motorcycle according to instructions
contained in your authorized shop manual.
n
Mount the shock per instructions contained in the enclosed supplemental
instructions.
Preload / Ride Sag
n
Preload is preset to an average setting, but should be adjusted to
Progressive Suspension shall not be held liable for any
consequential or incidental damages resulting from the failure of
a Progressive Suspension part. Progressive Suspension shall have
no obligation if a part becomes defective as a result of improper
installation or abuse.
produce the proper Ride Sag using the adjuster wrench included
(requires the use of a 3/8" rachet) - OR the Remote Adjustable Pre-Load
adjuster, if so equipped.
n
Pre-load adjustment controls the “ride height” or “sag” of your motorcycle.
To check your Ride Sag there are two key measurements, the first is
Extended Height the second is Ride Height, and both are ideally
measured from the center of the rear axle to an arbitrary point directly
above the axle (a fender bracket, for instance).
Warning
Changing the chassis and/or suspension on any vehicle will
change the handling characteristics of that vehicle. Care should
be taken when operating the vehicle with such modifications
while getting accustomed to the new handling characteristics.
6911 Marlin Circle, La Palma, CA 90623
n
Extended Height is measured with the bike on a jack with the rear tire
Tech line: 714.523.8700
just off the ground or off the stand and with a helper. While holding the
bike straight up have the helper solidly lift the rear end by the fender or
rack until you feel the shocks stop extending, or “top out”. Once you are
certain the suspension if fully extended, take your first measurement.
Fax: 714.523.3220
www.progressivesuspension.com
Page 2 of 2
Instruction Sheet Part # 3082
n
Ride Height is measured with the rider, or riders, and gear on the bike
(hands on the bars and feet on the pegs) and a helper or two supporting
it. A measurement is again taken using the same points as before.
n
Now subtract the second measurement - Ride Height - from the first
measurement - Extended height - and the difference between the two
measurements is the Ride Sag.
n
Ride Sag is generally expected to be 1/3 of the total wheel travel. If your
number is less, then the bike will require less preload, and if it is greater,
more preload is needed.
W a r n i n g
Warning: Preload Adjuster locking rings (if equipped) are not locked!
Locking rings must be tightened before riding motorcycle!
Rev. C
Maintenance
n
Shock and linkage should be cleaned and properly lubricated at
intervals recommended for the stock shock in your service manual.
Shock service and parts.
n
Contact us for service center information. Our technical Staff will assist
you if you have any problems or questions. Call (714) 523-8700,
Monday - friday, 8 a.m. to 4 p.m. Pacific Time.
For balanced suspension, we recommend the installation of a pair of our
progressive rate fork springs
n
As stated above, on 465 Series shocks not equipped with the Remote
Adjustable Pre-Load adjuster, once the ride height has been set the lock
ring (if equipped) must be firmly tightened against adjustment ring.
n
On 465 Series shocks equipped with the Remote Adjustable Pre-Load
Figure 1
adjuster, the fine adjustment range is set to what we feel is the average
range. However the adjustable range can sometimes be moved up or
down depending on your needs. The method for this courser adjustment
is the same as adjusting the standard preload - simply rotate the
adjuster rings.
Caution
Regardless of which kind of preload adjustment your 465 shock has, there
is a minimum installed spring length that is model specific - and you must
NEVER adjust the preload to produce a spring length less than that
minimum length, or the spring may go coil-bound and damage will result.
The minimum installed spring length is noted on the model specific
installation instruction supplement included with this shock.
Damping adjustments
n
Rebound damping is the speed your shock returns after being
compressed. Position 1 offers the least resistance (low rebound) while
position 5 offers the most (high rebound). See figure 1.
n
We recommend position 3 as a starting point.
n
Adjust with the included 1/4” allen wrench.
n
Too little rebound damping can cause wallowing in turns, a springy feel
under acceleration out of the turns and a tendency to push the rider
forward on the machine while going over big bumps and depressions.
Too much rebound damping causes a harsh ride, wheel chatter on
braking and tendency for the machine to stay squatted after hitting a
bump (packing down).
n
All damping adjustments should be tested by thoroughly riding the
motorcycle.
Rebound Damping
Due to the cam shape design of
the rebound adjuster, any
damping change from Position 1
must be made in a clockwise
direction. Do not turn the knob
counter-clock-wise from position
1 to position 5!