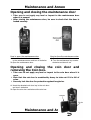
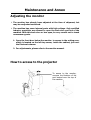
1
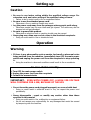
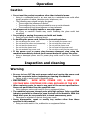
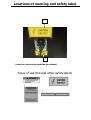
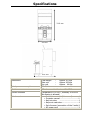
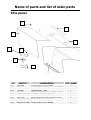
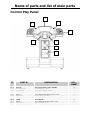
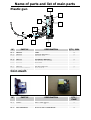
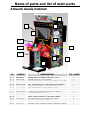
REV 0
SERVICE MANUAL
A
AV
VR
RA
AN
NC
CH
HEESS A
AU
UTTO
OM
MA
ATTIIC
CP
PR
REESSEEN
NTTSS
Before using this product, read this SERVICE MANUAL carefully to understand the
contents stated herein.
Manufactured in France by AVRANCHES AUTOMATIC
1
Contents
About the product -------------------------------------------- p
Precautions for use ------------------------------------------ p
Setting up------------------------------------------------------- p
Operation ------------------------------------------------------- p
Inspection and cleaning ------------------------------------ p
Moving and transportation -------------------------------- p
o
Precaution for transportation ---------------------- p
Location of warning and safety label ------------------- p
Specifications -------------------------------------------------- p
How to remove packaging --------------------------------- p
How to fasten the adjusters ------------------------------- p
How to connect the 2 cabinet parts-------------------p
How to separate the 2 cabinet parts------------------p
How to fit the Pop title Panel -------------------------p
4
4
5
6
7
8
9
10
11
12
12
12
12
12
Name of parts and list of main parts -------------------- p
o
Monitor Cabinet-------------------------------------- p
o
Title panel / pop material -------------------------- p
o
Title panel -------------------------------------------- p
o
Control Play Panel ----------------------------------- p
o
Plastic gun-------------------------------------------- p
o
Coin mech -------------------------------------------- p
o
Various electronic elements------------------------ p
o
Artwork decals/Cabinet ----------------------------- p
o
Artwork decals/Play Panel-------------------------- p
o
Artwork/Title panel------------------------------p
13
13
13
14
15
18
18
19
20
20
20
Avranches Automatic
11 ZA CROMEL – 50220 SAINT QUENTIN SUR LE HOMME – FRANCE
TEL (33) 02 33 89 61 62 – FAX (33) 02 33 89 61 63
Web Site : WWW.avranchesautomatic.com
2
Contents
How to play----------------------------------------------p 21
o
Game screen ----------------------------------------- p 22
Adjusting the machine ---------------------------------p
o
Test mode -------------------------------------------- p
o
Game setting----------------------------------------- p
o
I/O check --------------------------------------------- p
o
Gun setting ------------------------------------------- p
o
Sound setting ---------------------------------------- p
o
Screen check ----------------------------------------- p
o
Coin setting ------------------------------------------ p
o
Book keeping ---------------------------------------- p
o
Reset all setting ------------------------------------- p
23
23
24
25
25
26
27
28
29
29
Maintenance and Annex--------------------------------p
o
Opening & closing the maintenance door-------- p
o
Power unit-------------------------------------------- p
o
Service panel----------------------------------------- p
o
Replacing the coin selector ------------------------ p
o
Replacing the fluorescent light -------------------- p
o
Resetting the circuit protector --------------------- p
o
Adjusting the monitor------------------------------- p
o
How to access to the projector -------------------- p
o
Setting and maintenance of the projector ------- p
o
Cleaning the Air Filters -------------------------- p
o
Cleaning the Protection lens-------------------- p
o
Lamp replacement ------------------------------- p
o
Lamp handling precautions --------------------- p
30
30
31
31
32
33
33
34
34
35
36
36
37
37
Wiring diagrams ----------------------------------------p 38
Avranches Automatic
11 ZA CROMEL – 50220 SAINT QUENTIN SUR LE HOMME – FRANCE
TEL (33) 02 33 89 61 62 – FAX (33) 02 33 89 61 63
Web Site : WWW.avranchesautomatic.com
3
About this product
• Thank you for purchasing this AVRANCHES AUTOMATIC
product. This manual explains how to operate your
machine correctly and safely
Failure to operate the machine correctly could result in malfunction
or accidents, so please read this manual carefully before
commencing operation. Be sure to operate the machine as described
in this manual.
Keep this manual carefully so as to be ready for use when necessary.
If the machine still fails to display or to get started, immediately turn
OFF the main power switch and contact your nearest dealer.
The specification of this product are subject to change without the
notice for reasons such as improving the performance.
Precautions for use
In this manual, the precautions to be followed without fail in
order to prevent damage to persons to install, use or maintain
“AKUMA BI-OPTIC”, or other persons, or to properties, are
shown as follows.
Be sure to read the following
The following suggestions show the degree of danger and damage caused
when the product is used improperly with the suggestions disregarded.
Indicates
a
situation
where
disregarding the suggestions could
result in death or serious injury.
WARNING
Indicates
a
situation
where
disregarding the suggestions could
result in injury or product damage.
CAUTION
220 VOLT
IMPORTANT : EVEN WITH POWER OFF, A HIGH 220 VOLTAGE
WILL CONTINUE FOR 4 MN, BECAUSE OF THE UPS
4
Setting up
Warning
Definitions of qualified in-shop maintenance persons and industry
specialist who handle this product.
o
Replacing the machine parts, inspecting and maintaining the machines, and
troubles must be assigned only to a qualified in-shop maintenance person or
industry specialist.
o
This product should not be set up, moved or transported by anyone than an
industry specialist. Doing so could result in injury or product damage.
o
When installing the machine, make sure that all the 16 adjusters are tight on
the floor and that the machine is placed stably and horizontally.
o
When setting up this product, take care that no undue force is applied to the
opening / closing sections of the game machine. Failure to do so could cause
injury or product damage.
This product is an indoor game machine. Never set up the game
machine outside
o
Setting up the product outside could result in accidents or equipment failure.
Do not set up the game machine near emergency exits
o
Doing so could block exits in time of emergency and could result in death or
serious injury.
Do not set up the game machine.
o
In a place exposed to rain or moisture.
o
In a place exposed to direct sunlight.
o
In a place exposed to direct heat from air-conditioning and heating
equipment, etc..
o
Near hazardous flammable substance such as thinner and kerosene.
o
On an inclined or uneven floor
o
In a place exposed to strong vibration.
o
In a place exposed to excessive dust.
o
Near equipment generating strong magnetism or electricomagnetic waves.
Otherwise an accident or malfunction may result
Do not place containers holding chemicals or water on or near the game
machine.
o
Electrical shock or damage could be caused by water or foreign matter
entering the inside of the machine.
Do not place objects near the ventilation holes
o
Doing so could cause the internal temperature to rise excessively, resulting in
fire equipment failure.
Do not bend the power cord by force or place heavy object on it.
o
Doing so could result in electric leakage or fire.
Never plug or unplug the power cord with wet hand
o
Doing so could result in electrical shock.
Never unplug by pulling the power cord
o
Doing so could damage the cord, resulting in electric leakage or fire.
5
Setting up
Caution
Be sure to use indoor wiring within the specified voltage range. For
extension cord, use indoor wiring of the specified rating or more.
o
Failure to do so could result in fire or equipment failure
Be sure to use the attached power cord.
o
Otherwise a fire or machine trouble may result.
Lay the power cord,away from the passages where people walk along.
o
Otherwise people may trip over them and get injured. The cable may also be
stepped on and get damaged.
Be sure to ground this product.
o
Otherwise an electric shock or machine trouble may be caused.
Never plug more than one cord at a time in the electrical receptacle.
o
Doing so could result in fire or electrical shock.
Operation
Warning
If there is any abnormality such as smoke, bad smell or abnormal noise
being emitted from the machine, immediately turn OFF the main power
switch and unplug the power cord from the receptacle to stop operating
it.
o
Using the machine in abnormal conditions could result in fire or accidents.
In case of abnormality
1. Turn OFF the main power switch
2. Unplug the power cord from the receptacle
3. Contact the nearest dealer
IMPORTANT : EVEN WITH POWER OFF, A HIGH 220 VOLTAGE
WILL CONTINUE FOR 4 MN, BECAUSE OF THE UPS
Do not leave the power cord plugged improperly or covered with dust
o
Doing so could result in electrical shock or fire, so inspect the power cord
periodically.
o
Never disassemble , repair or modify any section other than those
specified in this manual
o
Doing so could result in fire, malfunction or equipment failure
o
We do not assume any responsibility for any damages that would be caused
by tampering with the machine.
6
Operation
Caution
Do not use this product anywhere other than industrial areas.
o
Using in a residential area or an area next to a residential area could affect
signal reception of radios, television sets, telephones, etc…
o
The following users should not play the game
o
Those under the influence of alcohol.
o
Those suffering from or being treated for arm or wrist ailments.
o
Those suffering high blood pressure or heart ailments
Ask players not to roughly handle or wave the game.
o
An injury or machine trouble may result. Breaking the glass could hurt
somebody
Do not plug or unplug the power cord with wet hands
o
Doing so could result in electrical shock
In handling the power cord, follow the instructions below.
o
o
o
o
o
Do
Do
Do
Do
Do
not
not
not
not
not
damage the power cord
bend the power cord excessively
heat the power cord
bind the power cord
sandwich the power cord
o
o
o
o
o
Do
Do
Do
Do
Do
not
not
not
not
not
modify the power cord
twist the power cord
pull the power cord
tread on the power cord
drive a nail into the power cord
If the power cord or power plug becomes damaged, stop using the
machine immediately and ask your nearest dealer to replace the parts.
o
Using a damaged power cord or power plug could result in fire or electrical
shock
Inspection and cleaning
Warning
Be sure to turn OFF the main power switch and unplug the power cord
from the receptacle before inspecting or cleaning the machine.
o
Failure to do so could result in electrical shock
IMPORTANT :
EVEN WITH POWER OFF, A HIGH 220
VOLTAGE WILL CONTINUE FOR 4 MN, BECAUSE OF THE UPS
When replacing parts, be sure to use parts of the correct specifications.
Never use parts other than the specified ones.
o
Using improper parts could result in fire or equipment failure.
The machine has some internal parts with high voltage. Only a qualified
industry specialist is allowed to open the back of the machine. With this
black door open, be very careful not to touch unnecessary parts.
o
Otherwise an accident or electric shock may result.
Never disassemble, repair or modify any section other than those
specified in this manual.
o
Doing so could result in fire, malfunction or equipment failure
7
Inspection and cleaning
Warning
Ask your nearest dealer to perform repairing, etc..
o
We do not assume any responsibility for any damages that would be caused
by tampering with the machine.
To clean the game machine, wipe it with a soft dampened in a neutral
detergent and wrung out
o
Using thinner or other organic solvent or alcohol may decompose the material.
o
Electrical shock or equipment failure could be caused by water entering the
inside of the machine.
o
Moving and transportation
Caution
The game machine contains parts such as the monitor, electronic
components and precision components which are sensitive to vibrations
and impacts. Great care therefore should be taken when moving and
transporting the game machine. Be sure not to let the machine tip over.
Before moving the machine, be sure to turn OFF the main power switch,
unplug the power cord from the receptacle and remove the power cord
from the machine.
o
Stepping on or tripping over the power cord may result in an accident or
damage the machine.
IMPORTANT :
EVEN WITH POWER OFF, A HIGH 220
VOLTAGE WILL CONTINUE FOR 4 MN, BECAUSE OF THE UPS
Before moving the units, be sure to separate the main unit and Play
Panel unit and fully raise the adjusters so that the machine can be
moved on the casters.
o
Otherwise accidents, machine damage or trouble may result.
When moving the units, be careful not to apply undue force.
o
An accident or machine damage may result.
Precaution in handling
When setting up, inspecting, maintaining, moving or transporting this
product, follow the procedures and instructions set forth in this manual
and perform such work safely.
Do not remove labels of “WARNING”, “CAUTION”, etc attached to the
product.
Do not set up, handle, inspect, maintain, move or transport this
product under conditions equivalent to the condition of “WARNING” or
“CAUTION” specified in this manual.
If a new owner is to have this product as a result of transfer, etc., be
sure to give this manual to the new owner.
Moving and transportation
Precaution for transportation
Shipment by road, ocean freight, air freight…..
IMPORTANT: EVEN WITH POWER OFF, A HIGH 220 VOLTAGE
WILL CONTINUE FOR 4 MN, BECAUSE OF THE UPS.
Before moving the
machine, always disconnect the
connector 2 pts AMP MINI, which is accessible by the front
maintenance door of the monitor cabinet .
Before putting Power ON, reconnect the connector 2 pts AMP
MINI.
Locations of warning and safety label
3
2
Located on the monitor backside the cabinet)
Types of warning and other safety labels
Specifications
2292 mm
908 mm
1603 mm
Dimensions
Rated power consumption
Monitor
Service condition
Attachments
Total weight
:
Approx 307 kgs
Main unit
:
Approx 263 kgs
Gun unit
:
Approx 44 kgs
580 Watts
38” colour monitor Hantarex Polo EV3
Temperature 10 to 35°C, Humidity 20 to 80%
(No dewing is allowed)
•
•
•
•
•
•
Instruction manual (this manual)………….1
Projector manual ……………………………….1
Key coin door
...................................1
Keys coin cash door...............................1
Set of screws (connection of the 2 units) 1
AC power cord ...................................1
How to remove packaging
1.
2.
3.
4.
Unpack the unit
Loosen back fixation brackets pallet on cabinet
Loosen front fixation brackets pallet on cabinet
Move the cabinet from the pallet
How to fasten the adjusters
Adjust the adjusters so that the casters do not touch the floor. Take
care not to exceed the maximum adjusting height of the adjuster.
Adjust all the adjusters so that they are parallel with the floor and make
sure that the machine is stable and placed in horizontal position. Then
tighten up the hexagon nuts upward.
WARNING : It is vital to ensure that cabinet is securely mounted to the floor to
avoid damage to cabinet during operation
How to connect & separate the 2 cabinet parts
HOW TO CONNECT
Before connection of 2 the units, play panel cabinet and monitor cabinet,
be sure to turn OFF the main power switch and remove the power cord plug
from the receptacle.
IMPORTANT : EVEN WITH POWER OFF, A HIGH 200 VOLTAGE WILL CONTINUE
FOR 4MN, BECAUSE OF THE UPS.
To connect the play panel to the monitor cabinet, use the junction metal part
provided with the cabinet and the set of screws which is located into the cash
door.
When connecting the separate units, take care not to catch the wiring and
your hand between the units
HOW TO SEPARATE
Before doing the disconnection of 2 the units, play panel cabinet and
monitor cabinet, be sure to turn OFF the main power switch and remove the
power cord plug from the receptacle.
IMPORTANT : EVEN WITH POWER OFF, A HIGH 200 VOLTAGE WILL CONTINUE
FOR 4MN, BECAUSE OF THE UPS.
When disconnecting the separate units, take care of the wiring.
How to fit the Pop panel onto the monitor cabinet
Unscrew the screws already
attached onto the 2 metal
brackets, and use them to fit the
Top Material to the brackets, and
after the assembly set to the
cabinet
Name of parts and list of main parts
Monitor Cabinet
N°
N°1
N°2
N°3
N°4
N°5
PART N°
MA111MA
MA111MI6
MA111UC3
MA111VC
03H38P31K
DESIGNATION
QTY / GAME
PROJECTOR MIRROR 340 * 208
1
HALF MIRROR 786 * 868
1
PROJECTOR GLASS 82 * 200
1
CLEAR THOUGHENED GLASS 474 * 869
1
38” COLOUR MONITOR HANTAREX POLO I EV3
1
Title panel / Pop Material
1
2
4
N°
N° 1
N° 2
N° 3
N° 4
PART N°
MA109FB
MA113EP
1POHC6*25ZNO
1POHC6*12ZNO
3
DESIGNATION
POP MATERIAL / FOREX TITLE
METAL FIXATION BRACKET
SCREW POEL HC 6*25 Z BLACK
SCREW POEL HC 6*12 Z BLACK
QTY / GAME
1
2
4
4
Name of parts and list of main parts
Title panel
8
2
1
3
7
6
5
4
N°
N°1
N°2
N°3
N°4
N°5
N°6
N°7
N°8
PART N°
MA109PB
07FL18W
07R18W
MA113EH
07H12V30W60°
MA113SH
1POHC6*10ZNA
1POHC6*10ZNA
DESIGNATION
FOLDED PLEXI TITLE PANEL
FLUORESCENT LIGHT 18W – DAYLIGHT
FLUORESCENT TRAY
METAL BRACKET FOR HALOGEN LAMPS
HALOGEN LAMP 12V-30W-60°
METAL BRACKET FOR HALOGEN LAMP
SCREW POEL 6*10 Z BLACK
SCREW POEL 6*10 Z BLACK
QTY / GAME
1
1
1
4
4
4
4
3
Name of parts and list of main parts
Control Play Panel
1
2
8
3
7
4
5
6
N°
N°1
N°2
N°3
N°4
N°5
N°6
N°7
N°8
PART N°
MA112P
MA103GUNB
MA113GHP
06BCB
05PCNAM
1399B
06BCR
MA103GUN
DESIGNATION
RED VACFORM PLAY PANEL
BLUE RECOIL GUN
SPEAKER METAL GRID
RECTANGULAR BLUE BUTTON
COIN CASH DOOR
SECURDOR
RECTANGULAR RED BUTTON
RED RECOIL GUN
QTY /
GAME
1
1
2
1
1
1
1
1
Name of parts and list of main parts
Control Play Panel
4
1
2
3
N°
N°
N°
N°
N°
1
2
3
4
PART N°
08AP130M6-8C
MA113EFP
MA112CV
MA113GH
DESIGNATION
SPEAKER – 130MM – COAX – 8 ohms
METAL BRACKET PLAY PANEL FIXATION
PLASTIC CONNECTOR COVER
METAL GUN HOLDER
QTY /
GAME
2
1
2
2
Name of parts and list of main parts
Control Play Panel
1
7
2
6
5
3
4
N°
N°
N°
N°
N°
N°
N°
N°
1
2
3
4
5
6
7
PART N°
MA113JP
1POHC6*10N
6RF72
6VL16*102
1POHC6*10NI
MA113EBV
MA113BP
DESIGNATION
JUNCTION METAL PART
POEL HC 6X 10 Z NATUREL
CASTER
SCREW JACK
SCREW POEL HC 6X 10 CH
METAL COVER PROTECTION
METAL BASIS
QTY /
GAME
1
4
2
2
4
2
1
Name of parts and list of main parts
1
Plastic gun
2
4
3
6
8
7
5
N°
N° 1
N° 2
N° 3
N° 4
N° 5
N° 6
N° 7
N° 8
PART N°
PA0008
PA0009
PA0010
PA0011
PA0012
PA0013
PA0014
PA0015/16/17/18
DESIGNATION
LENS
SENSOR BRACKET
SENSOR PCB
SOLENOID BRACKET
SOLENOID CYLINDER
TRIGGER
MICRO SWITCH
GUN CABLE
QTY / GUN
1
1
1
1
1
1
1
1
Coin mech
N°
PART N°
N° 1 05RM5
N° 2 05CF340PR091
DESIGNATION
RM5 COIN MECH
OR
M.E.I CF340 COIN MECH
QTY /
GAME
1
1
Name of parts and list of main parts
Various electronics elements
1
2
3
11
4
5
10
9
7
8
IMPORTANT : EVEN WITH POWER OFF, A HIGH 220 VOLTAGE
WILL CONTINUE FOR 4 MN, BECAUSE OF THE INVERTER.
N°
N°1
N°2
N°3
N°4
N°5
N°6
N°7
N°8
N°9
N°10
N°11
PART N°
07APSB500
04SPS170P/12V
04CWT300
MA103BD
HTS424040M9AT00
MA103CV
MA103CM
MA103CI0G
07RT10M
04ODWP65
MA103CUSB
DESIGNATION
SOUND AMPLIFIER
POWER SUPPLY 12 V - 170W - PFC
POWER SUPPLY ATX CWT300BSP
DESKTOP CASE
HARD DISK
VIDEO BOARD
MOTHERBOARD
I/O BOARD
RELAY T 0.05S/10MN
UPS INVERTER RIELLO 650 VA 400 W
DONGLE
QTY / GAME
1
1
1
1
1
1
1
1
1
1
1
6
Name of parts and list of main parts
Artwork decals/Cabinet
1
4
2
6
5
12
11
3
10
8
7
9
N°
N° 1
N° 2
N° 3
N° 4
N° 5
N° 6
N° 7
N° 8
N° 9
N°10
N°11
N°12
PART N°
MA109FB
MA109PB
MA109JDM
MA109JGM
MA109SGD
MA109SGG
MA109MAH
MA109MAB
MA109JPD
MA109JPG
MA109PH
MA109PC
DESIGNATION
QTY / GAME
AKUMA MORTIS IMMORTAL POP TITLE
1
AKUMA PLASTIC TITLE PANEL
1
RIGHT SIDE DECAL OF THE MONITOR CABINET
1
LEFT SIDE DECAL OF THE MONITOR CABINET
1
RIGHT STATIC DECAL MONITOR GLASS
1
LEFT STATIC DECAL MONITOR GLASS
1
« THE VICIOUS SPIRIT MORTIS » DECAL
1
THE FRIGHTENED FACE
1
RIGHT SIDE DECAL OF THE PLAY PANEL
1
LEFT SIDE DECAL OF THE PLAY PANEL
1
PLAYER 1 & PLAYER 2 DECAL
1
INSTRUCTION “CHARGE YOUR WEAPON” DECAL
1
How to Play
The evil legend is reborn.
A long time ago, the beasts that massacred humans were sealed by a brave warrior.
Sealed into a holy talisman stone, "The Circle of Light".
But now, the vicious spirit Mortis has unsealed the demons.
And now they are back.
In order to revive the Circle of Light, Akuma cards must be fused into one of the two
foundation stones.
The slot you choose will decide your next destination.
When all 6 cards are fused, the foundation stones will react and the dark spirits will
be sealed once more.
Follow the dark legend of "Akuma" in this revolutionary new games.
Evil rituals have unbound terrifying demons from the curse that locked them inside
sacred runes. Choose your target using the awesome tactical "rune" system, unique
to this game, then hunt your opponent through many nightmarish locations adding a
level of depth and immersion never seen in arcade shooters before!
Using the amazing "Bi-Optic" 3D system, the beasts you encounter will literally fly
out of the screen at you. This awesome new technology allows visuals so realistic
that you could almost reach out and touch their grotesque forms. Each beast you
defeat opens a depth further into the dark and intense environment challenging
players. This combined with the intense 3D state of the art graphics makes "Akuma
Mortis Immortal" the most scary and exciting video game experience this year!
How to Play
GAME SCREEN
SCORE
LIVES
FIRE POWER
CREDITS
SCORE
:
This is increased when you shot enemies
LIVES
:
These are reduced when you take damage from enemies.
When all lives are gone, "CONTINUE" will be displayed.
CREDITS
:
The number of remaining coin.
FIRE POWER GAUGE :
Your "Fire Power" will vary depending on your weapon
charging time.
Adjusting the machine
Test mode
(Please press the TEST button located in the Service Door)
Select a menu item using the gun trigger (P1/P2
The selected menu item will appear highlighted in green.
Enter the chosen menu item by pressing the ‘START’ button.
RETURN TO THE GAME
Return to Game mode, terminating the Test mode.
GAME SETTING
Several settings on Game preference.
I/O CHECK
Check the status of I/O devices.
GUN SETTING
Check the gun adjustment.
SOUND CHECK
Check and control volume and speakers..
SCREEN CHECK
Check screen position and colour for monitor adjustment.
COIN CHECK
Adjust coin settings for Start and Continue.
BOOK KEEPING
Check income statistics and clock setting.
CLEAR RANKING DATA
Resume to factory ranking data..
RESET ALL SETTINGS
Resume to factory setting.
Adjusting the machine
Game Setting
Select the menu item using the gun trigger .
Enter the menu item by pressing the ‘START’ button.
The current status is shown in green letters. Once you have chosen a different
mode, the option is shown in red letters.
To save the new setting please choose ‘SAVE AND EXIT’, then press ‘START’.
To cancel the new setting choose ‘EXIT WITHOUT SAVING’, then press ‘START’.
GAME DIFFICULTY
Choose the game difficulty from VERY EASY, EASY, MEDIUM, HARD and VERY HARD
MEDIUM is the default setting when delivered.
GUN RECOIL
Select the feedback of the gun recoil.
ENABLE : Feedback (default).
DISABLE : No feedback.
SUBTITLE
Select the subtitle in game mode.
OFF
: No subtitle(default).
FRENCH :
JAPANESE :
SCREEN FLIP MODE
Select the direction of the screen flip.
DIRECT
: No flip
MIRROR
: left - right flip
MIRROR-180 : left-right and up side down (default)
Adjusting the machine
I/O Check
Check all status of each I/O item.
INPUT CHECK
Check all buttons:
When you press each button the display shows ON and OFF accordingly.
OUTPUT CHECK
Lamp Checks.
Check the 'P1 START' lamp by pressing ‘TEST’ and ‘P1 START’ buttons
simultaneously, and check the 'P2 START' lamp by pressing ‘TEST’ and ‘P2 START'
buttons simultaneously.
To terminate the I/O Check mode press ‘TEST’ and ‘SERVICE’ buttons at
the same time.
Gun Setting
Check and calibration of the bullet hit position.
Calibrate the gun by pulling the trigger of Player 1 while pressing the “START” button
of Player 1
Calibrate the gun by pulling the trigger of Player 2 while pressing the “START” button
of Player 2.
Pull the trigger of the gun aiming the centre of the two crosses (both front and rear)
after correcting your position to see two crosses as one on the “GUN CALIBRATION”
mode.
Adjusting the machine
Sound Setting
You can control the volume of both the game sound and attract demo loop. and also
conduct a speaker check
VOLUME
Control the volume of all sound in the Game mode by pressing ‘P1 START’ (for higher
volume) or ‘P2 START’ (for lower volume). The volume can be set between 0 (Min)
and 20 (Max).
ATTRACT SOUND
Control the sound in the Attract Demo loop.
Press the ‘START’ button to choose one of the following items.
ON
:
Same volume as set for VOLUME.
MUTE :
Lower than above Volume setting during the Attract Demo loop.
OFF :
No sound during the Attract Demo loop.
GAME BGM
Control the sound in the game mode.
Press the ‘START’ button to choose one of the following items.
ON
: Same volume as set for VOLUME.
OFF
: No bgm sound during the game mode.
SPEAKER CHECK
Check Left and Right speakers.
Check the left speaker by pressing the ‘P1 START’ button, and the right speaker by
pressing the ‘P2 START’ button.
Adjusting the machine
Screen Check
Adjust the screen position and colour.
When adjusting the monitor and the projector colour, ensure that each of the seven
colour bars have equally stepped shades of that colour, and that none of the steps
on that bar merge into the same shade. Whilst doing this, also ensure that both the
screen background, and the bottom-most step of each of the colour bars, is as close
to pure black as possible.
To exit this mode, press the 'START' button.
Front monitor
Adjust the front screen position making all outer frames to be displayed within the
screen.
Rear Projector
Adjust the screen position and zoom making all blinking points and lines to be
displayed within the screen.
* You can choose the display of front or rear screen by pulling trigger of either Player
1 or Player 2 to get calibration screen separately.
Adjusting the machine
Coin Setting
Set the Start coin and Continue coin.
FREE PLAY
If you choose ‘FREE PLAY ON’, other coin settings cannot be modified.
START CREDITS
Set the number of coins/credits to enable a game start.
CONTINUE CREDITS
Set the number of coins/credits to enable a 'continue' during game-play.
Adjusting the machine
Book Keeping
Display the income statistics
Unless Date and Time are set correctly, the statistics will show incorrect data.
Therefore, please ensure that Date and Time are correctly set.
To delete all income data statistics, choose ‘CLEAR BOOKKEEPING’
CLEAR RANKING DATA
It asks 'YES' or 'NO' twice if this item is chosen.
All recorded ranking data will be reset if it is chosen 'YES'.
RESET ALL SETTINGS
Resume the factory setting.
It asks 'YES' or 'NO' twice if this item is chosen.
All changes made will be reset if you choice 'YES'.
Maintenance and Annex
Opening and closing the maintenance door
Take care to not apply any load or impact to the maintenance door
when it is opened.
After closing the maintenance door, be sure to check that the door is
locked securely.
How to open the maintenance door
How to close the maintenance door
1. Insert the attached maintenance key
in the maintenance door and turn it clockwise.
2. Open the maintenance door.
1. Close the maintenance door.
2. Turn the maintenance key counter
clockwise and draw it out
Opening and closing the coin door and
removing the Coin box.
Take care to not apply any load or impact to the coin door when it is
open.
Note that the coin box is considerably heavy to take out if it is full of
coins.
Securely lock the door for protection against burglaries.
1. Insert the attached coin door key in the coin door.
and turn it clockwise
2. Open the coin door and take out the coin box.
Maintenance and Annex
Power Unit
The power unit is located on the back of main unit.
Be sure to use the attached AC power cord.
Be sure to ground to the machine.
Never connect the grounding wire to gas pipe, water pipe or telephone
ground terminal
6A
IMPORTANT : EVEN WITH POWER OFF, A HIGH 220 VOLTAGE
WILL CONTINUE FOR 4 MN, BECAUSE OF THE INVERTER.
Service Panel
You will find the service panel when the maintenance door is opened
with the attached maintenance key.
Maintenance and Annex
Replacing the Coin Selector
Open the maintenance door selector; be sure to turn OFF the main
power switch and unplug the power cord from the receptacle.
1. Open the maintenance door.
Move the small metal part up.
Move the small plastic door to the left, to remove.
2. Slide the coin selector to the right and take it out.
3. To reattach the coin selector
While holding left the small plastic door, slide the coin
selector to the left for fitting it into position.
4. Move the small plastic door into position.
Move down the small metal part and close
the maintenance door.
Maintenance and Annex
Replacing the fluorescent light
Before replacing the fluorescent light, be sure to turn OFF the main
power switch and unplug the power cord from the receptacle.
IMPORTANT : EVEN WITH POWER OFF, A HIGH 220 VOLTAGE WILL
CONTINUE FOR 4 MN, BECAUSE OF THE INVERTER.
The fluorescent light is hot just after it is switched off. Wait until it
cools down and then replace it with a new one of the same type.
When installing and removing the fluorescent light unit, take care not
to damage the wiring connecting the fluorescent light unit and the
game machine.
Resetting the circuit protector
If an over current or short circuit occurs, the circuit protector will be automatically
actuated to protect the electric circuits of the game machine. When resetting the
circuit protector, turn OFF the main power switch, unplug the power cord from the
receptacle, eliminate the cause, and then press the button of the circuit protector.
How to reset the circuit protector
Before resetting the circuit protector, be sure to turn OFF the main
power switch and unplug the power cord from the receptacle.
IMPORTANT : EVEN WITH POWER OFF, A HIGH 220 VOLTAGE WILL
CONTINUE FOR 4 MN, BECAUSE OF THE INVERTER.
If the circuit protector trips soon again, immediately turn OFF the main
power switch, unplug the power cord, and contact your nearest dealer.
If the machine is in abnormal conditions and does not operate normally,
immediately turn OFF the power switch, unplug the power cord from
the receptacle and contact your nearest dealer.
1. Open the little drawer at the power unit.
2. Change the fuse
Fuse 5 A
Maintenance and Annex
Adjusting the monitor
The monitor has already been adjusted at the time of shipment, but
may be readjusted as desired.
The machine has some internal parts with high voltage. Only qualified
industry specialists are allowed to open the back door and box of the
machine. With this back door or box open, be very careful not to touch
unnecessary parts.
1. Open the front door below the monitor to access to the setting area,
which is located on the left top corner, inside the cabinet, just over
the Electronic drawer.
2. For adjustments, please refer to the monitor manual.
How to access to the projector
To access to the monitor,
unscrew the fixations of the
part located over the top of
the machine
Maintenance and Annex
Setting and maintenance of the projector
For warranty purpose, in case of faulty projector, the material must be
returned packed in is original handbag. Keep carefully this handbag if
you want to have the benefit of warranty.
All the setting and operating instructions should be read before the
product is operated. A projector manual is joined to this game
Read all the instructions given in the Projector manual and retain them
for later use.
Pay attention , even with power off, a high 200 voltage will continue for
4mn, which allow the projector to cool down, and for this reason the
screen display a blue colour.
Access to settings of :
Focus
Size of the rear screen (please
refer to the projector manual)
Follow all warnings and instructions marked on the projector.
When replacement parts are required, be sure the service technician
has used replacement parts specified by the manufacturer that have
characteristics as the original parts. Unauthorized substitutions may
result in fire, electric shock, or injury to persons.
Maintenance and Annex
Maintenance and Annex
Wiring diagrams