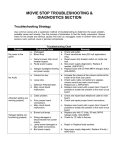
1
1
To Purchase This Item, Visit BMI Gaming | www.bmigaming.com | (800) 746-2255 | +561.391.7200
CONTENTS
FACTORY CONTACT INFORMATION........................................................................................... 2
GAME SPECIFICATIONS ................................................................................................................. 4
SAFETY PRECAUTIONS................................................................................................................... 4
WELCOME TO: PRIZE HUB.............................................................................................................. 5
HOW TO USE PRIZE HUB................................................................................................................ 6
DISPENSING PRIZES......................................................................................................................... 7
QUICK SET UP GUIDE ...............................................................................................................8-11
MAIN MENU......................................................................................................................................12
LOCATION SETUP..................................................................................................................13
HONEYWELL BARCODE SCANNER REGISTRATION...................................................14
EVOLVE SYSTEM REGISTRATION......................................................................................15
CARD SYSTEM SETUP..........................................................................................................16
STATISTICS...............................................................................................................................17
HISTORY...................................................................................................................................18
DIAGNOSTICS ........................................................................................................................19
PRIZE MENU............................................................................................................................20
LOADING PRIZE IMAGES ..........................................................................................21
ADVERTISING MENU............................................................................................................22
TICKET MENU.........................................................................................................................23
PASSWORD SETUP MENU..................................................................................................23
BACKUP & RESTORE MENU................................................................................................24
LOADING CAPSULE PRIZES.........................................................................................................25
LOADING SPINDLE PRIZES ..........................................................................................................26
LOADING LOCKER PRIZES............................................................................................................27
PRIZE SPECIFICATIONS.................................................................................................................28
HOW TO: LOAD PRINTER PAPER................................................................................................29
MARQUEE INSTALLATION............................................................................................................30
SIDE DECAL PLACEMENT.............................................................................................................31
CIRCUIT BOARD PINOUTS & GUIDES................................................................................ 32-34
WIRIING DIAGRAMS ............................................................................................................... 35-40
TROUBLESHOOTING GUIDE ................................................................................................ 41-58
PARTS LISTS............................................................................................................................... 59-63
SECURITY PACKAGE.......................................................................................................................64
STATISTICS RECORDS ....................................................................................................................65
MAINTENANCE LOG ......................................................................................................................66
TECHNICAL SUPPORT...................................................................................................................67
WARRANTY.......................................................................................................................................68
CERTIFICATE OF COMPLIANCE .................................................................................................69
HONEYWELL SCANNER REGISTRATION CODES...................................................................71
ZEBEX SCANNER REGISTRATION CODES................................................................................73
3
To Purchase This Item, Visit BMI Gaming | www.bmigaming.com | (800) 746-2255 | +561.391.7200
GAME SPECIFICATIONS
POWER REQUIREMENTS
WEIGHT
NET WEIGHT
550 LBS.
INPUT VOLTAGE RANGE
100 to 120
VAC
/
220 to 240
VAC
SHIP WEIGHT
700 LBS.
INPUT FREQUENCY
RANGE
50 HZ
/
60 HZ
DIMENSIONS
WIDTH
94.5” (4 modules)
MODULE
DEPTH
33.5”
MAIN HUB
HEIGHT
78.75”
CAPSULE
HUB
OPERATING TEMPERATURE
FAHRENHEIT
80-100
SPINDLE
HUB
CELSIUS
26.7-37.8
LOCKER
HUB
MAX START UP
CURRENT
OPERATING
CURRENT
0.9 AMPS @ 115 VAC
1.0 AMPS @115 VAC
0.45 AMPS @230 VAC
0.5 AMPS @ 230 VAC
0.9 AMPS @ 115 VAC
0.9 AMPS @ 115 VAC
0.45 AMPS @ 230 VAC
0.45 AMPS @ 230 VAC
0.3 AMPS @ 115 VAC
0.3 AMPS @115 VAC
0.15 AMPS @ 230 VAC
0.15 AMPS @ 230 VAC
0.5 AMPS @ 115 VAC
0.5 AMPS @ 115 VAC
0.25 AMPS @ 230 VAC
0.25 AMPS @ 230 VAC
SAFETY PRECAUTIONS
!
NOTICE
!
Modifications to the mechanical, electrical and structural components of this game
may void its compliance certifications.
!
DANGER
!
DO NOT perform repairs or maintenance on this game with the power ON.
Unplug the unit from the wall outlet or shut off the power strip located inside the cabinet.
!
WARNING
!
Use of flammable subtances can cause sever burns or serious injury.
Always use NON-FLAMMABLE solvents for cleaning. DO NOT use gasoline kerosene or thinners.
!
CAUTION
!
Lifting heavy objects can cause back, neck or other injuries. Be sure adequate lifting and moving
devices are available when unloading, unpacking and moving this game.
!
ATTENTION
!
Be sure the electrical power matches the game requirements. See the serial number located on the
back of the game cabinet. Always plug into a grounded circuit. If the supply cord is damaged, it must
be replaced by an approved cord or assembly provided by the manufacturer.
!
IN CASE OF EMERGENCY
UNPLUG THE POWER CORD.
The power cord must be accessible at all times in case of an emergency.
4
!
To Purchase This Item, Visit BMI Gaming | www.bmigaming.com | (800) 746-2255 | +561.391.7200
WELCOME TO: Prize Hub
Congratulations on your Prize Hub purchase!
Create game rooms where they’ve never been before!
Bay Tek’s Prize Hub presents the opportunity to turn wasted space into a revenueearning hot spot, as well as transforming and refreshing established small game rooms
into efficient and independent entities. This self-contained prize redemption center
offers increased profits with its automated, low-maintenance and easy-to-use format.
With the flexibility to utilize many ticketless user interfaces, such as Bay Tek’s own
Evolve system, card-swipe systems and barcode scanners, the Prize Hub is your ticket
to the future of redemption!
Please take a moment to read through this manual and be sure to contact our factory if
you have any questions, or would like some more information.
Thank you for your purchase! Your business is important to us and we hope you enjoy
this game as much as we do!
Your Friends at Bay Tek Games
GAME INSPECTION
Inspect the game for any damaged, loose, or missing parts.
If damage is found, please contact your freight carrier first.
Then, contact Bay Tek Games’ Service Department at 920.822.3951
or e-mail them at [email protected] for further assistance.
5
To Purchase This Item, Visit BMI Gaming | www.bmigaming.com | (800) 746-2255 | +561.391.7200
HOW TO USE PRIZE HUB
Prize Hub’s versatile interface allows it to be placed
in game rooms with Bay Tek’s Evolve coupon system,
E-ticket cardswipe systems and classic ticket redemption game rooms with Deltronic Ticket Eaters.
Evolve System:
Bay Tek’s Evolve System modifies the games in a
fun center to print a single coupon with a QR code
worth the amount of tickets won. These secure QR
codes are scanned by Prize Hub to add tickets to the
shopping screen.
E-Ticket Systems:
Card swipe systems from Core Cashless, Embed and
Intercard are all compatible with Prize Hub. Players
swipe their cards to play games and their tickets go
right on the card. The Prize Hub then reads the card
and adds the tickets to the shopping screen.
Deltronics Ticket Eaters:
Deltronics Ticket Eaters print barcode coupons after
counting and shredding traditional paper tickets.
These barcodes are scanned by Prize Hub and the
tickets are added to the shopping screen.
After tickets are added to Prize Hub, the shopping
fun can begin!
6
To Purchase This Item, Visit BMI Gaming | www.bmigaming.com | (800) 746-2255 | +561.391.7200
DISPENSING PRIZES
After adding your tickets, shop through the touchscreen prize marketplace and select your prize.
Capsules will dispense from the carousel in the Capsule Hub, into Prize Door A.
Hanging prizes will vend from the Spindle Hub, into
Prize Door B.
Prize Doors C1-5 in the Locker Hub unlock when a
large prize is claimed, and re-lock 45 seconds after
being opened.
Press “continue shopping” to select another prize, or
print a reciept to keep leftover tickets. Any leftovers
from a card swipe transaction will remain on the
card.
7
To Purchase This Item, Visit BMI Gaming | www.bmigaming.com | (800) 746-2255 | +561.391.7200
QUICK SET UP GUIDE
Locate the four bolt holes on each side of each hub.
Some hubs may have spacer boards mounted to the
sides; these prevent gaps between cabinets.
Open all front doors and remove back doors to access
the inside of the cabinets.
Attach the hubs in the desired order with the included
bolts, washers and lock nuts.
Use a 1/2” socket to tighten the bolts securely.
8
x4
To Purchase This Item, Visit BMI Gaming | www.bmigaming.com | (800) 746-2255 | +561.391.7200
QUICK SET UP GUIDE
Feed the loose connector ends of the red, black and
white power cables (connected to the control board
of each hub) through the large holes near the floor
of the cabinets. Link to the adjoining hubs, going
from the outside hubs toward the Main hub. There
are two connector ends on each cable; the outermost cabinets will only use one.
The power cables are numbered as follows:
Spindle Hub: CE1820
Capsule Hub: CE1813
Locker Hub: CE1810
Plug the two final ends into the CE1805 cable inside
the Main hub.
See diagram below...
LOCKER
SPINDLE
MAIN
CAPSULE
CE1805
CE1810
CE1820
CE1813
9
To Purchase This Item, Visit BMI Gaming | www.bmigaming.com | (800) 746-2255 | +561.391.7200
QUICK SET UP GUIDE
Feed the loose connector ends of the thin grey
phone cable in each hub through the holes in all
adjoining cabinets and into the Main hub.
The phone cables are numbered as follows:
Spindle Hub: CE1816
Capsule Hub: CE1811
Locker Hub: CE1811
Plug the phone cable ends into the appropriate
ports on the main board inside the Main hub.
Always use port 1 for single hubs.
Only use port 2 if you have two of the
same hub and one is marked “B”.
LOCKER
SPINDLE
MAIN
CAPSULE
MAIN
BOARD
CE1816
CE1811
CE1811
PHONE PORT IDENTIFICATION
BACK OF
CABINET
FRONT OF
CABINET
EXTRA 2
EXTRA 1
LOCKER 2 LOCKER 1 CAPSULE 2 CAPSULE 1 SPINDLE 2 SPINDLE 1
10
To Purchase This Item, Visit BMI Gaming | www.bmigaming.com | (800) 746-2255 | +561.391.7200
QUICK SET UP GUIDE
Replace the back doors of the cabinets.
Plug the power cord into the socket in the back of the
Main hub, and into a standard 110v electrical outlet.
Switch the power strip inside the left door to ON.
Continue on to page 12 to explore the Operator Menus...
11
To Purchase This Item, Visit BMI Gaming | www.bmigaming.com | (800) 746-2255 | +561.391.7200
MAIN MENU
Press the red menu button inside the front door
of the cabinet and hold for 2 seconds.
The Main Menu will come up on the monitor.
Touch your selections to enter sub-menus.
MENU QUICK ENTRY:
Tap the upper corners of the monitor in the
following order: L-R-L-R-L-R-L-R to enter the menu
without opening the door.
An owner password must be set for this to work.
Prize Hub is equipped with a
security lock out function.
To enable: tap the “secure lock”
button in the upper right corner
of the menu. There may be a slight
delay.
To disable: tap the upper right
corner of the screen 4 times or press
the menu button
12
To Purchase This Item, Visit BMI Gaming | www.bmigaming.com | (800) 746-2255 | +561.391.7200
LOCATION SETUP
Touch Location Name to open the keypad.
Enter your location name.
Touch Location Phone to open the keypad.
Enter your location phone number.
Number of modules: should correspond with the
number of prize-dispensing modules in your setup
(do not count the control hub)
Kiosk Interface should be set to how your Prize Hub
accepts tickets; Evolve, card swipe (Core, Embed or
Intercard) or Deltronics ticket eater barcodes.
Max Capsule Dispense enables shoppers to select
multiples (up to 6) of the same capsule at one time.
Save Tickets (PF [power failure]), when enabled, will
cause the Prize Hub to remember and re-load any
tickets that were on it in the case of a power failure.
Kiosk Volume adjusts the volume of the spoken
instructions.
Setup Languages allows the operator to enable or
disable any of the 5 language options offered. When
enabled, the language will appear at the bottom of
the shopping screen as a button. When touched,
each language button changes the visual communication to that language. If the screen is idle for 2
minutes, it will revert back to English.
Setup Time and Date allows the Prize Hub to keep
accurate records of all transactions in the history
menu.
13
To Purchase This Item, Visit BMI Gaming | www.bmigaming.com | (800) 746-2255 | +561.391.7200
BARCODE SCANNER PROGRAMMING
If a failure were to occur that caused the scanner to become inoperable, follow these steps to re-register the
scanner. Identify the brand of scanner included in your Prize Hub, then use the appropriate instructions for that model.
Honeywell Scanner Programming
Tear out page 71 of this manual and cut on the dotted lines.
Follow these instructions:
1. Press and hold the scanner button to scan barcode 1. You will hear a confirmation beep when it
scanned correctly, the white and blue LEDs on the scanner will blink alternately
2. Press and hold the scanner button to scan barcode 2. You will hear a confirmation beep when it
scanned correctly.
3. Press and hold the scanner button to scan barcode 3. You will hear a confirmation beep when it
scanned correctly.
4. Press and hold the scanner button to scan barcode 4. You will hear a confirmation beep when it
scanned correctly.
5. Press and hold the scanner button to scan barcode 5. You will hear a three beeps when it scanned
correctly, the white and blue LEDs will stop blinking.
ZEBEX Scanner Programming
Tear out page 73 of this manual and cut on the dotted lines.
Follow these instructions:
1. Scan the first code- “Set All Defaults”
2. Scan the second code- “Presentation Mode”
3. Scan the third code- “Enable Interleaved 2 of 5”
4. Scan the fourth code- “ Two Discrete Lenghts”
5. Scan the number codes in the following sequence: 1 4 1 6
14
To Purchase This Item, Visit BMI Gaming | www.bmigaming.com | (800) 746-2255 | +561.391.7200
EVOLVE® SYSTEM REGISTRATION
Attach the Evolve box to your game following the
directions included with the system.
Open the Evolve box and locate the dip switches.
Switch Dip 2 to on, and press the print button to
create a registration code. Don’t forget to switch Dip
2 back to off after it prints.
In the location setup menu of the Prize Hub, touch
Register Evolve Units, then scan the code printed
from the Evolve box.
Any QR codes created by the registered Evolve box
will now be compatible with your Prize Hub.
Repeat this process with all games in your game
room.
15
To Purchase This Item, Visit BMI Gaming | www.bmigaming.com | (800) 746-2255 | +561.391.7200
CARD SYSTEM SETUP
Plug in an Ethernet cable to the port shown on the
main board (inside the Main Hub), and out through
the hole in the bottom of the cabinet.
Mount your card reader according to manufactuer
instructions, and plug the Ethernet cable into your
card reader server.
Adjust the Kiosk Interface in the Location Menu.
Set the IP address and Port number, username
and password for your specific card system
network.
Please leave the Prize Hub Network disabled.
16
To Purchase This Item, Visit BMI Gaming | www.bmigaming.com | (800) 746-2255 | +561.391.7200
STATISTICS MENU
The statistics menu will help you to determine how many tickets and prizes have been exchanged and their
total value, as well as which prizes are popular.
Reset Statistics:
Clears all stats in this menu to
0, with the exception of the NR
(non-resettable) page (3/3)
Tickets Total:
Total number of incoming tickets
Tickets Comped:
Total number of tickets added
from the operator menu
Tickets Redeemed:
Total ticket value of outgoing
prizes
Tickets Printed:
Total ticket value dispensed via
reciept
Total Prizes Vended:
Number of prizes dispensed
Total Cost of Prizes:
Net value of outgoing prizes;
value of each prize can be set in
prize menu
(###):
Ticket value of prize
Vended (page 1):
Total number of specific prize
location vends
Failures (page 2):
Number of times prize failed to
vend (due to being too far apart
on spindles, empty locations,
prize jams, etc.)
NRVend (page 3):
Displays a non-resettable statistic
of all vends the machine has ever
performed
17
To Purchase This Item, Visit BMI Gaming | www.bmigaming.com | (800) 746-2255 | +561.391.7200
HISTORY MENU
The history menu is a complete record of the unit’s transactions.
View earlier history reports by touching Next Page.
18
To Purchase This Item, Visit BMI Gaming | www.bmigaming.com | (800) 746-2255 | +561.391.7200
DIAGNOSTICS MENU
The Diagnostics Menu allows testing of capule and spindle dispensers and prize lockers, as well as the prize
chute sensors.
Touch “Test Dispense” to open the key pad to test individual prize mechanisms by entering their locations.
19
To Purchase This Item, Visit BMI Gaming | www.bmigaming.com | (800) 746-2255 | +561.391.7200
PRIZE MENU
The Prize Menu allows you to look through the images of the prizes loaded in your machine. Touching
“Select NEXT Location” will bring you through the
capusules first, then the spindles, then lockers.
Touching Restore All Default Pictures twice will set
the prize images back to the generic letter-number
location designations.
Stock Reset All returns the stock status of every
prize to Available.
Ticket Cost and Prize Cost are set in this menu. Ticket
Cost determines how many tickets a player must input in order to choose and receive the specific prize.
Prize Cost is a tracking tool to assist in determining
the net cost of the dispensed prizes. Prize Cost is an
optional tool.
The Stock Quantity should be set, especially for spindles, to the amount of prizes loaded in each location.
The monitor will automatically display the prize as
unavailable once all the prizes have been dispensed.
If Stock Quantity is not used, it should be set to 0.
The Stock Status indicator turns to “empty” when the
spindle or capsule bin is empty, or when they time
out. Touching this option will change the status.
When the Stock Status for a certain item is set to
Empty, this message will be displayed on the main
screen of the monitor.
20
To Purchase This Item, Visit BMI Gaming | www.bmigaming.com | (800) 746-2255 | +561.391.7200
LOADING PRIZE IMAGES
Insert a USB stick with prize images (.jpg files) into
the USB port shown, inside the front door of the
Prize Hub. Prize image files should be no larger
than 600 KB, with an ideal size of 590 x 590 pixels square.
While in the Prize Menu, touch the image of the
prize to enter the image selection screen. The
screen will change to a “finding prizes” screen, then
load the images into a grid.
Touch which image you would like to replace the
current prize image with.
Be sure to make any adjustments in ticket value
and cost in the Prize Menu, and that the prizes are
in the correct capsule and spindle locations.
21
To Purchase This Item, Visit BMI Gaming | www.bmigaming.com | (800) 746-2255 | +561.391.7200
ADVERTISING MENU
The Prize Hub allows for several full-screen ads to
be displayed at set intervals while the machine is in
attract mode.
To load advertisments, go into the advertising menu
and touch the icon to upload a new ad from a USB
stick. The ideal size for an ad is 768 x 1087, .png
format.
To load more than one ad, touch “next ad location”
and repeat the process. The machine can display up
to 4 advertisements at any time.
The length of ad can be adjusted in intervals of 2
seconds, up to 30 seconds. The time between ads
can be adjusted in 20 second intervals, up to 300
seconds.
To save your changes, touch “Update this Ad”.
22
To Purchase This Item, Visit BMI Gaming | www.bmigaming.com | (800) 746-2255 | +561.391.7200
TICKET MENU
The ticket menu allows the adding of tickets without
scanning or swiping them onto the machine. This
comes in handy if coupons get too crumpled to scan
or something else prevents the user from adding
their tickets.
Any “comped” tickets will appear in both the
statistics and the history menus to track their use.
PASSWORD SETUP MENU
Passwords can be set to allow different employees
to access different parts of the operator menu. An
owner password must be set for the tech and employee passwords to work.
Owners have full access to all menu functions.
Techs can access all functions except the password
setup menu.
Employees have very limited access to the statistics,
history and ticket database menus.
Passwords can be alpha-numeric and include up to
5 characters. They should be the entire 5 characters
to be effective. You will be prompted to verify the
password by entering it again.
23
To Purchase This Item, Visit BMI Gaming | www.bmigaming.com | (800) 746-2255 | +561.391.7200
BACKUP AND RESTORE MENU
This menu allows users to save Prize Hub data onto
a USB stick. The information is placed into a text file,
which can then be printed from any computer.
The data of up to 25 different Prize Hubs can be
downloaded to a single USB, assuming each unit is
named uniquely in the Location Setup menu.
Prize Images:
It is recommended to keep the prize images on a
separate USB stick for capacity reasons. Several of
our recommended prize vendors provide a USB containing the necessary images.
Advertisements:
It is recommended to keep advertisements on a
separate USB stick for capacity reasons.
Machine Settings:
All of the machine settings, including ticket values,
location name, etc. can be backed up. This will allow
operators to set up the Prize Hub quickly in case of
an information loss.
Prize Settings:
All prize locations, costs and ticket values can be
saved and uploaded to the same or other Prize Hubs.
Statistics:
Useful for tracking the usage of your Prize Hub,
including tickets in, tickets comped, tickets printed,
prizes out and any dispense failures.
BACKUP=
save to USB
History:
The machine history itemizes each transaction that
occurs on the Prize Hub, proving useful in confirming large ticket value exchanges and possibly theft.
RESTORE=
upload to Prize Hub from USB
If the machine is restored, the game needs to be
powered down and back up before the restore
takes effect.
Ticket Database:
The ticket database records every ticket number
and QR code printed by the Prize Hub. It is recommended to back up the database regularly so that
anyone saving printed tickets at home can still come
back and redeem them if the Prize Hub experiences
a malfunction and needs a hard drive replacement.
24
To Purchase This Item, Visit BMI Gaming | www.bmigaming.com | (800) 746-2255 | +561.391.7200
LOADING CAPSULE PRIZES
Open the capsule cabinet door.
Rotate the capsule tree to the desired position by
turning it slowly.
The bins are identified by the stickers on the
plexiglass; the location is always to the right side of
the location markers.
Dump capsules into the hoppers with the shovel
provided.
Be sure to place the matching blister packs in the
display slots between each capsule hopper.
Display dimensions:
9”
8”
Close and lock the door.
Adjust any ticket values and prize images in the prize
menu (see page 18).
25
To Purchase This Item, Visit BMI Gaming | www.bmigaming.com | (800) 746-2255 | +561.391.7200
LOADING SPINDLE PRIZES
Open the front door of the display case and slide the
ticket value bars up and out of their rests. Set aside.
Remove the safety rods by turning CLOCKWISE.
Hang prizes on spindles. To avoid time-out dispense
failures, try to place the prizes no more than 3-4 turns
apart.
Insert the safety rods OVER the hang tabs of the
prizes, and secure by turning COUNTER-CLOCKWISE.
SEE PAGE 19 FOR HELP LOADING PRIZE IMAGES.
26
To Purchase This Item, Visit BMI Gaming | www.bmigaming.com | (800) 746-2255 | +561.391.7200
LOADING LOCKER PRIZES
Open the main hub door and enter the menu.
Enter the Diagnostics menu and touch Test Dispense
to bring up the keypad.
Key in the locations of the prize doors to unlock them.
Lift up on the doors and place prizes inside. The solenoids will automatically lock after 30 seconds.
Make sure the doors close securely and test them to
Adjust any ticket values on the doors and monitor,
and upload prize images for each prize.
SEE PAGE 19 FOR HELP LOADING PRIZE IMAGES.
27
To Purchase This Item, Visit BMI Gaming | www.bmigaming.com | (800) 746-2255 | +561.391.7200
PRIZE SPECIFICATIONS
5
5
10.5"
14"
13.5"
TOTAL UNIT CAPACITY:
1
10000 ($50 TO $100)
1
1
5000 ($25 TO $50)
LOCKERS
2
3000 ($15 TO $30)
**
2
2500 ($12.50 TO $25)
10"
4
2000 ($10 TO $20)
11"
4
1500 ($7.50 TO $15)
6~28
3
1000 ($5 TO $10)
2
3
750 ($3.75 TO $7.50)
**
6
500 ($2.50 TO $5)
TOP ROW
4
350 ($1.75 TO $3.50)
**
2
200 ($1TO $2)
5"
100 ($.50 TO $1)
8"
75 ($.35 TO $.75)
36~168
50 ($.25 TO $.50)
12
25 ($.17 TO $.25)
**
SPINDLES
15 ($.07 TO $.15)
ROWS 1-3:
2" CAPSULES*
TICKETS (COST***):
1980
LOCATIONS PER VALUE:
TOTAL CAPACITY
18
MAX DEPTH
VARIETY
110
CAPSULES
MAX WIDTH
CAPACITY PER
MAX LENGTH/ HEIGHT
(WITH HANGER)
Prize Hub Factory Default Prize Specs
FULL MODULAR UNIT
1
1
1
1
1
2027 (MIN) - 2181 (MAX)
* THE CAPSULE MECHANISM IS COMPATIBLE WITH 2" ACORN CAPSULES, ROUND CAPSULES,
EGG CAPSULES, FOAM BALLS, SUPER BALLS AND CAPSULES FILLED WITH CANDY
** SPINDLE CAPACITY VARIES BY PRIZE DEPTH
FLAT ITEMS (ONE PER COIL)
14
10
1" THICK ITEMS
5
2" THICK ITEMS
3
3-4" THICK ITEMS
28
*** PRIZE COST IS BASED ON A 50% TO 0%
MARKUP SCALE. CHOOSE THE VALUES
THAT FIT YOUR BUSINESS PLAN.
To Purchase This Item, Visit BMI Gaming | www.bmigaming.com | (800) 746-2255 | +561.391.7200
HOW TO: LOAD PRINTER PAPER
Remove the plastic disk and the empty paper core
from the spool holder.
Slide a new roll of paper onto the spool and replace
the plastic disk.
Feed the end of the paper into the opening until it
grabs and begins to feed through the printer.
29
To Purchase This Item, Visit BMI Gaming | www.bmigaming.com | (800) 746-2255 | +561.391.7200
MARQUEE INSTALLATION GUIDE
Tools Needed:
Extra person
Drill with #2 square bit
Unpackage the marquee and locate the
hardware packet; set aside.
Team-lift the marquee onto the top of the
Prize Hub. One person will have to hold the
marquee up while the other directs them to
center it.
Secure the marquee in place with included
black wood screws.
Feed the marquee cable through the hole in
the top of the Main Hub or Hybrid cabinet,
and plug in to cable clamped near the
cabinet ceiling; it is labeled “MARQUEE”.
Make sure the marquee is lit up, then clamp
the cables to the cabinet as necessary.
30
To Purchase This Item, Visit BMI Gaming | www.bmigaming.com | (800) 746-2255 | +561.391.7200
SIDE DECAL PLACEMENT
8.0”
20.75”
31
To Purchase This Item, Visit BMI Gaming | www.bmigaming.com | (800) 746-2255 | +561.391.7200
CIRCUIT BOARD PINOUTS
CAPSULE HUB BOARD (AACB1803)
ON
OFF
1 2 3 4
SPINDLE HUB BOARD (AACB1803)
AACB1803
ON
OFF
AACB1803
1 2 3 4
MAIN HUB BOARD (AACB1800)
LOCKER HUB BOARD (AACB1803)
ON
OFF
1
2
3
4
AACB1800
AACB1803
1 2 3 4
OFF
ON
32
To Purchase This Item, Visit BMI Gaming | www.bmigaming.com | (800) 746-2255 | +561.391.7200
CIRCUIT BOARD PINOUT GUIDES
MAIN HUB
Q1
Q2
Q3
Q4
+12v
+12v
GND
GND
MARQUEE LIGHT 1
MARQUEE LIGHT 2
MARQUEE LIGHT 3
MARQUEE LIGHT 4
J15
J15
J15
J15
J15
J15
J15
J15
1
2
3
4
5
6
7
8
PX13
PA8
PX14
GND
GND
+12V
MENU BUTTON
J16
J16
J16
J16
J16
J16
1
2
5
6
7
8
CAPSULE HUB
A5CB1803 PINOUT
+12V
+12V
+12V
+12V
+12V
+12V
Q1
Q2
Q3
Q4
Q5
Q6
GND
GND
GND
GND
+12V
+12V
+12V
PA8
PX14
PA9
PA10
PA11
PA12
PA13
ENGAGE MOTOR
J5
J5
J5
J5
J5
J5
J5
J5
J5
J5
J5
J5
1
2
3
4
5
6
7
8
9
10
11
12
ENGAGE SENSOR INPUT
CAPSULE PRIZE SENSOR
DOOR INTERLOCK SWITCH
STEPPER MOTOR ENABLE
STEPPER MOTOR STEP SIGNAL
STEPPER MOTOR HOME SENSOR
J9
J9
J9
J9
J9
J9
J9
J9
J9
J9
J9
J9
J9
J9
1
2
3
4
5
6
7
8
9
10
11
12
13
14
TIER 1 CAPSULE BIN MOTOR
TIER 2 CAPSULE BIN MOTOR
TIER 3 CAPSULE BIN MOTOR
33
To Purchase This Item, Visit BMI Gaming | www.bmigaming.com | (800) 746-2255 | +561.391.7200
CIRCUIT BOARD PINOUT GUIDES
SPINDLE HUB
+12V
+12V
+12V
+12V
+12V
+12V
Q1
Q2
Q3
Q4
Q5
Q6
+12V
+12V
+12V
+12V
+12V
+12V
Q10-B
Q10-A
Q9-B
Q9-A
Q8-B
Q8-A
+12V
+12V
+12V
+12V
+12V
+12V
Q13-B
Q13-A
Q12-B
Q12-A
Q11-B
Q11-A
SPINDLE 1
SPINDLE 2
SPINDLE 3
SPINDLE 4
SPINDLE 5
SPINDLE 6
SPINDLE 7
SPINDLE 8
SPINDLE 9
SPINDLE 10
SPINDLE 11
SPINDLE 12
J5
J5
J5
J5
J5
J5
J5
J5
J5
J5
J5
J5
1
2
3
4
5
6
7
8
9
10
11
12
+12V
+12V
+12V
+12V
+12V
+12V
Q16-B
Q16-A
Q15-B
Q15-A
Q14-B
Q14-A
J6
J6
J6
J6
J6
J6
J6
J6
J6
J6
J6
J6
1
2
3
4
5
6
7
8
9
10
11
12
+12V
PA9
GND
Q7
J7
J7
J7
J7
J7
J7
J7
J7
J7
J7
J7
J7
1
2
3
4
5
6
7
8
9
10
11
12
PA12
PA13
+12V
GND
SPINDLE 13
SPINDLE 14
PRIZE CHUTE MOTOR SENSOR
PRIZE CHUTE MOTOR ENABLE
PRIZE SENSE 1
PRIZE SENSE 2
J8
J8
J8
J8
J8
J8
J8
J8
J8
J8
J8
J8
1
2
3
4
5
6
7
8
9
10
11
12
J14
J14
J14
J14
1
2
3
4
J15
J15
J15
J15
1
2
3
4
LOCKER HUB
A5CB1803 PINOUT
+12V
+12V
+12V
+12V
+12V
+12V
Q1
Q2
Q3
Q4
Q5
Q6
PRIZE LOCKER 1
PRIZE LOCKER 2
PRIZE LOCKER 3
PRIZE LOCKER 4
PRIZE LOCKER 5
PRIZE LOCKER 6
J5
J5
J5
J5
J5
J5
J5
J5
J5
J5
J5
J5
1
2
3
4
5
6
7
8
9
10
11
12
GND
GND
GND
GND
+12V
+12V
+12V
PA8
PX14
PA9
PA10
PA11
PA12
PA13
34
PRIZE LOCKER 1 SWITCH
PRIZE LOCKER 2 SWITCH
PRIZE LOCKER 3 SWITCH
PRIZE LOCKER 4 SWITCH
PRIZE LOCKER 5 SWITCH
PRIZE LOCKER 6 SWITCH
J9
J9
J9
J9
J9
J9
J9
J9
J9
J9
J9
J9
J9
J9
1
2
3
4
5
6
7
8
9
10
11
12
13
14
To Purchase This Item, Visit BMI Gaming | www.bmigaming.com | (800) 746-2255 | +561.391.7200
MAIN HUB WIRING DIAGRAM
A5CE1800
Communication to
Motherboard
Power IN from
Power Supply
Optional Locker
Unit # 2
To Locker Unit
AACE1811
AACE1800
Optional Capsule
Unit # 2
AACE1801
AACB1800
To Capsule Unit
AACE1811
Optional Spindle
Unit # 2
To Spindle Unit
AACE1816
Menu Button
AAPB2700
AACE1802
AAMB7
Audio Phono Jack
A5CEAU010
Speaker
AACE8811
35
4
To Purchase This Item, Visit BMI Gaming | www.bmigaming.com | (800) 746-2255 | +561.391.7200
CAPSULE HUB WIRING DIAGRAM
Carousal
Home Sensor
AACB4401
Engage Pivot
Sensor
AACB4401
A5SW7000
Door
Open
Switch
AACE1812
AACE1814
LED lights
on front door
AAMO1800
Top Capsule
Motor
AACE1812
AAMO1800
Middle Capsule
Motor
AACE1812
+
-
Capsule
Drop Sensor
AACB4401
AACE1812
AACE1812
AACE1814
AAMO1800
Bottom Capsule
Motor
Stepper
Motor
Board
Power In
AACE1813
To J9 Connector
on Board
AACB1801
AACE1812
Power in from
Power Supply
AACE1813
To J5 Connector on Board
Pivot Motor
AAMO1800
ON
OFF
3 & 4 Dips On
LED Blinks 2 Times
1
2
AACB1803
33 44
Connector to
Stepper Motor
for Carousal
AACE1812
AAMO6901
To AACB1800 Board
Communication to
Controller Board
AACE1811
6
36
To Purchase This Item, Visit BMI Gaming | www.bmigaming.com | (800) 746-2255 | +561.391.7200
SPINDLE HUB WIRING DIAGRAM
B14
B13
Top Row 1
Spindles
AACE1822
To AACB1800 Board
Communication to
Controller Board
B12
B11
B9
Row 2
Spindles
Note: All Spindles are
Part # AADSPZ010
AACE1816
B10
AACE1822
ON
B7
B6
B5
B2
B1
Row 3
Spindles
All Dips Off
LED Blinks 1 Time
OFF
1 2 3 4
B8
AACB1803
AACE1821
B4
B3
Bottom Row 4
Spindles
AACE1823
To Power In
on Controller
Board
AACE1820
AACE1819
+
-
AACE1821
AACE1815
LED lights
on front door
Prize Chute Sensor
Boards AACB4402
5
37
AACE1818
To Purchase This Item, Visit BMI Gaming | www.bmigaming.com | (800) 746-2255 | +561.391.7200
LOCKER HUB WIRING DIAGRAM
AACE1806
LED Lights
A5SW3000
Locker Door Switch
AACE1807
A5SO5050
Locker Solenoid
AACE1808
AACE1809
+
-
Locker Door # 5
AACE1806
LED Lights
+
-
AACE1807
AACE1809
Locker Door # 4
AACE1806
LED Lights
A5SW3000
Locker Door Switch
AACE1809
To J9 on
Main Board
AACE1807
AACB1803
AACE1807
A5SO5050
Locker Solenoid
1 2 3 4
4
OFF
Locker Door # 2
ON
AACE1806
LED Lights
+
A5SW3000
Locker Door Switch
AACE1809
LED Light Cable
AACE1808
AACE1811
To AACB1800 Board
Communication to
Controller Board
AACE1807
AACE1810
Power in Jumper
A5SO5050
Locker Solenoid
Locker Door # 1
7
38
AACE1808
AACE1809
+
A5SW3000
Locker Door Switch
AACE1809
To J5
on Main
Board
A5SO5050
Locker Solenoid
Locker Door # 3
AACE1806
LED Lights
# 4 Dip On
LED Blinks 3 Times
+
-
AACE1808
AACE1809
A5SO5050
Locker Solenoid
AACE1808
A5SW3000
Locker Door Switch
To Purchase This Item, Visit BMI Gaming | www.bmigaming.com | (800) 746-2255 | +561.391.7200
AC/ POWER SUPPLY WIRING DIAGRAM
Power Out to
each Module
AACE1805
Power Supply
Cable
Power Out to
each Module
Power Supply
A5PS1008
AACE1805
Power Supply
Cable
2
4
3
Power Supply
Cable
Hard Drive
Com Cable
1
Hard Drive
A5HD1800
Touchscreen
Monitor
A5MO1800
12 VDC Power
to Printer
AACE1824
USB Communication
Cable to Motherboard A5CE1800
Power Supply
Cable
Power In
on Board
A5PS1800
Power Supply
for Touchscreen
All Dips Off
AAMB7
AACB1800
AA
Power in Cord
A5CORD12
AC Power In
A5CORD5
Audio Phono Jack
A5CEAU010
Scanner
A5SC1800
Outlet Strip
AACE1817
Line Filter
Power In Cord
A5FI9010 From Wall A5CORD5
39
To Purchase This Item, Visit BMI Gaming | www.bmigaming.com | (800) 746-2255 | +561.391.7200
MOTHERBOARD WIRING DIAGRAM
A5CE1801
USB Access Point
Connects to Motherboard
to load pictures
AAMB7
USB Scanner
Connects to Motherboard
for communication.
A5SC1800
Scanner
USB Cable to Printer
A5CORD14
A5PRTH002
USB Printer
A5MO1800
Touchscreen
Monitor
VGA Cable
to Monitor
USB Com Cable for
Touchscreen
A5CORD14
Note: Make sure
paper is loaded with
watermark showing
on top side.
AACE1757
A5CEAU010
Audio Jack from
Motherboard to
Main Board
To J19
on main
board.
AANEWGEN1-PJ
Speaker
AACE8811
AACE1752
Communication cable
from Blue Socket (J16) on
Minigen board to Interface
Board. (A5CB0232)
Important Red wire must be to
top of the connector
A5CB0232
Interface Board
A5CE1800
USB cable from
Interface Board to
Motherboard
40
To Purchase This Item, Visit BMI Gaming | www.bmigaming.com | (800) 746-2255 | +561.391.7200
TROUBLESHOOTING GUIDE
!
!
CAUTION
Be aware of the possibility for electrostatic discharge (ESD) when working inside the Prize Hub.
Ground yourself or keep clear of the main boards to avoid shock and/or damage to the electronics.
Troubleshooting Strategy
Use common sense and a systematic method of troubleshooting to determine the exact problem, probable cause and
remedy. Use the process of elimination to find the faulty component. Always check for the simple and obvious causes
first such as unplugged, loose or broken wires and bad sensors, bent, pinched, stuck or jammed components.
This Troubleshooting Guide is organized by Prize Hub Component.
Please go to section for component of your particular problem.
Locker
Unit
Capsule
Unit
Main
Unit
41
8
Spindle
Unit
To Purchase This Item, Visit BMI Gaming | www.bmigaming.com | (800) 746-2255 | +561.391.7200
MAIN HUB TROUBLESHOOTING GUIDE
Troubleshooting Chart
Problem
Probable Cause
No power to the game.
No lights on at all.
(Power Supply not ON)
Monitor shows nothing at
all on power on.
Check for green LED on
monitor control unit.
A5MO1800
Touchscreen
Monitor
Remedy
Unplugged
Check wall outlet
Circuit breaker tripped
Reset power strip breaker switch or building
circuit breaker
Power strip faulty
Change plug position, replace if needed
(AACE1817)
Power supply unplugged
Insure unit is plugged into power strip
Rocker Switch
Make sure rocker switch is set ON (-)
Power supply shutting down
because of 12 V overload
See power supply diagnostics to isolate bad
component. A bad motor or 12 volt short
could cause this
Push ON button on monitor.
Power cable unplugged from
monitor.
Ensure power is plugged into side of
monitor, down to power strip.
Power strip faulty
Change plug position, replace if needed
(AACE1817)
Faulty power supply for
monitor
Check A5CORD12 to ensure 110 volts to
monitor power supply.
Re-Boot game and check for
any errors on monitor.
Power game down, wait 10
seconds, then power game
ON to reset.
If error shows on monitor, refer to suggestions below.
Faulty monitor.
Replace monitor. (A5MO1800)
Blurry Monitor - Too bright, or dim.
Press the “Auto” button on control unit to select Auto Adjustment.
This may take a few seconds.
Verify that the screen looks good and image is centered.
Monitor shows “No
Signal” then black.
Re-Boot game to see if problem still exists.
Power game down, wait 10
seconds, then power game
ON to reset.
Motherboard/power
supply is not working.
Faulty or loose RAM
Large power connector unplugged
on motherboard
Small 12 Volt power connector
unplugged on motherboard.
AAMB7
Monitor VGA cable unplugged.
Faulty power supply - Check for 12 Refer to Monitor/Motherboard Power Supply
Volts and green LED on
Diagnostics for further diagnostic information
motherboard.
If all else fails - Replace faulty motherboard.
(AAMB7)
9
42
To Purchase This Item, Visit BMI Gaming | www.bmigaming.com | (800) 746-2255 | +561.391.7200
MAIN HUB TROUBLESHOOTING
GUIDE
Troubleshooting Chart
Problem
Probable Cause
Remedy
Monitor shows “No
Boot Device” on
screen.
Re-Boot game to see if
AAMB7
problem still exists.
Power game down, wait
10 seconds, then power
game ON to reset.
No 12 Volts to hard drive
Hard Drive is not
Faulty Connection or cable plugged
working.
into wrong place
Check power supply connection to hard drive
Monitor shows “Sleep
Mode” on screen.
Check power supply voltage.
Replace power supply. (A5PS1008)
Re-Boot game to see if Power Supply or Motherboard not
problem still exists.
communicating correctly with
Power game down, wait
monitor.
10 seconds, then power
game ON to reset.
Ensure both power supply connections are
secure to motherboard.
Monitor shows “GNU
Grub, ” on screen.
Turn off game
Plug keyboard into motherboard
Turn on game.
Press “enter” on keyboard when that screen
comes on.
Re-Boot game to see if Internal Linex software not
detecting boot loader.
problem still exists.
Power game down, wait
10 seconds, then power
game ON to reset.
Monitor shows
“Kernel panic-unable
to mount root” on
screen.
Check or replace cable from hard drive to
motherboard. Ensure it is plugged into correct
place. (See Wiring Diagrams)
Refer to Monitor/Motherboard Power Supply
Diagnostics
Replace motherboard. (AAMB7)
Game will now boot normally.
Separate metal tabs on sides of RAM, it will
flip up to remove.
Faulty or loose RAM
Re-install and Re-Boot game to see if problem
still exists.
Power game down, wait 10 seconds, then
power game ON to reset.
AAMB7
Replace motherboard. (AAMB7)
Monitor shows anything else other than
Motherboard has trouble
Prize Hub program on loading or running program
screen.
Small 12 Volt power connector unplugged
on motherboard.
Re-Boot game to see if
problem still exists.
Power game down, wait
10 seconds, then power
game ON to reset.
Faulty or loose RAM
Monitor does not come
Voltage variation in power
back up after a power
network
loss
Turn off the power strip, wait 30 seconds,
then turn power strip back on
Large power connector unplugged on
Motherboard
Faulty motherboard - Replace faulty board.
(AAMB7)
43
To Purchase This Item, Visit BMI Gaming | www.bmigaming.com | (800) 746-2255 | +561.391.7200
MAIN HUB TROUBLESHOOTING GUIDE
Troubleshooting Chart
Problem
Probable Cause
Touchscreen does not work. USB Connector unplugged
Re-Boot game to see if problem still exists.
Power game down, wait 10
seconds, then power game
ON to reset.
Speaker does not work.
A5CEAU010
Audio Jack from
Motherboard to
Main Board
Menu Button does not work.
Scanner
does not
work.
Check for
lights on
scanner
itself.
Verify connector at monitor and motherboard
Problem can be monitor or
motherboard.
Replace A5MO1800 &
AAMB7
AAMB7
A5MO1800
Touchscreen
Monitor
Disconnected, loose or
broken wires.
Check connections and reseat audio cable
from motherboard to AACB1800 board.
Cables # AACE8811, AACE1802, and
A5CEAU010.
Faulty speaker.
Replace speaker. (AACE8811)
Motherboard creates sound,
AACB1800 board amplifies it.
AAMB7
Remedy
Determine if
AACB1800
AACB1800 board is good.
Unplug audio jack cable (A5CEAU010) from
motherboard, plug into MP3 player and see if
music is amplified and comes out of speaker.
If Yes - then motherboard is faulty.
If No - then AACB1800 may be faulty.
Disconnected, loose or
broken wires.
Check connections from pushbutton to
AACB1800 board.
Cables # AAPB2700 and AACE1801
Faulty button.
Test button and replace. (AAPB2700)
Faulty AACB1800 board.
Replace AACB1800 board.
No lights on
scanner.
Disconnected, loose or
broken wires.
Check connections from scanner to
motherboard and power.
Power
problem to
scanner.
Faulty power supply or outlet
plug.
Connect scanner into different power
source.
Check for voltage at
scanner.
If scanner has power, but still no indicator
light, replace scanner. (A5SC1800)
Yes - Lights
are on scanner.
Ensure QR Code is enabled.
Faulty USB communication.
Refer to “How to Register Evolve Units.”
Check USB from scanner to motherboard.
Problem can be scanner or
motherboard.
Replace one at a time.
(A5SC1800 and AAMB7)
Disconnected, loose or
broken wires.
Faulty circuit boards is sign.
Check connections from AACB1800 board to
top sign boards.
(Cables # AACE1800, )
Faulty AACB1800 board.
Replace AACB1800 board.
Optional top sign does not
flash.
44
To Purchase This Item, Visit BMI Gaming | www.bmigaming.com | (800) 746-2255 | +561.391.7200
MAIN HUB TROUBLESHOOTING GUIDE
Troubleshooting Chart
Problem
Probable Cause
Prize Unavailable on screen
Does not load picture files
from USB stick
Printer does not print.
First - Power game
down, wait 10 seconds,
then power game ON to
reset.
Remedy
There are many reasons this
may show up on monitor.
Please refer to “Prize Unavailable Message”
in troubleshooting section.
File name is not recognized.
Either .jpg or .bmp format
Use all small lower case letters in file name.
Picture files are too large
Optimum size of 590 X 590 pixels
Open with Microsoft Office Picture Manager
Click on “Picture” tab scroll down to “Resize”
Click on “Custom width x height” and change
both fields to 590.
Click on “File” and Save
USB stick Faulty
Load picture files onto different USB and retry
Top door on printer lifting up.
This spring provides tension for the door.
Note: Make sure
paper is loaded with
watermark showing
on top side.
Check power to printer.
Press “Print” button to print test page.
If printer does not print test page,
check power cable from power supply.(AACE1824)
Replace printer.( A5PRTH002)
If printer does print test page, communication to motherboard is faulty.
Turn game power off, wait 10 seconds, turn game power ON and re-test.
Check USB cable. (A5CORD14)
Test print by entering Ticket Menu
and adding 1 ticket.
Exit menu and press Print Tickets.
Entire Module not
being seen by Prize
Hub
Please refer to “Entire Unit not Recognized by Main Hub” in troubleshooting
section.
45
To Purchase This Item, Visit BMI Gaming | www.bmigaming.com | (800) 746-2255 | +561.391.7200
MAIN HUB TROUBLESHOOTING GUIDE
PRIZE UNAVAILABLE MESSAGE
Prize Unavailable will show for a number of reasons:
A.) Location is actually empty of prizes.
B.) Prize dispensing malfunction.
C.) Prize jam.
D.) Stock Quantity is set too low.
E.) Motor/Sensor self test failed at power on.
F.) Entire row of prizes unavailable.
Locker
Unit
A.) Location is actually empty of prizes.
Main
Unit
Capsule
Unit
Spindle
Unit
The locker will only hold one prize. Once that prize is won, it will show that prize unavailable.
Spindles will hold 3 to 17 items depending on thickness of the prize. Once all the prizes are won, it will show that prize
unavailable.
Capsules will hold 120 of the 2” capsules per capsule pie slice. Once the pie slice is empty, it will show that prize unavailable.
Solution: If location contains prizes, and still shows that prize is unavailable, continue to suggestions below:
B.) Prize dispensing malfunction.
Capsule Unit:
Capsule carousel will slow down, stop, pivot motor moves dispensing motor in, and dispensing motor dispenses capsule.
If capsule does not fall for whatever reason, the motor will time-out and carousel will go around again to try to dispense
that same capsule.
If that capsule has tried to dispense twice and fails, it will show that prize unavailable, not subtract tickets from guest and
have him chose a different prize.
If front door opens while prize is being dispensed, that prize will show unavailable. Check door switch and cables.
Spindle Unit:
A spindle will turn off after 35 seconds - if the prize is not seen by prize chute sensors, then it will show that prize unavailable, not subtract tickets from guest and have him chose a different prize.
Locker Unit:
If locker door does not open for whatever reason, the coil power will time-out after 3 minutes.
It will show that prize unavailable, but does subtract tickets and will log that win in the history menu.
Solution: Refer to troubleshooting section of each unit to diagnosis further.
C.) Prize jam.
Capsule Unit:
Capsule unit is specifically designed to resist and power-through jams.
If it shows prize unavailable and they are still capsules in unit, turn the sprocket
by hand and see if it dispenses capsule.
If not - Remove capsules and locate jammed capsule.
If it does dispense - Check capsule drop sensor and refer to Capsule Unit Troubleshooting Section
Spindle Unit:
The spindle will turn for 35 seconds - if the prize does not fall from spindle, or gets stuck in the prize chute, it will not
seen by prize chute sensors. It will show that prize unavailable, not subtract tickets from guest and have him chose a
different prize.
Solution: Refer to Spindle Unit Troubleshooting Section to diagnosis further.
46
To Purchase This Item, Visit BMI Gaming | www.bmigaming.com | (800) 746-2255 | +561.391.7200
MAIN HUB TROUBLESHOOTING GUIDE
PRIZE UNAVAILABLE MESSAGE
Locker
Unit
Main
Unit
Capsule
Unit
Spindle
Unit
D.) Stock Quantity is set too low.
Enter Owner Menu and go to Prize Menu.
There is a selection for “Stock Quantity” If this is left at zero, the game will operate fine. It will dispense prizes until empty, but not
know it’s empty until the prize is selected, and it times out.
If this is set to a number, the Prize Hub will allow that number to be dispensed and then
show Prize Unavailable for that prize only.
We usually leave capsules set to zero, and count the number of prizes on the spindles to reflect actual prizes hanging.
E.) Motor/Sensor self test failed at power on.
Capsule Unit
At power on - The pivot motor will move and test home sensor.
If it fails, capsule stepper motor will not start (it will also be very hard to turn by hand.) and all capsule prizes will be
unavailable.
Solution: Refer to Capsule Unit Troubleshooting Section to diagnosis motor/sensor.
F.) Entire row of prizes unavailable.
If Entire unit is not recognized by main hub, the entire row of prizes will show unavailable.
Spindle Unit:
Prize chute sensors are blocked, dirty, or faulty.
No communication from a Spindle Unit to Main Hub Unit.
Capsule Unit:
If pivot motor test fails on power on.
At power on - The pivot motor will move and test home sensor.
If it fails, capsule stepper motor will not start (it will also be very hard to turn by hand.) and all capsule prizes will be
unavailable.
No communication from a Capsule Unit to Main Hub Unit.
Solution: Refer to “Entire Unit not Recognized by Main Hub” in troubleshooting section.
47
To Purchase This Item, Visit BMI Gaming | www.bmigaming.com | (800) 746-2255 | +561.391.7200
MAIN HUB TROUBLESHOOTING GUIDE
HUB NOT RECOGNIZED
If Entire unit is not recognized by main hub, an entire row of prizes will show unavailable.
Step # 1 - Ensure individual Unit is communicating to Main Hub
Step # 2 - Refer to troubleshooting topics specific to a unit.
Step # 1
Verify 12 volt DC power to unit.
12 Volt power comes from Main Unit’s power supply. There are
jumper cables that feed 12 volts to individual units.
(Cable part #’s: AACE1805, AACE1810, AACE1813, AACE1820)
Locker
Unit
Main
Unit
Capsule
Unit
Enter menu and got to “Diagnostic Menu”
Verify Unit is has version number in the #1 slot.
(#2 slot is for additional optional units)
Software version should start with:
1 for Spindle
2 for Capsule
3 for Locker
Touch Version
Information
Touch
Diagnostic
Menu
Verify dipswitches and flashing LED on unit’s 1803 boards.
ON
ON
OFF
1 2 3 4
Spindle Unit
1 Flash from LED
All Dips OFF
OFF
AACB1803
1 2 3 4
AACB1803
ON
OFF
1 2 3 4
AACB1803
Capsule Unit
2 Flashes from LED
Dips 3 & 4 ON
Locker Unit
3 Flashes from LED
Dip 4 ON
Ensure phone cables are secure from silver socket on 1803 boards to correct socket on 1800 board.
To Locker Unit
AACE1811
AACB1800
To Capsule Unit
AACE1811
To Spindle Unit
AACE1816
48
Spindle
Unit
To Purchase This Item, Visit BMI Gaming | www.bmigaming.com | (800) 746-2255 | +561.391.7200
MAIN HUB TROUBLESHOOTING GUIDE
HUB NOT RECOGNIZED
Step # 2
Troubleshooting topics specific to a unit.
Spindle Unit Only:
If the Prize Chute Sensors are blocked, dirty, or faulty - the Prize Hub will not allow any spindle prizes to be selected and
will show the entire row of prizes as “Unavailable”.
AACB4402
Solution:
1.) Remove 4 of #2 square head screws from L Brackets in rear of prize chute wood box. Wood Box will now slide out
front of game. Remove Prize Chute Sensor by removing the 4 Phillips bolts that secure sensor to black plastic mask.
(The black plastic masks must remain attached to wood to provide alignment for the sensors.)
Clean emitters and detectors. Ensure they are pointing straight out and no components on boards are bent.
2.) Inspect cables between sensors and to 1803 board. (AACE1818, AACE1823) Replace if needed.
3.) Ensure AACE1823 cable is plugged into correct socket on 1803 board. (Gold socket) See diagram.
AACB1803
AACE1823
Prize Chute Sensor
Boards AACB4402
AACE1818
4.) Replace both Prize Chute Sensors. (AACB4402)
5.) Replace 1803 Control Board. (AACB1803)
Capsule Unit Only:
If pivot motor test fails on power on - the Prize Hub will not allow any capsule prizes to be selected and will show the
entire row of prizes as “Unavailable”.
Home Sensor
(AACB4401)
Power game down, wait 10 seconds, then power game ON.
Immediately at power on - The pivot motor will move and test home sensor.
If Motor does not move:
Check for 12 Volt DC at motor.
Check for disconnected, loose or broken wires on motor and cable to 1803 board.
Replace if needed. (AACE1812, AAMO1800)
Replace motor. (AAMO1800)
If Motor does move, but capsule stepper motor will not start (it will also be very hard to turn by hand):
Ensure black plastic cam is spinning with motor as it turns.
Check for 12 Volt DC between yellow and blue wires at sensor. 5 Volts between blue and white should drop to zero
when blocked.
Check for disconnected, loose or broken wires from sensor to 1803 board.
Replace if needed. (AACE1812, AACB4401)
Replace sensor. (AACB4401)
49
To Purchase This Item, Visit BMI Gaming | www.bmigaming.com | (800) 746-2255 | +561.391.7200
MAIN HUB TROUBLESHOOTING GUIDE
MONITOR/ MOTHERBOARD POWER SUPPLY DIAGNOSTICS
1.) Verify AC power to game. Check power strip in bottom front.
The rocker switch should be illuminated.
2.) Power supply is mounted to wood platform under motherboard.
Lift wood platform to access power supply.
3.) Check connection to power supply.
4.) Ensure Power Supply switch is set to 115V (or 230V)
(Some model power supplies may not have this)
5.) Ensure Power switch is on.
6.) Ensure fan is turning.
- If power supply fan is turning and there is no 12 Volt out, then
(A5PS1008)
- If power supply fan is not turning, then continue to “Verify Power to Motherboard”
replace power supply.
Verify Power to Motherboard
The motherboard will turn on power supply.
If your game has no 12 volts, it may be the motherboard not turning on.
In addition - there may be a 12 volt short somewhere else in cabinet that is not allowing the power supply to turn on.
Minimize load on power supply and isolate short
Unplug all outputs from power supply except for motherboard.
This will have power supply, motherboard, and monitor left plugged in.
If power supply, motherboard, and monitor now turn on:
Plug in one component at a time to power supply to
locate short.
3 - Motherboard “Jump Start”
If green Led is ON, but game not on, you may start motherboard by quickly touching these 2 red pins at the same time.
If power supply still does not power on, then continue
to steps 1,2, and 3.
2 - Check BOTH connections from power supply.
Large power supply connection.
Black and yellow wires.
(12 Volts DC)
Note: The location of this connector may vary depending on which
version motherboard is in game.
1 - Green LED on motherboard should be ON.
AAMB7
If this is not on, recheck power supply or replace motherboard. (AAMB7)
If power supply still does not power on, replace power supply. (A5PS1008), replace motherboard. (AAMB7)
50
To Purchase This Item, Visit BMI Gaming | www.bmigaming.com | (800) 746-2255 | +561.391.7200
SPINDLE HUB TROUBLESHOOTING GUIDE
Troubleshooting Chart
Problem
Probable Cause
No lights on at all in
Spindle Unit
Spindle Not Turning
Test dispense a prize by going
into menu and selecting a
locker.
Spindle Always Turning
Remedy
12 Volt power comes from
Main Unit’s power supply.
Verify main unit has 12 Volt lights. Verify 12
Volt jumper cables that feed 12 volts are
connected to Spindle Unit
Disconnected, loose or
broken wires.
Check connections from LED lights to 1803
board. Replace if needed.
(AACE1815, AACE1819, AACE1820)
Faulty 1803 board.
Replace AACB1803 board
Check for 12 Volts DC on
spindle motor
If spindle motor has 12 VDC, and does not
move - Replace spindle. (AADSPZ010)
Disconnected, loose or
broken wires.
If no 12 VDC:
Check connections from spindle to
controller board. (AACE1821, AACE1822)
Faulty controller board.
Replace controller board. (AACB1803)
Spindle will time out and stop
spinning after 35 seconds in
any mode.
If spindle continues to spin, the controller
board is faulty.
Replace board. (AACB1803)
Prize is stuck Make sure prize hanger is UNDER retaining pin.
Prize does not Drop on spindle.
or
More than One Prize Prize stuck in Inspect prize chute and clear jam.
Drops at a time.
prize chute
Spindle will turn off
after prize chute
sensors “sees” prize
drop.
The spindle will turn
for 35 seconds - if the
prize does not fall
from spindle, or gets
stuck in the prize
chute, it will not seen
by prize chute sensors. It will show that
prize unavailable, not
subtract tickets from
guest and have him
chose a different
prize.
Prize chute
sensors are
dirty, misaligned, or
faulty.
Clean emitters and detectors. Ensure they are pointing straight out
and no components on boards are bent
To remove sensors: Remove 4 of #2 square head screws from L Brackets in
rear of prize chute wood box. Wood Box will now slide out front of game. Remove Prize Chute Sensor by removing the 4 Phillips bolts that secure sensor
to black plastic mask.
(The black plastic masks must remain attached to wood to provide alignment
for the sensors.)
Inspect cables between sensors and to 1803 board. (AACE1818,
AACE1823) Replace if needed.
Ensure AACE1823 cable is plugged into correct socket on 1803
board. (Gold socket) See diagram.
Replace both Prize Chute Sensors. (AACB4402)
AACB440
Replace 1803 Control Board. (AACB1803)
51
To Purchase This Item, Visit BMI Gaming | www.bmigaming.com | (800) 746-2255 | +561.391.7200
SPINDLE HUB TROUBLESHOOTING GUIDE
Troubleshooting Chart
Problem
Probable Cause
Screen stays locked on
“Dispensing Spindle”
Prize Hub is attempting
spindle drop but something is
disrupting the process.
Prize Dispense Failure on
screen.
Remedy
The spindle will turn for 35
seconds while showing this
message.
Refer to “Prize does not Drop”
troubleshooting section.
Prize did not dispense when
Prize Hub expect it.
Refer to “Prize Unavailable on screen”
troubleshooting section.
Entire Unit Not Recognized
by Main Hub
Refer to “Entire Unit not Recognized by Main
Hub” in troubleshooting section.
No communication from a
Capsule Unit to Main Hub
Unit.
Refer to “Entire Unit not Recognized by Main
Hub” in troubleshooting section.
Check cables from spindle to Control Board
If this shows longer, a spindle Replace if needed. (AACB1803)
is retrying or faulty control
Refer to “Prize Unavailable on screen”
board.
troubleshooting section.
Prize does not drop after Prize
Hub tries to drop it.
Prize will go to “Unavailable”
Entire row of prizes show
“Prize Unavailable”
Location is actually Spindles will hold 3 to 17 items depending on thickness of the prize.
Once all the prizes are won, it will show that prize unavailable.
empty of prizes.
Prize dispensing
malfunction.
Prize Unavailable
on screen
Prize jam.
A spindle will turn off after 35 seconds - if the prize is not seen by
prize chute sensors, then it will show that prize unavailable, not
subtract tickets from guest and have him chose a different prize.
The spindle will turn for 35 seconds - if the prize does not fall from
spindle, or gets stuck in the prize chute, it will not seen by prize
chute sensors. It will show that prize unavailable, not subtract tickets from guest and have him chose a different prize.
Refer to “Prize does not Drop.” section
Stock Quantity is
set too low.
The number of prizes on the spindles should reflect the actual number of prizes hanging on each spindle. The game will then only dispense that amount, then go to prize unavailable.
If pivot motor test fails on power on.
Entire Unit Not
Recognized by
Main Hub
Refer to “Entire Unit not Recognized by Main Hub” in
troubleshooting section.
No communication Refer to “Entire Unit not Recognized by Main Hub” in
from a Spindle Unit troubleshooting section.
to Main Hub Unit.
52
To Purchase This Item, Visit BMI Gaming | www.bmigaming.com | (800) 746-2255 | +561.391.7200
CAPSULE HUB TROUBLESHOOTING GUIDE
Troubleshooting Chart
Problem
No lights on at all in
Capsule Unit
Carousel Motor Not
Turning
Probable Cause
Remedy
12 Volt power comes from
Main Unit’s power supply.
Verify main unit has 12 Volt lights. Verify 12
Volt jumper cables that feed 12 volts are
connected to Capsule Unit
Disconnected, loose or
broken wires.
Check connections from LED lights to 1803
board. Replace if needed.
(AACE1815, AACE1819, AACE1820)
Faulty 1803 board.
Replace AACB1803 board
Check switch operation, inspect connections
on AACE1812 cable.
Go to Diagnostics in Menu to “Module
Status Information” - If it shows “Capsule
Tree Door Opened” then replace AACB1803
board in unit.
Door Switch is Open
Pivot Motor Home Sensor
At power ON, pivot motor will cycle to test
home sensor. Please refer to “Motor/Sensor
self test failed at power on” section below.
Inspect cables from Carousel
Stepper Motor to Stepper
Motor Board to 1803 board.
(AACE1812, AACB1801,
AACE1813, AAMO6901)
Test for 12 Volts DC at Stepper Motor Board
Carousel Motor Always
Turning or does not slow
down.
Faulty Stepper Motor Board
Replace Stepper Motor Board (AACB1801)
Faulty Stepper Motor
Replace Stepper Motor (AAMO6901)
Carousel Home sensor is
blocked or faulty.
Check for 12 Volt DC between yellow and
blue wires. 5 Volts between blue and white
should drop to zero when blocked.
Disconnected, loose or
broken wires.
Check connections from sensor to
AACB1800 board. Cables # AACB4401 and
AACE1812
Faulty Sensor
Replace AACB4401
Faulty Stepper Motor Board
Replace AACB1801
Faulty Control Board
Replace AACB1803
53
To Purchase This Item, Visit BMI Gaming | www.bmigaming.com | (800) 746-2255 | +561.391.7200
CAPSULE HUB TROUBLESHOOTING GUIDE
Troubleshooting Chart
Problem
Probable Cause
Check switch operation, inspect connections on
AACE1812 cable.
Go to Diagnostics in Menu to “Module Status
Information” - If it shows “Capsule Tree Door
Opened” then replace AACB1803 board in unit.
Door Switch is Open
Carousel
Motor is
not turning
Pivot Motor Home Sensor
At power ON, pivot motor will cycle to test home
sensor. Please refer to “Motor/Sensor self test
failed at power on” section below.
Inspect cables from Carousel Stepper Motor to Stepper
Motor Board to 1803 board.
(AACE1812, AACB1801,
AACE1813, AAMO6901)
Capsule
does not
Drop
Go to
Menu and
try “Test
Dispense”
Remedy
12 Volt DC Power In
AACE1813
Test for 12 Volts DC at Stepper Motor Board
Carousel
Motor does
not slow
down
Capsule
Engage
Motor is
not turning
Faulty Stepper Motor Board
Replace Stepper Motor Board (AACB1801)
Faulty Stepper Motor
Replace Stepper Motor (AAMO6901)
Carousel Home sensor is
blocked or faulty.
Check for 12 Volt DC between yellow and
blue wires. 5 Volts between blue and white
should drop to zero when blocked.
Disconnected, loose or
broken wires.
Check connections from sensor to AACB1800
board. Cables # AACB4401 and AACE1812
Faulty Sensor
Replace AACB4401
Faulty Stepper Motor Board
Replace AACB1801
Faulty Control Board
Replace AACB1803
After motors swing over, the
Individual capsule engage
motor will spin sprocket.
If 12 Volts DC is ok:
Replace motor (AAMO4401)
If motor does not turn, check
for 12 volts DC at motor.
If no12 Volts DC:
Check for disconnected, loose or broken wires.
(Cable #’s AAMO4401, AACE1812)
Replace Control Board (AACB1803)
Capsule
Engage
Motor is
turning
Carousel Motor is hard
to turn by hand
If motor is turning and no
capsules drop there must be
a jam inside unit.
Remove capsules and locate and clear jam.
Carousel motor should be easy to spin by hand. If it is hard to spin:
At power ON, pivot motor failed the home sensor test. Please refer to “Motor/
Sensor self test failed at power on” section below.
Binding in chain and/or sprockets.
Stepper motor itself is binding. Turn game off and see if binding continues.
54
To Purchase This Item, Visit BMI Gaming | www.bmigaming.com | (800) 746-2255 | +561.391.7200
CAPSULE HUB TROUBLESHOOTING GUIDE
Troubleshooting Chart
Problem
Probable Cause
Remedy
Carousel keeps turning until 2 Carousel Home sensor faulty. Refer to
“Carousel Motor Always Turning or does not
minute time out and then
gives Prize Dispense Failure slow down” troubleshooting section.
Screen stays locked on
“Dispensing Capsule”
Capsule motor is turning, but
no capsules falling.
Refer to “Capsule does not drop” troubleshooting section.
Prize Hub is attempting capsule drop but something is disrupting the process.
Prize Dispense Failure on
screen.
Carousel Home sensor unplugged or blocked.
Refer to “Capsule Does Not Drop” troubleshooting section.
Capsule Jam
Capsule does not drop after
Prize Hub tries to drop it.
Prize will go to “Unavailable”
Too many Capsules
dropping.
Capsule
Drop Sensor
AACB4401
Capsule drop sensor is not
being seen.
Motor/
Sensor
self test
failed at
power
on.
Power
game
down,
wait 10
seconds,
then
power
game ON.
Dirty, blocked, or faulty Home Inspect AACB4401– There should be 12 volts
DC between yellow and blue wires.
Sensor
There should be 5 Volts DC between white
and blue and it should drop to zero VDC
when blocked.
Replace if it stays at 5 VDC or 0 VDC.
Disconnected, loose or
broken wires.
Dirty, blocked, or faulty
Home Sensor
Pivot Motor does
turn at
power on.
Pivot Motor does
NOT turn
at power
on.
Home Sensor
(AACB4401)
Check for disconnected, loose or broken
wires from sensor to 1803 board.
Replace if needed. (AACE1812, AACB4401)
Inspect AACB4401– There should be 12 volts DC between yellow and blue wires.
There should be 5 Volts DC between white and blue and
it should drop to zero VDC when blocked.
Replace if it stays at 5 VDC or 0 VDC.
Disconnected, loose or
broken wires.
Check for disconnected, loose or broken wires from sensor to 1803 board.
Replace if needed. (AACE1812, AACB4401)
Disconnected, loose or
broken wires.
Check connections from motor to 1803 board.
(AACE1812, AAMO1800)
Check for 12 Volts DC
at motor at power ON.
If 12 V is at motor - Replace motor (AAMO1800)
If no 12 V at motor - Replace AACE1812 cable and/or
AAMO1800 motor.
55
To Purchase This Item, Visit BMI Gaming | www.bmigaming.com | (800) 746-2255 | +561.391.7200
CAPSULE HUB TROUBLESHOOTING GUIDE
Troubleshooting Chart
Problem
Probable Cause
Remedy
Location is actually
empty of prizes.
Capsules will hold 120 of the 2” capsules per capsule pie slice.
Once the pie slice is empty, it will show that prize unavailable.
Prize dispensing
malfunction.
Capsule carousel will slow down, stop, pivot motor moves dispensing motor in, and dispensing motor dispenses capsule. If capsule
does not fall for whatever reason, the motor will time-out and carousel will go around again to try to dispense that same capsule.
If that capsule has tried to dispense twice and fails, it will show that
prize unavailable, not subtract tickets from guest and have him
chose a different prize.
If front door opens while prize is being dispensed, that prize will
Front door opens
Prize Unavailable while it is dispensing show unavailable. Check door switch and cables. Refer to
“Carousel motor not turning” in troubleshooting guide.
prize.
on screen
Capsule unit is specifically designed to resist and power-through
jams.
If it shows prize unavailable and they are still capsules in unit, turn
the sprocket by hand and see if it dispenses capsule.
If not - Remove capsules and locate jammed capsule.
If it does dispense - Check capsule drop sensor and refer to Capsule Unit Troubleshooting Section
Prize jam.
Stock Quantity is set We usually leave capsules set to zero, it will dispense capsules
until it tries to dispense an empty bin.
too low.
Motor/Sensor self
test failed at power
on.
If pivot motor test fails on power on.
At power on - The pivot motor will move and test home sensor.
If it fails, capsule stepper motor will not start (it will also be very
hard to turn by hand.) and all capsule prizes will be
unavailable.
Entire Unit Not Rec- Refer to “Entire Unit not Recognized by Main Hub” in
troubleshooting section.
ognized by Main
Hub
Refer to “Entire Unit not Recognized by Main Hub” in
No communication
from a Capsule Unit troubleshooting section.
to Main Hub Unit.
Entire row of prizes show
“Prize Unavailable”
Entire Unit Not Recognized
by Main Hub
Refer to “Entire Unit not Recognized by Main
Hub” in troubleshooting section.
Pivot Motor/Sensor self test
failed at power on.
Refer to “Motor/Sensor self test failed at
power on.” in troubleshooting section.
No communication from a
Capsule Unit to Main Hub
Unit.
Refer to “Entire Unit not Recognized by Main
Hub” in troubleshooting section.
56
To Purchase This Item, Visit BMI Gaming | www.bmigaming.com | (800) 746-2255 | +561.391.7200
LOCKER HUB TROUBLESHOOTING GUIDE
Troubleshooting Chart
Problem
Probable Cause
Verify main unit has 12 Volt lights. Verify 12 Volt jumper cables that feed 12 volts are connected to Locker Unit
No lights on at 12 Volt power comes from
Main Unit’s power supply.
all in
Disconnected, loose or
Locker Unit
broken wires.
Check connections from LED lights to 1803 board. Replace
if needed.
(AACE1806, AACE1808, AACE1810)
Replace AACB1803 board
Faulty 1803 board.
Locker door
does not
open
Linkages loose or
not aligned.
Solenoid is
engaging
Test dispense a
prize by going
into menu and
selecting a
locker.
Remedy
Remove wood platform.
Inspect linkages at solenoid.
Inspect linkages at pivot.
Pivot point not
adjusted correctly
Slotted holes will allow pivot bracket to
move forward and backward.
Move forward if latch does not lock door.
Move backward if door has play when locked.
Solenoid is
NOT
engaging
Disconnected,
loose or broken
wires.
Check connections from solenoid to
Controller Board. (AACE1807, AACE1809)
Check for 12
Volts DC at
solenoid.
If 12 Volts DC is at solenoid:
Replace solenoid. (A5SO5050)
If no 12 Volts DC at solenoid:
Replace cables and/or controller board. (AACE1807,
AACE1809, AACB1803)
Open locker door, lift and remove
Solenoid stays engaged. wood base to access switch.
Locker door stays open.
Solenoid will disengage 30 Disconnected, loose or
seconds after door switch broken wires.
sees the door open and
Faulty 1803 board.
then close.
Location is actually
empty of prizes.
Prize Unavailable Prize dispensing
malfunction.
on screen
Entire Unit Not Recognized by Main Hub
Check connections from switch to 1803
board. Replace if needed.
(AACE1807, AACE1809)
Replace AACB1803 board.
Lockers can only hold 1 prize. Once that is empty, it will show
that prize unavailable.
If locker door does not open for whatever reason, the coil
power will time-out after 3 minutes.
It will show that prize unavailable, but does subtract tickets
and will log that win in the history menu.
Refer to “Entire Unit not Recognized by Main Hub” in troubleshooting section.
No communication from Refer to “Entire Unit not Recognized by Main Hub” in troublea Locker Unit to Main
shooting section.
Hub Unit.
57
To Purchase This Item, Visit BMI Gaming | www.bmigaming.com | (800) 746-2255 | +561.391.7200
LOCKER HUB TROUBLESHOOTING GUIDE
Troubleshooting Chart
Problem
Probable Cause
Verify main unit has 12 Volt lights. Verify 12 Volt jumper cables that feed 12 volts are connected to Locker Unit
No lights on at 12 Volt power comes from
Main Unit’s power supply.
all in
Disconnected, loose or
Locker Unit
broken wires.
Check connections from LED lights to 1803 board. Replace
if needed.
(AACE1806, AACE1808, AACE1810)
Replace AACB1803 board
Faulty 1803 board.
Locker door
does not
open
Linkages loose or
not aligned.
Solenoid is
engaging
Test dispense a
prize by going
into menu and
selecting a
locker.
Remedy
Remove wood platform.
Inspect linkages at solenoid.
Inspect linkages at pivot.
Pivot point not
adjusted correctly
Slotted holes will allow pivot bracket to
move forward and backward.
Move forward if latch does not lock door.
Move backward if door has play when locked.
Solenoid is
NOT
engaging
Disconnected,
loose or broken
wires.
Check connections from solenoid to
Controller Board. (AACE1807, AACE1809)
Check for 12
Volts DC at
solenoid.
If 12 Volts DC is at solenoid:
Replace solenoid. (A5SO5050)
If no 12 Volts DC at solenoid:
Replace cables and/or controller board. (AACE1807,
AACE1809, AACB1803)
Open locker door, lift and remove
Solenoid stays engaged. wood base to access switch.
Locker door stays open.
Solenoid will disengage 30 Disconnected, loose or
seconds after door switch broken wires.
sees the door open and
Faulty 1803 board.
then close.
Location is actually
empty of prizes.
Prize Unavailable Prize dispensing
malfunction.
on screen
Entire Unit Not Recognized by Main Hub
Check connections from switch to 1803
board. Replace if needed.
(AACE1807, AACE1809)
Replace AACB1803 board.
Lockers can only hold 1 prize. Once that is empty, it will show
that prize unavailable.
If locker door does not open for whatever reason, the coil
power will time-out after 3 minutes.
It will show that prize unavailable, but does subtract tickets
and will log that win in the history menu.
Refer to “Entire Unit not Recognized by Main Hub” in troubleshooting section.
No communication from Refer to “Entire Unit not Recognized by Main Hub” in troublea Locker Unit to Main
shooting section.
Hub Unit.
58
To Purchase This Item, Visit BMI Gaming | www.bmigaming.com | (800) 746-2255 | +561.391.7200
PARTS LIST
PART #
A5BK6035
A5CE1800
A5FI9010
A5HA1001
A5LK1001
A5HLPR001
A5LK6000
A5ME1807
A5ME1810
A5ME1869
A5ME1870
A5ME1883
A5ME1886
A5ME1889
A5MO1800
A5PRTH002
A5PS1008
A5PYTH010
AAPA4100
A5SC1800
A5CEAU010
AACE1800
AACE1801
AACE1802
AACE1803
AACE1804
AACE1805
AACE1817
AACE1824
AAPB2700
W5TM1117
DESCRIPTION
MAIN HUB PARTS
PART #
DESCRIPTION
SPINDLE HUB PARTS
Light Bracket
2' USB Cable
In Line Filter
T-Handle
Lock for T-Handle
Thermal Printer Paper Holder
Back Door Lock
Control Front Door
Side Guard
Lock Arm
Door Lock Rail
Bar Code Reader/Printer Plate
Lock Link
Lock Bracket
Monitor, 22" Touch Screen
Thermal Printer
Power Supply
Thermal Printer Paper
Thermal Printer Paper Pkg, 5 Rolls
Scanner
Audio Streao Cable
Main Marquee Cable
Main Hub Button Cable
Main Hub Speaker Cable
Main Hub Ground Cable
Main Hub Ground Cable
Main Power Jumper
Main Outlet Strip
Main Printer Power Cable
Menu Push Button Assy.
T-Molding, Black W/ Silver, 9' per
A5BK6035
A5HA1001
A5LK1001
A5LK6000
A5ME1806
A5ME1810
A5ME1823
A5ME1824
A5ME1869
A5ME1870
A5ME1886
A5ME1889
A5ME4407WHT
A5ME4408WHT
A5ME4409
A5ME4439WHT
A5SHZN010
A5TG1800
A5TR1801
AADSPZ010
A5DSPN010
AACE1815
AACE1816
AACE1818
AACE1819
AACE1820
AACE1821
AACE1822
AACE1823
W5TM1117
59
Light Brackets
T-Handle
Lock for T-Handle
Lock for Back Door
Front Door
Side Guard
Top Glass Clamp
Side Class Clamp
Lock Arm
Door Lock Rail
Lock Link
Lock Bracket
Prize Door
Security Door
Prize Door Connector
Bill Validator Cover
Shaft
Tempered Glass,
40.875"x16.997"x3/16"
Trim, Price Tag Moulding, 12' per
Prize Dispensing Spindles, 14 per
Prize Dispensing Pins, 14 per
Spindle Unit LED Lights
Spindle Unit Serial Comm.
Spindle Unit Prize Chute Jumper
Spindle Unit Light Cable
Spindle Unit Power Jumper
Spindle Unit Spindle Cable
Spindle Unit Spindle Cable
Spindle Unit Prize Chute Cable
T-Molding, Black W/ Silver, 19' per
To Purchase This Item, Visit BMI Gaming | www.bmigaming.com | (800) 746-2255 | +561.391.7200
PARTS LIST
PART #
A5BK6035
A5BKSW001
A5BR1001
A5CH1800
A5HA1001
A5LK1001
A5LK6000
A5ME1727
A5ME1728
A5ME1729
A5ME1761
A5ME1810
A5ME1812
A5ME1813
A5ME1825
A5ME1831
A5ME1864
A5ME1865
A5ME1869
A5ME1870
A5ME1872
A5ME1873
A5ME1874
A5ME1875
A5ME1876
A5ME1878
A5ME1879
A5ME1880
A5ME1881
A5ME1882
A5SP1006
A5SP1007
A5SP1801
A5SP1082
A5ST1800
A5SW7000
A5TG1801
A5VF1800
A5VI1800
DESCRIPTION
PART #
CAPSULE HUB PARTS
Light Bracket, 3 per
Switch Bracket, 1 per
Bearing, 2 per
Chain, 88 Links Long
T-Handle
Lock for T-Handle
Lock for Back Door
Motor Bracket
Right Side, 18 per
Left Side, 18 per
Capsule Shear Pl., 18 per
Side Guard, 2 per
Step Motor Bracket
Vibrate Bracket, 2 per
Door
Capsule Funnel
Capsule Dispense Shaft
Capsule Motor Bracket, 3 per
Lock Arm
Door Lock Rail
Side Glass Clamp, 2 per
Top Glass Clamp, 2 per
AACE1811
AACE1813
AACE1814
AAMO1800
AAMO6901
W5TM1117
W5TM4402
W5TM8000
Capsule Unit Com Cable
Capsule Unit Stepper Motor Cable
Capsule Unit LED Light Cable
Pivot and Capsule Engage Motor
Stepper Motor
T-Molding, Black W/Silver, 12' per
T-Molding, 13/16" Blue, 13' per
T-Molding, 1/2" Blue, 11' per
LOCKER HUB PARTS
A5CL1003
A5ME1750
A5ME1751
A5ME1752
A5ME1753
A5ME1754
A5ME1755
A5ME1756
A5ME1757
A5SO5050
A5SP9107
A5SW3000
A5TG1802
Top Baffle
Bottom Baffle
3/8 Dia, 4" Long Rod, 12 per
Top BRG Bracket
Sensor Bracket
Gear Motor Rocker
Capsule Chute Bracket
Sprocket, 35 x 10 Tooth
Sprocket, 35 x 72 Tooth
Spring, 54 per
Spring, 6 per
Strip, 36 per
Door Switch
Tempered Glass 55"X27.654"X3/16"
Capsule Chute Vacuum Form
Vibration Dampner, 4 per
DESCRIPTION
AACE1806
AACE1807
AACE1808
AACE1809
AACE1810
AACE1811
W5TM4002
60
Glass Clamp
Handle
Solenoid Bracket
Locker Latch Pivot
Top Shelf Cover
Shelf Cover
Sample Door
Locker Latch
Long Side Rail
Solenoid
Spring, 5 per
Switch
Tempered Glass,5 per,
13.8"X12.688"X.125"
Locker Unit LED Lights
Locker Unit Solenoid/Switch
Jumper
Locker Unit Light Cable
Locker Unit Solenoid/Switch Cable
Locker Unit Power In Jumper
Locker Unit Solenoid/Switch Com
T-Molding, 13/16" Blue, 8' per
To Purchase This Item, Visit BMI Gaming | www.bmigaming.com | (800) 746-2255 | +561.391.7200
MAIN HUB PARTS PICTURES
AACE1800
AACE1801
AACE1805
A5CORD12
A5CEAU010
A5LK6000
A5HA1001
AACE1802
AACE1803
AACE1804
AACE1817
AACE1824
A5CORD5
A5FI9010
A5PYTH0010
A5HLPR001
A5LK1001
AAPB2700
W5TM1117
O
O 1234
AA
A5PRTH002
A5MO1800
A5PS1008
A5SC1800
AACE8811
A5HD1800
61
AAMB7
AACB1800
To Purchase This Item, Visit BMI Gaming | www.bmigaming.com | (800) 746-2255 | +561.391.7200
SPINDLE HUB PARTS PICTURES
AACE1816
AACE1822
A5LK6000
AACE1818
AACE1819
AACE1820
AACE1823
AADSPZ010
A5DSPN010
AACB4402
A5LK1001
AACB1803
W5TM1117
A5HA1001
A5ME4407-WHITE
62
AACE1821
To Purchase This Item, Visit BMI Gaming | www.bmigaming.com | (800) 746-2255 | +561.391.7200
CAPSULE HUB PARTS PICTURES
AACE1811
A5LK6000
AACE1812
A5HA1001
AACB4401
A5LK1001
AAMO6901
AASW7000
AACB1803
W5TM1117
LOCKER HUB PARTS PICTURES
AACE1806
AACE1807
AACE1808
AACE1811
A5SO5050
A5SP9107
A5LK6000
A5HA1001
A5LK1001
63
AACE1809
AACB1803
AACE1810
W5TM1117
To Purchase This Item, Visit BMI Gaming | www.bmigaming.com | (800) 746-2255 | +561.391.7200
SECURITY PACKAGE
Bay Tek offers a security hasp package for Prize Hub’s back doors.
The hasps are mounted on each door with 1/4” bolts, washers and lock nuts.
The holes must be drilled out; there are markers to assist with placement.
A padlock (not included) can then be inserted into the holes, securing the back doors more forcibly than
with basic locks alone.
The security package includes 3 sets of metal hasps.
To order: call our Parts & Service team and order part number AAKIT-PH-SECURITY.
List Price: $99.00
Distributor Price: $79.20
Hybrid version
64
To Purchase This Item, Visit BMI Gaming | www.bmigaming.com | (800) 746-2255 | +561.391.7200
WEEKLY STATISTICS RECORDS
DATE:
LOC
ITEM
COST
TIX
OUT
2" Capsules:
A1
A2
A3
A4
A5
A6
15
15
25
25
25
25
A7
A8
A9
A10
A11
A12
50
50
50
50
50
50
A13
A14
A15
A16
A17
A18
75
75
75
100
100
100
Spindles:
B1
B2
B3
B4
200
200
200
200
B5
B6
B7
B8
350
350
350
350
B9
B10
B11
B12
500
500
750
750
B13
B14
1000
1500
Large Prize Locker :
C1
C2
C3
C4
C5
2000
2500
3000
5000
10000
Download a statistics spreadsheet @ baytekgames.com
65
FAILS
IN
To Purchase This Item, Visit BMI Gaming | www.bmigaming.com | (800) 746-2255 | +561.391.7200
MAINTENANCE LOG
If repairs are necessary, it is good practice to keep a log of repairs done and parts ordered.
The chart below will assist you in tracking your game’s maintenance.
DATE
MAINTENANCE PERFORMED
PARTS ORDERED
66
INITIALS
To Purchase This Item, Visit BMI Gaming | www.bmigaming.com | (800) 746-2255 | +561.391.7200
TECHNICAL SUPPORT
Excellent customer service is very important to Bay Tek Games!
We know that keeping your games in great operating condition is important to your business.
When you need us, we are here to help. You can call us for free technical assistance, and you can
count on us to have parts on-hand to support your game. We offer options that fit your needs.
Electronics / Circuit Boards - Repair Options
Repair & Return – If you have Circuit Board issues with your Bay Tek game, you can send the board
to us and we’ll repair it right away. Most items sent to us are repaired and returned to you within two
days. This option is your best value as we offer this fast turn-around service at the most reasonable
price.
Advance Replacement – If you have Circuit Board issues with your Bay Tek game, but you don’t
have time to send in your board in for repair, give us a call and ask for an Advance Replacement.
We’ll send you a replacement board that same day (pending availability). When you get your new
board, just repackage the defective board in the same box and send it back to us. We make it easy by
including a UPS Return Shipping label for you to put on the box (not available for international shipments). This is your best option when you need to get your game up and running as quickly as possible!
Spare Parts – Take matters into your own hands and purchase new spare Circuit Boards for your
Bay Tek games. Many of our games share the same main-board electronics. This means you can buy
one set of spare electronics to support many of your Bay Tek games. Spare boards allow you to get
your game up and running the quickest and provide you a valuable troubleshooting option. Call our
technicians to get recommendations for what you should keep on hand for spare parts!
Technical Support:
“You” are the best tool for troubleshooting! Your abilities to understand the game and your skills to
repair the game are invaluable to us! If you need help, you know you can call us. It’s not easy to diagnose a game remotely by phone, but our technicians do a great job. They’ll need your help to perform
some troubleshooting steps and convey to them exactly what’s happening with your game.
Returns, Credits, & Fees:
NOTICE! ALL ITEMS being sent to Bay Tek Games for repair or return, etc. require prior Return
Authorization! Bay Tek Games will provide a Product Return Form with an authorizing Ticket Number
for each item to be returned. Please be certain to include this document with all shipments!
Late Fees and Non-Return Fees - Advance Replacement and Warranty Replacement items require
the defective items to be returned by Bay Tek games promptly to avoid Late Fees. We expect items to
be returned with 10 working days. Late fees are invoiced monthly. Late fees are non-refundable under
any circumstance! Any item not returned within 90 days will be invoiced in full as a replacement part.
Bench Fees - Bench fees will apply for each electronic item returned to Bay Tek Games (this includes
unused Advance Replacement items). This charge covers our cost to inspect, evaluate and retest
each item. Please note that returned items that do not pas our tests will be charged accordingly as
replacement items or advance replacements.
Restocking Fees - Unused items returned for credit will be credited minus a restocking fee. Items
must be returned with in 30 days of purchase in order to qualify for any credit amount. No shipping
charges will be credited.
67
To Purchase This Item, Visit BMI Gaming | www.bmigaming.com | (800) 746-2255 | +561.391.7200
WARRANTY
Bay Tek Games warrants to the original purchaser that all game components will be free of defects
in workmanship and materials for a period of 6 months from the date of purchase. If you fill out the
registration card in the cashbox of the game, Bay Tek will add another 3 months to your warranty, free
of charge.
Bay Tek Games will, without charge, repair or replace defective component parts upon notification to
the parts/service department while the game is under warranty.
Warranty replacement parts will be shipped immediately, via ground service, along with a Product
Return Form for the return of defective parts.
Defective parts must be shipped back to Bay Tek Games unless otherwise instructed. Items not returned to Bay Tek Games will be invoiced as replacement parts.
This warranty does not apply in the event of any misuse or abuse to the product, or as a result of any
unauthorized repairs or alterations. The warranty does not apply if any serial number decal is altered,
defaced, or removed from its original position.
!
ATTENTION
!
In order to maintain the safety & compliance certifications of this
game, ONLY approved parts may be used. For approved
replacement parts, refer to the parts list in this manual.
Should you need your game serviced, determine the serial number from the decal placed on the
front of this manual, or locate it on the back of the game. Then contact our Service Department at:
920.822.3951 or e-mail: [email protected]
NON-WARRANTY
Options and estimated charges will be provided to you for your approval.
Please remember that any items being sent to Bay Tek Games must include prior return
authorization from our Parts & Service Department.
This approval will include a Product Return Form which is required to be included with any incoming
shipments. Repaired parts will be shipped back using the same method in which they were received.
Repairs are warranted for 30 days from the date of return shipment.
68
To Purchase This Item, Visit BMI Gaming | www.bmigaming.com | (800) 746-2255 | +561.391.7200
CERTIFICATE OF COMPLIANCE
69
To Purchase This Item, Visit BMI Gaming | www.bmigaming.com | (800) 746-2255 | +561.391.7200
70
To Purchase This Item, Visit BMI Gaming | www.bmigaming.com | (800) 746-2255 | +561.391.7200
HONEYWELL SCANNER CODES
Follow the directions on page 14 to reconfigure your scanner.
CODE 1 / 5
CODE 2
CODE 3
CODE 4
71
To Purchase This Item, Visit BMI Gaming | www.bmigaming.com | (800) 746-2255 | +561.391.7200
72
To Purchase This Item, Visit BMI Gaming | www.bmigaming.com | (800) 746-2255 | +561.391.7200
ZEBEX SCANNER CODES
Follow the directions on page 14 to reconfigure your scanner.
CODE 1
CODE 2
CODE 3
CODE 4
NUMBER CODES
73