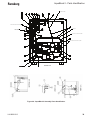
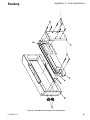
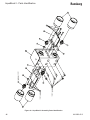
1
Ransburg SERVICE MANUAL LN-9902-00.3 (Replaces LN-9902-00.2) February - 2013 AQUABLOCK MODEL: A12148-XX IMPORTANT: Before using this equipment, carefully read SAFETY PRECAUTIONS, starting on page 1, and all instructions in this manual. Keep this Service Manual for future reference. Service Manual Price: $30.00 (U.S.) Ransburg NOTE: This service manual has been superceded from service manual number LN-9902-00.2 to service manual number LN-9902-00.3. Reasons for this change are noted under “Manual Change Summary” inside the back cover of this manual. LN-9902-00.3 Ransburg AquaBlock 2- Contents CONTENTS SAFETY: PAGE 1-4 SAFETY PRECAUTIONS........................................................................................................... 1 HAZARDS / SAFEGUARDS...................................................................................................... 2-4 INTRODUCTION: 5-10 FEATURES..................................................................................................................................5-6 SPECIFICATIONS......................................................................................................................6 DESCRIPTIONS.........................................................................................................................7-8 AQUABLOCK 2 MODEL IDENTIFICATION.............................................................................. 9 STANDARD SYSTEM.................................................................................................................9 INSTALLATION: 11-18 AQUABLOCK 2 LOCATION....................................................................................................... 11 MOUNTING.................................................................................................................................11 PNEUMATIC CONNECTIONS................................................................................................... 11 PAINT SUPPLY........................................................................................................................... 11-12 AQUABLOCK 2 PNEUMATIC AND FLUID SCHEMATIC........................................................ 13 AQUABLOCK 2 ELECTRICAL SCHEMATIC............................................................................ 14 AQUABLOCK 2 SYSTEM W/GEAR PUMP............................................................................... 15 AQUABLOCK 2 SYSTEM W/FLOWMETER / REGULATOR................................................... 16 AQUABLOCK 2 INSTALLATION CHECKLIST.......................................................................... 17 OPERATION: 19-20 START-UP................................................................................................................................... 19 MAINTENANCE: 21-36 PERIODIC MAINTENANCE....................................................................................................... 21 PREVENTIVE MAINTENANCE.................................................................................................. 22-23 RE-ASSEMBLY........................................................................................................................... 23 LKIT0018-06 CERAMIC CYLINDER ASSEMBLY (200 CC )/PARTS LIST.............................. 24-25 TOOLS TO REBUILD DISCONNECTS..................................................................................... 26 PROCEDURE FOR REBUILDING MALE AND FEMALE AQUABLOCK 2 DISCONNECTS............................................................................................... 26-31 REMOVAL AND INSTALLATION OF MALE AND FEMALE DISCONNECTS FROM AQUABLOCK 2 ASSEMBLY.............................................................. 31-32 ALIGNMENT PROCEDURE FOR DISCONNECT COUPLINGS............................................ 33 TROUBLESHOOTING GUIDE................................................................................................... 35-36 (Continued On Next Page) LN-9902-00.3 AquaBlock 2 - Contents Ransburg CONTENTS (Cont.) PAGE PARTS IDENTIFICATION: 37-48 AQUABLOCK 2 ASSEMBLY PARTS IDENTIFICATION.......................................................... 37-42 A12148-XX AQUABLOCK 2 PARTS LIST................................................................................. 43-44 FITTING SELECTION................................................................................................................. 44 A12140-01 FITTINGS (METRIC) AND A12140-02 FITTINGS (FRACTIONAL) / PARTS LIST.............................................................. 45-46 AQUABLOCK 2 RECOMMENDED SPARE PARTS................................................................. 47 A12101-00 MALE DISCONNECT ASSEMBLY PARTS............................................................ 47 A12109-00 FEMALE DISCONNECT ASSEMBLY PARTS........................................................ 47 ACCESSORIES.......................................................................................................................... 48 WARRANTY POLICIES: 49 LIMITED WARRANTY................................................................................................................. 49 LN-9902-00.3 Ransburg LN-9902-00.3 Ransburg AquaBlock 2 - Safety SAFETY SAFETY PRECAUTIONS Before operating, maintaining or servicing any Ransburg electrostatic coating system, read and understand all of the technical and safety literature for your Ransburg products. This manual contains information that is important for you to know and understand. This information relates to USER SAFETY and PREVENTING EQUIPMENT PROBLEMS. To help you recognize this information, we use the following symbols. Please pay particular attention to these sections. A WARNING! states information to alert you to a situation that might cause serious injury if instructions are not followed. A CAUTION! states information that tells how to prevent damage to equipment or how to avoid a situation that might cause minor injury. ! The user MUST read and be familiar with the Safety Section in this manual and the Ransburg safety literature therein identified. This manual MUST be reaed and thoroughly understood by ALL personnel who operate, clean or maintain this equipment! Special care should be taken to ensure that the WARNINGS and safety requirements for operating and servicing the equipment are followed. The user should be aware of and adhere to ALL local building and fire codes and ordinances as well as NFPA-33 SAFETY STANDARD, prior to installing, operating, and/or servicing this equipment. A NOTE is information relevant to the procedure in progress. While this manual lists standard specifications and service procedures, some minor deviations may be found between this literature and your equipment. Differences in local codes and plant requirements, material delivery requirements, etc., make such variations inevitable. Compare this manual with your system installation drawings and appropriate Ransburg equipment manuals to reconcile such differences. WARNING ! WARNING The hazards shown on the following page may occur during the normal use of this equipment. Please read the hazard chart beginning on page 2. Careful study and continued use of this manual will provide a better understanding of the equipment and process, resulting in more efficient operation, longer trouble-free service and faster, easier troubleshooting. If you do not have the manuals and safety literature for your Ransburg system, contact your local Ransburg representative or Ransburg. 1 LN-9902-00.3 Ransburg AquaBlock 2 - Safety AREA HAZARD SAFEGUARDS Tells where hazards Tells what the hazard is. Tells how to avoid the hazard. may occur. Spray Area Fire Hazard Improper or inadequate oper-ation and maintenance pro-cedures will cause a fire hazard. Protection against inadvertent arcing that is capable of causing fire or explosion is lost if any safety interlocks are disabled during operation. Frequent power supply shut-down indicates a problem in the system requiring correc-tion. Fire extinguishing equipment must be present in the spray area and tested periodically. Spray areas must be kept clean to prevent the accumulation of combustible residues. Smoking must never be allowed in the spray area. The high voltage supplied to the atomizer must be turned off prior to cleaning, flushing or maintenance. When using solvents for cleaning: Those used for equipment flushing should have flash points equal to or higher than those of the coating material. Those used for general cleaning must have flash points above 100oF (37.8oC). Spray booth ventilation must be kept at the rates required by NFPA-33, OSHA, and local codes. In addition, ventilation must be maintained during cleaning operations using flammable or combustible solvents. Electrostatic arcing must be prevented. Test only in areas free of combustible material. Testing may require high voltage to be on, but only as instructed. Non-factory replacement parts or unauthorized equipment modifications may cause fire or injury. If used, the key switch bypass is intended for use only during set-up operations. Production should never be done with safety interlocks disabled. Never use equipment intended for use in waterborne installations to spray solvent based materials. The paint process and equipment should be set up and operated in accordance with NFPA-33, NEC, and OSHA requirements. LN-9902-00.3 2 Ransburg AquaBlock 2 Safety AREA HAZARD SAFEGUARDS Tells where hazards Tells what the hazard is. Tells how to avoid the hazard. may occur. General Use and Maintenance Electrical Equipment Improper operation or maintenance may create a hazard. Personnel must be given training in accordance with the requirements of NFPA-33. Personnel must be properly trained in the use of this equipment. Instructions and safety precautions must be read and understood prior to using this equipment. High voltage equipment is utilized. Arcing in areas of flammable or combustible mater-ials may occur. Personnel are exposed to high voltage during operation and maintenance. The power supply, optional remote control cabinet, and all other electrical equipment must be located outside Class I or II, Division 1 and 2 hazardous areas. Refer to NFPA-33. Protection against inadvertent arcing that may cause a fire or explosion is lost if safety circuits are disabled during operation. Comply with appropriate local, state, and national codes governing ventilation, fire protection, operation maintenance, and housekeeping. Reference OSHA, NFPA-33, and your insurance company require-ments. Turn the power supply OFF before working on the equipment. Test only in areas free of flammable or combustible material. Testing may require high voltage to be on, but only Frequent power supply shut- as instructed. down indicates a problem in the system which requires Production should never be done with the safety correction. circuits disabled. Explosion Hazard/ Incompatible Materials 3 An electrical arc can ignite coating materials and cause a fire or explosion. Before turning the high voltage on, make sure no objects are within the sparking distance. Halogenated hydrocarbon solvents for example: methylene chloride and 1,1,1,-Trichloroethane are not chemically compatible with the aluminum that might be used in many system components. The chemical reaction caused by these solvents reacting with aluminum can become violent and lead to an equipment explosion. Aluminum is widely used in other spray application equipment - such as material pumps, regulators, triggering valves, etc. Halogenated hydrocarbon solvents must never be used with aluminum equipment during spraying, flushing, or cleaning. Read the label or data sheet for the material you intend to spray. If in doubt as to whether or not a coating or cleaning material is compatible, contact your material supplier. Any other type of solvent may be used with aluminum equipment. LN-9902-00.3 Ransburg AquaBlock 2- Safety AREA HAZARD SAFEGUARDS Tells where hazards Tells what the hazard is. Tells how to avoid the hazard. may occur. Toxic Substances Certain material may be harmful if inhaled, or if there is contact with the skin. Follow the requirements of the Material Safety Data Sheet supplied by coating material manufacturer. Adequate exhaust must be provided to keep the air free of accumulations of toxic materials. Use a mask or respirator whenever there is a chance of inhaling sprayed materials. The mask must be compatible with the material being sprayed and its concentration. Equipment must be as prescribed by an industrial hygienist or safety expert, and be NIOSH approved. Intended Use LN-9902-00.3 Using coating materials and/or cleaning and flushing solvents which fave flash points below 100°F (37.8°C) may cause a fire hazard. This system is intended for use with waterborne coating formulations only. 4 AquaBlock 2- Introduction Ransburg INTRODUCTION FEATURES Over the past several years, the finishing industry has experienced increasing pressure to meet the requirements of environmental legislation aimed at reducing the amount of air pollution being generated by the painting process. This has brought about increased use of conforming coatings such as water based paints which contain less solvent. Another obvious answer to reducing the use of solvents is to reduce the amount of coating being applied. This can be accomplished by the use of electrostatic applicators. Therefore, it appeared logical to combine these two solutions to achieve the best of both worlds. However, water based coatings contain water which is electrically conductive. This means that in an electrostatic spray system, the supply of water based coatings must be isolated from ground to prevent the high voltage from shorting out through the conductive water based coating. For many years, isolated paint supply systems have been used in electrostatic spray systems when highly conductive coatings were applied. This was a necessary condition if you were using electrostatics and conductive coatings. As the use of water based coatings increased, the need for other methods to avoid the use of isolated coating supplies became obvious. Isolated coating supplies require a lot of floor space, the use of protective fencing around the isolation area, and in many cases, long delays in production are experienced to accomplish color change. pressure drop across the system depending on the viscosity and volume of paint going through the system. The voltage block system is comprised of the AquaBlock 2 cabinet. The AquaBlock 2 cabinet contains the 4-way shuttle assembly, the cylinder and pneumatic sensing / switching valves. Because it is pneumatically controlled the AquaBlock 2 can be located inside or outside of hazardous areas. The paint enters one port of the 4-way shuttle assembly and is connected alternately to one of two outlets at each end of the cylinder. The cylinder is a double ended piston assembly, having a 220cc capacity. The physical disconnect of the 4-way shuttle assembly in conjunction with the cylinder provides electrical isolation between the paint connections. The 4-way shuttle is moved by a pneumatic actuator which is actuated by the end of stroke sensors built-in to the cylinder assembly. Thus, the system operates with minimal interruption or delay, providing a smooth, continuous flow of paint to the spray applicator(s). The AquaBlock 2 system is a modular design which can be integrated into any existing paint feed system, handle single or multiple automatic applicators and requires little maintenance. Color change through the AquaBlock 2 can be accomp-lished in as little as 60 seconds, depending on the system configuration. To respond to this need, Ransburg has developed the AquaBlock 2 which is a high vol-tage blocking device used to prevent the high voltage from following the conductive path from the spray applicator, through the paint line, to the grounded water based coating supply. The AquaBlock 2 is inserted between the grounded paint supply line entering the spray booth and the spray applicator(s). One AquaBlock 2 can be used for one or more automatic spray applicators. There is a 5 LN-9902-00.3 Ransburg AquaBlock 2 - Introduction NOTE Most power supplies manufactured by Ransburg can be used with the AquaBlock 2 System. However, in existing installations where older models are in use, the high voltage system should be pre-tested using the recommended test procedure to determine if a newer, more suitable model should be installed for best performance. Where competitive models are in use, the same test procedure should be applied. Our service representatives can assist you in conducting this test. ! WARNING The AquaBlock 2 is intended for use with non-flammable coating materials. The flash point of all coating materials, cleaning solvents, etc., must be greater than 100°F. NOTE The AquaBlock 2 is not intended for use with emulsion type materials. If concerned, test material thoroughly. ! CAUTION DO NOT USE TAP WATER FOR FLUSHING OR CLEANING. Deionized water is the acceptable material. LN-9902-00.3 SPECIFICATIONS Physical Dimensions: 30" Wide X 36" High X 13" Deep (76.2 cm Wide X 91.4 cm High X 33.0 cm Deep) Weight:110 lbs. (Approx.) (50 Kg) Electrical High Voltage: 90kV Maximum Mechanical Air Air Supply: 90 psi +/- 5 psi (6.2 bar +/- 0.3 bar) 10 SCFM Maximum (Air required for cylinder sensing curcuit) (283 slpm) Air Filtration: 25-50 Micron Paint Supply Pressure: 100 psi Maximum (6.9 bar) 20 psi Minimum (1.4 bar) Volume: See Maximum Pressure (Depending on viscosity) Temperature: 120°F Maximum (49°C) Filtration is required for paint, water, and/or solvent supplies connected to the system. 6 Ransburg AquaBlock 2 - Introduction DESCRIPTIONS 4-Way Shuttle Assembly The 4-Way Shuttle Assembly consists of a series of quick-disconnects and their respective mounting blocks, and a pneumatic actuator. The AquaBlock 2 has four (4) Female Quick-Disconnects that are located on two (2) stationary End Blocks. One End Block is mounted on the left side of the shuttle assembly and one is mounted on the right side. Four (4) Male Quick-Disconnects are located on a moving Center Block with two on each side. The movement of the Center Block / Male Quick Disconnects is controlled by the pneumatic actuator. As the AquaBlock 2 operates the Center Block is shuttled, back and forth, to create a connection to alternating sides of the cylinder and the paint inlet and outlet. The 4-way shuttle assembly receives grounded paint from the paint supply system and directs it to one end of the cylinder assembly. The paint being forced into the cylinder forces paint out of the other side (using incoming paint pressure). The paint being forced out of the cylinder assembly then flows through another port of the 4-way shuttle assembly and out to the atomizer. When the filling side of the cylinder is full, a pneumatic signal is sent to the actuator that moves the 4-way shuttle. The flow of paint in the 4-way shuttle is now switched and the emptied side of the cylinder is now filling with paint from the grounded paint supply. The full side of the cylinder is now connected to the atomizer. Actuator The pneumatic actuator is a part of the 4-way shuttle assembly. It is located in the back portion of the assembly and is shielded from high voltage by a series of shields, covers, and mounting blocks. When a pneumatic signal is received from the 4-way valve of the pneumatic control assembly, the actuator moves the center block from one end of the shuttle assembly to the other. Once the 4-way shuttle assembly is switched, the air signal is maintained to overcome the spring force of the quick disconnects and hold the connection. 7 Pneumatic Control Assembly This assembly includes a 4-way pneumatic valve which controls the operation of the actuator in response to pneumatic signals received from the end-of-stroke sensors in the cylinder assembly. There are specially sized orifices built-in to the 90 degree cross fitting at the inlet of the 4-way pneumatic valve which are connected to each of the pilots. These restricted orifices supply a low volume of air to the pneumatic sensor circuit in the cylinder assembly. The 4-way valve is normally maintained in an open position to one of the specified outlet ports. When it receives an end of stroke signal from the cylinder assembly, it switches to the other port. The valve supplies air to move the actuator and the 4-way shuttle assembly to the opposite side. Cylinder The cylinder is a double-ended piston reservoir with a port located at each end. The pistons are moved by fluid pressure entering one end of the cylinder from the paint supply system while it is evacuated from the other end and fed to the applicator(s). High Voltage / 4-Way Shuttle Interlock A pneumatic 3-way valve is located in the top of the AquaBlock cabinet and is activated when the cabinet door is opened. This 3-way valve is a normally closed type that supplies air to the bulkhead fitting located in the top of the cabinet and also to a high volume 3-way valve inside of the cabinet when the door is fully closed. The pneumatic signal at the bulkhead is intended for an interlock for the high voltage power supply. This interlock can be accomplished through a pressure switch to shut down high voltage when the cabinet door is opened. The air pilot supplied to the high volume 3-way valve is to interlock the motion of the 4-way shuttle assembly. When the door is opened the pilot is removed and the air supply to the actuator is closed off. LN-9902-00.3 Ransburg AquaBlock 2 - Introduction NOTE If the high voltage power supply does not have a pneumatic pressure switch, contact your local Ransburg representative about adding it to your power supply. System Electrical Current Monitor The electrical circuit that monitors the electrostatic current that bleeds through the AquaBlock 2 is composed primarily of a microampere meter located on the face of the cabinet. The electrical circuit is completed by one wire connected from the paint supply fitting to the meter and another wire from the meter to earth ground. The meter provides an indication of the level of current that is passing through the AquaBlock 2 from the electrostatic applicator. This current measurement provides useful information as to the level of contamination inside the quick disconnect shields, contamination inside the cabinet, and abnormal system operation such as quick disconnect (or fluid seal) leakage, etc. Current Meter Current Range (Microamperes) Activity 0-20 Normal Operation Range 20-50 Clean Quick-Disconnect Shields 50+ Shut System Down * * Possible Damage The scale on the microampere meter is divided into three zones (refer to "Current Meter" chart). Each time the 4-way shuttle assembly switches there is a possibility that the current meter will show a current reading momentarily. If the needle on the meter returns slowly to the steady state current or stays high, this could be an indication of a problem situation that requires immediate attention and potential system damage. LN-9902-00.3 8 AquaBlock 2 - Introduction Ransburg AQUABLOCK 2 MODEL IDENTIFICATION * When ordering, use A12148-AA as indicated by Table A (see "Table A" in the "Parts Identification" section). Two digits must follow the basic part number, for example: A12148 - XX Basic Part Number (Table A) Fitting Selection * Model number and serial number are located on the face of the rear plate assembly. Figure 1: Standard System TABLE A - Fitting Selection (Figure 8) Dash # 9 Description "A" 01 Assembly, AquaBlock 2, Metric A12140-01 02 Assembly, AquaBlock 2, Fractional A12140-02 LN-9902-00.3 AquaBlock 2 - Introduction Ransburg NOTES LN-9902-00.3 10 AquaBlock 2 - Installation Ransburg INSTALLATION ! WARNING This manual MUST be read and thoroughly understood by ALL personnel who operate, clean, or maintain this equipment. Special care should be taken to ensure that the WARNINGS and requirements for operating and servicing are safely followed. ! WARNING All AquaBlock 2 installations must comply with appropriate local, state, and national codes governing ventilation, fire protection, operation, maintenance, and housekeeping. Refer to OSHA, NFPA-30, NFPA-33, and customer's insurance requirements. AQUABLOCK 2 LOCATION The AquaBlock 2 cabinet is installed between the grounded coating supply and the electrostatic spray applicator(s). This system provides a “voltage block” to prevent high voltage from following the conductive path through the water based paint line connected from the spray applicator(s), which are at high voltage, and the grounded paint supply. The unit should be installed near the spray equipment to minimize the length of fluid line to be flushed and also minimize the amount of fluid hose that will be charged at high voltage potential. MOUNTING 1. Mount the unit onto an appropriate structure in or near the spray booth using four bolts (7/16" minimum diameter). 2. Ground the unit by attaching the grounding cable provided to a suitable earth ground. PNEUMATIC CONNECTIONS 1. From a filtered and regulated air supply, connect 3/8" or 10mm OD tubing to the fitting labeled NOTE The air supply pressure to the AquaBlock 2 system must be between 85 and 95 psi (90 psi nominal). “AIR SUPPLY” on the top of the cabinet. 2. Connect 1/4" or 6mm OD tubing from the fitting labeled “HIGH VOLTAGE INTERLOCK” to the appropriate pressure switch connection on the power supply. When the cabinet door is open, the high voltage power supply is de-energized. PAINT SUPPLY 1. Connect 3/8" or 8mm OD tubing from the water based coating supply to the fitting labeled “FLUID INLET” on the top of the cabinet. ! CAUTION This connection uses a metal fitting which is grounded through the current meter. No other metal fittings should be used to replace plastic connections located on or in this cabinet. 11 LN-9902-00.3 AquaBlock 2 - Installation Ransburg ! CAUTION The last 18-24-inches of the paint supply hose connected to the fluid inlet of the enclosure must be made of a non-conductive material. This isolated fluid hose is required to ensure proper operation of the current meter. 2. Feed the 3/8-inch or 8mm OD paint line going to the spray applicator(s) through the slotted opening in the bottom of the cabinet. The tubing should be shielded tubing, such as Ransburg part number 74178-01, or if other tubing is used it should be covered with 1-inch (or equivalent) Polyurethane tubing from the connection inside of the AquaBlock 2 cabinet to the applicator(s). Connect the tubing to the fitting on the bottom of the 4-way shuttle assembly and the other end to the applicator(s). ! ! CAUTION Systems utilizing positive displacement pumps for the regulation of the fluid flow to the applicator(s) must be located after the AquaBlock 2 in the charged fluid stream. This is to avoid over-pressurization of the AquaBlock 2 system, or the paint tubing feeding the system, during the switching operation. This location requires that the pump and any other conductive objects attached to the pump be isolated from ground. Figures 4 and 5 illustrate basic examples of typical installations for the AquaBlock 2 system. Figure 4 shows a typical system with an isolated gear pump flow control system, and Figure 5 shows a typical system with an isolated flowmeter and fluid regulator flow control system. CAUTION The paint line exiting the AquaBlock 2 cabinet should not be broken, or contain additional connections, from the connection at the 4-way shuttle assembly to the applicator(s). If additional connections are required, for the addition of flow control system components, etc., special care must be taken to ensure that the connections do not pass close to ground sources that could cause current leakage or electrical arcing. Additionally the use of conductive com-ponents, such as metal flowmeters or regulators, should be limited as much as possible to decrease system capacitance as much as possible. LN-9902-00.3 12 AquaBlock 2 - Installation 19 71 71 60 64 65 34 30 38 30 59 34 38 30 30 59 Ransburg Figure 2: AquaBlock 2 Pneumatic and Fluid Schematic 13 LN-9902-00.3 AquaBlock 2 - Intstallation 61 68 5 20 65 66 13 11 39 60 Ransburg Figure 3: AquaBlock 2 Electrical Schematic LN-9902-00.3 14 AquaBlock 2 - Installation Ransburg Figure 4: AquaBlock 2 System W/Gear Pump 15 LN-9902-00.3 Ransburg AquaBlock 2 - Intstallation Figure 5: AquaBlock 2 System W/Flowmeter/Regulator LN-9902-00.3 16 AquaBlock 2 - Installation Ransburg AquaBlock 2 Installation Checklist oAll users must carefully read and understand the Safety Precautions and all instructions before using the AquaBlock 2 system. oInstallation must comply with appropriate local, state, and national codes governing ventilation, fire protection, operation, maintenance, and housekeeping. Refer to OSHA, NFPA-30, NFPA-33, and the customer's insurance requirements. o All coating materials, solvents, etc. used in the AquaBlock 2 system must have a flash point of equal to or above 100°F. oFiltration is required for the paint supply as well as any water or solvent supply connected to the system. oAll electrically conductive objects, with the exception of those required by the process, must be grounded. This includes all metallic fluid lines, fittings, etc. oAll connections to ground must be made individually from each component. oThe ground lug on the AquaBlock 2 cabinet must be connected to ground. oThe coating material supply to the AquaBlock 2 must be grounded. oAn 18–24-inch length of electrically non-conductive fluid line must be used between the grounded fluid supply and the AquaBlock 2 fluid inlet fitting. oThe high voltage interlock from the AquaBlock 2 assembly must be installed and functional. oMain air supply to the AquaBlock 2 cabinet must be 90 psi +/- 5 psi. oThe fluid inlet pressure at the AquaBlock 2 enclosure must never exceed 100 psi or be less than 20 psi. oThe electrostatic voltage must never exceed 90kV. oMaterial to be sprayed in not of an emulsion typed. 17 LN-9902-00.3 Ransburg AquaBlock 2 - Installation NOTES LN-9902-00.3 18 Ransburg AquaBlock 2 - Operation OPERATION START-UP NOTE Air Supply 1. Turn on the air supply to the AquaBlock 2 cabinet and adjust the air pressure to between 85 and 95 psi (90 psi nominal) at the inlet to the cabinet. Purging the Paint Supply Inlet and Outlet ! CAUTION The system may be flushed out with a blend of water and solvent (Butyl Cellosolve or Butyl Carbitol). Check with your coating supplier for recommended cleaning mixtures. DO NOT use tap water. Deionized water is acceptable. NOTE Fluid pressure (both paint and water supplies) at the paint inlet must not exceed 100 psi. 1. Connect the paint inlet line to a supply of flushing solvent. Disconnect the outlet paint line after the exit of the cabinet and turn on the water solvent mixture supply. Collect the water/solvent mixture in a grounded container for approximately sixty seconds to make sure any contaminates in the system are flushed out. Turn off the water/ solvent mixture supply and reconnect the paint line. Turn on the water/solvent mixture supply and open the trigger valve(s) to the applicator(s). Allow water/solvent mixture to flow through the AquaBlock 2 for 3-4 cycles of the 4-way Shuttle Assembly and turn off the trigger valve(s). 19 The paint supply pressure to the AquaBlock 2 must be above 20 psi to establish proper flow through the system and less than 100 psi to prevent leakage or damage. The supply pressure should be minimized to a suitable pressure to achieve required flow. 2. Check for leaks around all connections, inside and outside the system. 3. Turn the water/solvent mixture supply off and relieve the system of pressure. Disconnect the paint line from the water/solvent mixture supply and connect the paint supply line to the system. Charging the System With Paint 1. Turn the paint supply on to the system and open the trigger valve(s) to the applicator(s). Allow the paint to flow through the AquaBlock for 3-4 cycles of the 4-way Shuttle Assembly and turn off the trigger valve(s). Adjust the paint supply pressure to the system to between 20 and 100 psi. 2. The system is now ready for operation and high voltage may be turned on at the power supply. LN-9902-00.3 Ransburg AquaBlock 2 - Operation NOTES LN-9902-00.3 20 Ransburg AquaBlock 2 - Maintenance MAINTENANCE ! WARNING Prior to performing any maintenance on the AquaBlock 2, shut off, relieve, and lock out all pressure and power sources, including com-pressed air, flush material and coating supply systems, and high voltage power supplies. PERIODIC MAINTENANCE Shift/Daily 1. Without high voltage applied to the applicator(s) check outside and inside of the AquaBlock cabinet for any fluid leaks and correct as needed. 2. Flush the AquaBlock 2 fluid lines, cylinder, etc. with appropriate flushing solvents using normal color change procedures. NOTE The steady state current of the Aqua-Block 2 refers to the current reading when the 4-way shuttle is in one of the two end positions. The switching current refers to the AquaBlock 2 current when the 4-way shuttle is switching. 3. Open the AquaBlock 2 cabinet door and ensure free movement of 4-way Shuttle by pushing back and forth by hand. 4. Remove the eight (8) Quick-Disconnect Shields by turning counter-clockwise. 6. Clean the eight (8) Quick-Disconnects using an appropriate solvent and a soft rag or soft bristle brush. 7. Install the eight (8) Quick-Disconnect Shields by turning clockwise and hand tighten. 8. Close the AquaBlock 2 cabinet door. 9. With paint loaded into the AquaBlock 2 and high voltage applied to the applicator(s) check the steady state current of the AquaBlock 2 system on the current meter on the door of the cabinet(refer to "Current Meter" chart in the "Introduction" section). ! CAUTION The system may be flushed out with a blend of water and solvent. A water/solvent mixture (Butyl Cellosolve or Butyl Carbitol) should be left in the system when not in use. Check with your coating supplier for recommended cleaning mixtures. DO NOT USE TAP WATER. DEIONIZED WATER IS ACCEPTABLE. ! CAUTION Purging the system with compressed air only or a combination of compressed air and flushing fluid may leave deposits of dry coating material in the system which may cause damage to the seals and internal surfaces of the components. 5. Clean Quick-Disconnect Shields using appropriate solvent and a soft rag or soft bristle brush. 21 LN-9902-00.3 Ransburg AquaBlock 2 - Maintenance PREVENTIVE MAINTENANCE NOTE In the event of a system malfunction, a determination of the probable cause should be made using the "Troubleshooting Guide" in this section. The failed sub-assembly can then be easily replaced following the instructions below. Periodically inspect tubing and fittings for wear or damage, and replace as required. General Overall cleanliness of the AquaBlock 2 is key to maintaining voltage blocking capabilities and helping to ensure trouble free operation. The internal and external surfaces of the AquaBlock 2 should be cleaned periodically for efficient operation. 1. Coating material should be cleaned from the inside of the AquaBlock 2 enclosure immediately. Conductive coatings left on surfaces effect system operation and may lead to poor system performance. 2. Ensure proper operation of interlocks – High Voltage, AquaBlock 2 pneumatic circuit, etc. 4-Way Shuttle Assembly The main components of the 4-Way Shuttle Assembly include the rodless cylinder, and the four (4) pairs of quick disconnects. The rodless cylinder is not field repairable. Care should be taken to ensure their cleanliness and proper use and they should provide a long service life. Should service or repair be required the rodless cylinder should be returned to Ransburg in Angola, IN. The quick disconnects are serviceable. (See "Procedure for Rebuilding Male and Female AquaBlock 2 Disconnects" in the "Maintenance" section.) 1. Coating material should be cleaned from the LN-9902-00.3 face of the rodless cylinder immediately. Care should be taken to ensure that any cleaning solvents used do not enter any of the openings of the rodless cylinder. 2. Ensure proper alignment of quick disconnects at each end of the shuttle stroke. Jack screws are provided for fine adjustment when required. (See "Adjustment Procedure" in the "Maintenance" section.) 3. Inspect inlet and outlet tubing for abrasion or wear. Cylinder Assembly The cylinder/reservoir assembly [60] has a double piston. The pistons are fed by the 4-way shuttle assembly. This sub-assembly can be easily replaced for repair or preventive maintenance. The cylinder/reservoir assembly should be repaired or replaced approximately every 6 months. This frequency may be increased in applications using abrasive coatings. Removal 1. Thoroughly flush the coating material from the system and relieve the fluid pressure. 2. Disconnect the fluid tubes at each end of the cylinder/reservoir. 3. Disconnect the pneumatic end of stroke signal lines from the cylinder/reservoir center section. 4. Loosen and remove the two (2) mounting screws [29] and remove the assembly. Disassembly (Refer to Figure 6) 1. Drain as much purge material as possible from each reservoir. 2. Place the assembly’s mounting plate [2] on a flat surface and unscrew each reservoir [10] using the RPM-419, wrench assembly. 3. Loosen both jam nuts [6] at either end of the connecting rod [5] and unscrew each piston assembly. 22 AquaBlock 2 - Maintenance NOTE During removal of the reservoirs, one of the pistons may unscrew itself from the connecting rod. If this occurs, install the connecting rod and pull the piston from the reservoir. If piston cannot be pulled out, place the reservoir on a flat surface. Apply air pressure as required to the fluid port until piston becomes free. DO NOT USE EXCESSIVE PRESSURE! 4. The piston [4] assembly consists of the piston, piston seal [9], seal retaining plate [7], and o-ring [8]. Remove the seal retaining plates by pulling each assembly apart with a twisting motion. 5. Remove the piston seals and discard them. 6. Remove the o-rings located in the seal retaining plate and inspect them for swelling or damage. If the o-rings have swollen, they should be replaced. RE-ASSEMBLY (See Figures 6, 7b, and 7c) 1. Thoroughly clean all traces of coating material, dirt, etc., from all components. ! CAUTION Cleanliness of the cylinder/reservoir assembly is essential to its operation as a voltage blocking device. After the components have been thoroughly cleaned, they must be wiped down with a non-polar solvent (such as high flash Naphtha) to reduce any amount of conductive residue. 2. Inspect the ceramic sleeves inside each reservoir [10] for excessive wear. If the sleeves contain deep scoring, then the reservoir should be replaced. 3. Install piston seals [9], o-ring end first, onto each piston [4]. 23 Ransburg 4. Install o-rings [8] into grooves on each seal retaining plates [7]. 5. Install connecting rod [5] through the center section [1] and thread the piston assemblies [4, 7, 8, and 9] onto each end. Tighten the piston assemblies securely by hand, then tighten each jam nut [6]. 6. Slide one (1) of the piston assemblies, about half way, into one of the reservoirs [10] by pushing squarely on the opposite piston assembly. Carefully thread the reservoir onto the center section and tighten securely using the RPM-419 wrench. Push the exposed piston unit until it bottoms against the center section. Carefully thread the remaining reservoir onto the center section and tighten securely with the wrench. 7. Install the cylinder/reservoir assembly using the two (2) nylon mounting screws [29] provided with the unit. 8. Connect the pneumatic end-of-stroke signal lines to the fittings in the cylinder/reservoir center section. 9. Connect the fluid tubes at each end of the cylinder/reservoir. Tighten the tube fitting nuts securely and slide the polyurethane tubing over each fitting. 10. Turn on the main air supply. 11. The unit is now ready to resume operation. 12. Follow "Start-Up Procedures" and check for leaks. NOTE If fluid flow cannot be established through the system, then the cylinder/reservoir assembly may be "out of phase" with the shuttle block assembly. Interchange the pneumatic end-of-stroke signal lines at the cylinder/reservoir center section to obtain flow. LN-9902-00.3 Ransburg 10 3 2 4 8 9 7 6 1 5 AquaBlock 2 - Maintenance Figure 6: LKIT0018-06 Ceramic Cylinder Assembly (200cc) LN-9902-00.3 24 AquaBlock 2 - Maintenance Ransburg LKIT0018-06 200CC CERAMIC CYLINDER ASSEMBLY PARTS LIST (Figure 6) Item # 1 2 3 4 5 6 7 8 9 10 25 Part # LAQU0024-00 LAQU0013-00 LSFA0017-00 LAQU0010-00 LAQU0012-02 LSFA0016-00 LAQU0011-00 LSOR0007-03 LAQU0027-00 77725-02 Description Center Section, Machined, Cylinder/Reservoir Plate, Machined, Cylinder Support SFHC Screw, 1/4-20 x 1/2" Lg. Piston, Machined Connecting Rod, Machined, Cylinder/Reservoir Jam Nut, 1.06-20 UN, Nylon Plate, Machined, Piston Seal O-Ring, 60 Duro Seal, O-Ring Loaded, Cylinder/Reservoir Piston Cylinder/Reservoir Assembly, Paint Qty 1 1 4 2 1 2 2 2 2 2 LN-9902-00.3 Ransburg AquaBlock 2 - Maintenance TOOLS REQUIRED TO REBUILD DISCONNECTS 30mm Socket (1 3/16"), 7mm Socket (9/32"), Awl or Rod (1.5mm Diameter (1/16"), Snap Ring Pliers (Internal Type) PROCEDURE FOR REBUILDING MALE & FEMALE AQUABLOCK 2 DISCONNECTS Female Disconnect After removal of the disconnect from the Aquablock assembly, carefully remove the coiled spring around the body. Inspect the spring for any damage. If there are any flat spots or kinks to it, replace the part. Hold the small end of disconnect in a vise with non-marking jaws. Using a 30mm (1 3/16) wrench or socket, unscrew the packing retainer from the main body. Using your finger or a non-metallic device, push the assembled stem LN-9902-00.3 parts out of the main body from the large end. Remove the o-ring from the groove near the large end of the body. Disassemble the seal carrier assembly as follows: Using an awl or other similar devise, insert it into the hole located in the stem through the spring as a holding devise. Use a 7mm (9/32") nut driver or socket to unscrew the hex nut. Remove stem through the front. Remove the piston packing (black rubber piece) from the seal carrier and replace with a new part. Remove the white spring energized u-cup seal on the exterior of the seal carrier body. Do not damage the sealing surface that it is located on. Replace the seal with a new part. 26 AquaBlock 2 - Maintenance Ransburg Thoroughly clean all parts and make sure they are dry before assembling. Install the new piston packing (black rubber piece) into the front opening, large end first. Make sure the top is even and a little above the metal body. Reassemble the white spring energized seal onto the seal carrier with the spring side facing to the open bore end. Start at one spot and using both thumbs, push evenly on both sides until it snaps on. (Any damage to this seal during the assembly process will result in a leak.) Insert the stem from the rubber side end. Slide the spring over the stem and compress the spring enough to insert an awl through the stem hole. Compressing the spring will aid when installing the hex nut. Install the spring retainer onto the stem with the legs toward the seal carrier side. Apply a small amount of blue adhesive 243 (7969-03) to the first one or two threads only of the hex nut and install until it bottoms on the shaft to a final torque of 10-15 lbs•in. (1.13-1.69 Nm) Reinstall the o-ring into the groove in the main body. Lightly lubricate both the exterior body of the seal carrier assembly and the inside diameter of the smooth bore in the female body. Slide the seal carrier assembly straight into the female body, seal carrier end first until it stops on a shoulder near the open end of the part. Install the o-ring onto the packing retainer. Apply a small amount of red adhesive 271 (7969-02) to the middle threads. Put the female disconnect into a vise with non-marking jaws and tighten packing retainer until it stops on the body shoulder. Install coiled spring into groove around the body. Figure 7: Female Disconnect 27 LN-9902-00.3 Ransburg AquaBlock 2 - Maintenance Disassembly of Female Disconnect LN-9902-00.3 28 AquaBlock 2 - Maintenance Ransburg Reassembly of Female Disconnect 29 LN-9902-00.3 Ransburg AquaBlock 2 - Maintenance Reassembly of Female Disconnect (Continued) Disassembly of Male Disconnect Inspect the white face seal in the groove on threaded side of the body. If there is no damage, do not replace. To replace, pry out of groove. Do not damage threads or seating surfaces. Using a snap ring pliers, remove snap ring holding seat assembly into the body. Remove piston assembly, spring, and spring retainer from the threaded end. Thoroughly clean all parts and make sure they are dry before assembling. Inspect the male body front face and the interior seating face behind the front face. If any damage is observed, the body needs to be replaced. Inspect the rubber of the piston assembly. Any pits, scratches, tears; replace with new. Insert piston into the body followed by the spring and spring retainer. The small end of the retainer goes into the spring. Reinstall the snap ring. Make sure it is fully into the groove. SPRING CLIP A12098-00 SPRING RETAINER A11392-00 PISTON ASSEMBLY A12099-00 SPRING A12122-00 SEAT 79001-50 0-RING A12097-00 BODY INSPECT FOR PITS, SCRATCHES AND TEARS VISUALLY INSPECT THIS AREA TO ENSURE THAT THERE ARE NO NICKS OR DAMAGE. Figure 8: Male Disconnect LN-9902-00.3 30 AquaBlock 2 - Maintenance Disassembly and Reassembly of Male Disconnect Ransburg REMOVAL AND INSTALLATION OF MALE AND FEMALE DISCONNECTS FROM AQUABLOCK 2 ASSEMBLY Male Disconnect Remove the white plastic shields surrounding the male disconnects. (Male disconnects are located on the center sliding plastic block.) Using a 30mm (1 316") socket or wrench, unscrew disconnects. Examine the front face metal and rubber parts as well as the white face seal on the threaded end. If there are any signs of wear, nick, pits, gouges, or if the seal has been leaking, replace the assembly with new or proceed to the "Procedure for Rebuilding Male and Female AquaBlock 2 Disconnects" in the "Maintenance" section in this manual. To reinstall, thread the assembly into the plastic block until it stops, then final torque to 50-60 lbs•in. (5.65-6.78 Nm). Reinstall the white plastic shields. Female Disconnect Remove the white plastic shields surrounding the female disconnects (female disconnects are located on the outer stationary plastic blocks with the tubing attached). Using a 30mm socket or wrench, unscrew disconnects. Examine the front face metal and rubber parts as well as the bore on the threaded end. If there is any signs of wear, nick, pits, gouges or if the seal has been leaking, replace the assembly with new or proceed to the "Procedure for Rebuilding Male and Female AquaBlock 2 Disconnects" in the "Maintenance" section in this manual. 31 LN-9902-00.3 Ransburg AquaBlock 2 - Maintenance To reinstall, the plastic threaded nipples (that the disconnect will attach to) must have all residual pipe tape removed, then replaced. Remove all tape from the threads carefully, do not damage threads or o-rings. Apply new thread tape to threads only. 6-8 complete turns of tape is required, more tape may damage threads and less tape may result in leakage of the assembly. While holding the part with the threaded nipple tight against the plastic block, insert the female disconnect, thread onto the nipple by hand. (It may be helpful to use the socket only with no ratchet attached.) Tighten until the disconnect gets close to meeting the plastic block. (It is best to make 1/4 or less turns at a time when tightening.) At this time, insert a .030 (0.76mm) feeler gage or pin between the metal flange of the disconnect and the plastic block. Tighten disconnect until a slight drag can be felt on the feeler or pin gage. Make sure nipple part is pushed up against the plastic block when checking the gap. Add 6-8 turns of new tape. Remove all old tape carefully. Removal of Disconnects LN-9902-00.3 32 AquaBlock 2 - Maintenance Ransburg ALIGNMENT PROCEDURE FOR DISCONNECT COUPLINGS Start by loosening the six (6) plastic hex screws on the block that holds the female disconnects. Loosen them only enough to allow unit to move slightly. Retract jack screws on the same plastic block with a 6mm long shank hex key or “T” type wrench. Unit should be free to float at this point. Using your hand, push the male disconnect block assembly to engage fully into the female disconnects. While holding the connection in place, tighten the four corner hex head screws of the female block assembly. Tighten lightly with a ½” end wrench. Tighten the remaining four (4) screws equally as light. Allow the disconnects to separate, then re-engage them. If a metal scraping sound is heard or they are hard to engage, locate the area where the parts are interfering. If it is at the top or bottom, the eight hex head bolts with have 33 to be loosened and the block moved up or down slightly. Use the same tightening procedure as stated above. If the interference is side to side the appropriate jack screw will have to be tightened or loosened. Re-engage the disconnects and recheck. This procedure may have to be preformed several times to achieve proper alignment. A slight interference is acceptable. The female disconnect, if properly installed with the .030" (0.76mm) gap, is floating and will allow some mis-alignment and still function well. Perform the same procedure for the opposite set of disconnects. If, when finished, the disconnects fully mate when pushed together by hand, the alignment is complete. Do not tighten the six (6) mounting screws any further when finished. LN-9902-00.3 Ransburg AquaBlock 2 - Maintenance NOTES LN-9902-00.3 34 AquaBlock 2 - Maintenance Ransburg TROUBLESHOOTING GUIDE General Problem Possible Causes Corrective Action No Paint Flow 1. Quick-disconnect not engaging fully 2. Low or no paint pressure 1. Determine why the quick-disconnect is not engaging and remove obstruction. Ensure quick-disconnect shields are fully installed. Replace quick-discount(s). 2. Ensure that paint supply pressure is above 20 psi. 3. Contamination in cylinder 3. Replace or repair cylinder 4. Low air pressure 4. Ensure that air pressure is set to 90 psi +/-5 psi. 1. Low pressure in the paint supply system. 2. Contamination in cylinder 1. Increase paint supply pressure above 20 psi. 1.Over-pressure 1. Decrease paint supply pressure below 120 psi. 2. Worn or damaged seal(s) 2. Replace quick-disconnect(s). 3. Quick-disconnect misaligned 3. Align quick-disconnect(s). 4. Dry material between seal and seat 4. Repair or replace disconnect(s). Cylinder Leakage 1. Worn or damaged piston seal(s) 1. Replace or repair cylinder. High Current 1. High voltage shields missing 1. Install high voltage shields ensuring that they are fully installed. 2. Clean all surfaces with a strong solvent and rewipe surface with a non-polar solvent. Low Paint Flow Quick-Disconnect Leakage 2. Contaminated component surfaces inside AquaBlock 2 cabinet 3. Cylinder leakage 4. Pin hole in tubing and/or fitting 5. Fluid leaking from tubing and/or fittings 6. Polyurethane tube shields missing from tubing 7. Contaminated quick- disconnect shields 35 2. Replace quick-disconnect(s). 3. Replace or repair cylinder. 4. Replace pin holed tube and/or fitting and clean all contaminated surface. 5. Tighten or replace fitting and clean all contaminated surface. 6. Install polyurethane tube shields. 7. Clean shields or replace. LN-9902-00.3 Ransburg AquaBlock 2 - Maintenance TROUBLESHOOTING GUIDE (Cont.) General Problem Possible Causes Corrective Action No Shuttle 1. Faulty 4-way pneumatic 1. Replace 4-way pneumatic valve. valve 2. Cylinder not reaching end of 2. Replace or repair cylinder. stroke 3. Door safety switch not fully 3. Close door tight, replace switch. engaged or faulty Slow Shuttle 1. Low air pressure LN-9902-00.3 1. Ensure that air pressure is set to 90 psi +/- 5 psi. 36 Ransburg AquaBlock 2 - Parts Identification PARTS IDENTIFICATION THE SCHEMATIC LABEL OF THIS KIT IS INSTALLED ON THE INSIDE OF THE DOOR. 1 15 17 14 16 DOOR LATCH ASSEMBLY 2 REQ'D. Figure 9a: AquaBlock 2 Assembly Parts Identification 37 LN-9902-00.3 Ransburg AquaBlock 2 - Parts Identification ** FLUID INLET 18 INCHES ** BOTTOM LEFT AND RIGHT PORTS 17 INCHES EACH 32 INCHES REF. ** TOP LEFT AND RIGHT PORTS 16 1/2 INCHES ** TOP LEFT PORT TO TOP RIGHT PORT 29 INCHES ** RIGHT CYLINDER TO TOP RIGHT PORT 12 1/2 INCHES SECTION A-A Figure 9b: AquaBlock 2 Assembly Parts Identification LN-9902-00.3 38 32 39 BACK TORQUE TO 30-35 LBS-IN 4 PLACES 6 PLACES FRONT TORQUE TO 30-35 LBS-IN 6 PLACES SIDE Ransburg Figure 9c: AquaBlock 2 Assembly Parts Identification LN-9902-00.3 AquaBlock 2 - Parts Identification TORQUE TO 15 - 20 LBS-IN 4X TORQUE TO 20 - 25 LBS-IN 4X Ransburg Figure 9d: AquaBlock 2 Assembly Parts Identification LN-9902-00.3 40 41 TORQUE TO 12-15 LBS-IN 6X (1.36-1.69 Nm) TORQUE TO 8-10 LBS-IN 8X (.90-1.13 Nm) TORQUE TO 50 - 60 LBS-IN 4X (5.65-6.78 Nm) AquaBlock 2 - Parts Identification Ransburg Figure 9e: AquaBlock 2 Assembly Parts Identification LN-9902-00.3 TORQUE TO 30 - 35 LBS-IN 6 PLACES 48 57 LN-9902-00.3 58 APPLY TEFLON THREAD TAPE 6-8 WRAPS 4 PLACES 50 53 49 52 51 46 54 47 USED FOR FINE ADJUSTMENT WHEN REQUIRED 59 .030" SET THIS GAP USING A FEELER GAUGE DURING ASSEMBLY 4 PLACES Ransburg AquaBlock 2 - Parts Identification Figure 9f: AquaBlock 2 Assembly Parts Identification 42 AquaBlock 2 - Parts Identification Ransburg A12148-XX AQUABLOCK 2 PARTS LIST (Figures 9a, 9b, 9c, 9d, 9e, and 9f) Item # Part # 1 A12112-00 2 A12143-00 3 A12228-00 4 TRM-35-038 5 70695-00 6 7486-13 7 7734-06 8 SS-655-ZN 9 7734-07 10 7733-14 11 LAQU0029-00 12 7486-32 13 SSW-4010 14 LAQU0022-00 15 LSFA0001-16C 16 LAQU0021-00 17 LSFA0018-00 18 7730-20F 19 SSF-8027 20 LSMP0001-00 21 LSMP0002-00 22 LSMP0003-00 23 LS0122-00 24 LAQU0016-00 25 7567-01 26 TR-SSF-281 27 A12095-00 28 20559-09 29 LSFA0021-32C 30 A12113-00 31 A12114-00 32 A12115-00 33 79001-06 34 A12116-00 35 A12227-00 36 A12117-00 37 A12118-00 38 A12119-00 39 A12120-00 40 A12121-00 41---- 42 A12101-00 43 A12123-00 44 A12124-00 45 A12125-00 46 A12126-00 47 A12146-00 48 A12127-00 49 A12128-00 50 A12129-00 51 A12130-00 52 79001-37 53 A12131-00 54 A12109-00 43 Description Enclosure, AquaBlock 2 Label, Enclosure, AquaBlock 2 Label Kit, AquaBlock 2 Label, Ground Stud, Grounding Flat Washer, 1/3" Medium Lock Washer, 1/4" Helical Spring Nut, 1/4-20 UNC Hex Lock Washer, 5/16" Helical Spring Nut, 5/16-18 UNC Hex Meter, AquaBlock 0-100 Microamp Current Flat Washer, #4 Spark Gap, Neon Lamp Plate, Machined, Enclosure Door, Retaining Screw, 1/4-20 X 1/2" Lg., Nylon Pan Head Knob, Machined, Enclosure Door, Retaining Washer, Machined, Knob Retaining Screw, #10-32 UNF X 5/8" Lg., Slotted Round Head Nut, #10-32 Nylon, Lock Valve, Door Interlock, 3-Way Valve Push Button, Air Valve Actuator Angle Bracket, Air Valve Mounting Breather Vent, 1/8" NPT Washer, Machined, Fluid Line Grounding Lock Washer, #6 External Tooth Screw, #6-32 X 1/8" Lg., Pan Head Back Panel, AquaBlock 2 Flat Washer, 3/8" Nylon Screw, 3/8-16 X 1" Lg., Socket Head Cap, Nylon Base Plate, AquaBlock 2 Bolt, M12 X 1.75", 70mm Lg., Glass Filled Nylon Bolt, M12 X 1.75", 40mm Lg., Glass Filled Nylon O-Ring, Solvent Proof Rodless Cylinder, AquaBlock 2 Pipe Plug, 1/8-28 BSPT Screw, M6 X 1", 50mm Lg., Socket Head Cap, Stainless Steel Adapter Block, Carriage, AquaBlock 2 Screw, M6 X 1", 25mm Lg., Socket Head Cap, Stainless Steel Center Block, AquaBlock 2 Bolt, M8 X 1.25", 30mm Lg., Glass Filled Nylon ---- Quick-Disconnect, Male, AquaBlock 2 Shield, Male, Quick-Disconnect, AquaBlock 2 Shield, Center Block, AquaBlock 2 Screw, M6 X 1", 30mm Lg., Fillister Hd., Nylon End Block, AquaBlock 2 Set Screw, M12 X 1.75", 20mm Lg., Glass Filled Nylon Bolt, M8 X 1.25", 50mm Lg., Glass Filled Nylon Shield, End Block AquaBlock 2 Bolt, M6 X 1", 12mm Lg., Nylon Holder, Female Quick-Disconnet, AquaBlock 2 O-Ring, Solvent Proof Holder Nut, Female Quick-Disconnect, AquaBlock 2 Quick-Disconnect, Female, AquaBlock 2 Qty 1 1 1 1 1 1 1 1 1 1 1 4 1 2 4 2 2 2 2 1 1 1 1 1 1 1 1 6 8 1 6 4 2 1 2 4 1 4 1 6 -4 4 2 8 2 4 12 2 4 4 4 4 4 LN-9902-00.3 Ransburg AquaBlock 2 - Parts Identification A12148-XX AQUABLOCK 2 PARTS LIST (Cont.) (Figures 9a, 9b, 9c, 9d, 9e, and 9f) Item # Part # 55 56 57 58 59 60 61 62 63 64 65 66 67 68 69 70 71 72 73 74 75 76 77 78 79 80 81 82 83 84 85 * 86 * 87 ** 88 ** 89 90 91 A12132-00 A12134-00 79001-01 79001-14 A12135-00 LKIT0018-06 A12096-00 7567-05 7958-48C 41-FBR-1000 A12137-00 A12141-00 A12149-00 70539-00 Table A - "A" A12150-00 A12151-00 A12152-00 A12153-00 A12154-00 A12155-00 A12156-00 A12157-00 A12158-00 A12159-00 14157-09 A12161-00 A12136-00 A12139-00 78321-00 A12144-03 A12145-01 A12144-01 78326-00 A12147-01 A10841-01 LSMP0007-00 Description Qty Fitting, Elbow, Female Quick-Disconnect, AquaBlock 2 Fitting, Y (120), Female Quick-Disconnect O-Ring, Solvent Proof O-Ring, Solvent Proof Shield, Female Quick-Disconnect, AquaBlock 2 220cc Ceramic Coated Cylinder Assembly Kit, No Fittings Valve, 4-Way, 2-Position, Double Air Pilot Lock Washer, 1/4" External Tooth Screw, 1/4-20 UNC X 1.5" Lg., Hex Head Cap Breather Vent, 1/4" NPT Fitting, 4-Way, Restricted Air Valve, 3-Way, Normally Closed Assembly, Ground Cable, AquaBlock 2 Grounding Assembly (Not Shown) Kit, Fittings and Tubing, AquaBlock 2 Fitting, In-Line Y, 10mm T Fitting, Bulkhead, 10mm T Fitting, Elbow, 10mm T X 1/4" NPTM Fitting, Universal, Restricted Outlet, 8mm T X 1/4" NPTM Fitting, Elbow, 6mm T X 1/8" NPTM Fitting, Reducer Elbow, 10mm T X 6mm T Fitting, Bulkhead, 6mm T Fitting, Tee, 6mm T Fitting, Tee, 6mm T X 1/8" NPTM Fitting, NY, 8mm T X 3/8" NPTM Fitting, Elbow, 8mm T x 1/8" NPTM Fitting, NY, Elbow, 6mm T X 1/4" NPTM Fitting, NY, 8mm T X 3/8" AN Fitting, Bulkhead, 8mm T, Stainless Steel Tubing, Nylon, 10mm, Natural Tubing, Nylon, 8mm, Green Tubing, Nylon, 8mm, Yellow Tubing, Nylon, 6mm, Green Tubing, Nylon, 6mm, Yellow Tubing, Nylon, 6mm, Natural Tubing, PFA, 8mm Tubing, Tygon, 3/4" ID X 1" OD 2 2 4 4 4 1 1 2 2 3 1 1 1 1 1 1 1 1 2 5 1 1 1 2 2 2 2 8 1 10.5" 16" 16" 44.5" 44.5" 24.75" 111" 161" * Both tubes must be equal in length. **Both tubes must be equal in length. TABLE A - Fitting Selection (Figure 10) Dash # Description "A" 01 Assembly, AquaBlock 2, Metric A12140-01 02 Assembly, AquaBlock 2, Fractional A12140-02 LN-9902-00.3 44 Ransburg 8 1 9 2 10 3 11 4 12 5 13 6 14 7 AquaBlock 2 - Parts Identification Figure 10: A12140-01 Fittings (Metric) and A12140-02 Fittings (Fractional) 45 LN-9902-00.3 Ransburg AquaBlock 2 - Parts Identification A12140-01 FITTINGS (METRIC) AND A12140-02 FITTINGS (FRACTIONAL) - PARTS LIST (Figure 10) Item # A12140-01 (Metric) A12140-02 (Fractional) Description Qty 1 A12150-00 A12163-00 Fitting, Inline Y, 10mm or 3/8", T 1 2 A12150-00 A12164-00 Fitting, Bulkhead, 10mm or 3/8", T 1 3 A12152-00 A12165-00 Fitting, Elbow, 10mm or 3/8", T X 1/4" NPTM 1 4 A12153-00 A12153-00 Fitting, Universal, Restricted Outlet, 8mm or 5/16", 2 T X 1/4" NPTM 5 A12154-00 A12167-00 Fitting, Elbow, 6mm or 1/4", T X 1/8" NPTM 5 6 A12155-00 A12168-00 Fitting, Reducer Elbow, 10mm or 3/8", 1 T X 6mm or 1/4", T 7 A12156-00 A12169-00 Fitting, Bulkhead, 6mm or 1/4", T 1 8 A12157-00 A12170-00 Fitting, Tee, 6mm or 1/4", T 1 9 A12158-00 A12171-00 Fitting, Tee, 6mm or 1/4", T X 1/8" NPTM 2 10 A12159-00 A12172-00 Fitting, Nylon, 8mm or 3/8", T X 3/8" NPTM 2 11 14157-09 14187-09 Fitting, Elbow, 8mm or 5/16", T X 1/8" NPTM 2 12 A12161-00 LSFI0056-00 Fitting, Nylon, Elbow, 6mm or 1/4", T X 1/4" NPTM 2 13 A12136-00 LSFI0022-07 Fitting, Nylon, 8mm or 5/16", T X 3/8" AN 8 14 A12139-00 41-FTC-1003 Fitting, Stainless Steel, Bulkhead, 8mm or 3/8", T 1 15 78321-00 A10608-04 Tubing, Nylon, 10mm or 3/8", Natural (Not Shown) 10.5" 16 A12144-03 A12144-03 Tubing, Nylon, 8mm or 5/16", Green (Not Shown) 16" 17 A12145-01 A12145-01 Tubing, Nylon, 8mm or 5/16", Yellow (Not Shown) 16" 18 A12144-01 A12144-02 Tubing, Nylon, 6mm or 1/4", Green (Not Shown) 44.5" 19 78326-00 A10609-02 Tubing, Nylon, 6mm or 1/4", Yellow (Not Shown) 44.5" 20 A12147-01 7113-11 Tubing, Nylon, 6mm or 1/4", Natural (Not Shown) 24.75" 21 A10841-01 76698-04 Tubing, PFA, 8mm or 3/8" (Not Shown) 111" LN-9902-00.3 Cut Lengths 10.5" 16" 16" 9.5" + 35" 9.5" + 35" 5.5" + 10.5" + 1.25" + 7.5" 19" + 33" + 33" + 13" + 13" 46 AquaBlock 2 - Parts Identification Ransburg AQUABLOCK 2 RECOMMENDED SPARE PARTS Part # LAQU0027-00 LSOR0007-03 79001-37 79001-01 79001-14 77725-02 A12127-00 A12101-00 A12122-00 A12109-00 A12096-00 A12141-00 Description Seal, O-Ring Loaded O-Ring, Solvent Resistant O-Ring, Solvent Proof O-Ring, Solvent Proof O-Ring, Solvent Proof Cylinder Resistor Assembly, Paint Bolt, M12 X 1.25, 50mm, Lg., Gas Filled Nylon Quick-Disconnect, Male Seat, Quick-Disconnect Quick-Disconnect, Female Valve, 4-Way, 2-Position, Double Air Pilot Air Valve, 3-Way, Normally Closed Qty 2 2 4 4 4 0-1 0-6 0-4 0-4 0-4 0-1 0-1 A12101-00 MALE DISCONNECT ASSEMBLY PARTS Part # Description A12097-00Body 79001-50 O-Ring, Solvent Proof A12122-00Seat A11392-00 Piston Assembly A12099-00Spring A12098-00 Spring Retainer A12100-00 Spring Clip Qty 0.1 0-1 0-1 2 0-1 0-1 2 A12109-00 FEMALE DISCONNECT ASSEMBLY PARTS Part # Description 79001-48 O-Ring, Solvent Proof A12102-00Body A12201-00Spring A12105-00Stem A12391-00 Piston Packing 79001-49 O-Ring, Solvent Proof A12106-00 Seal Carrier A12107-00Spring A12110-00 Hex Nut A12104-00 Packing Retainer A12105-00 U-Cup Seal 47 Qty 0-1 0-1 2 2 2 0-1 0-1 0-1 2 0-1 2 LN-9902-00.3 Ransburg AquaBlock 2 - Parts Identification ACCESSORIES Thread Tape Petroleum Jelly Thread Sealant White Paste (7969-10) Adhesive 271 Red (7969-02 Adhesive 243 Blue (7969-03) LN-9902-00.3 48 Ransburg AquaBlock 2 - Warranty Policies WARRANTY POLICIES LIMITED WARRANTY Ransburg will replace or repair without charge any part and/or equipment that fails within the specified time (see below) because of faulty workmanship or material, provided that the equipment has been used and maintained in accordance with Ransburg’s written safety and operating instructions, and has been used under normal operating conditions. Normal wear items are excluded. THE USE OF OTHER THAN RANSBURG APPROVED PARTS VOIDS ALL WARRANTIES. SPARE PARTS: One hundred and eighty (180) days from date of purchase, except for rebuilt parts (any part number ending in “R”) for which the warranty period is ninety (90) days. EQUIPMENT: When purchased as a complete unit, (example: guns, power supplies, control units, etc.), is one (1) year from date of purchase. WRAPPING THE APPLICATOR IN PLASTIC WILL VOID THIS WARRANTY. 49 RANSBURG’S ONLY OBLIGATION UNDER THIS WARRANTY IS TO REPLACE PARTS THAT HAVE FAILED BECAUSE OF FAULTY WORKMANSHIP OR MATERIALS. THERE ARE NO IMPLIED WARRANTIES NOR WARRANTIES OF EITHER MERCHANTABILITY OR FITNESS FOR A PARTICULAR PURPOSE. RANSBURG ASSUMES NO LIABILITY FOR INJURY, DAMAGE TO PROPERTY OR FOR CONSEQUENTIAL DAMAGES FOR LOSS OF GOODWILL OR PRODUCTION OR INCOME, WHICH RESULT FROM USE OR MISUSE OF THE EQUIPMENT BY PURCHASER OR OTHERS. EXCLUSIONS: If, in Ransburg’s opinion the warranty item in question, or other items damaged by this part was improperly installed, operated or maintained, Ransburg will assume no responsibility for repair or replacement of the item or items. The purchaser, therefore will assume all responsibility for any cost of repair or replacement and service related costs if applicable. LN-9902-00.3 Ransburg MANUAL CHANGE SUMMARY This manual was published to supercede Service Manual LN-9902-00.2, AquaBlock 2 to make the following changes: 1. Change logo. LN-9902-00.3 Service Manual Price: $30.00 (U.S.) Manufacturing 1910 North Wayne Street Angola, Indiana 46703-9100 Telephone: 260/665-8800 Fax: 260/665-8516 www.ransburg.com Technical/Service Assistance Telephone: 800/ 233-3366 Fax: 419/ 470-2071 Technical Support Representative will direct you to the appropriate telephone number for ordering Spare Parts. © 2013 Ransburg. All rights reserved. Models and specifications subject to change without notice. Form No. LN-9902-00.3 Litho in U.S.A. 02/13