1
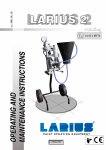
11 - 11
Ed. 007
AIRLESS PNEUMATIC PUMP
OPERATING AND
MAINTENANCE INSTRUCTIONS
II 2 G c IIB T6
PA I N T
S P R AY I N G
ENGLISH
EQUIPMENT
Due to a constant product improvement programme, the factory reserves the right to modify technical details
mentioned in this manual without prior notice.
This manual is to be considered as an English language translation of the original manual in Italian. The
manufacturer shall bear no responsibility for any damages or inconveniences that may arise due to the incorrect
translation of the instructions contained within the original manual in Italian.
NOVA 45:1/60:1
TECHNICAL DATA..............................................p.2
N DESCRIPTION FOR EXPLOSIVE AREAS.........p.9
O DISASSEMBLY OF THE PNEUMATIC MOTOR.. p.12
P DISASSEMBLY OF THE PUMPING GROUP......p.17
DESCRIPTION OF THE EQUIPMENT...............p.4
Q EXPLODED VIEW FOR STAINLESS STEEL
INTRODUCTION........................................................p.1
A
B
C
D
E
F
G
H
I
L
M
WORKING PRINCIPLE.......................................p.2
TRANSPORT AND UNPACKING.......................p.5
PUMPING GROUP..............................................p.20
SAFETY RULES..................................................p.5
CONDITIONS OF GUARANTEE.........................p.6
R EXPLODED VIEW FOR MOTOR GROUP..........p.22
S EXPLODED VIEW FOR CARBON STEEL
TYPICAL INSTALLATION....................................p.6
PUMPING GROUP..............................................p.24
T EXPLODED VIEW FOR HIGH PRESSURE LINE
SETTING-UP.......................................................p.7
WORKING...........................................................p.7
FILTER.................................................................p.26
CLEANING AT THE END OF THE WORK..........p.8
U COMPLETE HANDTRUCK.................................p.28
V AIR GROUP COMPLETE....................................p.29
Z ACCESSORIES...................................................p.30
ROUTINE MAINTENANCE.................................p.8
PROBLEMS AND SOLUTIONS..........................p.9
Read this operator’s
manual carefully before
using the equipment. An
improper use of this machine can cause injuries
to people or things.
It indicates an accident risk or serious
damage to equipment if this warning
is not followed.
It indicates a fire
or explosion risk if
this warning is not
followed.
It indicates wound and
finger squashing risk
due to movable parts in
the equipment.
It is obligatory to wear suitable It indicates imporclothing as gloves, goggles and tant recommendations about dispoface shield.
sal andrecycling
process of products
in accordance with
the environmental
regulations.
WE ADVISE THE USE OF THIS EQUIPMENT ONLY BY PROFESSIONAL OPERATORS.
ONLY USE THIS MACHINE FOR USAGE SPECIFICALLY MENTIONED IN THIS MANUAL.
Thank you for choosing a LARIUS S.R.L. product. As well as the product purchased,
you will receive a range of support services enabling you to achieve the results desired,
quickly and professionally.
1
English
AIRLESS PNEUMATIC PUMPS FOR SPRAY PAINTING
NOVA 45:1/60:1
English
A WORKING PRINCIPLE
So doing the pump sucks the fluid and pushes it to the outlet.
The ratio 45:1 (o 60:1) means that the outlet pressure of fluid is
45 (o 60) times higher than the pump feed air pressure.
NOVA pump 45:1 (or 60:1) is a pneumatic pump to be used in
the high pressure painting without air (Airless) or for transferring
of fluids in case of more stations of usage.
NOVA pump is essentially constituted of an air motor and a structure
called «material pumping group» or simply «pumping group».
In the pneumatic motor, compressed air causes the vertical reciprocating movement of the motor piston; this movement is transmitted
through a connecting rod to the material pumping piston.
B TECHNICAL DATA
NOVA 45:1
NOVA 60:1
PUMP FEED AIR PRESSURE
3-7 bar (40-90 psi)
3-7 bar (40-90 psi)
MAXIMUM PRESSURE OF THE PRODUCT
270 bar (3900 psi)
360 bar (5200 psi)
3/4" GAS (M)
3/4" GAS (M)
MAXIMUM DELIVERY
14 l/min (3,7 gpm)
12 l/min (3,2 gpm)
CYCLES PER LITRE
4
5
MAXIMUM CYCLES PER MINUTE
60
60
1" conical GAS (F)
1" conical GAS (F)
57 kg
57 kg
<90 dB (A)
<90 dB (A)
1110 mm
1110 mm
FEED AIR INLET
MATERIAL OUTLET
WEIGHT
NOISE PRESSURE LEVEL
TOTAL HEIGHT
Parts of the pump in contact with the material
Pumping group: galvanized carbon steel and cast iron or stainless
steel AISI 303 and 420B
Sealing balls: stainless steel AISI 420B
Gaskets: teflon or nitrile or delrin or vulkollan
Always observe these instructions carefully
when evaluating the product compatibility
and in case of disposal of some parts of the
pump no more usable, in order to meet the
environmental regulations on recycling process.
Other parts of the pump
Support and cylinder for pneumatic motor: aluminium
Covering: sheet FE37
Motor piston and roller pushing mount: cast iron
2
NOVA 45:1/60:1
87
530
240
1110
580
English
150
100
4000
160
3500
140
3000
120
2500
100
2000
80
1500
60
1000
40
50
300
4000
3200
2400
1600
800
500
0
BAR
L/MIN
0
0
240
180
120
2
5
3
10
4
15
5 GPM
20
0
0
0
CFM
4800
120
4200
105
3600
90
3000
75
2400
60
1800
45
1200
30
600
15
L/MIN
60
20
1
PSI
L/MIN
2400
1800
1200
600
0
0
PUMP DELIVERY
3000
AIR CONSUMPTION
200
CFM
MATERIAL OUTLET PRESSURE
MATERIAL OUTLET PRESSURE
250
PSI
AIR CONSUMPTION
BAR
1
2
5
3
10
4
15
5 GPM
20
0
0
L/MIN
PUMP DELIVERY
7 bar (100 psi)
5 bar (70 psi)
3 bar (40 psi)
Black curve: Material outlet pressure
Gery curve: Air consumption
The pump can work in continuity when the delivery is limited to the
white zone. Out of this zone the speed must be intermittent.
3
NOVA 45:1/60:1
English
C DESCRIPTION OF THE EQUIPMENT
1
6
ANTI-FREEZE SYSTEM
2
5
3
4
POS.
POS.
Description
Description
1
Pump feed air inlet
4
Fluid inlet
2
Pneumatic motor
5
Fluid pumping group
3
Material outlet
6
Eyebolt for pump transport
4
NOVA 45:1/60:1
• The packed parts should be handled as indicated in the
symbols and markings on the outside of the packing.
•
Before installing the equipment, ensure that the area to
be used is large enough for such purposes, is properly
lit and has a clean, smooth floor surface.
The behaviour of the employees shall strictly
comply with the Accident prevention AND
ALSO ENVIRONMENTAL regulations in force in
the country where the plant is installed and
used.
Read carefully and entirely the following
instructions before using the product. Please
save these instructions in a safe place.
• The user is responsible for the operations of unloading
and handling and should use the maximum care so as
not to damage the individual parts or injure anyone.
To perform the unloading operation, use only qualified
and trained personnel (truck and crane operators, etc.)
and also suitable hoisting equipment for the weight of the
installation or its parts.
Follow carefully all the safety rules.
The personnel must be equipped with the necessary
safety clothing.
The unauthorised tampering/replacement of
one or more parts composing the machine,
the use of accessories, tools, expendable
materials other than those recommended by
the Manufacturer can be a danger of accident.
The Manufacturer will be relieved from tort and criminal
liability.
•
KEEP YOUR WORK PLACE CLEAN AND TIDY. DISORDER
WHERE YOU ARE WORKING CREATES A POTENTIAL
RISK OF ACCIDENTS.
•
ALWAYS KEEP PROPER BALANCE AVOIDING UNUSUAL
STANCE.
• Check the packing is undamaged on receipt of the equipment. Unpack the machine and verify if there has been
any damage due to transportation.
In case of damage, call immediately LARIUS and the
Shipping Agent. All the notices about possible damage or
anomalies must arrive timely within 8 days at least from
the date of receipt of the plant through Registered Letter
to the Shipping Agent and to LARIUS.
•
BEFORE USING THE TOOL, ENSURE THERE ARE NOT
DAMAGED PARTS AND THE MACHINE CAN WORK PROPERLY.
•
ALWAYS FOLLOW THE INSTRUCTIONS ABOUT SAFETY
AND THE REGULATIONS IN FORCE.
•
Keep those who are not responsible for the
equipment out of the work area.
• The disposal of packaging materials is a customer’s
competence and must be performed in accordance with
the regulations in force in the country where the plant is
installed and used.It is nevertheless sound practice to
recycle packaging materials in an environment-friendly
manner as much as possible.
•
NEVER exceed the maximum working pressure
indicated.
•
NEVER point the spray gun at yourselves or at
other people.THE CONTACT WITH THE CASTING CAN
CAUSE SERIOUS INJURIES.
•
In case of injuries caused by the gun casting,
seek immediate medical advice specifying the
type of the product injected. Never undervalue a wound caused by the injection of a
fluid.
•
Always DISCONNECT THE SUPPLY AND release the
pressure in the circuit before performing any
check or part replacement of the equipment.
•
NEVER MODIFY ANY PART IN THE EQUIPMENT. CHECK
REGULARLY THE COMPONENTS OF THE SYSTEM.
REPLACE THE PARTS DAMAGED OR WORN.
•
Tighten and check all the fittings for
• The manufacturer will not be responsible for the unloading
operations and transport to the workplace of the machine.
E SAFETY RULES
•
The employer shall train its employees
about all those risks stemming from accidents, about the use of safety devices for
their own safety and about the general
rules for accident prevention in compliance with international regulations and with
the laws of the country where the plant
is used.
5
English
D TRANSPORT AND
UNPACKING
English
NOVA 45:1/60:1
connection between pump, flexible hose and
spray gun before using the equipment.
•
Always use the flexible hose supplied with
standard kit. THE USE OF ANY ACCESSORIES OR
TOOLING OTHER THAN THOSE RECOMMENDED IN
THIS MANUAL, MAY CAUSE DAMAGE OR INJURE THE
OPERATOR.
•
TAKE PROPER SAFETY MEASURES FOR THE PROTECTION
OF HEARING IN CASE OF WORK NEAR THE PLANT.
The fluid contained in the flexible hose can
be very dangerous. Handle the flexible hose
carefully. Do not pull the flexible hose to
move the equipment. Never use a damaged or
a repaired flexible HOSE.
The machine is equipped with
an anti-freeze system
that allows it to
work even at very low temperatures. However, after a few
minutes of operation, the
upper metal outer surface
cools dramatically.
Avoid touching the area
indicated.
Contact of the skin with the
low-temperature area may
cause frostbite. Common working clothes and leather gloves
provide adequate protection.
The high speed of travel of the product in
the hose can create static electricity through
discharges and sparks. It is suggested to earth
the equipment.
The pump is earthed through the earth cable
of the supply.
The gun is earthed through the high pressure flexible hose.
All the conductors near the work area must be earthed.
•
NEVER SPRAY OVER FLAMMABLE PRODUCTS OR
SOLVENTS IN CLOSED PLACES.
•
NEVER USE THE TOOLING IN PRESENCE OF POTENTIALLY EXPLOSIVE GAS.
condiTIONS OF GUARANTEE
Always check the product is compatible with
the materials composing the equipment (pump,
spray gun, flexible hose and accessories)
with which it can come into contact. Never
use paints or solvents containing Halogen
Hydrocarbons (as the Methylene Chloride).
If these products come into contact with aluminium parts can
provoke dangerous chemical reactions with risk of corrosion
and explosion.
The conditions of guarantee do not apply in the
following situations:
- improper washing and cleaning of components
causing malfunction, wear or damage to the
equipment or any of its parts;
- improper use of the equipment;
- use that does not conform with applicable national
legislation;
- incorrect or faulty installation;
- modifications, interventions and maintenance that
have not been authorised by the manufacturer;
- use of non-original spare parts or parts that do
not correspond to the specific model;
- total or partial non-compliance with the instructions provided.
Avoid approaching too much to the pump
piston rod when the pump is working or under
pressure. A sudden movement of the piston rod
can cause wounds or finger squashing.
F TYPICAL INSTALLATION
IF THE PRODUCT TO BE USED IS TOXIC, AVOID INHALATION
AND CONTACT BY USING PROTECTION GLOVES, GOGGLES
AND PROPER FACE SHIELDS.
The NOVA pump is generally supplied on support for wall fastening
or on trolley or on double post ram.
For the correct fastening of the pump on other structures use
the 4 holes placed at the base of the pneumatic motor (see the
illustration for dimensions).
6
NOVA 45:1/60:1
Ø266 *
English
45ϒ
45ϒ
H1
H2
Ø11
Ø240
*Int. holes
• Make the compressed air flow into the pump. It is advisable to
adjust air pressure to minimum necessary for its continuous
working.
• When the product chamber is full, pump will start working and
stopping. Pump will start working again any time the trigger
of the spray gun is pressed or the delivery valve is open.
• The pump has been adjusted at our factory with light mineral
oil and a part of it could be left inside the pumping element.
Point the spray gun (H3) or the delivery valve at the tank (H4)
and drain the product left inside the pump till the material to
be used has come out.
G SETTING-UP
PUMP FASTENING ON THE HOIST
For the correct fastening of the pump on the ram, follow the
procedure described in the manual for use and maintenance of
the double post ram.
CONNECTION TO THE FEED AIR
For pump feed use a hose with an internal diameter no lower
than 20 mm.
H3
H4
Install at the pump inlet an air pressure regulator
(it is suggested complete with condensate filter
and lubricator).The outlet pressure of the material
is 45 times (NOVA 45:1) or 60 times (NOVA 60:1)
the inlet pressure of the pump feed air. Therefore, it is extremely important to adjust the value of the feed air pressure.
CONNECTION OF THE MATERIAL OUTLET HOSE
Connect the high pressure hose at the outlet of the pump.
It is recommended to tighten the fittings.
Always avoid pump idling: this operation could
damage the pneumatic motor and the seals.
H WORKING
• In case of long inactivity during the use with the plant (for
example, all night long at the end of the working day), ensure
the product you are using can be left inside the pump and
the different pipes without drying.
In this case, it is enough to stop the air supply to the pump
and drain the residual pressure in the circuit acting on the
delivery valve or on the pump bleeder valve.
Check all the fittings for connection of the different components (pump, flexible hose, spray
gun, etc.) before using the equipment.
• Dip the material pumping hose (H1) into the product tank
(H2) (if the pump is fixed on the double post ram, follow the
procedure described in the manual of use and maintenance
of the double post ram).
7
English
NOVA 45:1/60:1
I CLEANING AT THE END OF
THE WORK
By "cleaning at the end of the work" is meant the cleaning to carry
out in case of use with a different product or if a long period of
storage is foreseen.
•
Stop the air supply to the pump.
•
Dip the material pumping hose into the washing solvent
tank (check its chemical compatibility with the product being
used).
•
Make compressed air flow into the pump. It is advisable to
adjust the air pressure to minimum necessary to its continuous
working.
•
Point the spray gun or the delivery valve at a container and
drain all the product left inside the pump till a clean solvent
comes out.
•
Now, stop the air supply to the pump and drain the residual
pressure.
•
In case of long inactivity, the operations of sucking and leaving
light mineral oil inside the pumping element are suggested.
Store possible dangerous fluids in proper containers. Their disposal must be performed in
accordance with the regulations in force about
the industrial waste goods.
L ROUTINE MAINTENANCE
Always close the compressed air supply and release the pressure in the plant before performing
any check or maintenance of the pump.
•
Check periodically (and each time the pump is operated after
a long storage) the packing nut is not loosened, causing
otherwise the coming out of the product.To tighten the packing
nut, lift the wet cup (see illustration below).
Use the wrench supply (ref. 11504). The packing nut must be
tightened so as to avoid wastes of product, but not excessively
to provoke pumping piston seizure and seals wear. In case
of persistent coming out of product, replace the seals.
•
To prevent the product from drying up on the piston rod, refill
the cup with lubricant (compatible with the product used).
•
Check periodically the air supply to the pump. Ensure the
air is always clean and lubricated. In case of installation of
a lubricator on the air supply to the pump, it is advisable to
keep its cup full of a mixture of water and antifreeze liquid
(dilution ratio 4:1).
Wet cup
Oil ring
Key
Ref. 11504
8
NOVA 45:1/60:1
M PROBLEMS AND SOLUTIONS
•
The pump does not start
• Feed air not sufficient;
• Check the air supply. Widen the
diameter of the feed hose;
• Outlet product line clogged;
• Clean. Disconnect the outlet product
pipe. Feed pump at minimum pressure and check if the pump starts
without the outlet pipe;
• Disassemble the pumping group and
clean;
• Turn the plug counterclockwise and
push downwards the valve body. Use
a metal rod and a mallet;
• Disassemble the motor and check;
•
•
Accelerated working and no pressure of the pump
Solution
Cause
•
Dried product inside the pumping
element;
Pneumatic motor blocked in the cycle
reversal position;
•
Parts failure of the pneumatic motor;
• There is no product;
• The pump sucks air;
•
•
Feed air not sufficient;
Suction valve worn or partially clogged;
•
Outlet valve worn or partially clogged;
• Suction valve worn or partially clogged;
•
•
The pump works, but not sufficient
flow of product
Leakage of product from the wet
cup
• Add product;
• Open the bleeder valve. For ram
version, follow the instructions in the
relevant manual;
• Increase the feed air pressure;
• Disassemble the suction valve. Clean
and/or replace if necessary the worn
parts;
• Disassemble the outlet valve. Clean
and/or replace if necessary the worn
parts;
• Disassemble the suction valve. Clean
and/or replace the worn parts;
• The feed air pressure is too low;
• Clean. Disconnect the outlet product
pipe. Feed pump at minimum pressure and check if delivery increases
without the outlet pipe;
• Increase air pressure;
•
•
• Outlet product line clogged;
Upper gaskets worn.
Tighten the packing nut. In case of
persistent waste of product, replace
the upper gaskets of the pumping
element.
Always close the compressed air supply and release the pressure in the plant before performing any check or
replacement of parts of the pump.
N DESCRIPTION FOR EXPLOSIVE AREAS
These safety instructions refer to the installation, use and maintenance procedures for NOVA series LARIUS pneumatic piston
pumps for decanting. These pumps are designed for use in potentially explosive areas where gas or vapours are present.
NOVA series LARIUS pneumatic piston pumps
are group II mechanical devices for use in the
presence of gas in zones classified as IIB (category
2 G). They have been designed and constructed in
accordance with ATEX Directive 94/9/EC and the
European standards: EN 1127-1, EN 13463-1ed
EN 13463-5.
These instructions must be followed in addition to
the warnings given in the user and maintenance
manual.
9
English
Problem
NOVA 45:1/60:1
The main characteristics of NOVA series pneumatic piston pumps
are indicated in the table below:
Ratio
Input
pressure
Ø Air
intake
Ø Material
intake
Ø Material
outlet
20:1
3 ÷ 6 bar
CG 3/4"
Ball valve
CG 1. 1/2"
120 bar
32 l/min
45:1
3 ÷ 6 bar
CG 3/4"
Ball valve
CG 1. 1/2"
270 bar
14 l/min
55:1
3 ÷ 6 bar
CG 3/4"
Plate
CG 1"
330 bar
12 l/min
60:1
3 ÷ 6 bar
CG 3/4"
Ball valve
CG 1"
360 bar
12 l/min
68:1
3 ÷ 6 bar
CG 3/4"
Ball valve
CG 3/4"
410 bar
11 l/min
• Environment temperature: -20°C ÷ +60°C
• Max. fluid temperature: 60°C
Ø Max working Max capacity
pressure
• Maximum number of cycles per minute: 60
MARKING
3
English
TECHNICAL FEATURES
X
II 2 G c IIB T6
• Eanvironment temp.: -20°C ÷ + 60°C
• M fluid temperature: 60°C
• Tech. File: NOVA/ATX/08
II =
Group II ( surface)
2=
Category 2 (zone 1)
G=
Explosion hazardous environment with presence of gas, fog and vapour
c=
Manufacturing safety "c"
T6 =
Class of temperature T6
- 20°C ÷ + 60°C
Environment temperature
60°C
xxxx/AA
Maximum fluid temperature
Serial number (xxxx = PROGRESSIVE/ year = AA)
Relation between hazardous areas, products and categories
DANGEROUS AREA
CATEGORIES AS PER RULES
94/9/CE
Gas, vapour or fog
Zone 0
1G
Gas, vapour or fog
Zone 1
2G or 1G
Gas, vapour or fog
Zone 2
3G, 2G or 1G
10
NOVA 45:1/60:1
SAFETY INSTRUCTIOINS FOR ONSTALLATIONS IN HAZARDOUS AREAS
SAMPLE DECLARATION OF CONFORMITY
•
•
•
•
•
•
English
We
Before proceeding with the installation carefully
read the use and service manual. All the service
operations must be carried out as stated in the
manual.
Larius S.r.l.
Via Stoppani, 21
23801 Calolziocorte (LC)
declare under our sole responsibility that the product
The M.T. cable of the above mentioned pumps must be
grounded by means of an appropriate anti-loosening connection element.
The pipes used to connect suction and delivery must be
metallic, or plastic with metallic braid or plastic with fabric
braid with suitable earthing cable.
The pumps must be installed upon grounded barrels made
from metallic or anti-static materials.
Gas and vapour of flammable liquids must belong to the
group IIB.
According with the nature of the operations and products, the
operator must regularly check the presence of deposit, the
cleaning, the wearing and the correct pump’s functioning.
The user must periodically clean the filter located upon the
suction unit in order to prevent solids from reaching the
pump’s internal elements. The air feeling the pump needs
to be filtered and originated by a safe area. (SAFE AREA).
NOVA series pneumatic piston pumps for decanting
to which this declaration relates complies with the
following Directives:
- Directive 94/9/EC (ATEX)
The conformity are under observance of the following standards or standards documents:
- EN 1127-1
- EN 13463-1
- EN 13463-5
Marking
3
X
II 2 G c IIB T6 • Eanvironment temp.: -20°C ÷ + 60°C
• M. fluid temperature: 60°C • Tech. File: NOVA/ATX/08
The NOVA series pneumatic piston pumps must
not be made to run without a proper load.
Technical file: NOVA/ATX /08
All the operations, installation and service, must
be carried out by qualified operators.
Calolziocorte- LC
EXAMPLE OF INSTALLATION
The diagram illustrates a typical installation example of a LARIUS
pneumatic piston pump for decanting.
11
Technical file c/o: INERIS (0080)
Signature (LARIUS)
NOVA 45:1/60:1
English
O DISASSEMBLY OF THE PNEUMATIC MOTOR
Always close the compressed air supply and
release the pressure in the plant before disassembling the pneumatic motor of the pump.
•
Turn counterclockwise the screws (N8) [take care of the
washers (N9)] and extract the mount (N7) together with the
rollers (N10) and the pins (N11).
•
Extract the spring (N12), the spring guide rod (N13) and the
roller pushing piston (N14). Ensure the spring slides freely
on the guide rod, the guide rod slides into the roller pushing
piston and this last slides into the mount hole. Replace possible
damaged parts.
•
Unscrew the coupling sleeve so as to disconnect the pumping
group from the motor.
•
Disconnect the air feed pipe to the pump.
•
Unscrew the fitting (N1) and the sleeve (N2).
•
•
Turn counterclockwise the screws (N3) [take care of the
washers (N4)] and remove the covering (N5).
Check the roller (N10) and the pin (N11) are undamaged.
Replace them if damaged.
•
Remove and check the rubber pad (N15) and the washer
(N16).
•
Unscrew the two ring nuts (N6) from the mount (N7).
N1
N2
N3
N4
N5
Coupling sleeve
N8
N9
N7
N14
N13
N6
N12
N12
N13
N6
N14
N10
N10
N11
N11
N15
N16
12
NOVA 45:1/60:1
•
•
•
N18
•
N19
N17
N19
N20
N21
N17
N22
N23
N18
Remove the screws (N24) [take care of the washers (N25)],
a manifold (N26) and the gasket (N27).
Handle with care the manifold. The edges of its
plate are very sharp.
Important: do not remove the other manifold if
not necessary (it will facilitate the fastening of
the manifold removed).
•
N28
N29
Using a screwdriver, extract the washer (N28) and the rubber
pad (N29).
N24
N25
N26
N27
13
English
•
Pull upwards the seat (N17) so as to take out the valves
(N18) and the springs (N19) (clean and/or replace the worn
parts).
Unscrew the lock nut (N20) [take care of the washer (N21)]
by keeping the bush (N22) blocked using a key.
Extract the seat (N17) from the rod (N23).
Unscrew the bush (N22) (if necessary, keep the rod (N23)
blocked on the threaded part using pliers with the bits wrapped
in rags to avoid damage to thread).
NOVA 45:1/60:1
English
•
•
Turn counterclockwise the trip rod bearing (N30) [take care
of the washer (N31)] and check the seal inside the screw
(N30) is undamaged.
Take out the screws (N32) [take care of the washers (N33)]
and remove carefully the cylinder (N34) (do not bend it during
extraction in order to avoid that motor piston may damage
the internal surface of the cylinder).
N32
N30
N33
N34
N31
•
•
•
•
•
•
Extract the motor piston from the motor support (N35).
Verify the O-ring (N36) is undamaged.
Tighten the lower edge of the piston rod using pliers (see
illustration) and unscrew the fitting (N37) with a key.
Remove the motor rod (N38) and check it is undamaged.
Rub the motor rod (N38) with vaseline grease before inserting
it into the housing of the piston rod.
Tighten again with pliers the lower edge of the piston rod and
screw the fitting (N37) (application of a sealant on the thread
is advisable).
Warning: tighten here
N36
N38
N35
N37
14
NOVA 45:1/60:1
•
•
•
•
•
N43
N41
Check gas ring
N40
N42
N39
•
•
Insert into the motor rod (N44) the washer (N45).
Carefully insert the trip rod bearing (N46) into the motor rod
(turn it slowly following the direction of the thread) and screw
it on the cylinder (N41).
Insert the rubber pad (N47) and the washer (N48) into the
support.
Screw the bush (N49) on the motor rod (N44). Insert the seat
(N50), the washer (N51) and screw the lock nut (N52).
N52
N51
N50
Adjust bush and lock nut so as the rod (N44)
just out of about 1 mm from the lock nut (see
illustration).
N48
1 mm
•
•
N49
N47
N46
N45
N44
N44
15
English
•
Check the gas ring inside the support (N39) is undamaged.
Check the gasket (N40) is undamaged and correctly positioned.
Coat the inner walls of the cylinder (N41) with a thin layer of
vaseline grease.
Insert the motor piston (N42) into the cylinder (N41) carefully.
Fasten the cylinder (N41) on the support (N39) (respect the
position) and at the same time insert the piston rod into the
support.
Turn clockwise the screws (N43).
English
NOVA 45:1/60:1
•
Insert the springs (N54) and the valves (N55) into the seat
(N53). Position the seat on the pump support and lay the
manifold (N56) on the seat [do not forget the gasket (N57)].
•
Fasten the manifold with screws (do not tighten) ensuring it
is perfectly parallel to the other manifold and the distance
between them is 46 mm (see illustration).
The distance between the walls of the manifold and the edge
of the seat must be about 0,8 mm.
46 mm
0,8 mm
N53
0,8 mm
N54
N55
N56
N57
N56
N68
N53
•
•
•
•
•
•
•
N67
Rub the rollers (N58) and the pins (N59) with vaseline grease
and insert them into the mount (N60).
Rub the rubber pad (N61) and the washer (N62) with vaseline
grease and insert them into the mount (N60).
Grease the roller pushing pistons (N63), the spring guide
rods (N64), the springs (N65) and insert them into the mount
(N60).
Fasten without tightening the ring nuts (N66) on the mount
(N60).
Fasten the mount on the manifolds and tighten the screws
(N68) [do not forget of washer (N67)].
Tighten the ring nuts (N66) and the screws (N69).
Assemble again the covering and all the fittings of the air
supply line.
N66
N69
N60
N66
N65
N64
N63
N58
N59
N61
N62
16
NOVA 45:1/60:1
P DISASSEMBLY OF THE PUMPING GROUP
•
•
Unscrew the coupling sleeve so as to disconnect the pumping
group from the motor.
•
Remove the nuts (O1) and take out the pumping group.
•
Remove the wet cup (O2).
Disconnect the suction pipe and the outlet tube of the product
from the pumping group.
O2
Coupling sleeve
O1
17
English
Always close the compressed air supply and
release the pressure in the plant before disassembling the pumping group. If the product being
used is toxic, it is suggested to follow the cleaning
procedure on page 8 to avoid the contact with the product
during the disassembling of the pumping element.
English
NOVA 45:1/60:1
•
Remove the split pin (O3), loosen the nut (O4) and unscrew
the tie rod from the piston rod.
•
Unscrew the packing nut (O5).
O5
Tie rod
O4
O3
•
Unscrew the suction valve. Clean and/or replace its parts, if
necessary.
18
NOVA 45:1/60:1
English
It is possible to increase the suction valve ball
stroke placing the stop ball pin (O6) on the upper
holes of the suction valve. This modification is
suggested in case of very viscous products.The
same operation can be performed on the piston rod.
O6
O6
Suction valve
•
Extract the piston rod from the bottom.
•
Disassemble the piston rod and replace the gaskets worn.
•
Remove the upper gaskets, if necessary, to be replaced.
•
For the correct reassembling see illustration and the exploded
view on page 18.
19
NOVA 45:1/60:1
English
Q EXPLODED VIEW FOR STAINLESS STEEL PUMPING GROUP
WARNING: always indicate code and quantity for each part required.
20
1
2
11
3
12
10
9
9A
9
9A
9
4
5
8
21
22
23
6
7
13
7A
7B
7C
24
25
14
8
9
9A
26
27
2
16
9
9A
28
19
17
9
30
18
10
15
29
20
NOVA 45:1/60:1
Code
Description
Pos.
Code
,
1
2*
3
4
5
6
7
7A
7B
7C
8*
9*
9A*
10*
11
12
98200
,
95003
95015
95004
95005
95006
95007
95008
95008/1
95008/3
95008/2
98209
95010
95138
98212
98214
98126
Complete pumping group for NOVA
45:1 inox
Bush
Split pin
Sleeve
O-ring
Tie rod
Nut
Cup complete with packing
Cup
O-ring
Packing nut
Female ring
Teflon "V" gasket
Polyethilene gasket
Male ring
Pumping group housing
Filter fitting
13
14
15
16
17
18*
19
20
21
22
23
24
25
26*
27
28
29
30
95016
98217
96099
98218
98220
98219
98053
98222
98223
98224
98225
98226
95027
95028
98229
98230
98232
98231
Description
Gasket
Sleeve
Bush
Piston rod
Stop ball pin
Elastic ring
Ball Ø7/8"
Packing nut
Piston valve
Ring
Stop ball pin
Ball guide
Ball Ø1-1/4"
O-ring
Suction valve
Reduction M-F
Suction pipe fitting
Elbow M-F 1" GAS"
*Pumping group repair kit for stainless steel NOVA 45:1 Ref. 40071
Pos.
Code
Description
Pos.
Code
,
1
2*
3
4
5
6
7
7A
7B
7C
8*
9*
9A*
10*
11
12
98201
,
95003
95015
95004
95005
95006
95007
95502
95008/1
95008/3
95502/1
98203
95504
95514
98204
98210
98126
Complete pumping group for NOVA
60:1 inox
Bush
Split pin
Sleeve
O-ring
Tie rod
Nut
Cup complete with packing
Cup
O-ring
Packing nut
Female ring
Teflon "V" gasket
Polyethilene gasket
Male ring
Pumping group housing
Filter fitting
13
14
15
16
17
18*
19
20
21
22
23
24
25
26*
27
28
29
30
95016
98208
96099
98202
98205
98219
98053
98206
98207
98224
98225
98226
95027
95028
98229
98230
98232
98231
*Pumping group repair kit for stainless steel NOVA 60:1 Ref. 40076
21
Description
Gasket
Sleeve
Bush
Piston rod
Stop ball pin
Elastic ring
Ball Ø7/8"
Packing nut
Piston valve
Ring
Stop ball pin
Ball guide
Ball Ø1-1/4"
O-ring
Suction valve
Reduction M-F
Suction pipe fitting
Elbow M-F 1" GAS"
English
Pos.
NOVA 45:1/60:1
English
R EXPLODED VIEW FOR MOTOR GROUP
WARNING: always indicate code and quantity for each part required.
1
2
3
40
41
6
50
34
51
34
4
5
10
11
12
13
35
36
7
14
15
16
17
37
42
29
30
43
44
28
27
38
26
25
24
18
15
14
19
20
21
22
39
45
46A
46B
46
47
48
49
52
54
53
22
8
9
23
24
25
26
27
28
33
32
31
29
30
NOVA 45:1/60:1
Code
Pos.
Code
1
95062
Screw
29
95070
Manifold
2
95063
Washer
30*
95072
Manifold gasket
3
95064
Covering
31
95096
Washer
4
95065
Screw
32
95068
Screw
5
95066
Washer
33
95067
Plug 3/4" conical GAS
6
95061
Eyebolt
34
95090
Fitting
7
95109
Support
35
95089
Elbow 3/4" GAS
8
95092
Roller
36
95088
Extension
9
95091
Pin
37
95099
Gas ring
10
95084
Roller piston
38
95074
Screw
11
95085
Spring guide
39
95100
Motor cylinder
12
95086
Spring
40*
95101
O-ring
13
95087
Ring nut
41
95102
Motor piston
14
95093
Shock absorber
42
95103
Motor rod
15
95094
Washer
43
95104
Fitting
16
95095
Lock nut
44
95105
Gasket
17
95096
Washer
45
95106
O-ring
18
95098
Bush
46
95107
Complete motor mount
19
95078
Rod guide screw
46A*
3314
Gas ring
20*
95079
Leather ring
46B*
95082
Leather ring
21*
95080
Seal
47
95114
Washer
22*
33031
Copper washer
48
95083
Screw
23
95097
Valve housing
49
95159
Plug
24
95077
Spring
50
510040
Plug
25*
95075
O-ring
51
95944
Sleeve 3/4" GAS
26
95076
Travese reverse valve
52
95002
Tie rod
27
95073
Manifold plate
53
95013
Nut
28
95071
Plate gasket
54
95229
Plug
Description
*Motor gasket kit for NOVA pump Ref. 40065
23
Description
English
Pos.
NOVA 45:1/60:1
English
S EXPLODED VIEW FOR CARBON STEEL PUMPING GROUP
WARNING: always indicate code and quantity for each part required.
1
2
20
11
10
12
9
9
9
9
15
3
4
5
8
21
6
7A
7
7B
22
13
23
14
24
25
26
7C
8
15
9
9
9
9
2
27
16
30
28
31
17
19
18
10
24
29
NOVA 45:1/60:1
Code
,
1
2*
3
4
5
6
7
7A
7B
7C
8*
9*
10*
11
12
13
95001
,
95003
95015
95004
95005
95006
95007
95008
95008/1
95008/3
95008/2
98209
95011
98212
95014
95126
95016
Description
Complete pumping group for
NOVA 45:1
Bush
Split pin
Sleeve
O-ring
Tie rod
Nut
Cup complete with packing nut
Cup
O-ring
Packing nut
Female ring
Leather "V" gasket
Male ring
Pumping group housing
Filter fitting
Gasket
Pos.
Code
14
15*
16
17
18*
19
20
21
22
23
24
25
26*
27
28
29
30
31
98217
95010
98218
95020
95019
95021
98222
95023
95024
95025
95026
95027
95028
95029
95030
95031
95032
96099
Description
Sleeve
Teflon "V" gasket
Piston rod
Stop ball pin
Elastic ring
Ball Ø7/8"
Packing nut
Piston valve
Ring
Stop ball pin
Ball guide
Ball Ø1-1/4"
O-ring
Suction valve
Reduction M-F
Elbow M-F
Suction pipe fitting
Bush
*Pumping group repair kit for carbon steel NOVA 45:1 Ref. 40070
Pos.
Code
,
1
2*
3
4
5
6
7
7A
7B
7C
8*
9*
10*
11
12
13
95500
,
95003
95015
95004
95005
95006
95007
95502
95008/1
95008/3
95502/1
95503
95505
95506
95511
95126
95016
Description
Complete pumping group for
NOVA 60:1
Bush
Split pin
Sleeve
O-ring
Tie rod
Nut
Cup complete with packing nut
Cup
O-ring
Packing nut
Female ring
Leather "V" gasket
Male ring
Pumping group housing
Filter fitting
Gasket
Pos.
Code
14
15*
16
17
18*
19
20
21
22
23
24
25
26*
27
28
29
30
31
98208
95504
98202
98205
95019
95021
98206
95509
95024
95025
95026
95027
95028
95029
95030
95031
95032
96099
*Pumping group repair kit for carbon steel NOVA 60:1 Ref. 40075
25
Description
Sleeve
Teflon "V" gasket
Piston rod
Stop ball pin
Elastic ring
Ball Ø7/8"
Packing nut
Piston valve
Ring
Stop ball pin
Ball guide
Ball Ø1-1/4"
O-ring
Suction valve
Reduction M-F
Elbow M-F
Suction pipe fitting
Bush
English
Pos.
NOVA 45:1/60:1
English
T EXPLODED VIEW FOR HIGH PRESSURE FILTER
WARNING: always indicate code and quantity for each part required.
6
11
5
10
9
4
3
8
15
2
13
7
1
17
16
16
12
12
16
15
16
14
26
NOVA 45:1/60:1
Pos.
Code
Pos.
Code
,
95200
Complete line filter
8
95207
Intermediate fitting
1
95201
Filter base
9
95208
Ring nut
2
95202
O-ring
10
95209
O-ring
3
98303
Sieve fitting
11
96115
Filter container
4
95204
Dowel
12
95230
Fitting 3/8" - 3/8"
5
95205
Sieve support
13
95231
Fitting 3/8"" G-M16x1,5
6
95218
Filter sieve 30 MESH
14
3387
Fitting 3/8" G-M20x2
6
95219
Filter sieve 60 MESH
15
33034
High pressure ball valve 3/8"
6
95220
Filter sieve 100 MESH
16
33010
Washer
6
95221
Filter sieve 200 MESH
17
95214
Plug 3/8" GAS
7
95206
Screw
Description
Description
Version INOX
Nova 45:1/60:1
Pos.
Code
Description
Pos.
Code
98300
Stainless steel complete line
7
98306
Screw
filter
8
98307
Intermediate fitting
Description
,
,
1
98301
Filter base
9
95208
Ring nut
2
95202
O-ring
10
95209
O-ring
3
98303
Sieve fitting
11
98090
Filter container
4
98304
Dowel
12
6149
Fitting 3/8" - 3/8"
5
95205
Sieve support
13
6148
Fitting 3/8"" G-M16x1,5
6
95218
Filter sieve 30 MESH
14
3385
Fitting 3/8" G-M20x2
6
95219
Filter sieve 60 MESH
15
33037
High pressure ball valve 3/8"
6
95220
Filter sieve 100 MESH
16
33010
Washer
6
95221
Filter sieve 200 MESH
17
98385
Plug 3/8" GAS
27
English
Nova 45:1/60:1
NOVA 45:1/60:1
English
U COMPLETE HANDTRUCK
1
2
Pos.
Code
1
95150
Complete handtruck
2
95154
Wheels
Description
28
NOVA 45:1/60:1
V AIR GROUP COMPLETE
8
9
4
5
6
2
3
5
2
7
1
12
Pos.
Code
Pos.
Code
,
95145
Air group complete
7
95313
Reduction 1" -3/4" Male Female
1
95031
Elbow Male Female 1" -MF92
8
95318
Rapid coupling 8x17
2
95090
Adapter 3/4 (NGE 3/4)
9
95319
Rapid coupling male da 1/4"
3
95301
Rapid coupling C/for rubber
10
95323
Valve 1"
,
,
hose skg 25
11
95350
Group F.R.L.
4
95302
Rapid coupling 1"male
12
96259
Manometer
5
95308
Female fitting (FB 3/4X19)
13
95089
Elbow F-F 3/4"
6
95309
Hose tor/20NL 71N 19x29
Description
29
Description
13
English
10
11
NOVA 45:1/60:1
English
Z ACCESSORIES
Code 11000: AT 300 1/4"
Code 11090: AT 300 M16x1,5
Code 11250: AT 250 1/4"
Code 11200: AT 250 M16x1,5
PISTON GUNSTOCK FILTERS
Code 11039: Green (30M) - Code 11038: White (60M)
Code 11037: Yellow (100M) - Code 11019: Red (200M)
FILTER
Code 95218: SIEVE 30M
Code 95219: SIEVE 60M
Code 95220: SIEVE 100M
Code 95221: SIEVE 200M
Code 11180: L91X 1/4"
Code 11120: L91X M16x1,5
FITTING WITH MANOMETER
Code 147: M16x1,5
Code 150: 1/4"
Code 7030: HP FLOW REGULATOR
Code 91044: PNEUMATIC MIXER
Code 6099: HEATER
30
NOVA 45:1/60:1
Nozzles code
FAST-CLEAN TIP
19-60
21-20
21-40
21-60
23-20
23-40
23-60
25-20
25-40
25-60
27-20
27-40
27-60
27-80
29-20
29-40
29-60
29-80
31-40
31-60
31-80
33-40
33-60
33-80
39-40
39-60
39-80
43-40
43-60
43-80
51-40
51-60
51-80
Code 300: FAST-CLEAN base UE 11/16x16
Code 18280: GASKET
Nozzles code
SUPER FAST-CLEAN
SUPER FAST-CLEAN TIP
SFC07-20
SFC07-40
SFC09-20
SFC09-40
SFC11-20
SFC11-40
SFC13-20
SFC13-40
SFC13-60
SFC15-20
SFC15-40
SFC15-60
SFC17-20
SFC17-40
SFC17-60
SFC19-20
SFC19-40
SFC19-60
SFC21-20
SFC21-40
SFC21-60
SFC23-20
SFC23-40
SFC23-60
SFC25-20
SFC25-40
SFC25-60
SFC27-20
SFC27-40
SFC27-60
SFC27-80
SFC29-20
SFC29-40
SFC29-60
Code 18280: GASKET
Code 18270: SUPER FAST-CLEAN base UE 11/16x16
31
SFC29-80
SFC31-40
SFC31-60
SFC31-80
SFC33-40
SFC33-60
SFC33-80
SFC39-40
SFC39-60
SFC39-80
SFC43-40
SFC43-60
SFC43-80
SFC51-40
SFC51-60
SFC51-80
English
FAST-CLEAN
07-20
07-40
09-20
09-40
11-20
11-40
13-20
13-40
13-60
15-20
15-40
15-60
17-20
17-40
17-60
19-20
19-40
English
NOVA 45:1/60:1
EXTENTION
Code 153: cm 30
Code 154: cm 40
Code 155: cm 60
Code 156: cm 100
Code 95055: SUCTION SYSTEM
Code 98055: SUCTION SYSTEM inox
Code 95200: LINE FILTER
Code 98300: LINE FILTER inox
ANTISTATIC HOSE 3/16" - M16x1,5
Code 6164: 5 mt
Code 55050: 7,5 mt
Code 35018: 10 mt
HIGH PRESSURE HOSE 3/8" - M16x1,5
Code 18063: 7,5 mt
Code 18064: 10 mt
Code 18065: 15 mt
32
L’innovazione.
Quella vera.
PAINT SPRAYING EQUIPMENT
SUPERNOVA Rif. 65100
VEGA AIRLESS Art.-Nr. 91500
VEGA MISTLESS Art.-Nr. 91400
23801 CALOLZIOCORTE - LECCO - ITALY - Via Stoppani, 21
Tel. (39) 0341/62.11.52 - Fax (39) 0341/62.12.43
E-mail: [email protected] - Internet http://www.larius.com
DIRECT LINE
CUSTOMERS TECHNICAL SERVICE
Tel. (39) 0341/621256
Fax (39) 0341/621234
GHIBLI MIX 2K 40:1 INOX: Rif. 24561
Manufacturer:
GHIBLI ZINC Rif. 96900
GHIBLI 30:1 Art.-Nr. 96000
OMEGA ZINC Rif. 7430
OMEGA AIRLESS Art.-Nr. 7300
OMEGA MISTLESS Art.-Nr. 7340
AIRLESS PNEUMATIC PUMPS