1
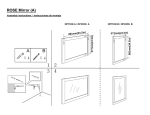
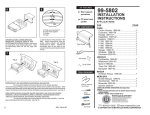
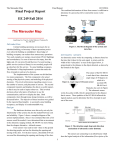
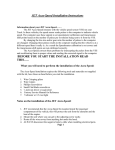
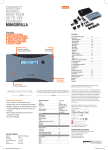
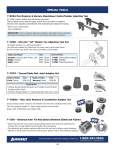
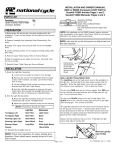
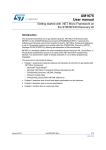
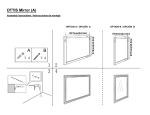
Mirror Removal
Tool
Form No. 529203
Operating Instructions
CTAA585
dual end Ford Mirror Removal Tool
CAUTION: To prevent personal injury, wear ANSI-compliant
eye protection and gloves when using this tool.
Application: 1997–’02 Windstar
1998–’04 Crown Victoria, Grand Marquis, Marauder, Taurus, Sable, Mustang, Town Car
1999–’04 Ranger; (Aero Mirror) Excursion, Super Crew (F-250 – F-550), F-650, F-750
2001–’04 Escape
2002–’04 Thunderbird
2. Disconnect heater wires from the glass, if so equipped.
~
1. Tip mirror glass inboard, and use the Mirror Removal Tool to pry the outside
lower glass edge from the motor assembly.
Application: 1996–’04 Explorer
1997–’04 Mountaineer
1998–’04 Expedition, Navigator, F-150
1999–’04 E-Series (Areo Mirror)
2000–’04 LS
2001–’04 Explorer Sport, Explorer Sport Trac
2003–’04 Aviator
1. Tip the mirror glass assembly as shown to expose the glass-to-motor-assembly locking tabs. Use the Mirror
Removal Tool to unlock the tabs. Pull the glass assembly from the motor assembly.
2. Disconnect heater wires from the glass, if so equipped.
Application: 1998–’04 F-150 Heritage
1999–’04 (Dual Arm Mirror) Excursion, Super Crew (F-250 – F-550), F-650, F-750
1. Tip the mirror glass assembly as shown to expose the jackpins that connect
the glass assembly. Use the Mirror Removal Tool to disconnect the jackpins.
2. Pull the glass assembly rearward, disconnecting the glass assembly socket
from the motor assembly ball.
3. Disconnect heater wires from the glass, if so equipped.
Note: When reassembling the glass, align the two jackpin ball keys to the mirror
assembly slots.
}
}
Mirror Removal Tool
Jackpin
© 2004 SPX Corporation
Rev. B, April 13, 2005
Operating Instructions Ford Mirror Removal Tool
CTAA585
Application: All FORD Inside Rear View Mirrors
Refer to the appropriate vehicle service manual for
more detailed instructions.
Mirror Mount
Figure 1
Removal
1. Remove the wire cover (if so equipped).
2. Unplug the connector (if so equipped).
Insert tool from
the top.
3. Remove the compass (if so equipped).
4. Refer to Figures 1 and 2, and determine which type
of mirror mount is on the vehicle.
5. Insert the Mirror Removal Tool between the mirror
mount and windshield bracket, from the top or
bottom depending on the type of mirror mount.
6. Pry the mirror mount from the windshield bracket
by pulling the tool away from the windshield.
Mirror Mount
Insert tool from
the bottom.
Figure 2
Installation
1. Slide the mirror mount over the windshield bracket
from the top, and roll the mirror to the UP position.
2. Quickly press the mirror assembly downward along
the windshield until the mirror mount is seated on
the windshield bracket. See Figure 3. (Depending
on the type of mirror mount, you may hear a “click”
as the mount is seated into place on the windshield
bracket.)
3. Reinstall the compass, electrical connector, and
cover (if so equipped).
Figure 3