1
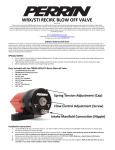
WRX/STI RECIRC BLOW OFF VALVE
012911
Thank you for purchasing the PERRIN WRX/STI Recirc BOV. Only persons experienced in the installation and proper operation of drive train systems
should perform installation of these parts. Please read through all the instructions before performing the installation.
WARNING: This part is designed, manufactured, and sold solely for use on off-road and racing vehicles not controlled by federal and or local emissions
laws. It is not intended for use on vehicles that operate on public streets and highways. Use of this part on emissions controlled vehicles may be in
violation of federal or local law! ASMC, LTD. is not responsible for any damages as a result of misuse of this part. Check your local laws prior to use or
installation.
SPECIAL NOTES:
•
•
The use of a factory service manual is highly recommended. These can be downloaded online at http://techinfo.subaru.com
Do not “tighten” BOV to increase holding pressure. The BOV will hold boost with no spring installed. Tightening cap with factory settings
will limit the amount of piston travel during blow off. Before adjusting, read through tuning tips below.
Parts Included with the PERRIN WRX/STI Recirc BOV:
•
•
•
•
•
•
•
•
•
(1) PERRIN WRX/STI Recirc BOV
(2) M8x25mm SS Socket Cap Screws
(28”) 1/2” Fuel Hose
(1’) 1/4” Hose
(1) 1/4”-1/4” Connector
(1) 1/2” Straight Connector
(1) 1/2” Tee
(1) 1/16” Allen Wrench
(1) 8” zip tie
Installation INSTRUCTIONS:
1)
Locate OEM Blow off valve, and remove from car. Use 12mm socket to remove bolts and pliers to remove clamp securing recirculation
hose to BOV. Remove vacuum fitting from back side of BOV and remove from car.
2) Remove cast aluminum elbow from front of BOV. Use a Phillips screwdriver to remove screws.
3) Install elbow to front of PERRIN BOV, and tighten using OEM screws making sure o-ring is still in place.
4) Locate and remove OEM steel crank case vent piping from front of intercooler. Using supplied ½” tee, ½” connector and ½” hose,
connect crank case vent hoses together. At the same time you can re-route hose under intake manifold to make a cleaner installation.
5) Slide OEM rubber recirc hose over cast aluminum elbow, and clamp using OEM pinch clamp.
6) Install BOV to Intercooler using supplied M8 bolts. NOTE: Install OEM gasket between BOV and intercooler. Tighten screws to 14ft-lbs.
7) If adjustment of BOV angle is needed, loosen (2) small nuts then set screws on flange, and adjust. Retighten set screws the lock into
place using nut. Take care and do not over tighten these.
8) Install supplied 1/4” adapter into OEM BOV vacuum hose, and connect 1/4" fuel hose. Attach hose to BOV and secure with ziptie.
9) BOV is factory set, and no adjustment is necessary.
10) Start car and check for leaks. If car runs erratically, check for leaks around BOV flange.
Tuning Instructions:
Keep in mind BOV is factory set to work on 90% of applications and no adjustment is necessary. But on cars with larger turbo’s or significantly
higher boost levels may want to make the BOV flow more when venting. In these situations simply adjusting or removing the flow control screw is
all that is needed.
If you desire to gain a little more response between shifts stiffening up the spring by screwing down the cap is necessary. At the same time as you
screw the cap down you need to adjust the flow control screw at the same time. Keep in mind that as you stiffen the spring, it keeps more boost in
the tubes between shifts and can potentially lead to compressor surge. For instance if you are running 10psi of boost, setting the spring too stiff
may cause compressor surge which will damage your turbo over time. But that same setting will be fine for cars running 25psi or more.
One last note, is the BOV will hold unlimited boost even at the lightest setting. So adjustments may not be necessary.
Adjusting Flow
•
•
•
•
•
•
Using diagram and locate the flow control screw. The distance between cap and top of screw determines amount of
valve lift. This amount of lift determines amount the BOV flows when it opens between shifts.
Flow control should be adjusted only after spring tension is set or cap is screwed down to desired position.
Adjusting flow control screw shorter will make BOV vent the maximum amount of boost when BOV vents. Venting too
much boost, can cause the car to feel like it has turbo lag as the turbo has to refill the boost tubes.
Adjusting flow control screw longer will make BOV flow less when BOV vents. The benefit to this is to keep some of the
pressurized air in the boost tubes, making the turbo do less work to re-fill boost tubes. This makes the car feel like it has
less turbo lag between shifts. Take note that not venting enough boost can cause compressor surge which can
eventually cause damage to the turbo.
Once adjustment is set, make sure to lock nut down to piston.
We find that .250”-.375” of valve lift works well for most applications.
Adjusting Spring Tension
•
•
•
•
•
Adjusting the spring tension is the PERRIN BOV doesn’t adjust the amount of boost it holds. Because of our unique
design, no spring is needed to hold boost. The spring is used to adjust how quickly the BOV vents boost when backing
off the throttle.
Adjusting the spring tension tighter will make the BOV vent slower and close quicker. To estimate this, it means that the
BOV will vent closer to 5% percent throttle when backing off of full throttle.
Adjusting the spring tension looser will make the BOV vent quicker, and close slower. To estimate this, it means that the
BOV will vent closer to 50% throttle when backing off of full throttle.
Please note there are grooves on body to indicate spring tension. Cap must be screwed down far enough to cover o-ring
on body, or a boost leak will occur.
Adjusting of spring tension (screwing the cap up and down) effects the amount BOV flows because it changes the
amount the pistons opens. When adjusting spring tension, make sure and check that the piston is able to open the
desired amount. You can remove the flow control screw completely during testing the install it later to adjust flow.
For questions & comments please contact
[email protected]
503-693-1702
Instant Chat Available on Website