1
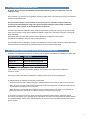
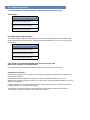
PRO 6000 Ear thermometer Service documentation This product is manufactured by Kaz USA, Inc. under license to the ‘Braun’ trademark. ‘Braun’ is a registered trademark of Braun GmbH, Kronberg, Germany. ThermoScan is a registered trademark of Helen of Troy Limited and its affiliates. 31IMP6SM190 REV8 16JUN15 PRO 6000 1.0Scope The purpose of this document is to provide the necessary information to check the accuracy of the PRO 6000 ear thermometer. The document will be used to standardize the procedure of checking the thermometer accuracy. 2.0 General information The Braun ThermoScan® thermometer is a clinical grade ear thermometer indicated for the intermittent measurement of human body temperature in patients of all ages in a professional use environment. 2.1 Technical specifications Displayed temperature range: 20-42.2°C (68-108°F) Operating ambient temperature range: 10-40°C (50-104°F) Display resolution: 0.1°C or °F Accuracy for displayed temperature range: With probe cover: ±0.2°C (±0.4°F) (35.0-42°C) (95-107.6°F) ±0.3°C (±0.5°F) (outside this temperature range) Without probe cover: ±0.1°C (35.0-42°C) ±0.2°C (outside this temperature range) Clinical repeatability: <0.3°C (0.57°F) Warm up time: initial start-up time: 3-4 seconds Measurement time: 2-3 seconds Automatic power down 10 seconds Battery life 6 months/1000 measurements Battery type 2*MN 1500 or 1.5V AA (LR6) Thermometer dimension 6”x1.7”x1.3” (152mm x 44mm x 33mm) Thermometer weight 3.6 oz (100g) without batteries Long term storage ranges Storage temperature -25-55°C (-13-131°F) Storage humidity 15-95% RH non-condensing Shockwithstands drops of 1 meter (3 feet) Pressure700-1060hPA (0.7-1.06 atm) The thermometer is specified to operate at 0.7-1.06 atmospheric pressure. 1 2.2 Serial number encoding Serial number location n ca oS erm Th To locate the serial number, open the battery door and then remove the batteries and set aside. The serial number is located on the left side of the battery compartment. Interpreting the serial number 00115 k 10101 A B C A: Julian manufacture date: Represents the first 5 numerals of the serial number. Numerals 1 through 3: Represent the day that the product was manufactured, for example 001=January 1st. These numerals will range from 001 to 365. Numerals 4 and 5: Represent the calendar year the product was manufactured, for example 15=2015 In the above example the Julian date of 00115 is calendar date January 1, 2015 B: Manufacturer: Letter indicates the manufacturer code. C: Lot serial number: Represents the manufacturer serial number. A, B and C combined represent a unique serial number for the whole device. 2.3 Inspecting the thermometer Visual inspection Always start with a visual inspection for any external damage especially the probe and probe lens window. Initial start up After removing the thermometer from the cradle the display screen will engage showing all segments followed by two dashes. If the display shows ERR, or other indication of error, refer to the directions for use, section 12. Accuracy verification Can only be tested using the 9600 Plus Calibration Tester (black body), which has a precisely defined temperature. 2 3.0 Frequency of calibration check In general, the accuracy for the PRO 6000 unit should be checked any time you suspect the unit is not reading correctly. Some countries, e.g. Germany, have regulations requiring a regular check of the measuring accuracy for all medical devices used by professionals. For infrared thermometers, this check must be done yearly and it is required to verify the measuring accuracy for the full temperature range. This implies that the thermometer will be tested at 3 different temperatures and the results will be documented via test protocol. The Welch Allyn 9600 Plus Calibration Tester meets this requirement by testing the accuracy at low, mid, and high points of the temperature range. See the 9600 Plus Calibration Tester user’s manual for information on testing the Braun PRO 6000. Note that the above described test procedure with the BB 3200 is not sufficient for this purpose. The 9600 PLUS Calibration device can test to these parameters. The PRO 6000 cannot be calibrated in the field. The calibration check is only used to determine that the thermometer measurements are accurate within the specified tolerances across the measurement range. 4.0 Required equipment for performing a calibration check In addition to the PRO 6000 thermometer, the following test equipment and materials are available from Welch Allyn: Material number Description 01802-110 Tester, calibration, 9600 Plus 06000-005 Braun PRO 6000 5k pc pkg (MN) 06000-801 Braun PRO 6000 800 pc pkg (MN) 06000-800 Braun PRO 6000 800 pc pkg (EU) 5.0 Changing the calibration set point temperature Verify the Welch Allyn 9600 Plus Calibration Tester(s) used to perform this check has been calibrated in the last 12 months. Follow the procedure described in the 9600 Plus Calibration Tester manual to setup the 9600 plus. To expedite testing, the following practices are recommended: • Use three testers set each to different set point to eliminate wait time for the tester to heat to the next set point. • When using only one tester to test several thermometers at all three temperatures, test all thermometers at one set point before proceeding to the next set point. • When using only one tester start at the lowest set point to eliminate waiting for the tester to cool, because the tester does not have an internal fan, it requires more time to cool down than to heat up. To scroll from one set point to the next, press and hold the temperature selection button until a beep sounds. The new set point appears in the upper left corner of the display. The device’s current temperature appears, flashes, and continues flashing until the cavity reaches equilibrium at the new set point. The 9600 Plus beeps when the set point is reached. 3 5.0 To begin calibration verification of the thermometer Caution: Store thermometers for testing in the same room as the 9600 Plus Calibration Tester for approximately 30 minutes prior to testing to allow for thermal accommodation. Caution: The ambient temperature must be stable and within the range of 18.3°C (65.0°F) – 26.7°C (80.0°F) Caution: Setup the 9600 Plus away from sunlight, drafts, and other sources of heat or cold. Fluctuations will impact the calibration check. Check the probe tip lens window for displacement. There shouldn’t be any gap in the seam formed between bezel and the lens window. If a gap exists the unit is damaged and must be replaced. Gently wipe the probe tip with a cotton swab slightly moistened with Isopropyl or Ethyl alcohol using care not to displace the lens window; remove excess alcohol with a clean cotton swab, and let air dry for 5 minutes. Do not use any chemical other than alcohol to clean the probe window. Place the Braun ThermoScan PRO 6000 in calibration mode using the following steps: a. With the thermometer in sleep mode, press and release the C/F button SCALE C/F Mem C/F Mem C/F Mem 3.000 b. Immediately (while all segments of the LCD are illuminated during self-test) press and hold the C/F button and the Mem button. c. After 5 seconds the thermometer will begin a long beep. During the beep release the Mem button and the C/F button. The thermometer is now in Calibration check mode, indicated by “CAL” being shown on the screen for 0.25 seconds every second. After entering calibration mode (CAL), wait for 1 minute before taking the first temperature. (Note: the PRO6000 must be left on a table and not kept in the hand during this time) 1 min Apply a new probe cover. If applied properly a short beep will sound and the flashing probe cover icon will disappear from the display. 4 Place the probe firmly into the ear device port. Wait approximately three seconds, press the thermometer Measure button, and watch for the Measure light to flash Leave the thermometer in the 9600 Plus Calibration Tester until you hear a beep. Remove the PRO 6000 Thermometer from the 9600 Plus Calibration Tester and read the temperature in the thermometer’s display. If the temperatures are within +/- 0.2º C (+/-0.4º F), when testing with a probe cover installed or +/- 0.1 C (+/-0.2 F) if a probe cover is not installed, the thermometer is within calibration. Note: it is recommeded that all calibration testing be performed with a probe cover installed. If temperatures are outside +/-0.2º C, verify the test procedure was strictly observed and repeat the calibration check 2 more times at this temperature. If any two subsequent test are within the acceptable limits the test may be considered a pass. If all 3 readings are out of calibration, see section 7.2. To perform the calibration check in high resolution mode see section 8, part 8.1. Wait one full minute before taking another reading with the same thermometer. Repeated measurements in short sequence may cause higher readings. (Note: the PRO 6000 must be left on a table and not kept in the hand during this time.) 1 min Note: The probe cover must be replaced with a new probe cover before each reading, to remove any residual heat absorbed from the 9600 Plus Calibration Tester. all available thermometers for calibration verification at the current calibration Test set point temperature. Proceed to the next calibration set point temperature; see “Changing the calibration set point temperature” in section 5.0 device will exit CAL mode after ten minutes of inactivity, or may be forced to The exit by holding both the C/F button and Mem button for 5 seconds. Upon exiting calibration check mode the thermometer will return to sleep mode. C/F Mem 5 6.0 Interpreting results 6.1 The thermometer is within calibration range if the measured values are at: Tenth degree Accuracy range with probe cover 36.0°C ±0.2°C (96.8°F ±0.4°F) 38.5°C ±0.2°C (101.3°F ±0.4°F) 41°C ±0.2°C (105.8°F ±0.4°F) Hundredth degree (high resolution) The smallest significant digit is the tenths digit (0.X), therefore when interpreting data at the hundredths digit (0.XX) the reading must be rounded to the nearest tenth prior to interpretation. As such, the accuracy ranges are as follows: Accuracy range with probe cover 36.0°C ±0.24°C (96.8°F ±0.44°F) 38.5°C ±0.24°C (101.3°F ±0.44°F) 41°C ±0.24°C (105.8°F ±0.44°F) 6.2 If results are outside the allowable tolerances, contact your local Welch Allyn Customer Care Representative: Go to www.welchallyn.com to find the contact information for technical support in your region. Complaints or concerns: Welch Allyn encourages all service centers to report customer complaints. This information is valuable for the improvements of products. All complaints where it is alleged that our product has caused or contributed to a death or a serious deterioration in the state of health of a patient, user or other person, must be reported immediately to your local Welch Allyn Organization. A serious deterioration in the state of health can include a life-threatening illness or a condition necessitating medical intervention to prevent permanent damage. Also all cases should be reported where the circumstances indicate, that the incident was such that, if it occurred again, it may lead to death or serious deterioration in health. 6 7.0 Additional display screens in calibration mode 7.1 High resolution reading: The normal resolution of the thermometer is shown to the tenth of a degree (Celsius or Fahrenheit). If resolution to the hundredth of a degree is desired, upon completion of a reading press and release the Timer button. The “CAL” display will change to “hr” and the temperature reading will show the last 3 digits of the reading to the hundredth of a degree. A reading such as 99.2F would, in high resolution, be shown as 924 (99.24) or 917 (99.17) as applicable. MemC / F Mem C/F Mem C / F Mem C/F Mem C / F Mem C/F Mem C / F Mem C/F Mem C / F Mem C/F MemC / F Mem C/F MemC / F Mem C/F MemC / F Mem C/F MemC / F C/F C/F MemC / F Mem To return to the calibration check mode ready state and prepare the thermometer to take a second reading, press and release the Measure button. 7.2 Ambient temperature reading: The ambient temperature as read by the thermometer can be displayed next. Press and release the Timer button to display the ambient temperature reading. The “hr” display will change to “At” and display the ambient temperature to a tenth of a degree. To return to the calibration check mode ready state and prepare the thermometer to take a second reading, press and release the Measure button. A second ambient sensor (thermistor) is also used (the lower of the two ambient temperatures is used by the thermometer) and can be accessed by pressing the Timer button once more. The screen will display “th” alternating with the display. 7.3 Sensor temperature reading: The temperature of the thermopile sensor of the thermometer can be displayed next. Press and release the Timer button to change from the ambient temperature reading to the temperature of the thermopile sensor. The display will change “th” to “St” and display the temperature of the sensor to a tenth of a degree. NOTE: Dependent upon the actions taken prior to entering this display, the temperature may remain steady at the heated level or may decrease until equilibrium with ambient is reached. To return to the calibration check mode ready state and prepare the thermometer to take a second reading, press and release the Measure button. 7.4 Target temperature reading prior to Measure button press: The target temperature reading immediately prior to pressing the Measure button can be displayed next. Press and release the Timer button from the sensor temperature reading to display the pre-button press target temperature reading, this will change the “St” display to “Pb” and show the target temperature reading prior to Measure button was pressed. Note: this reading is taken with the sensor heater activated and does not maintain or achieve the same accuracy as the reading following the Measure button press. Do not evaluate the calibration of the thermometer using this display. Mem To return to the calibration check m ode ready state and prepare the thermometer to take a second reading, press and release the Measure button or the Timer button. 7