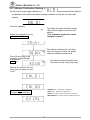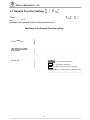
1
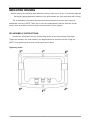
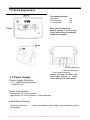
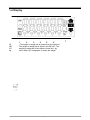
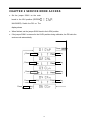
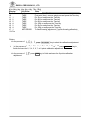
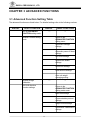
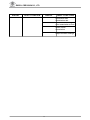
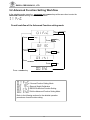
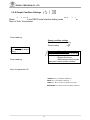
© Intelligent Weighing Technology, Inc. 2008. All rights reserved Worldwide.
The information contained herein is the property of Intelligent Weighing Technology Inc. and
is supplied without liability for errors or omissions. No part may be reproduced or used except
as authorized by contract or other written permission. The copyright and the foregoing
restriction on reproduction and use extend to all media in which the information may be
embodied.
Table of Contents
INDICATOR HOUSING ............................................................................................... 3
BEFORE USING THE SCALE .................................................................................... 4
PREPARING TO USE THE SCALE ........................................................................... 4
CHAPTER 1 INTRODUCTION .................................................................................... 5
1-1
1-2
1-3
1-4
1-5
1-6
1-7
Features and Specifications .................................................................................................... 5
Scale Appearance ....................................................................................................................... 6
Power Supply ............................................................................................................................... 6
Display ........................................................................................................................................... 7
Keyboard Function ...................................................................................................................... 8
Error Messages ........................................................................................................................... 9
Weight Units ................................................................................................................................ 9
CHAPTER 2 SERVICE MODE ACCESS................................................................10
2-1 Capacity Configuration 2-1-1
............................................................................................................ 11
Weight Units Setting
................................................................................................
2-1-2 Customised Weight Unit Setting
(no resolution limit) ....................... 14
2-1-3 Modify “Customized Weight Units” Setting .............................................................. 19
1
....................................................................................................................................................38
....................................................................................................................................................39
3-3-4 Restore to the Default Settings
................................................................................................................................................40
3-3-5 Noise Filter Settings
3-3-6 Hold Function Settings
3-3-7 Auto Unit Weight Averaging Setting ...........................................................................41
3-4 Weight Calibration .....................................................................................................................42
3-5 RS232 Serial Interface Settings .............................................................................................43
3-5-1 Baud Rate Settings ....................................................................................................44
.....................................................................................................................................................................45
3-5-2 Communication Protocol Settings
...................................................................................................................................................
46
3-5-3 Output Format Settings
...................................................................................................................................................
47
3-5-4 Continuous Transmission Settings
3-55 Selection of the Continuous Transmission Rate ...........................
3-5-6 Auto Transmission at Zero
...................................................................................................................................................
49
3-5-7 Reset Auto Transmission
...................................................................................................................................................
50
3-5-8 Output Condition Settings
................................................................................................................................................... 51
APPENDIX I: ASCII CODE TABLE ............................................................................55
APPENDIX II: 7 SEGMENT DISPLAY CHARACTERS ..........................................56
2
INDICATOR HOUSING
Before opening the stainless steel indicator housing, make sure it is dry. If necessary wipe the
housing dry paying particular attention to the joint between the front panel and rear housing.
The re-assembly instructions should be accurately followed to en sure the IP rating is
maintained in service. NOTE: There are no user serviceable parts inside the indicator and all
service work should be carried out by the technical staff of your supplier.
RE-ASSEMBLY INSTRUCTIONS:
Position the front panel onto the rear housing and fit all six fixing screws finger tight.
Tighten the screws in the order shown in the diagram below to a torque of 9 lb/ft 12 kgf-cm.
NOTE: Over tightening the screws could impair the IP rating.
Tightening order:
3
BEFORE USING THE SCALE
To enable you to use this scale correctly, we suggest that you read this manual carefully.
INSTRUCTIONS FOR USE
1. The load placed on the weigh pan must NOT exceed the maximum weighing capacity of the
scale.
2. Protect the scale from high temperatures.
3. Avoid objects impacting with the scale. Do not drop loads onto the scale or subject the
weigh pan to any strong shock loads.
PREPARING TO USE THE SCALE
1. Locate the scale on a firm level surface free from vibration for accurate
weight readings.
2. Adjust the four leveling feet (if fitted) to set the scale pan level.
3. Avoid operating the scale in direct sunlight or drafts of any kind.
4. If possible avoid connecting the scale to ac power outlet sockets which are
adjacent to other appliances to minimize the possibility of interference
affecting the performance of the scale.
5. Remove any weight that might be on the weigh pan before the scale is
switched on and avoid leaving weight on the pan for long periods of time
6. All goods weighed should be placed in the centre of the weigh pan for
accurate weighing. The overall dimensions of the goods being weighed
should not exceed the dimension of the weigh pan.
7. Once the scale has been powered on, it will go through an LCD display test
and it is ready for use when the display shows zero.
8. The scale requires 15~20 minutes warm up before operation to ensure best
accuracy
9. Please note when the
symbol keeps flashing on the screen, the
batteries need to be recharged.
4
CHAPTER 1 INTRODUCTION
1-1 Features and Specifications
Features:
n Sealed to IP67, Waterproof and dust proof (Only use cables of
3mm~5.5mm diameter to ensure correct sealing of the cable glands)
n Up to 1/1 5,000 display resolution (Internal 1/300,000) (10,000 divisions NTEP)
n Large LCD display with LED backlight
n Kilogram (kg) and pound (lb) weighing modes
n Auto calibration; Full range tare; Auto-zero tracking; Simple counting;
Gross/Net indication
n Hold function; Check mode Lo/Hi/OK
n Adjustable gravity value
n Low power indication
n Built-in RS-232 Serial Output
Specifications:
n Analogue Input: Input Sensitivity 0.3 m V/d (Min.)
n Input Signal Range: -1mV~+14mV
n Input Zero Range: -1 mV~+5mV
n Load Cell Excitation: 5V DC
n Load Cell Drive Capacity: up to 4 x 350 W / load cells
n Non-linearity: 0.01% of full scale
n A/D Resolution: 500,000 counts (Maximum)
5
1-2 Scale Appearance
The package includes:
1.Indicator
1 off
2.Power supply
1 off
3. User Manual
1 off
When you first unseal the
product package if you find any
of the items above are missing,
contact your supplier.
RS-232 cable entry
Load cell cable entry
Power supply connector
(RS-232 and load cell cables size
3mm~5.5mm diameter to ensure
correct sealing of the cable glands)
1-3 Power Supply
Power Supply Selection
1. 6V / 4.5Ah Rechargeable battery
2. Adaptor DC 9V
Power Consumption
Approximately DC 14 mA (Indicator)
Approximately DC 24 mA (Indicator + Display backlight)
Low Battery Warning
Please note when the (
be recharged.
) symbol keeps flashing on the display, the internal battery should
6
1-4 Display
HI
OK
LO
kg
1
2
3
4
5
6
: The weight on weigh pan is greater than the high limit :
The weight on weigh pan is equal to the OK limit : The
weight on weigh pan is less than the lower limit : kg
units. When “kg” is displayed, it means the weight
7
7
EXCELL PRECISION CO., LTD
1-5 Keyboard Function
ON/ZERO KEY
Press the ON/ZERO key to switch the indicator on. When switched on the
as the zero balance function.
ON/ZERO key acts
OFF KEY
When the indicator on, press the OFF key to switch it off.
TARE KEY
The tare function will not operate during the following conditions:
(1) When the scale powers on if the weight is negative and after a container is placed on
the weigh pan if the weight is still below zero.
(2) The tare value is over the full scale capacity.
UNITS KEY
Press the UNITS key to switch weight units; the display icons will indicate the active units.
N ET/G ROSS KEY
In the Tare mode, the screen displays the “TARE
8
1-6 Error Messages
fi The EEPROM is not working correctly.
fi Zero is higher than the zero range when switching the indicator on. fi
Zero is lower than the zero range when switching the indicator on. fi
A/D value is unstable.
fi A/D value is below Zero.
fi A/D IC malfunction (cannot read A/D value). The load cell may not be
connected to the indicator correctly.
fi The weight of the object is over the maximum capacity + 9 divisions. fi
A/D value is over the maximum range.
1-7 Weight Units
(kg)
(g)
(lb)
(lb/oz)
(oz)
(GN)
(dwt)
(ct)
1g=
1g=
1g=
1g=
1g=
1g=
1g=
1g=
0.001 kg
1g
0.002204623 lb
0.03527396 oz
0.03527396 oz
15.432358 GN
0.6430 149 dwt
5 ct
9
CHAPTER 2 SERVICE MODE ACCESS
n Set the jumper SWA1 on the main
board to the ADJ position (EEPROM
UNLOCKED). Switch the PW on. The
display shows
n When finished, set the jumper SWA1 back to the LOCK position.
n If the jumper SWA1 is returned to the LOCK position during calibration, the PW exits the
service mode automatically.
Press
Press ON/ZERO
Press ON/ZERO
Press ON/ZERO
Press ON/ZERO key
Press
ON/ZERO
Press
key
10
UNITS
key
UNITS
key
UNITS
key
UNITS
key
key
11
Input a parameter “00
12
Refer to “Note 3
Press
TARE
key
13
EXCELL PRECISION CO., LTD
NOTE 1 The users can set up the different weight units in various orders according to their
preference, and the amount of the chosen weight units can be up to 5
(a) (b) (c) (d) (e) (f)
(a) f i The first weight unit (only “kg
14
EXCELL PRECISION CO., LTD
Press
TARE
key
Refer to “Note 4
15
EXCELL PRECISION CO., LTD
Press
TARE
key
Refer to “Note 5
16
EXCELL PRECISION CO., LTD
NOTE 4
(a) (b)
(a) f i The number of the weight units (Max: 5, key in 1 ~ 5)
(b) fi The weight unit for weight calibration (choose from “kg”, “g
17
EXCELL PRECISION CO., LTD
B. Choose “kg
18
EXCELL PRECISION CO., LTD
NOTE 6
(o) (p) (q) (r) (s)
(o) f i Minimum division
Parameter description:
Decimal system:
Input 1, 2, or 5 as the
minimum division for the
weight value
(p) fi Decimal point position
Parameter description:
Decimal system:
0 fi
0
1 fi
0.0
2 fi 0.00
3 fi 0.000
4 fi 0.0000
5 fi 0.00000
(q) fi Weight unit displayed
4
Parameter
0
1
2
6
Unit
kg
g
lb
lb,oz
oz
GN
dwt
ct
Notation
system
10
10
10
16
10
10
10
10
symbol
kg
g
lb
lb
5
Icon 7 6
indication
Icon 6 6
Indication
7
Icon 6 6
indication
8
Icon 6 6
indication
(r) fi Scale change point (Input the parameter 0, 1, 2, or 3)
Parameter description:
0 fi full range
1 fi full range
2 fi dual range (changes at 1/2 of full scale)
3 fi triple range (changes at 1/6 of full scale and 2/3 of full scale)
(s) fi Save the weight units at preferred positions (no more than the number of set
weight units)
Parameter description:
1 fi the first position (the weight calibration unit)
2 fi the second position
3 fi the third position
4 fi the fourth position
5 fi the fifth position
19
EXCELL PRECISION CO., LTD
Refer to “Note 4
20
EXCELL PRECISION CO., LTD
After inputting “00
21
EXCELL PRECISION CO., LTD
2-2- 1 Weight Calibration Setting
n
For the most accurate weight calibration it is
recommended that the indicator
is calibrated at full load where possible, although calibration at less than full load is also
possible.
Press the
TARE
key
The display shows the calibration weight
value and the weight unit set at the first
position
4 The calibration weight value can be
changed if required
kg
.
Ensure the weigh pan is empty
Press the TARE key
The indicator calibrates the zero point.
When the weight is stable, the display
shows the calibration weight value.
Place full load (30kg in this
example) on the weigh pan
then press the
TARE key
The indicator shows the weight value.
The buzzer sounds “beep, beep, beep
kg
Remove the weights from the
weigh pan and press any key
to exit.
ON/ZERO key f i Increment number by 1
UNITS key f i Decrement number by 1
TARE key f i Move cursor one place to the right
Press the TARE key to
complete weight calibration
NET/GROSS key f i Move cursor one place to the left
22
EXCELL PRECISION CO., LTD
2- 2-2 Manufacturing Location Gravity Setting
n
The gravity value is set between that at the equator and the
polar
regions.
2
Gravity value at the equator GE = 9.7803184558 m/sec Gravity
value at the polar regions GP = 9.8321772792 m/sec 2 Taipei
2
9.78914 m/sec
Factory: Taipei
Shanghai
9.79585 m/sec
Factory: shanghai
NOTE
TARE
Factory: others
NOTE
Press the
Press the
2
TARE
key
Displays the gravity
value set previously
Re-set the gravity
value
key
Press the
TARE
key
Press the TARE key to
PW Serv ice Manual
23
SME300000016
complete the gravity setting
PW Serv ice Manual
24
SME300000016
EXCELL PRECISION CO., LTD
Remove all weight from the pan,
press T A R E to enter linearity
calibration mode.
Remove the steel weigh pan, leaving
the plastic one, ensure the pan is
empty, press T A R E key to record the
“first point”.
PW Serv ice Manual
25
SME300000016
EXCELL PRECISION CO., LTD
The weight factor is arranged as follows:1 = The weights are equal.
2 = The next weight is twice as big as the first weight
3 = 3 times as big as the first weight
4 = 4 times…
5 = 5 times …
PW Serv ice Manual
26
SME300000016
EXCELL PRECISION CO., LTD
Ex4: 30kg (1kg,
Display
03 CLn
L0
L1 1
L2 2
L3 5
L4 A
L5 2
L6 A
L7 1
03 CLn
2kg ,5kg, 10kg, 2kg, 10kg)
Note
Key Press
TARE
Into linearity calibration
TARE
First point (zero), remove weigh pan and press the Tare key
TARE
Put 1kg on and press the Tare key
TARE
Put 2kg on and press the Tare key
TARE
Put 5kg on and press the Tare key
TARE
Put 10kg on and press the Tare key
TARE
Put 2kg on and press the Tare key
TARE
Put 10kg on and press the Tare key
NET/GROSS
To finish linearity adjustment (7 points linearity calibration)
Notes:
4 In the process of
4
key to abort the calibration adjustment.
In the process of
,
,
,
,
,
, or
press NET/GROSS key to
finish and save the 2, 3, 4, 5, 6, 7, or 8 points calibration adjustment.
4 In the process of
adjustment.
PW Serv ice Manual
, press
TARE
key to finish and save the 9 points calibration
27
SME300000016
EXCELL PRECISION CO., LTD
2-4. Function Setting
n Environment
parameters
n Approval configuration
n Buzzer type
Press
TARE
key
In put a
r 00, 01, 02,
paramete or 03
ON/ZERO key f i Increment number by 1
To exit enter “00
UNITS key f i Decrement number by 1
TARE key f i Move cursor one place to the right
NET/GROSS key f i Move cursor one place to
left
PW Serv ice Manual
28
SME300000016
EXCELL PRECISION CO., LTD
2- 4- 1 Environment parameters
4 If parameters are changed in
, then
Press TARE
will be revised automatically
Return to zero point
Using ON/ZERO or UNITS to enter
Default = 0
0 f i show all 5 fi within 5 d
1 fi within 1 d 6 fi within 6 d
2 fi within 2 d 7 fi within 7 d
3 fi within 3 d 8 fi within 8 d
4 fi within 4 d 9 fi within 9 d
4 Weight value must over 1/3 full scale
Using ON/ZERO or UNITS
to enter
Stabilization range
Display shows the current setting
Using ON/ZERO
to enter
Filter setting
Display shows the current setting
Using
to
enter
ON/ZERO or UNITS
ON/ZERO key f i Step Up key
(Selects number 0,1,2,3,4,5,6,7,8,9)
UNITS key f i Step Down key
Enter “00
(Selects number 0,1,2,3,4,5,6,7,8,9)
TARE key f i Right key, flashing digit move to the right
NET/GROSS key f i Left key, flashing digit move to the left
Press TARE to exit the
environment parameters
29
EXCELL PRECISION CO., LTD
2- 4-2 Approval configuration
Press
TARE
key
Approval con figuration
Display shows current setting
Using ON/ZERO or UNITS
to input a parameter
Input the parameter “00
Press TARE key
to complete the setting
ON/ZERO key f i Increment number by 1
UNITS key f i Decrement number by 1
TARE key f i Move cursor one place to the right
NET/GROSS key f i Move cursor one place to the left
n
Brazil approved model: In the counting mode, the indicator is not able to calculate the count
value if the unit weight is less than 0.1e.
PW Serv ice Manual
30
SME300000016
EXCELL PRECISION CO., LTD
2-4 -3 Keyboard buzzer type
Keyboard buzzer type fitted
Display shows current type
Using ON/ZERO or
UNITS
Press“00
ON/ZERO key f i Step Up key
(Selects number 0,1,2,3,4,5,6,7,8,9)
UNITS key f i Step Down key
(Selects number 0,1,2,3,4,5,6,7,8,9)
TARE key f i Right key, flashing digit move to the right
NET/GROSS key f i Left key, flashing digit move to the left
Press TARE key
to complete the setting
PW Serv ice Manual
31
SME300000016
EXCELL PRECISION CO., LTD
2-5 Gravity zone compensation
Press TARE
Enter the gravity value of
the customer’s site.
ON/ZERO key f i Increment number by 1
UNITS key f i Decrement number by 1
TARE key f i Move cursor one place to the right
NET/GROSS key f i Move cursor one place to the left
4
The compensation entered has to
be between the value of gravity acceleration at the equator and
acceleration at the poles.
Acceleration of gravity at the Equator: GE = 9.7803184558 m/sec2
Acceleration of gravity at the Poles: GP = 9.8321772792 m/sec 2
Taipei
PW Serv ice Manual
9.78914 m/sec2
Shanghai 9.79585 m/sec2
32
SME300000016
EXCELL PRECISION CO., LTD
CHAPTER 3 ADVANCED FUNCTIONS
3-1 Advanced Function Setting Table
The advanced functions are listed below. For detailed settings refer to the following sections.
DISPLAY
LEVEL 1 FUNCTION
Exit the ADVANCED
FUNCTION setting mode
DISPLAY
LEVEL 2 FUNCTIONS
---
---
General Function setting
mode
Return to the
ADVANCED FUNCTION
setting menu
Automatic backlight
settings
Automatic power-off timer
settings
HI/LO/OK settings
Restore the default
settings
Noise filter settings
Hold function settings
Auto unit weight
averaging setting
---
External Weight
Calibration
RS232 Bi-direction
Function settings
---
Return to the
ADVANCED FUNCTION
setting mode menu
Baud rate settings
Communication protocol
settings
Output format settings
Continuous Transmission
settings
33
EXCELL PRECISION CO., LTD
DISPLAY
LEVEL 1 FUNCTION
DISPLAY
LEVEL 2 FUNCTIONS
Continuous data
transmission rate
Auto transmission at Zero
Reset of auto
transmission
Output condition settings
34
EXCELL PRECISION CO., LTD
3-2 Advanced Function Setting Workflow
In the weighing mode, press the NET/GROSS and ON/ZERO keys at the same time to enter the
Advanced Function setting mode. The LCD shows
Overall workflow of the Advanced Function setting mode:
Press
Press
ON/ZERO
UNITS
key
Press
UNITS
key
ON/ZERO
UNITS
Press
ON/ZERO
key
Press
Press
ON/ZERO
UNITS
key
key
f i General Function Setting Mode
fi External Weight Calibration
fi RS232 Bi-direction Function Setting
fi Exit the Advanced Function Setting Mode
Refer to the following sections for the detailed operation
procedures of each function setting.
35
key
EXCELL PRECISION CO., LTD
3-3 General Function Setting
There
are 7
functions in the general function setting mode from to.
n
Workflow of the General Function setting:
Press
TARE
key
Use the keys to select
the function
Key in “00
ON/ZERO key f i Increment number by 1
UNITS key f i Decrement number by 1
TARE key f i Move cursor one place to the right
NET/GROSS key f i Move cursor one place to the left
36
EXCELL PRECISION CO., LTD
3-3-1 Automatic Backlight Function Setting
Select
in the general function setting mode
the backlight function setting.
Press
TARE
to change
key
LCD displays the last status
Use ON/ZERO or UNITS key
to select function “on
Automatic backlight function
When the weight is over 10d, the display backlight will be on. After the weight
is stable for 10 seconds or when the scale returns to zero, the display
backlight switches off.
37
EXCELL PRECISION CO., LTD
3- 3-2 Automatic Pow er -off Timer Setting
Select
in the general function setting mode
the automatic power-off timer setting.
to change
Press TARE key
LCD displays the last status
Use ON/ZERO or UNITS
key to key in parameter
Automatic power-off timer setting
Use ON/ZERO or_ UNITS key to key in
parameter
Press TARE key to go
back to the Advanced
function setting menu
ACTIONS
0 f i No auto power-off
1 fi When the scale is idle for 1
minute, the scale
automatically switches off
2 fi When the scale is idle for 2
minutes, the scale
automatically switches off
DISPLAY
NOTE
9 fi When the scale is idle for 9
minutes, the scale
automatically switches off
ON/ZERO key f i Increment number by 1
UNITS key f i Decrement number by 1
TARE key f i Move cursor one place to the right
NET/GROSS key f i Move cursor one place to the left
38
Automatic power-off function
When the weight on weigh pan is less than 10d or keeps idle for the set time, the
scale will automatically switch off.
39
EXCELL PRECISION CO., LTD
3- 3-3 HI/LO/OK Settings
Select
in the general function setting mode
HI/LO/OK function.
4 When the high limit and low limit are both set as “0
Press TARE key
lb
LC .
Key in the desired high
limit value
lb
lb
lb
40
to set the
EXCELL PRECISION CO., LTD
3- 3- 4 Restore to the Default
Settings
Select
in the general function setting mode
to the default settings.
to restore
ACTIONS
DI
SPLAY
NO
TE
f i Return (Cancel the
restoration)
Press
TARE
key
Use ON/ZERO or UNITS
keys to select “return
fi Restore the default
ON/ZERO key f i Increment number by 1
UNITS key f i Decrement number by 1
TARE key f i Move cursor one place to the right
NET/GROSS key f i Move cursor one place to the left
4 The defaults include the following:
4 In approved models,
available.
set as 1 or 3,
41
setting is not
1)
2)
3)
4)
External weight calibration
HI/LO/OK setting values
Noise filter setting (External)
Sampling settings for the counting function
42
EXCELL PRECISION CO., LTD
3- 3-5 Noise Filter Settings
Select
in the general function setting mode
ACTIONS
DISPLAY
4 When modifying
Press
TARE
,
to set the noise filter se
NOTE
the parameters of
remain un-altered.
Returning to zero point setting
LCD displays the last status
key
Returning to the zero point setting
Use ON/ZERO or UNITS key to key in the
parameters or zero point
Default setting = 0
0 f i No skip
5 fi skip 5d
1 fi skip 1d
6 fi skip 6d
2 fi skip 2d
7 fi skip 7d
3 fi skip 3d
8 fi skip 8d
4 fi skip 4d
9 fi skip 9d
n When the weight on the scale is over 1/3
full capacity, the function is on.
Use ON/ZERO or
key to key in the
parameters
Press TARE key
Use ON/ZERO or
key to key in the
parameters
Digital switch & Stabilization range
setting
LCD displays the last parameter setting
UNITS
Digital switch & Stabilization range
setting
Use ON/ZERO or UNITS keys to key in the
parameters. Default setting = 0 Parameter
0 ~ 9, the larger the number the more
stable the weight.
Press TARE key
Use ON/ZERO or
key to key in the
parameters
Filter parameter setting
LCD displays the last parameter setting
UNITS
Filter parameter setting
Press
TARE
Use ON/ZERO or_ UNITS keys to key in the
parameters. Default setting = 5
Parameter 0 ~ 9.
The larger the number is, the faster the
filter responds. Fast response can lead to
weighing instability.
key
4 In approved models,
set as 1 or 3,
43
setting is not available
EXCELL PRECISION CO., LTD
3- 3-6 Hold Function Settings
Select
hold function.
in the general function setting mode
to set the
Hold function setting
Use ON/ZERO or UNITS keys to key in the
parameters
Default setting = 0
0 f i Hold function disabled
1 fi “Peak hold” mode
ON/ZERO key f i Increment number by 1
UNITS key f i Decrement number by 1
TARE key f i Move cursor one place to the right
NET/GROSS key f i Move cursor one place to the left
44
EXCELL PRECISION CO., LTD
Press
TARE
key
Use ON/ZERO or UNITS key
to key in the parameters
Press
TARE
key
Key in the parameter “00
45
EXCELL PRECISION CO., LTD
3-4 Weight Calibration
In the weighing mode, press the NET/GROSS and ON/ZERO keys at the same time to enter the
Advanced Function setting mode. The LCD shows
and use the
NET/GROSS
or UNITS key to select
ACTIONS
Press
TARE
to enter the weight calibration mode.
DISPLAY
NOTE
key
The LCD displays the calibration
weight value (the maximum capacity
of 1st unit) and the unit. The digit on
the right side keeps flashing.
kg
When the digit on the right
flashes, ensure that the
weigh pan is empty. Then
The scale is calculating the internal
value of the zero point. After
stabilization, the LCD shows the
calibration weight value.
Press the TARE
key.
When stable
kg
Place the displayed weight on the weigh pan.
key.
The
scal Press the calculates the full c
TARE
e
internal valueapacity and
stabilization,
the bu beeps 3after
times. Un
zzer
pan
and
the
procedure
load the
is completed.
n In approved models,
weight
ON/ZERO key f i Increment number by 1
UNITS key f i Decrement number by 1
TARE key f i Move cursor one place to the right
NET/GROSS key f i Move cursor one place to the left
set as 1 or 3, then
is disabled.
n Weight calibration conditions:
The calibration weight value placed on the weight pan must be over 100d, and the standard
deviation of the weight must be within 10%.
46
EXCELL PRECISION CO., LTD
Press
TARE
key
Key in the parameter 00 ~
08
Key in the parameter “00
47
EXCELL PRECISION CO., LTD
3-5-1 Baud Rate Settings
Select
in the RS232 serial interface setting mode
to set the Baud Rate.
Baud rate setting
LCD displays the last value
n
Default value: 9600 (bits/sec)
Baud rate setting
Use ON/ZERO or UNITS keys to select the
desired Baud rate 600 1200
ON/ZERO key fi Increment number by 1
UNITS key f i Decrement number by 1
TARE key f i Move cursor one place to the right
NET/GROSS key f i Move cursor one place to the left
48
EXCELL PRECISION CO., LTD
3-5-2 Communication Protocol Settings
Select
in the RS232 serial interface setting mode
to set the Communication Protocol.
Press
TARE
key
Communication protocol setting
LCD shows the last setting value. n
Default setting: n 8 1
Use _________ ON/ZERO or
__ UNITS key to select the
protocol setting
Communication protocol setting
Use ON/ZERO or _ UNITS keys to select
the protocol setting: n 8 1, E 7 1, O 7 1
Press
TARE
key
Key in the parameter “00
ON/ZERO key f i Increment number by 1
UNITS key f i Decrement number by 1
TARE key f i Move cursor one place to the right
NET/GROSS key f i Move cursor one place to the left
49
EXCELL PRECISION CO., LTD
3 - 5- 3 Output Format Settings
Select
in the RS232
serial interface setting mode to set the
Output Format.
NOTE
RS232 output format setting
LCD shows the last setting.
n
Default setting:
Use ON/ZERO or UNITS
key to select the output
format
Press
TARE
key
Key in the parameter “00
Press
TARE
ACTIONS
DISPLAY
key
RS232 output format
setting
Use ON/ZERO or
output format:
UNITS
keys to select the
= Same data as the scale =
Gross weight
= Net weight
= Same data as the scale in
simple format
= Same gross data as the
scale in simple format
50
= Same net data as the scale in
simple format
= Hi/Lo/OK status + Same
data as the scale in simple
format
= Hi/Lo/OK status + Simple
gross weight
= Hi/Lo/OK status + Simple
net weight
= Tare value
ON/ZERO key f i Increment number by 1
UNITS key f i Decrement number by 1
TARE key f i Move cursor one place to the right
NET/GROSS key f i Move cursor one place to the left
51
EXCELL PRECISION CO., LTD
3-5-4 Continuous Transmission Settings
Select
in the RS232 serial interface setting mode
to set the Continuous Transmission status.
ACTIONS
Press
TARE
DISPLAY
NOTE
key
Transmission setting
LCD shows the last setting
n Default setting:
Use ON/ZERO or UNIT
S
keys to select the
transmission type
Press
Transmission setting
TARE
Use ON/ZERO or _UNITS keys to select the
transmission type:
= Command mode
= Continuous transmission
= Constantly auto
transmission
key
= Shut down RS232
Key in the parameter “00
ON/ZERO key f i Increment number by 1
UNITS key f i Decrement number by 1
TARE key f i Move cursor one place to the right
NET/GROSS key f i Move cursor one place to the left
52
EXCELL PRECISION CO., LTD
3-5-5 Selection of the Continuous Transmission Rate
Select
in the RS232 serial interface setting mode
to set the Continuous Transmission Rate.
ACTIONS
Press
TARE
DISPLAY
NOTE
key
Continuous transmission rate setting
The LCD shows the last setting.
n Default setting:
Use the ON/ZERO or UNITS
keys to select the continuous
transmission
rate
Contin
Use O
the co
Press
TARE
key
Key in the parameter “00
ON/ZERO key f i Increment number by 1
UNITS key f i Decrement number by 1
TARE key f i Move cursor one place to the right
NET/GROSS key f i Move cursor one place to the left
53
EXCELL PRECISION CO., LTD
3-5-6 Auto Transmission at Zero
Select
in the RS232 serial interface setting mode
set the Auto Transmission at Zero.
4 When the value of “Auto transmission at zero
54
to
EXCELL PRECISION CO., LTD
3-5-7 Reset Auto Transmission
Select
in the RS232 serial interface setting mode
Reset Auto Transmission.
4 When the value of “Auto transmission at zero
55
to
EXCELL PRECISION CO., LTD
3-5-8 Output Condition Settings
Select
in the RS232 serial interface setting mode
Reset of Auto Transmission.
Press
TARE
to
key
Output condition settings
The LCD shows the last setting.
n
Use ON/ZERO or UNITS
keys to select the desired
setting
Press
TARE
Default setting:
Output condition settings
Use ON/ZERO or UNITS keys to select the
desired setting:
= Output all the time
= Stable weight output only (No
key
output when under/overload or unstable)
Key in the parameter “00
ON/ZERO key fi Increment number by 1
UNITS key f i Decrement number by 1
TARE key f i Mo ve cursor one place to the right
NET/GROSS key f i Move cursor one place to the left
56
EXCELL PRECISION CO., LTD
2 Command
mode
Command Format A
Host
Slave
Command
Command
MZ Zero
SO Command mode
MT Tare
UA Switch to the first unit
MG Gross weight
UB Switch to the second unit
MN Net weight
UC Switch to the third unit
CT Clear TARE value
UD Switch to the forth unit
SC Continuous transmission
UE Switch to the fifth unit
SA Auto transmit
UF Switch to the sixth unit
%
Stop continuous transmission and enter the command mode
Note: UA ~ UF settings are dependent the model of the scale
Command Format B
Host
Slave
RW
RG
Command
Data
Read current weight
Read Gross weight
RH
RI
Read Gross (simple)
Read Net (simple)
Read comparison situation +
RN Read Net weight
RJ current display of weight
(simple)
Read comparison situation +
RT Read TARE
RK
Gross (simple)
Read current display of
Read comparison situation +
RB
RL
weight (simple)
Net (simple)
Note: a. add % before the command to read continuously
b. add # before the command to transmit a stable value
Read weight comparison setting value RSô ô £ £
ô ô : Groups(00 ~ 09) £ £ :
HI
Show “HI
57
Setting Items
EXCELL PRECISION CO., LTD
Command Format C
Host
Slave
Command+ Data
Command+ Data
58
Write weight comparison setting value WS ô ô £ £ XXXXXX
ôô: Groups(00 ~ 09) ££: Setting Items XXXXXX: Setting Value HI
g
Write “HI” settin value
59
EXCELL PRECISION CO., LTD
2 Output data format
W e i gh t f o r m a t
Gross
Ne
Tare
S T ,
t T ,
S T ,
Pl
Mi
Un
GS
,
N ST ,
T R
,
+
+
+
u L , s GS
,
n O uL s , G OS L ,
s U tSa b , G lS e ,
S i m
G/N
G
/
G
/
P
l
Mi
p
0 1
1 .
0 1
2 3
2 3
2 .
+ SO S S P
- SS P S P
+
0 1 2
4 5
. 4
3 4
S
S
P
3
S
S
P
4
6
5
5
7S
6 t
6S
S Po zP
l . g
S Pk gP
C LR
SP S S SP S S S P
S S S SP S S S P
P. P
P PPl Pb
5 P6 SS P
l
+
1
0N
0N
Su
n - u Ss
.
1
1
S
P
S
P
2
3 .
2
3 4+
2
. 3+
S PS P S P
sS P S P S P
O L
4
5
4
S
P
S
P
5
.
5
SP
O
SP
6
6
6 CL R
PP L
S
PP
S
C o m p a r i s o n status + Simple
Byte0 Byte 1 Byte2 +/-
1
.
2
3
.
4
5
6
CR LF
Byte0 : HI 30H/31H
Byte1 : OK 30H/31H
Byte2 : LO 30H/31 H
2 Serial Data Transfer/Receive Format
LSB
MSB
n,8,
S
8-bit
dat
e,7,1
S
7-bit data
P S
o,7,1
S
7-bit data
P S
1
ST
0
1
0
1
0
Note:
S
P
: Parity bit
60
: Start bit STOP: Stop bit
EXCELL PRECISION CO., LTD
APPENDIX I: ASCII CODE TABLE
Symbol
A
B
C
D
E
F
G
H
I
J
K
L
M
N
O
P
Q
R
S
T
U
V
W
X
Y
Z
ASC
II
Code
41H
ASC II
Code
61H
62H
63H
64H
65H
66H
67H
68H
69H
6AH
6BH
6CH
6DH
6EH
6FH
70H
71H
72H
73H
74H
75H
76H
77H
78H
79H
7AH
Symbol
a
42H
43H
44H
b
c
d
45H
46H
47H
48H
49H
4AH
4BH
4CH
4DH
4EH
4FH
50H
51H
52H
53H
54H
55H
56H
57H
58H
59H
5AH
e
f
g
h
i
j
k
l
m
n
o
p
q
r
s
t
u
v
w
x
y
z
61
Symbol
0
1
2
3
4
5
6
7
8
9
ø
ASC II
Code
30H
31H
32H
33H
34H
35H
36H
37H
38H
39H
0DH
EXCELL PRECISION CO., LTD
APPENDIX II: 7 SEGMENT DISPLAY CHARACTERS
62