1
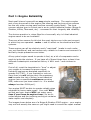
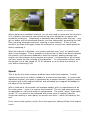
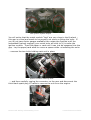
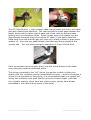
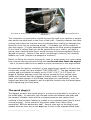
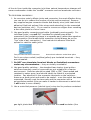
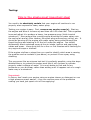
Leisure Hovercraft - Safety and Reliability
Hovercraft Safety & Reliability v1.01
©John Robertson 2010
This is a personal view of the current reliability performance of cruising leisure
hovercraft - you may not agree with some of the points made but all I ask is
that you examine the real-world evidence before reaching your own
conclusions.
The overriding concern of this review is the protection of the lives of
hovercraft operators and their passengers. Everyone who operates, or is a
passenger in a hovercraft is totally dependent on the reliability and safety
performance of the craft. This review is not concerned with which craft is
best, fastest, nicest looking, etc .
It is a sad fact that, despite many decades of development, the reliability
record of leisure hovercraft (both manufactured AND home/plan built) is
absolutely appalling. It would be surprising if the MTBF (mean/average time
between failure) of most craft is more than about 4 hours. This failure rate
would be completely unacceptable for any other type of machine! Would you
be satisfied if your car or washing machine would only run for a few hours
before needing repaired? The critically important difference between a
washing machine (or a car) failure and a hovercraft failure is that your life
depends on the reliability and safety of your hovercraft – you can't get out
and walk away from a disabled hovercraft when on water!
Whilst the safety record of cruising hovercraft may appear to be good, this is
largely an illusion - it only appears good because the poor reliability has limited
the exposure to risk – usually the craft has broken down long before the owner
can get into any kind of high risk situation!
Just because you have bought a shiny new manufactured hovercraft doesn't
mean that it is automatically going to be reliable – unfortunately most
“commercially” built leisure hovercraft fall far below the standard required for
reliable marine operation. In particular, the quality of the design and
manufacture of the electrical systems on leisure hovercraft is woefully
inadequate and, in some cases, downright dangerous. New owners are being
put at risk by elementary defects.
I make no apology for this statement but instead offer a challenge to UK
hovercraft manufacturers – prove that your craft are designed and
manufactured to established marine standards and then demonstrate the
reliability and safety with properly researched field test data and I will happily
retract this criticism.
After all this negativity I believe that it is possible to significantly improve the
reliability of a craft by taking a few very simple steps.
Hovercraft Safety & Reliability v1.01
©John Robertson 2010
Part 1: Engine Reliability
Most small leisure hovercraft are very simple machines. The most complex
part of any hovercraft is the engine (the steering and fan/prop drive systems
are the only other moving parts and are normally pretty basic). The most
common engine type in current use is an air-cooled industrial engine (Briggs &
Stratton, Kohler, Tecumseh, etc) – renowned for their longevity and reliability.
The obvious question is, when fitted to a hovercraft, why is it that industrial
engines seem to be so unreliable?
There are a few reasons for this but the most obvious one is the environment
in which they are operated – water – and it's effect on the electrical and fuel
systems.
These engines can all be relatively easily “marinised” (made to work under
very wet conditions) and can become very reliable in a marine environment if a
few fairly simple precautions are taken.
All any petrol engine needs to operate is fuel, air, a bit of compression and a
spark to ignite the mixture. If you have all of these things then, unless it has
suffered a catastrophic mechanical failure, it WILL work - and continue to
work.
First of all, resist the temptation to “tune” or adjust
your engine to increase the power output.
Industrial engines are designed specifically to
operate 24/7/365 – if you overload or over-rev
them then you will shorten their life expectancy
and increase the risk of failure (most industrial
engines have a specified continuous operating
RPM, make sure you know what it is - it is almost
always less than 3600rpm!).
Your engine MUST be able to operate reliably when
subjected to heavy water spray! Your craft WILL
get wet and your engine WILL get water spray
even if your have an engine cover (it's an aircooled engine and the incoming cooling air contains
water vapour and droplets).
The images shown below are of a Briggs & Stratton 35HP engine – your engine
may not look exactly the same so you might need to consult the repair manual
Hovercraft Safety & Reliability v1.01
©John Robertson 2010
to locate of the various components mentioned. Even if your engine isn't an
industrial air-cooled type you can still use most of the advice given below to
improve the reliability of your hovercraft engine.
Note that some of the modifications shown below may void any warranty you
may have on your engine or craft – if this is a concern then please check with
your supplier before carrying out any of this work
Fuel:
Make ABSOLUTELY sure you have a good quality fuel filter fitted (fitted as near
to the engine end of the fuel pipe as possible and ideally in a horizontal
position) and that it is replaced at least once per year. Make sure that your
fuel tank vent or filler is not going to allow water into your tank (ideally, fit a
small water separator unit in the fuel line). When refuelling, take great care to
make sure that the fuel you use is as clean as possible (don't refuel in a dusty
parking lot or on a windswept sandy beach).
Remove the fuel cut off solenoid from the carburettor – this device is not
needed for hovercraft use and has an unacceptably high failure rate. This
device is normally found at the base of the carburettor (see below) and often
acts as the float bowl drain (it will have two wires connected to it).
Vanguard engine anti-afterfire solenoid
Intek engine solenoid
Failure of this device will instantly disable the engine. There are two ways to
disable this device - you can either cut off the actuator pin (see below) OR
remove the entire solenoid and replace it with a small bolt with the same
thread.
Hovercraft Safety & Reliability v1.01
©John Robertson 2010
Solenoid with actuator pin
Actuator pin removed
When replacing a modified solenoid, you do not need to reconnect the wiring to
it (it is best to remove the connecting wiring loom altogether to reduce the
possibility of failure). Cleanliness is essential when dealing with this part – any
grit or debris will be introduced directly into the carburettor, bypassing the fuel
filter (causing blockages and poor running or even failure). If you cut the
actuator pin then thoroughly clean the solenoid to remove any metal particles
before replacing it.
When this device is disabled, your engine exhaust may “pop” or backfire just
after it has stopped. This is caused by unburnt fuel (it hasn't be burnt because
the ignition unit has been disabled to stop the engine) passing through the
engine into the silencer during engine spin-down – hot particles in the silencer
can then ignite the fuel causing a loud backfire . To minimise this effect, allow
the engine run at idle speed for 10-60 seconds or so to allow the silencer to
cool before switching it off.
Spark:
This is by far the most common problem seen with these engines. It does
require some work to make it reliable in a marine environment. In most small
industrial engines, the spark is generated by a sealed (almost!) ignition module
mounted next to the engine flywheel and activated by a magnet embedded in
the edge of the flywheel.
With a little work, this system will operate happily with no maintenance at all
for many years – even in a marine environment! The coil and electronics are
encapsulated in resin and need no maintenance. The metal “slices” that make
up the “U” core need to be protected with some type of coating (varnish,
conformal coating or even paint) to prevent corrosion - which can destroy the
unit.
First, remove the ignition unit(s) from the engine by taking off the front engine
cover
Hovercraft Safety & Reliability v1.01
©John Robertson 2010
Twin ignition system engine
You will notice that the metal module “legs” are very close to the flywheel –
this gap is critical and needs to be properly set when re-fitting the units. If
you do not have feeler gauges available then rotate the flywheel until the
embedded flywheel magnet (your metal tools will stick to it) is under the
ignition module. Then fold paper or card until it can just be squeezed into the
gap. Lay the paper/card aside to use as a spacer when re-installing the units.
… unscrew the two bolts holding each unit in place.
Ignition module retaining bolts
... and then carefully unplug the connector on the rear and disconnect the
thick black spark plug HT cable to remove the unit from the engine.
“Kill” terminal connection
Hovercraft Safety & Reliability v1.01
©John Robertson 2010
Thoroughly clean the unit and cables with a solvent (or a small amount of
petrol) – observing any necessary safety precautions.
Once dry, apply tape over the connector tab to prevent contamination and then
spray or coat the metal core and housing with varnish, conformal coating or
even a thin layer of high-temperature paint (recommended product is Servisol
Plastic Seal 60 available from electronic component suppliers) . It's very
important that this coating is continuous. Spray on several thin layers and try
not to put too thick a layer on the faces that are next to the flywheel. Leave
the protective tape on the connector tab for now.
The other area which will need work is the engine stop connector tab (see
above). When this tab is connected to the the engine body (earth) it will
disable the ignition unit and the engine will stop running. As you can see from
above, this tab is very close to an earthed connection (the small tab welded to
the metal core just below it) – a droplet of water could quite easily bridge this
gap and make the engine stop. To prevent this from happening, you should
coat the earth tab on the ignition unit with a layer of sealant (recommend
polyurethane based sealant adhesive – Sikaflex, etc). Neatness isn't an issue
here – it's far more important that the sealant is gap-free and properly bonded
to the surfaces!
Hovercraft Safety & Reliability v1.01
©John Robertson 2010
The HT (High Tension = high voltage) cable that connects the unit to the spark
plug also needs some attention. You need to seal the small gaps between the
plastic boots and the cable itself at each end of the cable to prevent water
getting into the connectors inside. Force a small amount of sealant into the
gap between the spark plug boot and the HT cable (if you gently bend the
cable away from the boot the gap will open up to make it easier to push some
sealant in). Also seal any gaps between the cable and the grommet at the
module end. You only need enough to seal about 1-2mm into the boot.
Once the sealant has thoroughly dried, coat the entire surface of the cable
using the spray coating mentioned above.
The wiring connected to the “kill” tab on the ignition module is often poor
quality with thin insulation and an uninsulated connector – as this connection is
critical to the operation of the engine, it is recommended that you replace the
wiring and connector with good quality corrosion resistant types (note that
twin cylinder engines, which have two ignition units, usually have diodes
embedded in the cable that connects to the units).
Hovercraft Safety & Reliability v1.01
©John Robertson 2010
The diode is clearly visible through the transparent section of the cable (be careful not to
damage it!)
This connection is usually then routed through the craft to an ignition or engine
stop switch mounted near to the front of the craft. Carefully examine the cable
routing and make sure that this wire is protected from chafing or damage (see
below for more info on protecting wiring) – if it breaks you will be unable to
stop the engine - if it gets earthed then the engine will stop working altogether.
If you think it unlikely that you will be ejected from your craft or you have a
spring-return hand throttle then I would strongly recommend against fitting a
lanyard kill switch – failure of this switch (surprisingly common) will instantly
disable your craft (maybe at a dangerous moment).
Before re-fitting the units to the engine, clean or scrape away your new coating
from a small area around each fixing hole on the side that faces the engine
- this is to ensure that the unit makes a proper connection to the engine earth.
Re-assemble the ignition module(s) to the engine being careful to fit them the
correct way round (they are marked “THIS SIDE OUT”). The gap between the
module and the flywheel is usually set to 0.008”-0.012” (0.2-0.3mm) for
Briggs & Stratton engines (check the service manual for your engine type).
Rotate the flywheel until the magnet is directly under the ignition unit then
place your feeler gauge (or the folded card/paper you used earlier) over the
magnet and allow the magnet to pull the ignition module onto the feeler/paper
before tightening the fixing bolts.
The spark plug(s):
The biggest problem with spark plugs in a marine environment is corrosion of
the metal body. In particular, the crimped metal seal between the body and
the ceramic insulator rusts and the increased pressure can cause microcracking of the insulator leading to a week or non-existent spark (and a poorly
running engine). Some makes of plug seem better than others (from
experience, NGK are particularly bad). Keep a close eye on the plug(s) and
replace them as soon as you see any sign of rust on the exposed metal body.
Hovercraft Safety & Reliability v1.01
©John Robertson 2010
Air:
Engines, in general, will run quite happily with a small amount of water vapour
in the intake air, however, the paper air filters used in industrial engines will
not tolerant water – they become saturated and restrict the air flow making
the engine run badly. When operating in salt water, the water evaporates and
can leave the filter blocked with layers of salt particle “dust”.
The most effective filters are the large cyclonic types fitted to some Briggs and
Kohler engines – they are very efficient at removing moisture and dust.
If you have another type of filter then the best option is to protect the intake
(the hole(s) where the fresh air gets into the filter housing) from direct water
spray by either extending them to a clean-air area using hose or PVC pipe
(under the seat is often a good place – but make sure it can't “hoover” up dust
and debris from the floor!) OR by fitting small shields (bits of plastic
sheet//box/etc attached to the filter casing) to protect the intake from direct
water spray. Making the intake air travel vertically upwards or around a sharp
bend to get to the air cleaner will use gravity to help remove larger water
droplets.
Hovercraft Safety & Reliability v1.01
©John Robertson 2010
General Electrical Wiring:
From a safety point of view you need to make sure that all wiring is
protected by suitably rated fuse(s) if it is connected (even if indirectly
through a switch) to a power source that can supply more current than the
wire is rated to handle. For example, 1.5mm2 stranded cable is normally rated
at 17amps continuous – it should be protected by a 16amp (the next lowest
size fuse) fitted at the power source end of the cable (usually the battery).
On a hovercraft fitted with an industrial engine the engine alternator is unlikely
to be able to supply more than 20amps or so therefore you might think that if
you use 20amp cable and switches there would be no need to fit fuses.
However, the starter battery is almost certainly capable of supplying many
hundreds of amps – any cable or switch connected directly or indirectly to the
battery must be either rated to handle this current (as in the case of the
battery to starter motor cable) OR be protected by a fuse. Failure to follow
this advice could result in a fire or explosion. Remember that you are sitting in
a craft with a large quantity of explosive fuel – often right underneath you!
Avoid routing wires next to fuel pipes or fuel tanks or in any enclosed space
containing either of these components. Never ever tie-wrap a cable to a fuel
pipe!
There are various other simple steps that you can take which will help protect
electrical wiring from the most common causes of damage – corrosion,
abrasion (chafing) and stress fractures.
Corrosion
Corrosion is basically a chemical reaction of the metallic parts of the electrical
system (cable connectors and cable copper cores) with oxygen. The metal
parts re-combine with oxygen and try to return to their stable original state
(iron oxide (rust!), copper oxide, aluminium oxide, etc). Protecting metallic
components from coming into contact with oxygen will prevent corrosion.
Corrosion in wiring systems is usually (but not always) most evident in
connectors or joints. Less commonly, you can get “creeping” corrosion inside
insulated cables that are poorly made or sealed (the corrosion creeps up
inside the cable, turning the copper wire into a crumbly green mush as it
goes).
Exposure to air is less likely to cause problems than exposure to water. Water
trapped inside a connector next to a metallic component is likely to remain in
contact with it for a considerable time (until it evaporates). Air only contains
20% oxygen whereas water is at least 66% oxygen. The main objective
should be to protect connectors from exposure to, and retention of, oxygenrich water.
It may seem that the best solution would be to completely seal all connectors
using tape or a sealant. Unfortunately, this isn't always the best answer. Even
if you could guarantee an air-tight seal, unless you can completely remove all
Hovercraft Safety & Reliability v1.01
©John Robertson 2010
of the air from inside the connector joint then natural temperature changes will
cause condensation inside the “sealed” connector and can accelerate corrosion.
To minimise corrosion:
1. As corrosion mainly affects joints and connector, the most effective thing
you can do is to reduce the number of joints and connectors! Remove
any supplied engine connector blocks and directly wire (with heat shrink
adhesive filled butt splices if the wires need extending) to the connected
devices (switches, etc),. If you need to remove an engine then remaking
a few cable joints is a minor issue.
2. Use good quality connectors and cable (preferably marine grade). For
individual joints, use soft PVC insulated tin-plated brass bullet
connectors (the insulating sleeve is a separate part) rather than spade or
tab connectors (the female bullet connector should always be on the
“live” side of any connection). Use heat shrink adhesive filled butt
splices for cable-to-cable joints.
Two-part sleeved bullet connector
Heat-shrink adhesive sealed butt splice
Don't use colour-coded (red/blue/yellow) pre-insulated terminals – they
are not sealed.
3. Do NOT use chocolate/terminal blocks or Scotchlock connectors
under any circumstances – they are totally unsuitable!
4. Use good quality switches – the standard lawn tractor-type ignition
switches commonly used in hovercraft are not suitable for a marine
environment. Switches should be rated IP66 or IP67 (dust sealed and
resistant to water spray) and should ideally be fitted in a protected
location. Pay attention to the connector terminals on the switches –
these are a weak point and need to be sealed – once the switch has been
connected, liberally coat the terminals and the connector with a
polyurethane sealant (this can make it harder to disconnect a switch but
it will make it more reliable)
2. Use a controlled-pressure (ratchet type) crimp tool to produce consistent
gas-tight joints that will properly support the wire and insulation (the
Hovercraft Safety & Reliability v1.01
©John Robertson 2010
“pliers” type crimp tools are simply not suitable). Get yourself a good
cable stripping tool – using old pliers or a pen knife will damage or overstress the wire strands and ultimately cause stress fractures.
3. Fit connectors in locations protected from direct water spray - or shield
them with plastic or a box (do not place them inside a closed box –
always make sure there are plenty of ventilation/drain holes on the
underside of any box).
4. Mount connectors so that cables enter from below rather than from
above – this will help prevent water droplets running down the cables
directly into the connector joints. If you are unable to do this then fit a
cable tie to the entry wire to re-direct water running down the cable.
5. Regularly treat connectors with a suitable water repellent spray to help
disperse any trapped water.
Abrasion and Stress:
Damage to cable and connectors is usually due to friction caused by
mechanical vibration between the cable and the component it is touching or
close to.
To prevent damage:
1. All wiring MUST be double insulated. The best option is to put all
cables inside some form of plastic conduit (corrugated flexi-pipe, PVC
water pipe, etc.). You can also spiral wrap wire bundles with a double
layer of good quality insulating tape or use commercial cable wrapping.
2. Carefully check your engine and any other components for sharp edges
or abrasive surfaces near to cables and either re-route the cable or fit
extra protection in this area to the cable or over the edge or surface.
Hovercraft Safety & Reliability v1.01
©John Robertson 2010
The example above shows an HT cable (the lower thick black
wire) passing directly over the sharp edge of the metal plate on
the left (the green wire, which also passes the edge, already
shows signs of abrasion damage on this brand-new engine!)
3. Pay very close attention to the routing of HT (spark plug) leads. Ideally
they should be suspended in free air and not touch any metallic part
(plastic cable spacers are available to help achieve this). Close proximity
of an earthed surface to these very high voltage cables can cause
breakdown of the insulation and subsequent failure.
4. Connectors should be supported by attaching them to a solid object
(don't leave connectors “dangling” in mid-air in the middle of a cable
run). More importantly, the cables entering and leaving the connector
MUST be prevented from moving relative to the connector.
5. As detailed above, use good quality crimp terminals (and the proper
tools) that correctly support the cable to prevent stress damage.
Hovercraft Safety & Reliability v1.01
©John Robertson 2010
Testing:
This is the single most important step!
You need to be absolutely certain that your engine will continue to run
properly when exposed to heavy water spray.
Testing your engine is easy. First, remove any engine cover(s). Start up
the engine and allow it to warm up and then set it to a fast idle. Take a garden
hose and adjust it to produce a heavy, low-pressure spray (think tropical
rainstorm!). Move around the running engine directing the water spray onto
the cooling air and air filter intakes, the spark plug area and any wiring, etc. It
should be pouring off the engine with water spray being pulled through the
thrust fan/prop and starting to fill the hull under the engine. You should
deliberately direct sustained spray at the air intake, ignition and spark plug
cables and areas. Keep doing this for a four or five minutes while listening for
any engine hiccups or misfires.
If the engine misfires or stops then you need to identify which area is causing
the problem and re-insulate it (see above) or protect it from spray using
shielding.
This may seem like an extreme test but it is perfectly possible, using the steps
detailed above, to protect the engine such that it will continue to operate
properly under a deluge of water. It is much better to find and fix any
problems on your driveway rather than waiting until it happens out on a rough
water way in a rainstorm!
Important:
In future, don't wash your engine using an engine cleaner or detergent or use
a high-pressure power washer – they can remove some of the protective
coating you have just spent a lot of time applying!
Hovercraft Safety & Reliability v1.01
©John Robertson 2010
Part 2: Passive Safety
These are the “designed-in” safety features of the craft and hull. They may
represent your last chance of survival.
The absolute minimum requirements are that the craft must remain in a
level and stable condition and not take on water when floating with the engine
off whilst fully loaded and for an indefinite period of time. It must
remain afloat when fully flooded and fully loaded or capsized. If you are
unsure whether your craft is capable of doing this then check it yourself or ask
the manufacturer or plan supplier – your life may depend on it!
The flotation, etc requirement detailed above apply under any water or
weather conditions! The designer/manufacture should inform you of the safe
normal operating envelope for the craft (they should tell you exactly what
water and weather conditions and payload the craft is capable of safely
operating in and what the hump performance limits are).
Unfortunately a large number of current hovercraft, including some
manufactured craft, do not meet these very basic passive safety requirements.
In addition, new owners are not informed of the operating envelope - I doubt
that some manufacturers are even aware what the performance limitations
are.
Most small hovercraft have virtually no freeboard (the height between the
water and the lowest part of the top of the hull when the craft is floating on
water) making them highly vulnerable to flooding and subsequent mechanical
failure. This is a potentially life-threatening issue so, for your own safety, you
should take great care when operating on rough water (make sure you stay
well within the manufacturers operational limits for your craft).
Hovercraft Safety & Reliability v1.01
©John Robertson 2010
Part 3: Active Safety
Active safety is really about about what you, as the pilot can do to help protect
yourself. Firstly, it is important that you a fully aware of the conditions under
which your craft can be safely operated – is it too windy, too rough, etc?.
Check with the manufacturer or the plans supplier what the operating envelope
is.
There are a few basic items of safety equipment that all hovercraft owners
should have at all times.
Lifejacket:
Auto-inflating types are strongly recommended, buoyancy aids or
manually inflated types are simply not adequate. A lifejacket is your
absolute last line of defence – unless your craft has sunk or is on fire, you
should never get into the water - if you have no other choice then a
lifejacket will improve your chance of survival.
Fire extinguisher: A fire on board any water craft is a life threatening
situation simply because you can't get away from it! Your craft is almost
certainly carrying a fairly large amount of volatile and explosive petrol –
you must be able to quickly and efficiently extinguish a fire. The
extinguisher must be capable of dealing with a fuel-fed fire and should be
checked regularly (normally there is a pressure meter or other device to
verify that the extinguisher is still properly charged). If you are forced to
abandon your craft due to a fire then move as far away as possible from it
to reduce the risk of being overcome by toxic fumes or burning fuel/debris
(most hovercraft hulls are made from highly combustible plastics)
Marine VHF Radio: A radio is your primary emergency communication
method. For most craft you should carry a waterproof hand held radio
on your person at all times (if you fall overboard or are ejected from the
craft then the radio is useless if it is still in your craft!)
Distress flares: Flares are your secondary emergency communications
device. Regularly check the expiry date on your flares and check that they
are properly packed in a waterproof container. You should only set off a
flare if you are fairly certain that someone will see it and summon help. .
Unless they are specifically designed for it, do not carry flares on your
person.
There are other important safety items that you should carry – these are
detailed in the HCGB Training Day Presentation available at
http://www.hovercraft.org.uk/showthread.php?t=21836
Hovercraft Safety & Reliability v1.01
©John Robertson 2010